
Fixed Asset Creation: To Create an Asset Under Construction
The following activity will walk you through the process of creating a fixed asset under construction.
Story
Suppose that in January 2025, SweetLife Fruits & Jams started the construction of a warehouse near its office building. According to the company's policy, the cost of such assets must be recorded to a dedicated asset account. The warehouse is expected to be placed in service on April 20, 2025.
Acting as a SweetLife accountant, you need to create a GL transaction, a fixed asset class for assets under construction, and the Office Warehouse asset. You then need to reconcile this asset with the GL transaction.
Configuration Overview
In the U100 dataset, the following tasks have been performed to support this activity:
- On the Enable/Disable Features (CS100000) form, the Fixed Asset Management feature has been enabled.
- On the Chart of Accounts (GL202500) form, the needed GL accounts have been created.
- On the Fixed Assets Preferences (FA101000) form, the Automatically Release Acquisition Transactions check box has been selected.
Process Overview
In this activity, on the Journal Transactions (GL301000) form, you will enter a GL transaction to record the acquisition of the office warehouse. On the Fixed Asset Classes (FA201000) form, you will create a fixed asset class for assets under construction. On the Fixed Assets (FA303000) form, you will create the needed fixed asset and reconcile it with the created GL transaction.
System Preparation
Before you begin creating a fixed asset under construction, do the following:
- Launch the MYOB Acumatica website with the U100 dataset preloaded, and sign in as an accountant by using the johnson username and the 123 password.
- In the info area, in the upper-right corner of the top pane of the MYOB Acumatica screen, click the Business Date menu button, and select 1/30/2025 on the calendar.
- In the company to which you are signed in, be sure that you have implemented the fixed asset functionality by performing the following prerequisite activities: Fixed Assets: To Configure the System for Fixed Asset Management, Fixed Assets: To Configure the Fixed Asset Functionality, and Fixed Assets: To Create Fixed Asset Classes.
- On the Company and Branch Selection menu on the top pane of the MYOB Acumatica screen, select the SweetLife Head Office and Wholesale Center branch.
Step 1: Creating a GL Transaction
To create a GL transaction that reflects the construction of the office warehouse, do the following:
- On the Journal Transactions (GL301000) form, add a new record.
- In the Summary area, specify the following settings:
- Module: GL
- Transaction Date: 1/30/2025 (inserted automatically)
- Post Period: 01-2025 (inserted automatically)
- Description: Construction of office warehouse
- On the Details tab, click Add Row
on the table toolbar, and specify the following settings in the added row:
- Branch: HEADOFFICE
- Account: 15010 (Accrued Purchases: Fixed Assets)
- Debit Amount: 38000
- Transaction Description: Office warehouse
- Click Add Row on the table toolbar again, and specify the
following settings in the second row:
- Branch: HEADOFFICE
- Account: 30100 (Capital Stock)
- Credit Amount: 38000
- Transaction Description: Office warehouse
- On the form toolbar, click Save.
- On the form toolbar, click Remove Hold, and then click Release to release the transaction.
Step 2: Creating a Fixed Asset Class
To create a fixed asset class for assets under construction, do the following:
- On the Fixed Asset Classes (FA201000) form, add a new record.
- In the Summary area, specify the following settings:
- Asset Class ID: UNDERCON
- Description: Assets Under Construction
- Active: Selected
- On the General tab, specify the following settings:
- Asset Type: BUILDING
- Depreciable: Selected
- Under Construction: Selected
- Useful Life, Years: 20
- On the GL Accounts tab, specify the following
settings:
- Fixed Assets Account: 15500 (Assets under Construction)
- Gain Account: 90000 (Gain/Loss of Fixed Asset Disposal)
- Loss Account: 90000 (Gain/Loss of Fixed Asset Disposal)
- On the Depreciation tab, specify the following
settings:
- Class Method: SL (Straight-Line)
- Averaging Convention: Mid Period
- On the form toolbar, click Save to save your changes.
Step 3: Creating a Fixed Asset Under Construction
To create the Office Warehouse fixed asset that is under construction, do the following:
- On the Fixed Assets (FA303000) form, add a new record.
- In the Summary area, specify Office Warehouse in the Description box.
- On the General tab, specify the following settings:
- Asset Class: UNDERCON
- Asset Type: BUILDING (inserted automatically from the fixed asset class settings)
- Useful Life, Years: 20.0000 (inserted automatically from the fixed asset class settings)
- Receipt Date: 1/30/2025
- Placed-in-Service Date: 4/20/2025
Notice that as soon as you specify the placed-in-service date, the system displays a warning message that the fixed asset is under construction and cannot be depreciated.
- Orig. Acquisition Cost: 38000
- Branch: HEADOFFICE (the current branch is inserted by default)
- Department: ADMIN
- On the form toolbar, click Save to save the asset.
The system has generated the acquisition transaction and saved it with the Balanced status. (You can review the transaction on the Transactions tab.)
- On the form toolbar, click Remove Hold to remove the
fixed asset from hold, and save it.
The following screenshot shows the created fixed asset under construction.
Figure 1. The fixed asset under construction 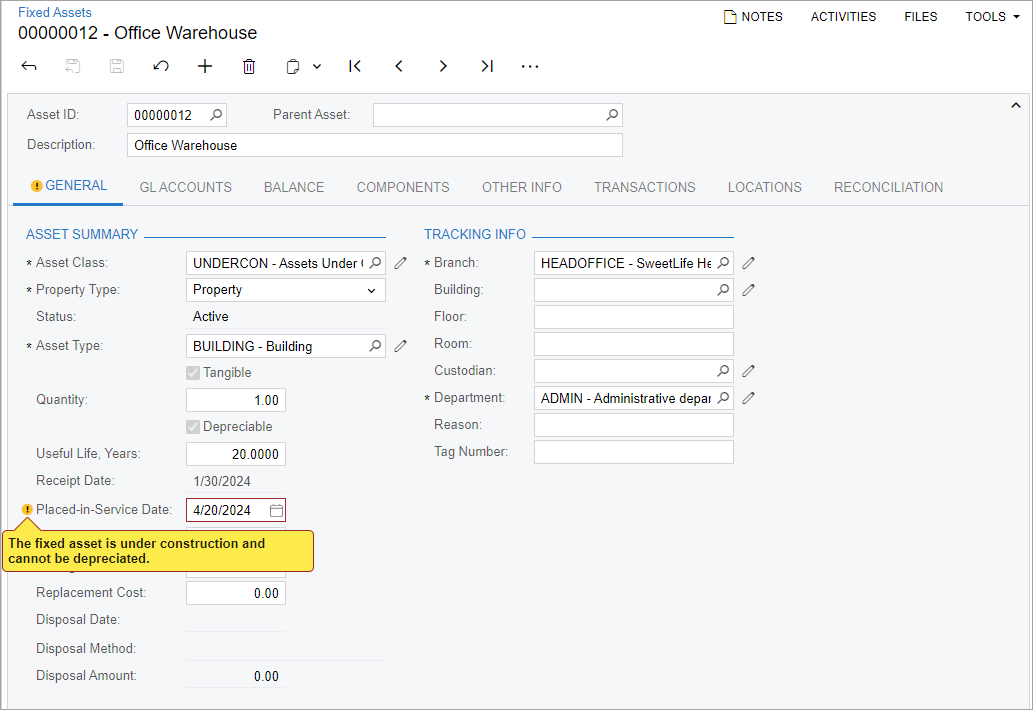
Step 4: Reconciling the Created Fixed Asset
To reconcile the Office Warehouse fixed asset, do the following:
- While you are still viewing the fixed asset on the Fixed Assets (FA303000) form, go to the Reconciliation tab.
- In the Account box, make sure that 15010 (Accrued Purchases: Fixed Assets) is selected.
- In the table, select the unlabeled check box in the row with the Orig. Amount value of 38,000.00.
- Click Process on the table toolbar to generate the reconciliation transaction.
- On the form toolbar, click Save to save the created
reconciliation transaction, and review it on the
Transactions tab.
The generated Reconciliation+ transaction was automatically released because the Automatically Release Acquisition Transactions check box (which is selected) also applies to the reconciliation transactions that correspond to asset acquisition. The Batch. Nbr. box displays the number of the corresponding GL batch.
- On the Reconciliation tab, review the Unreconciled Amount. It is 0.00, indicating that the full amount of the asset has been reconciled.