- Contents
- Index
- Search

Show results that include all search words
Current Pay
![]()
When running a pay, you open a new pay period - the Current Pay - and make any changes for that specific period e.g. enter overtime, add any one-off allowances, enter annual leave or sick leave taken etc.
Select Step Two from the Pay Cycle and the following screen appears:

TIP: You can also edit the Current Pay by selecting Current Pay from the Pay menu or clicking the Current Pay button on the Toolbar.
Select the Pay Frequency you wish to run and, if this is your first pay, enter the Pay Period Start Date and Pay Period End Date (representative of the accounting period that this pay falls into) and the Physical Payment Date (representative of when the employees receive their pay). The Physical Payment Date should be the date on which the bulk of your employees get paid, i.e. the date the money is transferred out of the company wages account.
Once the first pay has been set up, the pay dates will roll over automatically when you update the Pay. If you ever need to change your Pay Period End Date you can do so, but only if the Current Pay has not been created.
If you are creating a Monthly pay, and have ticked the 4 or 5 weeks salary in month option on the Special Options Setup window in the Payroll Setup, you must also specify whether the month has four or five weeks.
Having entered the date, click the Create New Pay button. You will be asked to confirm that you wish to create the new pay. Click Yes.
NOTE: Once a Pay is created, the Edit Pay button becomes available, allowing you to go back and make changes to the pay at any time.
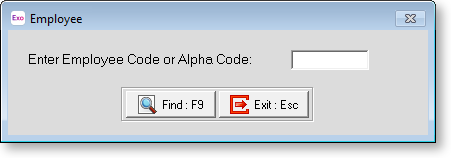
You will be presented with the Staff selection window. Enter the Employee Code or Alpha Code of the first employee whose pay you want to edit.
The Current Pay screen appears, showing the Current Pay for the selected employee. All of the information in the employee's Current Pay defaults to the values specified in their Standard Pay. You can edit this information as required. Exo Payroll dynamically calculates the pays as data is entered, so you see the results immediately.
NOTE: Under normal circumstances you would not need to go into every screen for every employee. Usually, the most that is necessary is to edit the Wages screen to enter any overtime. If there are no changes that need to be made to an employee this pay period, their pay is automatically created based on the Standard Pay.
The column of buttons down the left of the screen is used to edit various aspects of an Employee's Current Pay. You cannot edit the fields on the right.

Buttons on the left of the screen give access to different sections of the pay. Many of these sections can also be accessed by clicking on the headings in the Pay Item column. The following buttons and headings are available:
|
Button |
Heading |
Description |
|
Wages |
Wages |
Wages - This is where the employee's wage hours for the Current Pay are entered. This option is only enabled if the employee has been setup as Waged in the Employee Details tab of the Employee Maintenance screen. |
|
Allowances |
Taxable
Allowances |
Allowances - This is where allowances for the Current Period are entered. |
|
Hourly Rates |
|
Hourly Rates - This is where the employee's hourly rates are entered or maintained. This option is only enabled if the employee has been setup as Waged in the Employee Details tab of the Employee Maintenance screen. |
|
Salary |
Salary |
Salary - This is where the employee's salary for their matching pay frequency is entered. This option is only enabled if the employee has been setup as Salaried in the Employee Details tab of the Employee Maintenance screen. |
|
Deductions |
Pre-Tax
Deductions |
Deductions - This is where any deductions that are to be taken out of the employee's pay for the Current Pay are entered. |
|
Leave |
|
Leave Management - This is where you pay the employee leave for the Current Pay period. Clicking on any of the leave type headings, e.g. Holiday Pay, Sick Pay, opens the screen for that particular leave type. |
|
Costing |
|
Costing - If you wish to proportionally cost an employee's wages or salary by hours or by percentages to different Cost Centres then this is where it is switched on at both the employee level and setup. |
|
PAYE |
PAYE |
PAYE - If left unaltered, the computer will automatically calculate the PAYE payable on the employees' gross taxable amount, based on the tax code selected in the Employee Details Tab. If required, you do have the ability to override the PAYE with your own amounts. |
|
KiwiSaver |
Employee
KiwiSaver |
KiwiSaver - This is where you set up an employee's KiwiSaver contributions. |
|
How Paid |
Rounding |
How Paid - This is where you set up the way an employee's net pay is to be handled for the Current Pay. You can set up payment by direct credit, cash or by cheque or a combination of these. |
|
Days Paid |
|
Days/Hours Paid - This shows the number of days or hours that the Current Pay represents, depending on the option selected for the Pay holiday pay in property on the Leave Management Setup window. |
|
Payslip Note |
|
Payslip Note - This is a specific note for the currently selected employee, which will appear on the employee's current payslip. |
|
Employee Share |
|
Employee Share Schemes - This is where you enter benefits from an employee share scheme. |
One or more Days Paid fields are available at the bottom of the window. These fields let you enter the number of days to be paid for Holiday Pay and/or the Relevant Daily Rate. These values are not usually changed unless the employee is being paid for more than one pay period and will not be paid in the next pay period; if this is the case, enter the total number of days the pay represents.
A Reset button is available at the bottom of the Current Pay window. Clicking this button opens the following window:
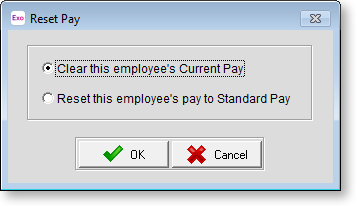
Select an option and click OK to either clear all pay information for the employee, or reset the information to their Standard Pay.
View Employee Details
Three buttons are available for viewing additional information about the employee.
|
Button |
Description |
|
|
This button generates a preview of the employee's payslip for this pay. |
|
|
This button opens the Employee Maintenance screen in a read-only capacity. This is handy for referencing an employee's personal details, which you may need to know about before processing the employee's pay. |
|
|
This button shows and hides the popup section on the right of the Current Pay window. This section displays additional details about the employee, as well as leave calculation information. |

Problems Found in Current Pay
It is essential that employees who are to be paid by direct credit in this pay have a positive Net Pay value. The net pay value is calculated as follows:
Gross Pay (Waged Hours + Salary + Taxable Allowances + Leave - Pre-Tax
Deductions)
+
Non Taxable Allowances
-
Post Tax Deductions
-
PAYE (Income tax + ACC Earner Levy + rounding)
=
Net Pay
The net pay value is usually paid by direct credit. Some employees have their net pay forwarded to multiple bank accounts. When this occurs, the secondary bank account usually has a prescribed amount transacted each pay period, with the balance going to the primary bank account. The fixed amount must be positive – money cannot direct debited from employees' bank accounts, through payroll. If the positive pay components are not sufficient to cover the fixed direct credit amount, a warning screen will appear.
To fix the problem, you may need to edit the Current Pay for the affected employees, either reducing the fixed direct credit amount, or increasing the positive pay components.