- Contents
- Index
- Search

Show results that include all search words
Employee Details
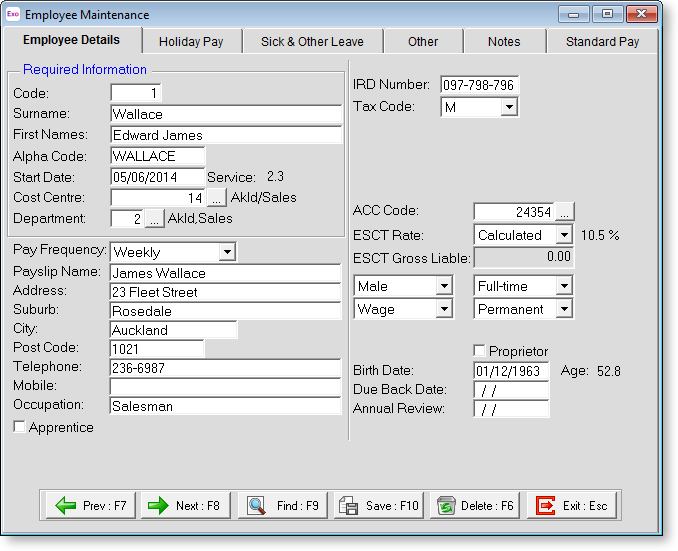
The Employee Details tab of the Employee Maintenance screen contains basic identification and remuneration information about the employee.
Required Information
When adding a new employee you will note that the only tab available is Employee Details. This is due to the fact that there are details required on this tab before you can continue. This data is in the section headed Required Information.
Code The Employee Code is automatically entered here when the employee is added.
Surname Enter the employee's surname/family name.
First Names Enter the employee's first name(s).
Alpha Code Exo Payroll uses Alpha Codes for sorting and listing employees. The first eight letters of the employee's surname is used as a sort code and this is shown here automatically. This alpha code must be unique. If a message appears that says "Alpha Code cannot be empty and must be unique" or "invalid input", it means that this Alpha Code is already in use, probably for an employee with the same surname. To correct this, change the Alpha Code to something else, e.g. by making the last character of the Alpha Code the employee's first initial.
Start Date This date is important, as it can also determine the default Annual Leave and Sick Pay Annual Entitlement dates. Enter the employees' actual commencement date with the company. The employee's years of service are displayed next to the start date. This value is calculated as the system date minus the Start Date.
Cost Centre This field shows the Cost Centre that the employee belongs to. This Cost Centre is chosen from the Cost Centres that were set up during Step Five: Add Cost Centres. The Cost Centre chosen for each employee acts as their default Cost Centre (which can be overridden).
TIP: If you have not created the Cost Centre that you need for any employee at this stage, you can press F2 to open the Maintenance window. Choose Cost Centres to create the Cost Centre without having to exit from the employee file.
Department Each employee must belong to a department. This department is chosen from the departments that were set up during Step Four: Add Departments. The department chosen for each employee acts as a grouping for reports or as a way of allocating costs.
Enter the code for the department you wish to use. If you do not know the code for the department you want to select for an employee, leave the field blank and press enter. This will display a list of departments for you to choose from.
TIP: If you have not created the department that you need for any employee at this stage, you can press F2 to open the Maintenance window. Choose Departments to create the department without having to exit from the employee file.
Once all of the above fields have been completed, the other tabs on the Employee Maintenance screen become available, as well as with the remaining sections of the Employee Details tab.
Optional Information
Pay Frequency Select the required Pay Frequency. Choose from:
- Weekly
- Fortnightly
- Bi-monthly
- 4 weekly
- Monthly
Personal Information
Payslip Name When printing a Payslip the payroll will print the employee's surname, then the employee's first names. If you wish a different name to appear on the Payslip then enter here what you would like to appear on the Payslip. Remember to include a surname because what goes in here is all that prints on the Payslip.
Address, Suburb, City, Post Code Enter the employee's address details. These are not critical for the running of the payroll but it means that these details can appear on the employee's payslips.
Telephone Enter the employee's telephone number. This field is optional, but filling it in means that you are able to print a telephone list report.
Mobile Enter the employee's mobile phone number. As above, entering this is not critical - not all employees may be in possession of a mobile phone. However, it could prove useful in the case of an emergency.
Occupation Enter the employee's occupation so that it will appear on the Employees report.
Apprentice Select this option if the employee is an apprentice. Once selected, an Hours field appears. Enter the accumulated hours from commencement of the apprenticeship.
Tax Information
IRD Number If the IRD number is blank or invalid, the Tax Code will default to "ND" with a tax rate of 45% to cover student loan and child support issues. Taking that into account, it is in the employee's interest to declare their correct tax code.
IRD numbers must be unique - if the number you enter belongs to another employee, a warning will appear. IRD numbers also contain a hidden computation to ensure that they are valid. If this validity check fails, then either the wrong number has been typed in or an incorrect number has been given. If an invalid number is entered the error message "The number you have entered is invalid" appears. MYOB recommends obtaining a printed statement if any dispute arises.
Tax Code Select the employee's tax code. The default tax code is M. The following tax codes are available:
- ND - No notification rate. This is the default rate if no IRD number has been specified.
- M - Main income
- M SL - Main income with student loan
- ME - Main income - Independent Earner Tax Credit (IETC)
- ME SL - Main income with student loan and IETC
- S - Secondary income $14,001 to $48,000
- S SL - Secondary income $14,001 to $48,000 with student loan
- SA - Secondary income > $180,001
- SA SL - Secondary income > $180,000 with student loan
- SB - Secondary income <= $14,000
- SB SL - Secondary income <= $14,000 with student loan
- SH - Secondary income $48,001 to $70,000
- SH SL - Secondary income $48,000 to $70,000 with student loan
- ST - Secondary income $70,001 to $180,000
- ST SL - Secondary income $70,001 to $180,000 with student loan
- CAE - Casual agricultural employee
- EDW - Election day worker
- NSW - Non-resident seasonal worker
- STC - Special tax code from IR 23
- WT - Withholding tax (used for the Employer Monthly Schedule)
- MC - Children with an IRD number, for claiming the child tax credit. Not available after 1 April 2013.
- ML - Main income < $9,880. Not available after 1 April 2013.
- ML SL - Main income < $9,880 with student loan. Not available after 1 April 2013.
- CHILD - Zero rated & excluded from the IR348. Not available after 1 April 2013.
Depending on which tax code is selected, additional options may become available.
Add Earner Levy If this employee's earnings are to have earner levy calculated against them then make sure there is an tick in the box by pressing the Space Bar, if no earner levy is to be calculated then press the Space Bar to remove the tick.
Tax Rate Enter the percentage rate to tax this employee at, e.g. 21.00 for 21%.
Student Loan Information
Student Loan Rate Enter the percentage rate at which the employee's student loan repayments should be calculated. By default, Exo Payroll uses the normal student loan rate of 12% - this field is intended as an override.
NOTE: Rates greater than 12% should not be entered - to contribute more than 12%, use the SLCIR and/or SLBOR options. Rates lower than 12% may be possible if the employee has been granted a Special Deduction Rate (SDR). The SDR certificate supplied by Inland Revenue will advise the rate that repayments should be calculated at.
Ignore Threshold Tick this box to ignore the student loan threshold when overriding the Student Loan Rate.
SLCIR If the employee has been required
to make additional Student
Loan repayments by the Commissioner of Inland Revenue, these
repayments must be made under the SLCIR tax code. Click the ![]() button to specify details of SLCIR deductions.
button to specify details of SLCIR deductions.
NOTE: Video Help is available for this topic on the EXO Employer Services Education Centre.
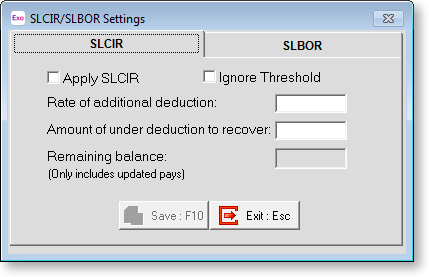
Tick the Apply SLCIR checkbox to enable SLCIR deductions.
The Ignore Threshold checkbox is only available for employees who are using the STC tax code. Ticking this box means that the student loan repayment threshold will not be used when calculating repayments. Inland Revenue will advise whether or not the threshold should be applied or ignored.
Enter the Rate of additional deduction, as specified by Inland Revenue.
Enter the total Amount of under deduction to recover, as specified by Inland Revenue. Once this amount has been repaid, SLCIR deductions will cease.
The Remaining balance field shows how much is still to be repaid. This amount is reduced each time a pay is updated.
NOTE: If the Amount of under deduction to recover field is edited, the Remaining balance field will be overwritten with the new amount.
SLBOR If the employee wants to make
additional Student Loan repayments to pay off their loan quicker,
these repayments must be made under the SLBOR tax code. Click the
![]() button to specify details of SLBOR deductions.
button to specify details of SLBOR deductions.
NOTE: Video Help is available for this topic on the EXO Employer Services Education Centre.
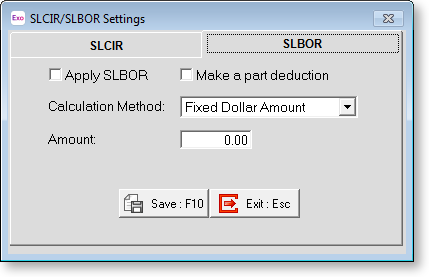
Tick the Apply SLBOR checkbox to enable SLBOR deductions.
Select how to calculate the additional deductions. Choose from:
- A fixed dollar amount
- A percentage of the employee’s Gross Pay
- A percentage of the employee’s Gross Pay over the student loan repayment threshold
Once the method is selected, enter the amount or rate to deduct.
NOTE: Being voluntary, SLBOR deductions are taken out of the employee’s pay after all other compulsory deductions are taken out. Ticking the Make a part deduction box means that if the employee does not have enough pay to cover the full amount of the SLBOR deduction once all other deductions are taken out, a part deduction of their remaining pay will be made. If the box is not ticked, the SLBOR deduction will not be made at all.
Other Details
ACC Code This shows the
ACC levy code that the system will use when calculating the amount to
pay when printing the ACC Employer Premium report. Click the ![]() button to add, edit or delete ACC Codes and their applicable rates on
the following window:
button to add, edit or delete ACC Codes and their applicable rates on
the following window:

Double-clicking a rate or clicking Select will pick that rate. Rates can be added or edited by clicking the appropriate buttons, then entering the Code, Rate and an optional Description (remember to click Save when done). You may have as many ACC Rates as you like. If a rate has already been used by a staff member, then you will be unable to delete it until their rate is changed.
ESCT Rate If you have Employer Super deductions set up in the Deductions masterfile, you will in effect be making a superannuation contribution, defined as a contribution made to a superannuation fund that an employer makes for their employees' benefit. Such contributions are liable for Employer’s Superannuation Contribution Tax, or ESCT. The choices for the rate of ESCT to apply are as follows:
- Calculated - To determine the employee's ESCT rate, Exo Payroll scans the total earnings liable for superannuation for the previous financial year; for employees who have been employed less than a full financial year, an estimate of their yearly earnings (the total salary or wages plus gross employer cash contributions that the employee has received or will receive) must be entered in the ESCT Gross Liable field. In either case, the system then automatically applies a rate of tax that is in alignment with the employee's income:
-
- Income $16,800 or less, tax rate will be 10.5%
- Income between $16,801 and $57,600, tax rate will be 17.5%
- Income between $57,601 and $84,000, tax rate will be 30%
- Income between $84,001 and $216,000, tax rate will be 33%
- Income $216,001 or more, tax rate will be 39%
- 10.5% - The employer and employee may agree to choose the lowest rate of tax, based on the employee's expected annual income.
- 17.5% - The employer and employee may agree to choose a lower rate of tax, based on the employee's expected annual income.
- 30% - The employer and employee may agree to choose a lower rate of tax, based on the employee's expected annual income.
- 33% - The employer and employee may agree to choose the flat rate option. From 1 April 2012, this option is only valid for defined benefit funds - in all other cases "Calculated" should be used instead.
- 39% - The employer and employee may agree to choose the top rate of tax, based on the employee's expected annual income.
NOTE: The ESCT Rate combo box also contains settings for 12.5% and 21%. As of 1 October 2010, these rates are no longer used, but are available for historical records.
ESCT Gross Liable This field is available if "Calculated" is select for the ESCT Rate field. It is editable if the employee has been employed for less than a full financial year. Enter an estimate of the amount that employee is expected to earn over the current financial year - this includes the total salary or wages plus gross employer cash contributions that the employee has received or will receive. This amount will be used to calculate the employee's ESCT rate.
Employment Type These choices show details about the status of the employee as a person and as an employee. Choose from:
|
Detail |
Options |
|
Gender |
Male, Female or Another Gender |
|
Hours |
Full-time or Part time |
|
Remuneration |
Salary or Wage |
|
Term |
Permanent or Casual |
Hours Per Pay Period This field is only available for salaried employees. Enter the number of hours per pay period, to be used in calculating amounts for the Department of Statistics report. The salary that you enter in an employee's Standard Pay must stand for a number of hours, e.g. Weekly = 40 hours, Monthly = 173.33 hours.
Allow Overtime This option is only available for salaried employees. Selecting this option means that the employee can be paid additional waged hours. (Remember that waged employees are already allowed overtime by virtue of being waged employees.)
Proprietor Tick this box if the employee is a working proprietor, to be counted as such in the Department of Statistics report.
Birth Date, Age This field shows the employee's birthday and the computer then calculates the employee's age.
TIP: The system can automatically remind you that the birthday is approaching - this is set up in the Special Options Setup window.
Due Back Date This field shows the date the employee is due back from their holidays. This will tell the system not to copy across their Standard Pay into the current pay until this date is reached. This date is usually automatically entered from the Holiday Pay screen but can also be maintained from this location.
Annual Review This field records the date of the annual review of wages or salary, if one is applicable.
TIP: The system can automatically remind you that the review date is approaching - this is set up in the Special Options Setup window.