
Managing the Inventory Catalog in the Customer Portal: Implementation Activity
In the following implementation activity, you will set up the MYOB Acumatica Customer Portal for your customers to order online. You will also learn how to manage your online catalog in MYOB Acumatica.
Story
Suppose that you are Kimberly Gibbs, system administrator at the SweetLife Fruits & Jams company. You need to configure the Customer Portal to provide your customers with access to the products that SweetLife sells.
In your MYOB Acumatica instance, you need to create new sales categories, add new items to these categories, which gives customers the ability to order these items in the Customer Portal.
Configuration Overview
For the purposes of this activity, the following tasks have been performed:
- The MYOB Acumatica application instance with the U100_SSP_Admin_2024.2.1 dataset preloaded and the Customer Portal application instance have been deployed in the same database.Tip:This deployment is outside of the scope of this training.
- In the U100_SSP_Admin_2024.2.1 dataset, on the User Roles (SM201005) form of MYOB Acumatica, the Portal Admin role has been assigned to the gibbs user account. The user account is associated with Kimberly Gibbs, the system administrator in the SweetLife Fruits & Jams company. The role provides full administrative privileges in the Customer Portal.
- On the Item Classes (IN201000) form, the FOOD and JCRCFGPRT (parts of configurable juicers) item classes have been defined.
- On the Item Sales Categories (IN204060) form, a few sales categories have been created, including the Certificates category.
- On the Stock Items (IN202500) form, the inventory items of the FOOD and JCRCFGPRT (parts of configurable juicers) item classes have been created.
Process Overview
In this activity, you will do the following:
- Sign in to MYOB Acumatica. In MYOB Acumatica, on the Enable/Disable Features (CS100000) form, you will enable the features needed for order management and inventory catalog.
- In the Customer Portal, on the Portal Preferences (SP800000) form, specify the settings for order management and the inventory catalog.
- In MYOB Acumatica, do the following:
- On the Stock Items (IN202500) form, you will add a description and an image to an inventory item.
- On the Item Sales Categories (IN204060) form, you will create and manage sales categories for inventory items, add items to sales categories, and remove an item from a sales category.
- Sign in to the Customer Portal. On the Catalog (SP700000) form, you will verify that the catalog contains the newly added items. Then you will verify that inventory catalog in the Customer Portal has been correctly configured.
System Preparation
Before you start configuring the order management and inventory catalog in the Customer Portal, do the following:
- Launch the MYOB Acumatica instance with the U100_SSP_Admin_2024.2.1 dataset preloaded.
- Sign in as system administrator Kimberly Gibbs by using the gibbs username and the 123 password.
- In MYOB Acumatica, make sure that on the Business Accounts (CR303000) form, for the STOREHUT business account, STORE is selected in the Class box.
- Make sure that you have performed the following prerequisite activities:
- Configuring the Customer Portal: To License the Customer Portal Instance
- Configuring the Customer Portal: To Specify the General Settings of the Customer Portal
- Managing Access to the Customer Portal: To Create User Roles for a Customer’s Employees
- Managing Access to the Customer Portal: To Create User Types for User Accounts
- Managing Access to the Customer Portal: To Create User Accounts for Contacts
- Download the red_delicious.jpg and sweetlife.jpg files.
<add key="IsMultiSiteMode" value="true" />You should also reload the webpages of the MYOB Acumatica instance and the Customer Portal. Synchronization of the MYOB Acumatica and Customer Portal instances may take some time.
Step 1: Enabling the Needed Features
To enable the features needed for order management and inventory catalog, in MYOB Acumatica, do the following:
- Open the Enable/Disable Features (CS100000) form.
- On the form toolbar, click Modify.
- Under the Customer Portal group of features, select the following check
boxes:
- B2B Ordering
- Financials on Portal
- On the form toolbar, click Enable to enable the features.
Step 2: Specifying the Settings for Order Management in the Customer Portal
To specify the settings for online order management in the Customer Portal, do the following:
- Launch the Customer Portal instance that uses the same database as the Acumatica ERP instance. You should sign in as system administrator by using the gibbs username and the 123 password.
- Open the Portal Preferences (SP800000) form.
- In the General Settings section of the B2B
Ordering Settings tab, do the following:
- In the Default Branch for New Orders box, select HEADOFFICE.
- In the Sales Order Type box, make sure that
SO is selected.
This value determines the type of a sales order to be generated when a customer creates a sales order in the Customer Portal.
- In the table, in the Include in Warehouses List column, select the check box in the row that has WHOLESALE in the Warehouse ID column.
- On the form toolbar, click Save.
- In the General Settings section, do the following:
- In the Default Stock Item Warehouse box, select WHOLESALE, which is the warehouse to be used by default for ordering stock items.
- In the Default Non-Stock Item Warehouse box, select WHOLESALE. This warehouse will be used by default for ordering non-stock items.
- Clear the Show Available Quantities check box. This setting causes the quantities of items available in the warehouses to be displayed in the catalog on the Catalog (SP700000) form. You do not need the customers to see these quantities.
- Make sure that the Allow Only Sales Unit for Purchase check box is selected. With this setting, items can be added to the purchase orders in only the unit of measure (UOM) that has been specified as the sales unit in the item's settings on the Stock Items (IN202500) or Non-Stock Items (IN202000) form.
- In the Default Image Settings section, upload the image
to be used as the default image when an inventory item does not have any images
attached. Do the following:
- Click Browse.
- Select the sweetlife.jpg file, which you have downloaded while preparing the system.
- Click Upload.
- On the form toolbar, click Save.
- Sign out of the Customer Portal.
Step 3: Adding the Description and the Image for an Inventory Item
If descriptions and images have been added for the inventory items in MYOB Acumatica, customers can view these descriptions and images in the online catalog on the Catalog (SP700000) form of the Customer Portal.
To add the description and the image for the APPLES inventory item, do the following:
- In MYOB Acumatica, sign in to the system as system administrator by using the gibbs username and the 123 password.
- On the Stock Items (IN202500) form, open the APPLES record.
- In the Description box, update the description by typing Fresh Red Delicious apples 1 lb.
- Add the image to the stock item by doing the following:
- On the Attributes tab, right of the Image box, click Browse.
- Select the red_delicious.jpg file, which you have downloaded earlier.
- Click Upload to add the image to the stock item
record.Tip:The images that you upload on the Attributes tab of the Stock Items form are displayed in the Item Details dialog box in the online catalog on the Catalog (SP700000) form of the Customer Portal, which a user can open by clicking the link in the Inventory ID column.
- On the form toolbar, click Save.
Step 4: Creating New Sales Categories and Subcategories for Inventory Items
To add new sales categories and subcategories to be used for inventory items in the catalog, do the following:
- While you are still signed in to MYOB Acumatica, open the Item Sales Categories (IN204060) form.
- Create the Fruits sales category as follows:
- In the Categories pane, click the tenant name.
- On the Categories pane toolbar, click Add Category.
- At the top of the right pane, in the Description box, type Fruits (the name of the new category).
- On the form toolbar, click Save.
- Create the Spares sales category as follows:
- In the Categories pane, click the tenant name.
- On the Categories pane toolbar, click Add Category.
- At the top of the right pane, in the Description box, type Spares.
- On the form toolbar, click Save.
- Create the subcategories of the Fruits category as follows:
- In the Categories pane, click Fruits.
- On the pane toolbar, click Add Category.
- At the top of the right pane, in the Description box, type Exotic Fruits.
- On the form toolbar, click Save.
- In the Categories pane, click Fruits.
- On the pane toolbar, click Add Category.
- At the top of the right pane, in the Description box, type Seasonal Fruits.
- On the form toolbar, click Save.
Step 5: Renaming a Sales Category
You can rename sales categories for inventory items by changing their descriptions.
While you are still viewing the Item Sales Categories (IN204060) form, to rename the Spares category (which you created in the previous step), do the following:
- In the Categories pane, click the Spares category.
- In the right pane, in the Description box, type Spare Parts.
- On the form toolbar, click Save.
Step 6: Rearranging Sales Categories
You can rearrange sales categories for inventory items by changing their order in the list of categories. Suppose that you need to place the Certificates category to the highest position for better visibility.
To rearrange the categories, do the following:
- While you are still viewing the Item Sales Categories (IN204060) form, in the Categories pane, click the Certificates category (which has been predefined in the U100_SSP_Admin_2024.2.1 dataset).
- On the pane toolbar, click Move Node Up to change the position of the category in the list. Click Move Node Up until the Certificates category is the first listed category.
- On the form toolbar, click Save.
Step 7: Adding Inventory Items to the Sales Categories
Your customers can view and add to their cart items from the online catalog on the Catalog (SP700000) form of the Customer Portal if these inventory items have been added to sales categories in MYOB Acumatica.
To add inventory items to sales categories, do the following:
- While you are still viewing the Item Sales Categories (IN204060) form, in the Categories pane, click the Fruits category, to which you will add inventory items.
- Add an inventory item to the Fruits category as follows:
- In the right pane, on the table toolbar of the Category Members table, click Add Row.
- In the Inventory ID column, select the GINGER item.
- Add all inventory items of the FOOD item class to the Fruits
category as follows:
- In the right pane, on the table toolbar of the Category Members table, click Add Items.
- In the Add Items dialog box, which opens, do the
following:
- In the Add Items box, select By Class.
- In the Item Class box, select FOOD.
- Click Add to add the items to the category and close the dialog box.
- Add all inventory items of the JCRCFGPRT (parts of configurable juicers)
item class to the Spare Parts category as follows:
- In the left pane, click the Spare Parts category, to which you will add inventory items.
- In the right pane, on the table toolbar of the Category Members table, click Add Items.
- In the Add Items dialog box, which opens, do the
following:
- In the Add Items box, select By Class.
- In the Item Class box, select JCRCFGPRT.
- Click Add to add the items to the category and close the dialog box. The system saves your changes automatically.
Tip:You can add an inventory item to multiple categories, if needed.
Step 8: Removing an Inventory Item from the Catalog
If you remove an item from a particular sales category, it will no longer be shown under that category in the Customer Portal. To remove an item from a category, do the following:
- While you are still viewing the Item Sales Categories (IN204060) form, in the Categories pane, select the Fruits category, from which you want to remove the GINGER item.
- In the right pane, in the Category Members table, select the unlabeled check box in the row with the GINGER item.
- On the table toolbar, click Delete Row.
- On the form toolbar, click Save.
You can see the modified list of sales categories for inventory items in the following screenshot.
Figure 1. The sales categories for inventory items 
- Sign out of the system.
Step 9: Reviewing the Inventory Catalog in the Customer Portal
To verify that the changes you have made to the sales categories are reflected in the catalog in the Customer Portal, do the following:
- Sign in to the Customer Portal as Tonya Lawrence by using the tonya@storehut.example.com username and the 123 password.
- In the Orders workspace, click Catalog. The Catalog (SP700000) form opens.
- In the Category box of the Selection area, click the magnifier button to open the list of sales categories for inventory items.
- Make sure that you can see the Fruits and Spare Parts categories, which you have added in this activity. In the Fruits category, make sure that you can see the Exotic Fruits and Seasonal Fruits subcategories, which you have also created.
- Double-click Fruits. The system inserts the value in the Category box and closes the list of sales categories.
- In the table, make sure that you can see the inventory items that you have added in this activity (except GINGER, which you have deleted).
- In the Inventory ID column, click the APPLES link. In the Item Details dialog box, which opens, view the image that you have uploaded in this activity. Close the dialog box.
- In the row that has APPLES in the Inventory ID
column and Fresh Red Delicious apples 1 lb in the
Description column, do the following:
- In the Qty. column, type 5.
- Select the Add to Cart check box.
Notice that the description is the updated one you specified earlier in the activity.
- On the table toolbar, click Add to Cart. Under the form
toolbar, notice that a message about the item in the cart is shown. (See the
following screenshot.)
Figure 2. The items and the message about the items in the cart on the Catalog form 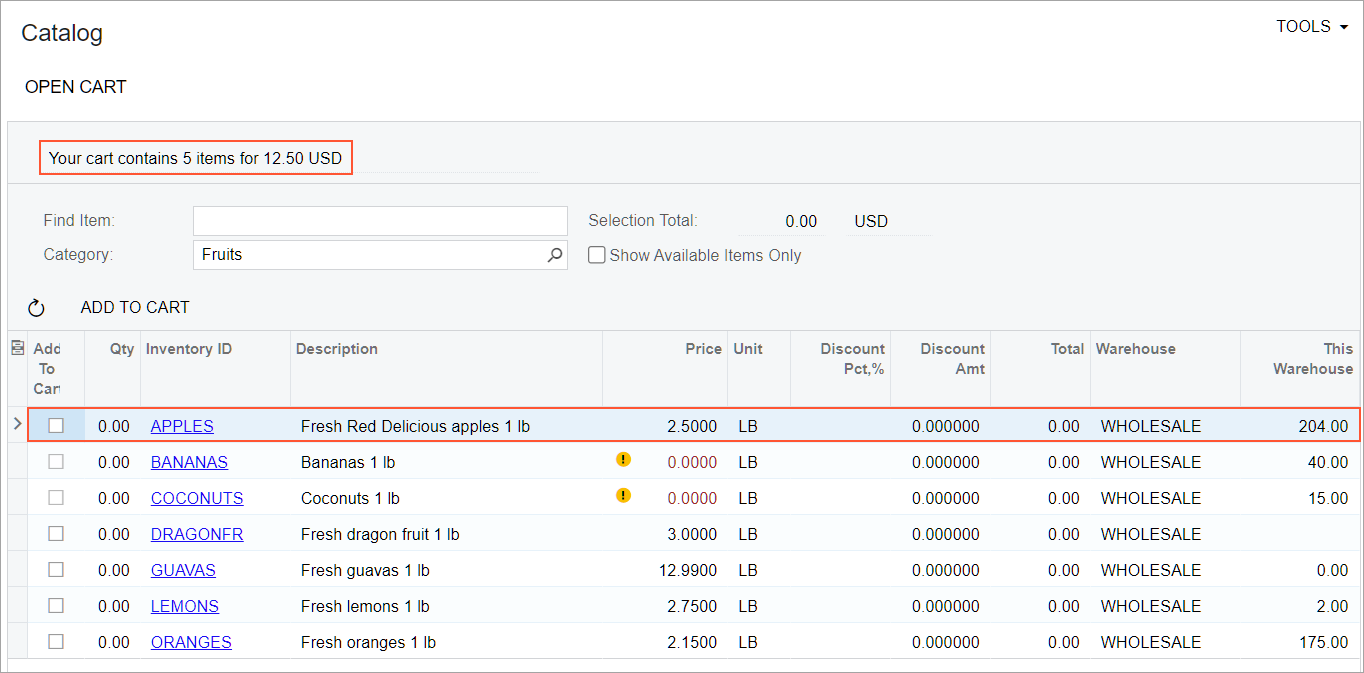
You have reviewed the catalog of inventory items in the Customer Portal.