Paperless Picking: To Process Wave Pick Lists
In the following activity, you will learn how to process a wave pick list. That is, you will prepare, pick, and pack a pick list of the Wave type in the paperless picking workflow.
Story
Suppose that the FourStar Coffee & Sweets customer of SweetLife has ordered items in four sales orders. Those orders have been entered into the system, and they now need to be picked, packed, and shipped.
The warehouse manager wants to speed up the process of picking and packing items by creating wave pick lists and assigning this work to multiple pickers. After the warehouse workers pick the items in a wave, a warehouse worker acting as the packer needs to pack the items and confirm the shipments. You will perform these actions, acting as all of these employees.
Configuration Overview
In the U100 dataset, the following tasks have been performed to support this activity:
- On the Enable/Disable Features (CS100000) form, the
following features have been enabled in the Inventory and Order
Management group of features:
- Warehouse Management
- Fulfillment
- Advanced Picking
- Paperless Picking
- On the Warehouses (IN204000) form, the WHOLESALE warehouse has been created. On the Locations tab, the following warehouse locations have been defined: L1R1S1, L2R1S1, L2R2S1, L3R1S3, L3R3S2. On the Totes tab, the following totes have been defined: T16, T17, T18, T19, and T20.
- On the Stock Items (IN202500) form, the
following stock items have been created, and the corresponding barcodes have
been defined:
- APJAM96, which has the AJ96 barcode
- PLUMJAM32, which has the PJ32 barcode
- LEMJAM96, which has the LJ96 barcode
- LEMJAM08, which has the LJ08 barcode
- KIWIJAM32, which has the KJ32 barcode
- LEMJAM32, which has the LJ32 barcode
- On the Sales Orders (SO301000) form, the following sales orders have been created for the COFFEESHOP customer: 000067, 000068, 000069, and 000070.
- On the Shipments (SO302000) form, the following shipment documents have been created for these sales orders: 000062, 000063, 000064, and 000065.
Process Overview
In this activity, you will do the following:
- Acting as the warehouse manager, you will create wave pick lists and send them to the picking queue by using the Create Pick Lists (SO503050) form. Then you will review the created pick lists on the Picking Queue (SO503080) form.
- Acting as pickers, you will do the following by using the Pick, Pack, and Ship (SO302020) form:
- Pick items in a wave pick list
- Pick items in another wave pick list
- Acting as a packer, you will pack one of the shipments of the wave by using the Pick, Pack, and Ship form.
System Preparation
Before performing the steps of this activity, do the following:
- Launch the MYOB Acumatica website, and sign in to a company with the U100 dataset preloaded. You should sign in as the warehouse manager by using the angelo username and the 123 password.
- In the info area, in the upper-right corner of the top pane of the MYOB Acumatica screen, make sure that the business date in your system is set to 1/30/2025. If a different date is displayed, click the Business Date menu button and select 1/30/2025 on the calendar. For simplicity, in this activity, you will create and process all documents in the system on this business date.
- As a prerequisite, perform Paperless Picking: Implementation Activity to enable the Paperless Picking feature.
- On the Warehouse Management tab of the Sales Orders Preferences (SO101000) form, make sure that the Display the Pick Tab, Display the Pack Tab, and Add Totes to Shipments on the Fly check boxes are selected.
Step 1: Creating Wave Pick Lists
To create wave pick lists, acting as the warehouse manager, do the following:
- Open the Create Pick Lists (SO503050) form.
- In the Action box, select Create Wave Pick Lists.
- In the Warehouse box, select WHOLESALE.
- In the End Date box, make sure that 1/30/2025 is specified.
- Enter 3 as the Max. Number of Pickers.
- Enter 2 as the Max. Number of Totes per Picker.
- Select the Send to Picking Queue check box.
- In the table, select the unlabeled check boxes in the rows of the shipments with reference numbers from 000062 through 000065.
- On the form toolbar, click Process. Close the
Processing dialog box after the processing is
completed.
The system has created the wave pick lists and sent them to the picking queue.
- Open the Picking Queue (SO503080) form.
- In the Warehouse box, select WHOLESALE.
The system shows the wave pick lists that you created in the table on the Pick tab. Notice that only two wave pick lists have been created. (Although you have entered 3 as the maximum number of pickers, the system has found the optimal workflow and determined that two pickers are enough for picking the wave.) Both rows with pick lists have the Added to Queue status, which means that pickers can start picking the items in these pick lists.
- Sign out of the system.
Step 2a: Picking Items in a Wave (Picker 1)
To pick the items in one of the wave pick lists, do the following:
- Sign in to the system as a picker by using the perkins username and the 123 password.
- Open the Pick, Pack, and Ship (SO302020) form, and make sure that the Pick tab is opened.
- On the form toolbar, click Next List.
In the Summary area, the system prompts you to enter the nearest location.
- Enter L2R2S1 to select the requested location. The system loads the 000001/2 pick list, whose items are closest to the entered location.
- Assign totes to the shipments that you will be picking by doing the
following:
- Enter T16. The system assigns this tote to the 000064 shipment and inserts the tote ID in the Tote ID column of all lines of this shipment.
- Enter T17. The system assigns this tote to the 000065 shipment.
You have assigned the totes to shipments, and now you can start picking items.
- Pick the items from the first location by doing the following:
- Enter LJ32 to pick the item. (LJ32 is the barcode for LEMJAM32, the 32-ounce jar of lemon jam, which is included in the 000065 shipment.)
- Set the quantity of the item to 15 as follows:
- On the form toolbar, click Set Qty. The system prompts you to enter the item quantity.
- Enter 15. You have indicated to the system that fifteen 32-ounce jars of lemon jam have been picked from the location and placed in the T17 tote, which is assigned to the 000065 shipment.
- Start picking the items from the second location by doing the following:
- Enter L2R1S1 to select the location from which you are currently picking items.
- Enter KJ32 to pick the item. (KJ32 is the
barcode for KIWIJAM32, the 32-ounce jar of kiwi jam, which is
included in the 000064 shipment.)
Suppose that you have started picking items from the second location and realized that T16 will not be spacious enough to fit the entire quantities of the KIWIJAM32 and LEMJAM96 items.
- Set the quantity to 15, which is the quantity that will fit in the T16 tote.
- Click Add Tote on the form toolbar to add a tote for the 000064 shipment.
- Enter T18. The system assigns this tote to the 000064 shipment and inserts the tote ID in the Tote ID column of all lines of this shipment that have not been picked yet.
- Continue picking the items from the second location by doing the following:
- Enter KJ32 to pick the item.
- Enter T18 to select the tote to which you want to pick the remaining items.
- Set the quantity to 5.
- Pick the items from the third location by doing the following:
- Enter L1R1S1 to select the location from which you are currently picking items.
- Enter LJ96 to pick the item. (LJ96 is the barcode for LEMJAM96, the 96-ounce jar of lemon jam, which is included in the 000064 shipment.)
- Enter T18 to select the tote to which you want to pick the ten 96-ounce jars of lemon jam.
- Set the quantity to 10.
- On the form toolbar, click Confirm Pick List to confirm
that picking is finished.
You have finished picking the items for one of the pick lists.
- Sign out of the system.
Step 2b: Picking Items in a Wave (Picker 2)
To pick the items in another wave pick list, do the following:
- Sign in to the system as a picker by using the rollins username and the 123 password.
- Open the Pick, Pack, and Ship (SO302020) form, and make sure that the Pick tab is opened.
- On the form toolbar, click Next List.
In the Summary area, the system prompts you to enter the nearest location.
- Enter L1R1S1 to select the requested location. The system loads the 000001/1 pick list, whose items are closest to the entered location.
- Assign totes to the shipments that you will be picking by doing the
following:
- Enter T19. The system assigns the tote to the 000062 shipment and inserts the tote ID in the Tote ID column of all lines of this shipment.
- Enter T20. The system assigns the tote to the 000063 shipment.
You have assigned the totes to shipments, and now you can start picking items.
- Pick the items from the first location by doing the following:
- Enter AJ96 to pick the item. (AJ96 is the barcode for APJAM96 the 96-ounce jar of apple jam, which is included in the 000062 shipment.)
- Set the quantity of the item to 10 as follows:
- On the form toolbar, click Set Qty. The system prompts you to enter the item quantity.
- Enter 10. You have indicated to the system that ten 96-ounce jars of apple jam have been picked from the location and placed in the T19 tote, which is assigned to the 000062 shipment.
You are continuing to pick items for different shipments from the same location, so you do not need to scan the location barcode again.
- Do the following:
- Enter LJ96 (LJ96 is the barcode for LEMJAM96, the 96-ounce jar of apple jam, which is included in the 000063 shipment.)
- Set the quantity to 10.
- To proceed to picking items from the second location, do the following:
- Enter L3R1S3 to select the location from which you are currently picking items.
- Enter LJ08 to pick the item. LJ08 is the barcode for LEMJAM08, the 8-ounce jar of lemon jam, which is included in the 000063 shipment.
- Set the quantity of the item to 5.
- Pick the items from the third location by doing the following:
- Enter L3R3S2 to select the location from which you are currently picking items.
- Enter PJ32 to pick the item. (PJ32 is the barcode for PLUMJAM32, the 32-ounce jar of plum jam, which is included in the 000062 shipment.)
- Set the quantity of the item to 5.
- On the form toolbar, click Confirm Pick List to confirm
that picking is finished.
You have finished picking the items in both pick lists.
- Sign out of the system.
Step 3: Packing a Shipment for the Wave
At this point in the wave picking, all of the shipments from the wave can be packed. For the purposes of this activity, you will pack just one of the shipments (000064) from the wave, acting as a warehouse worker who handles packing. You will create several packages because the quantity of items in the shipment is too large to pack them into one box. To pack the shipment from the wave, do the following:
- Sign in to the system as a warehouse worker who will perform packing operations by using the sauer username and the 123 password.
- Open the Pick, Pack, and Ship (SO302020) form.
- Enter T16, which is the reference number of the tote
whose items are ready for packing.
In the Summary area, the system notifies you that this is one of the two totes scanned for the 000064 shipment.
- Enter T18, which is the reference number of the second tote assigned to the shipment.
- Enter LARGE to select the box in which you are packing the items.
- Enter LJ96 to select the item being packed. The system
highlights the first line of the shipment in bold and inserts 1 as the
Packed Quantity; it also adds a line with this item
to the Package Content tab.
While packing, you find out that the selected box can hold only seven 96-ounce jars of the jam.
- Set the quantity of the item to 7 as follows:
- On the form toolbar, click Set Qty. The system prompts you to enter the item quantity.
- Enter 7. The system inserts 7 as the Packed Quantity.
- On the form toolbar, click Confirm Package to confirm the package.
- Enter LARGE to select the box in which you are now packing the items.
- Enter LJ96 to select the item being packed.
- Set the quantity of this item to 3. The system highlights the first line of the shipment in green to indicate that all 96-ounce jars of lemon jam have been packed.
- Enter KJ32 to select the next item being packed in the
same box.
While packing the second box, you find out that the selected box can hold only three 96-ounce jars of lemon jam and ten 32-ounce jars of kiwi jam.
- Set the quantity of the KJ32 item to 10.
- On the form toolbar, click Confirm Package to confirm the package.
- Enter MEDIUM to select the box in which you are packing the rest of the items.
- Enter KJ32 to select the item being packed in the last box.
- Set the quantity of this item to 10.
- On the form toolbar, click Confirm Package to confirm the last package for the 000064 shipment.
- On the form toolbar, click Confirm Shipment.
- Sign out of the system, and sign in again as a warehouse manager by using the angelo username and the 123 password.
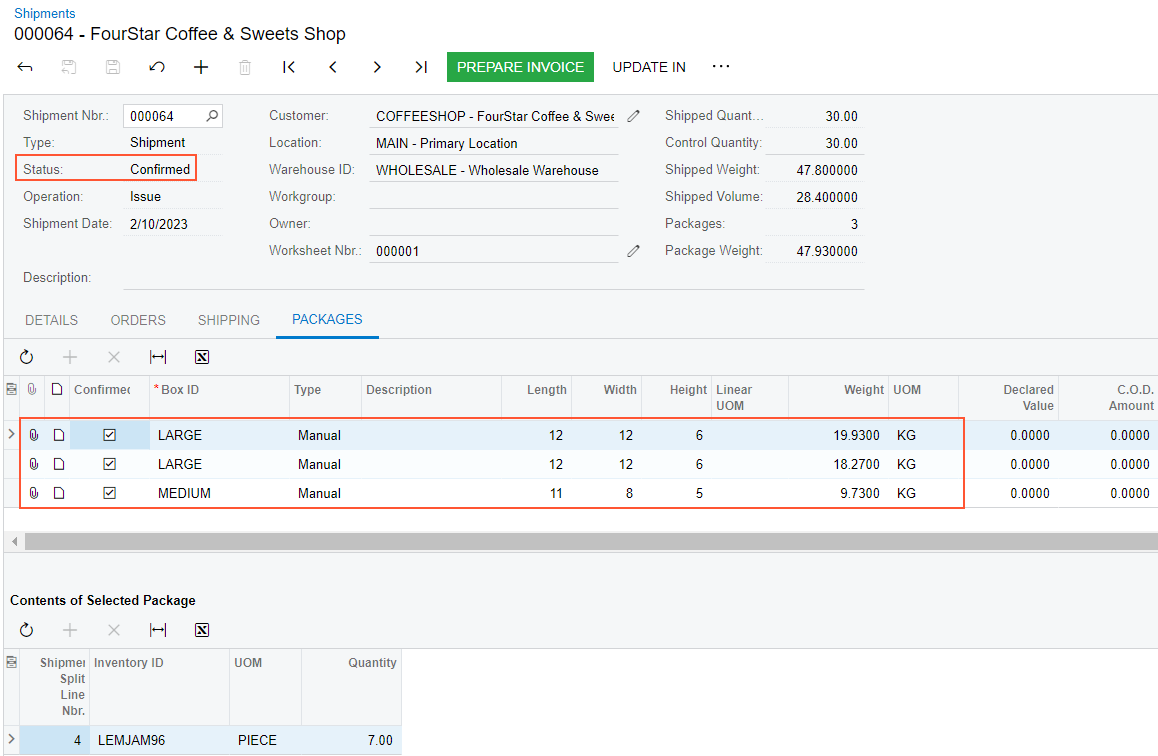
- On the Shipments (SO302000) form, open the 000064
shipment, which you packed. Notice that it is now assigned the Confirmed
status. The Packages tab lists each box in which the
items were packed. For the box whose row is selected in this table, the items
packed into this box are listed in the Contents of Selected
Package table.
Figure 1. Packing details for the shipment