To Configure AD FS Claims
After you have added a relying party trust for your MYOB Acumatica instance to the Microsoft Active Directory Federation Services (AD FS) server, you need to configure the necessary claims for the relying party trust. For description of all steps required for integrating MYOB Acumatica with AD FS, see Integration with AD FS.
The procedure below provides a sample configuration of claims for AD groups. You may add other claims that are specific to your organization.
Attention:
This topic walks you through the
configuration of third-party software. Please note the following:
- The procedure below is designed for the most common usage scenarios. If you are implementing a more complicated scenario and you encounter difficulties, contact MYOB Acumatica technical support.
- The vendor of the third-party software may change the user interface and settings. Therefore, the screen elements and setting names that you see may differ from the ones described in the procedure.
- The procedure will be updated to describe new common scenarios and changes in the user interface and settings.
To Configure AD FS Claims for the Relying Party Trust
- Sign in to the AD FS server, open the AD FS Management tool, and select the
relying party trust of your MYOB Acumatica instance in .Note:To configure AD FS, you must be a member of the Domain Admins group in the domain to which the federation server is joined.
- In the right pane, click Edit Claim Rules.
- In the Edit Claim Rules dialog box, add the
Main Claims rule. Do the following:
- Click Add Rule.
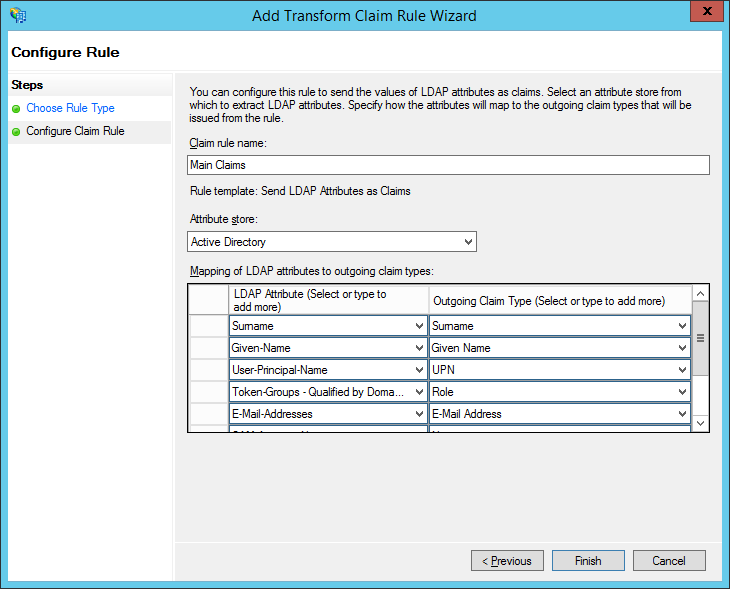
- In the Add Transform Claim Rule Wizard dialog box, in the Claim rule template box, select Send LDAP Attributes as Claims, and then click Next.
- In the Claim rule name box, type Main
Claims, as shown in the screenshot below.
Figure 1. Main Claims rule 
- In the Attribute store box, select Active Directory.
- In the Mapping of LDAP attributes to outgoing claim
types area, add the attributes specified in the
following table.
LDAP Attribute Outgoing Claim Type Necessity Surname Surname Optional Given-Name Given Name Optional User-Principal-Name UPN Required Token-Groups - Qualified by Domain Name Role Required E-Mail-Addresses E-Mail Address Required SAM-Account-Name Name Optional Display-Name Common Name Optional - Click Finish to add the rule.
- In the Edit Claim Rules dialog box, add the SID
rule. Do the following:
- Click Add Rule.
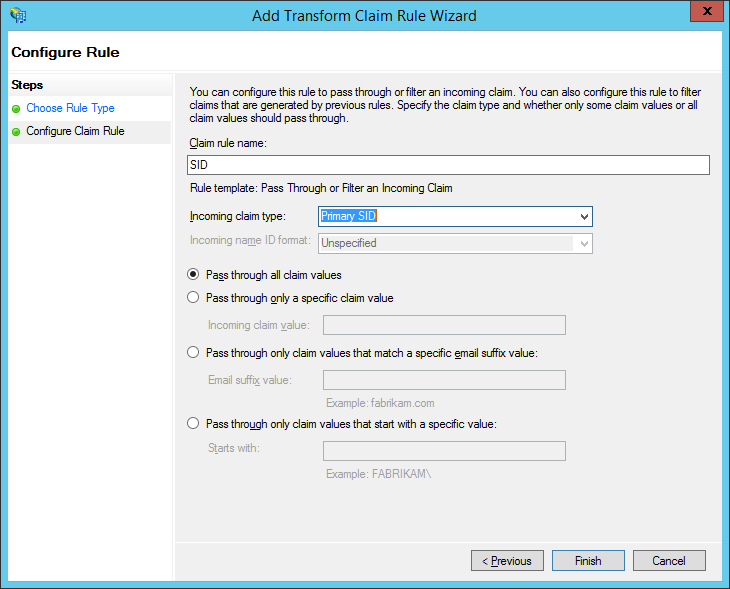
- In the Add Transform Claim Rule Wizard dialog box, in the Claim rule template box, select Pass Through or Filter an Incoming Claim, and then click Next.
- In the Claim rule name box, type
SID, as shown in the screenshot below.
Figure 2. SID rule 
- In the Incoming claim type box, select Primary SID.
- Select the Pass through all claim values option button.
- Click Finish to add the rule.
Now that you have configured the AD FS server, you have to enable integration in your MYOB Acumatica instance. For details, see To Enable AD FS Integration with MYOB Acumatica.
