
Integration of Field Services and Projects: General Information
In MYOB Acumatica, you can utilize the field service functionality when you are working with projects. Within a project, you can create a service document (a service order or an appointment) to perform the necessary services. In the service document, you can add lines with stock items and non-stock items (including services), associating each detail line with a particular project task. When the service document is billed, the system generates project transactions and updates the project cost budget.
Performing project services through field services ensures that all costs related to the services provided—including labor, materials, and other expenses—are accurately tracked and allocated to the project budget.
Learning Objectives
In this chapter, you will learn how to do the following:
- Configure the integration of the field service functionality with projects
- Create a project and specify the settings related to field services
- Create a service order directly from the project
- Create an appointment
- Review the project transactions that are generated when you are billing a service document and a project
Applicable Scenarios
You may want to integrate field services and project management if you are a project manager who handles projects involving multiple project tasks, each requiring different human resources and timelines to perform services. You can use MYOB Acumatica for the management of both projects and field services.
The integration can be performed in the following scenarios:
- You are currently using MYOB Acumatica to manage project management, and you plan to use it for field services as well.
- You are currently using MYOB Acumatica to manage field services, and you plan to use it for project management as well.
- You are implementing MYOB Acumatica, and you plan to use it for the management of projects and field services.
Workflow of Processing Service Documents Associated with Projects
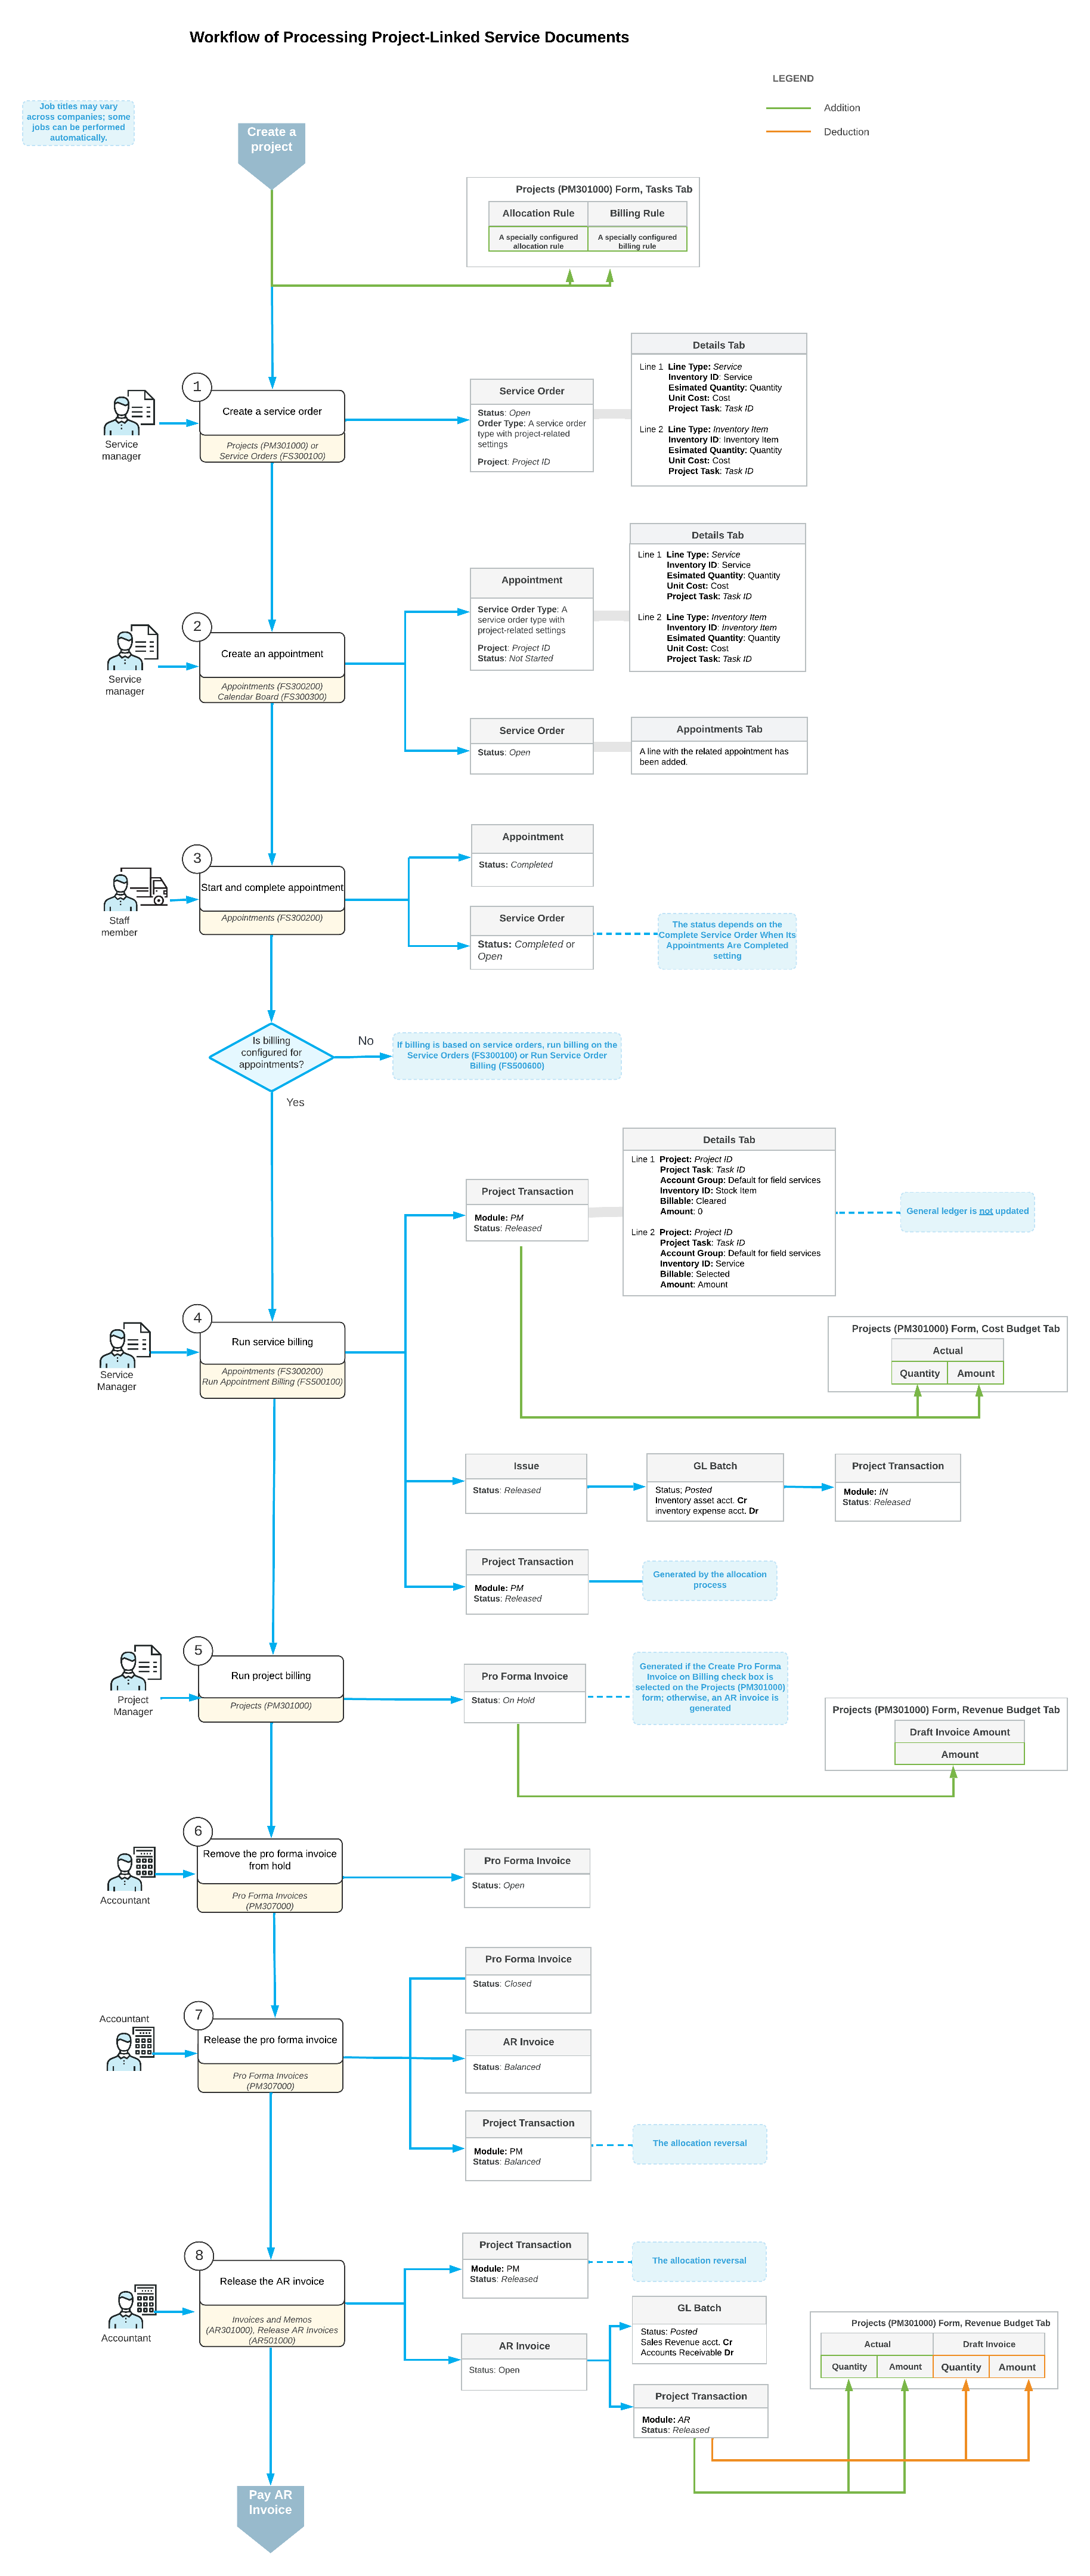
The following diagram illustrates the workflow of processing a project with a service order and an appointment. This workflow is based on the assumption that the project has been created in the system with the needed settings for integration with service management.
Creation of a Project
You create a project by using the Projects (PM301000) form, as described in the Project Creation and Processing: General Information topic. During project creation, you need to specify the settings that provide integration with service management as follows:
- Tasks tab: For each task to be performed by using service
management, do the following:
- In the Billing Rule column, specify the billing rule that has been configured to bill project transactions related to field services.
- In the Allocation Rule column, specify an allocation rule that has steps that have been configured for handling project transactions originating from service documents.
- Summary tab: Optionally, select the Run Allocation on Release of Project Transactions check box to cause the system to automatically perform allocation on release of project transactions.
- Defaults tab: In the Default Sales Account box, specify the needed sales account. This account is used by the billing rule and will be credited to reflect the revenue earned on release of AR invoices generated for the project.
After the project has been created and the necessary settings have been specified, you can create any number of service orders and appointments to perform services associated with the project tasks.
Creation of a Service Order
You can create a service order directly from the Projects (PM301000) form by clicking Create Service Order on the More menu. In the Create Service Order/Appointment dialog box, which opens, you select the project-related service order type in the Service Order Type box. In the Default Project Task box, you specify the project task to be used by default in the service order. The branch, branch location, description, and project are automatically copied from the project’s settings and populated in the respective boxes. You do not need to fill in the Service Order Settings section of the dialog box at this stage; these settings can be specified later on the Service Orders (FS300100) form.
At the bottom of the dialog box, you click Create and Review, and the system opens the Service Orders form. In the Summary area, the Project and Default Project Task boxes are already filled in. On the Details tab, you add lines for the necessary services, as well as any other non-stock items and stock items. The system inserts the default project task in the Project Task column for each detail line, but you can change it, if needed.
To create an appointment for the project-related service order, you click one of the following commands on the More menu of the Service Orders form:
- Create Appointment: The system opens the Appointments (FS300200) form, where you fill in the appointment’s settings. For details, see Appointment Creation: To Create an Appointment on the Appointments Form.
- Schedule on Calendar: The system opens the Calendar Board (FS300300), where you can create an appointment while considering staff members' availability, skills, licenses, and service areas. For details, see Appointment Creation: To Create an Appointment on the Calendar Board.
- Schedule on Staff Calendar: The system opens the Staff Calendar Board (FS300400), where you can create an appointment considering the schedules of the staff members.
Regardless of which form you use to create the appointment, the system inserts the project in the Summary area of the Appointments form.
Creation of an Appointment
You can create an appointment directly from a project without first creating a service order. When the appointment is created, the system automatically creates the related service order, populating it with the settings and detail lines of the appointment.
To create an appointment from a project, on the More menu of the Projects (PM301000) form, you click Create Appointment. In the Create Service Order/Appointment dialog box, which opens, you select the project-related service order type. In the Default Project Task box, you specify the default project task for the appointment. The system copies other settings—such as the branch, branch location, description, and project—from the project settings and inserts them in the appropriate boxes.
At the bottom of the dialog box, you click Create and Review, and the system opens the Appointments (FS300200) form, where you can specify other settings for the appointment. When you save the appointment, the system automatically creates the related service order on the Service Orders (FS300100) form and copies the relevant settings from this appointment.
In the created appointment on the Appointments form, on the Details tab, you add detail lines for the necessary services, as well as any non-stock items and stock items. In each line, you specify the project task (if it is different from the default project task). When you save the appointment, all added lines will be automatically included in the service order.
Transactions Generated During the Billing of a Service Order or an Appointment
Once an appointment has been completed, the billing process can be initiated. Billing can be processed for either appointments or service orders, depending on the settings of the customer's billing cycle.
When billing is completed for a service order or an appointment, the system generates transactions that can be viewed as follows:
- On the Billing Documents tab of both the Service Orders (FS300100) form and the Appointments form if billing was run for the appointment (that is, if Run Billing For is set to Appointments in the billing cycle associated with the customer)
- On the Billing Documents tab of only the Service Orders (FS300200) form if billing was run for the service order (that is, if Run Billing For is set to Service Orders in the billing cycle associated with the customer)
If a service document contains only non-stock items or services, the system generates and releases a project transaction that is recorded to the account group intended to initially track project transactions originating from service documents. For details, see Integration of Field Services and Projects: Workflow Setup.
If a service document contains both non-stock items (including services) and stock items, the following records are generated during billing:
- An inventory issue transaction.
The system creates an issue on the Issues (IN302000) form and releases it. On the Financial tab of the Issues form, the reference number of the generated inventory GL transaction is specified in the Batch Nbr. box. This GL transaction credits an inventory account (indicating a reduction in inventory) and debits the inventory expense account (COGS - cost of goods sold) specified in the reason code. This GL transaction recognizes an expense and generates a related project transaction, whose reference number is specified in the Project Tran. ID column in the debiting line on the Journal Transactions (GL301000) form.
- The project transaction.
The system creates the project transaction on the Project Transactions (PM304000) form. The Details tab contains the lines that the system has copied from the service document. In each line, the state of the Billable check box is assigned as follows:
- In a line with a stock item, the Billable check box is cleared because the system has created an inventory issue transaction for this line and has generated and posted an inventory GL transaction. For the debit expense line in this transaction, another project transaction is also generated.
- In a line with a service, the Billable check box is selected because it will be billed later through the project billing process.
Therefore, the total amount in the Summary area does not include the cost of the stock items because the Amount column for these lines on the Details tab contains 0.
This project transaction is recorded to the account group that initially keeps project transactions originating from service documents. However, note that stock items are added with an amount of 0.
You can view the project transactions associated with a particular project on the Project Transaction Details (PM401000) inquiry form. For details, see Integration of Field Services and Projects: Related Inquiry Form.
On the generation and release of the project transaction, the system updates the project's budget lines on the Cost Budget tab of the Projects (PM301000) form. The system updates the Actual Quantity and Actual Amount columns for these cost budget lines.
Reversal of a Project Transaction Created from a Service Document
You may need to reverse a project transaction that has been generated during the billing of a service order or an appointment. To do this, click Reverse Bill on the More menu of the Service Orders (FS300100) or Appointments (FS300200) form.
When a project transaction is reversed, all settings from the original transaction are copied to the reversed transaction. The system adds Reverse to the beginning of the transaction description in the Description box in the Summary area of the Service Orders or Appointments form.
You can view both the original transaction and the reversed transaction on the Billing Documents tab of the Service Orders or Appointments form, depending on which form the transaction was generated from (and then reversed).
If a service document contains stock items and an inventory issue has been generated during billing, clicking the Reverse Bill command will also reverse the issue. That is, the system will generate and post a reversed inventory transaction for this issue, which will debit an inventory asset account.