
Service Order Prepayments: Process Activity
This activity will walk you through the process of managing prepayments that have been made for a service order, including entering a prepayment while acting as a staff member attending an appointment. You will go through the whole process, starting from the creation of a service order and ending with the release of the invoice for the service order.
Story
Suppose that the GoodFood One Restaurant customer has contacted the service manager of the SweetLife Service and Equipment Sales Center to request installation services and a juicer. You will enter the service order into the system and create and schedule the related appointment. The customer has paid 20% of the service order total in advance when requesting the services and the item, and will prepay an additional 30% at the appointment. You will enter the prepayments at the appropriate times, process the appointment, and generate the billing documents.
Configuration Overview
In the U100 dataset, the following tasks have been performed to support this activity:
- The minimum system configuration, which is described in Company with Branches that Do Not Require Balancing: General Information, has been performed.
- The SWEETLIFE company has been created on the Companies (CS101500) form. This company has multiple branches created on the Branches (CS102000) form, including SWEETEQUIP (Service and Equipment Sales Center).
- On the Service Management Preferences (FS100100) form, the minimum settings have been specified, including specifying the numbering sequences and work calendar, for the service management functionality to be used.
- On the Employees (EP203000) form, EP00000040 (Maia Davis) and EP00000004 (Alberto Jimenez) have been defined. For EP00000004 (Alberto Jimenez), the Staff Member in Service Management check box has been selected, so you can assign him to perform services.
- On the Users (SM201010) form, the davis and jimenez accounts have been created. For the davis user account, in the Linked Entity box of the Summary area of the form, the Maia Davis employee account has been specified; for the jimenez user account, in this box, the Alberto Jimenez employee account has been specified.
- On the Branch Locations (FS202500) form, the WEST BRIGHTON branch location has been defined.
- On the User Profile (SM203010) form, for the davis user, the WEST BRIGHTON branch location has been specified as the default branch location.
- On the Service Order Types (FS202300) form, the INST service order type has been defined to generate SO invoices to bill customers for provided services. That is, in the Billing Settings section of the General tab, SO Invoices has been selected in the Generated Billing Documents box. Also, on the General tab (General Settings section), the Complete Service Order When Its Appointments Are Completed and Close Service Order When Its Appointments Are Closed check boxes are selected.
- On the Customers (AR303000) form, the GOODFOOD (GoodFood One Restaurant) customer has been defined, and the AP AP billing cycle has been selected in the Service Management section of the Billing tab.
- On the Billing Cycles
(FS206000) form, the following settings have been specified for the AP AP
billing cycle:
- Run Billing For: Appointments
- Group Billing Documents By: Appointments
Based on these billing cycle settings, a separate billing document is generated for each appointment; this document presents the details of each service of the appointment.
- On the Cash Accounts (CA202000) form, the 10200EQ (Equipment Checking) cash account is assigned to the SWEETEQUIP branch.
Process Overview
You will create a service order on the Service Orders (FS300100) form and add the service to be performed. You will enter the initial prepayment for the service order on the Payments and Applications (AR302000) form and then create the related appointment on the Appointments (FS300200) form. You then will process the appointment, including entering the second prepayment on the Payments and Applications form. Finally, you will process an invoice on the Invoices (SO303000) form to bill the customer.
System Preparation
Before you begin performing the steps of this activity, do the following:
- Launch the MYOB Acumatica website, and sign in to a company with the U100 dataset preloaded. You should sign in as a service manager by using the davis username and the 123 password.
- In the company to which you are signed in, ensure that the Service Management feature has been enabled on the Enable/Disable Features (CS100000) form.
- In the info area, in the upper-right corner of the top pane of the MYOB Acumatica screen, make sure that the business date in your system is set to 1/30/2025. If a different date is displayed, click the Business Date menu button and select 1/30/2025 on the calendar. For simplicity, in this activity, you will create and process all documents in the system on this business date.
Step 1: Entering a Service Order
To create a service order for the GoodFood One Restaurant, do the following:
- Open the Service Orders (FS300100) form.
- On the form toolbar, click Add New Record, and specify
the following settings in the Summary area:
- Service Order Type: INST
- Customer: GOODFOOD - GoodFood One Restaurant
- On the Details tab, click Add Row
on the table toolbar, and specify the following settings in the added row:
- Line Type: Service
- Inventory ID: INSTALL
- Click Add Row again on the table toolbar, and specify the
following settings in the added row:
- Line Type: Inventory Item
- Inventory ID: JUICER20C
- On the form toolbar, click Save.
Step 2: Entering a Prepayment for the Service Order
To create a prepayment for the service order, do the following:
- While you are still viewing the service order you created on the Service Orders
(FS300100) form, on the Prepayments tab, click
Create Prepayment on the table toolbar.
The Payments and Applications (AR302000) form opens in a pop-up window.
- In the Cash Account box of the Summary area, ensure that 10200EQ (Equipment Checking) is selected.
- In the Payment Amount box, type 820, which is 20% of the total amount.
- On the Service Orders tab, notice that the service order you created is assigned to the prepayment.
- On the form toolbar, click Remove Hold.
- On the form toolbar, click Save and then Release.
- Close the window with the form.
On the Service Orders form, to which you return, notice that the prepayment you have created is now listed on the Prepayments tab.
Step 3: Creating an Appointment
To create an appointment for the service order, do the following:
- While you are still viewing the service order on the Service Orders
(FS300100) form, click Create Appointment on the form
toolbar.
The system opens the Appointments (FS300200) form with relevant settings copied from the service order.
- On the Settings tab, in the Scheduled Start Date boxes, specify 2/3/2025 12:00 PM
- On the table toolbar of the Staff tab, click Add Row.
- In the Staff Member column, select Alberto Jimenez.
- On the form toolbar, click Save.
Step 4: Processing the Appointment with the Prepayment
To process the appointment, do the following on behalf of staff member Alberto Jimenez:
- While you are still viewing the appointment you created on the Appointments (FS300200) form, click Start on the form toolbar.
- On the Prepayments tab, click Create
Prepayment.
The Payments and Applications (AR302000) form opens in a pop-up window.
- In the Cash Account box, ensure that 10200EQ (Equipment Checking) is selected.
- In the Payment Amount box, type 1,230.00, which is 30% of the total amount.
- On the Service Orders tab, notice that the created service order is assigned to the prepayment.
- On the form toolbar, click Remove Hold.
- On the form toolbar, click Save and then Release.
- Close the window.
- On the Appointments form, to which you return, in the Actual
Date and Time section of the Settings
tab, specify the following settings:
- Actual Start Date: 2/3/2025 12:00PM
- Actual End Date: 2/3/2025 1:00PM
- Finished: Selected
- On the form toolbar, click Complete.
- On behalf of the accountant, on the form toolbar, click Close.
The completion and closing of the appointment caused the service order to also be completed and closed because of the settings of the INST service order type on the Service Order Types (FS202300) form, as described in the Configuration Overview section.
Step 5: Generating an Invoice
To generate an invoice, do the following (while still acting as an accountant):
- While you are still viewing the appointment on the Appointments form, click Run Billing on the form toolbar.
- After the processing has successfully completed, on the Billing
Documents tab, click the reference number of the invoice.
The Invoices (SO303000) form opens in a separate window with the generated invoice.
- On the Applications tab (Item 1 in the following
screenshot), notice that both prepayments are listed (Item 2).
Figure 1. The Applications Tab 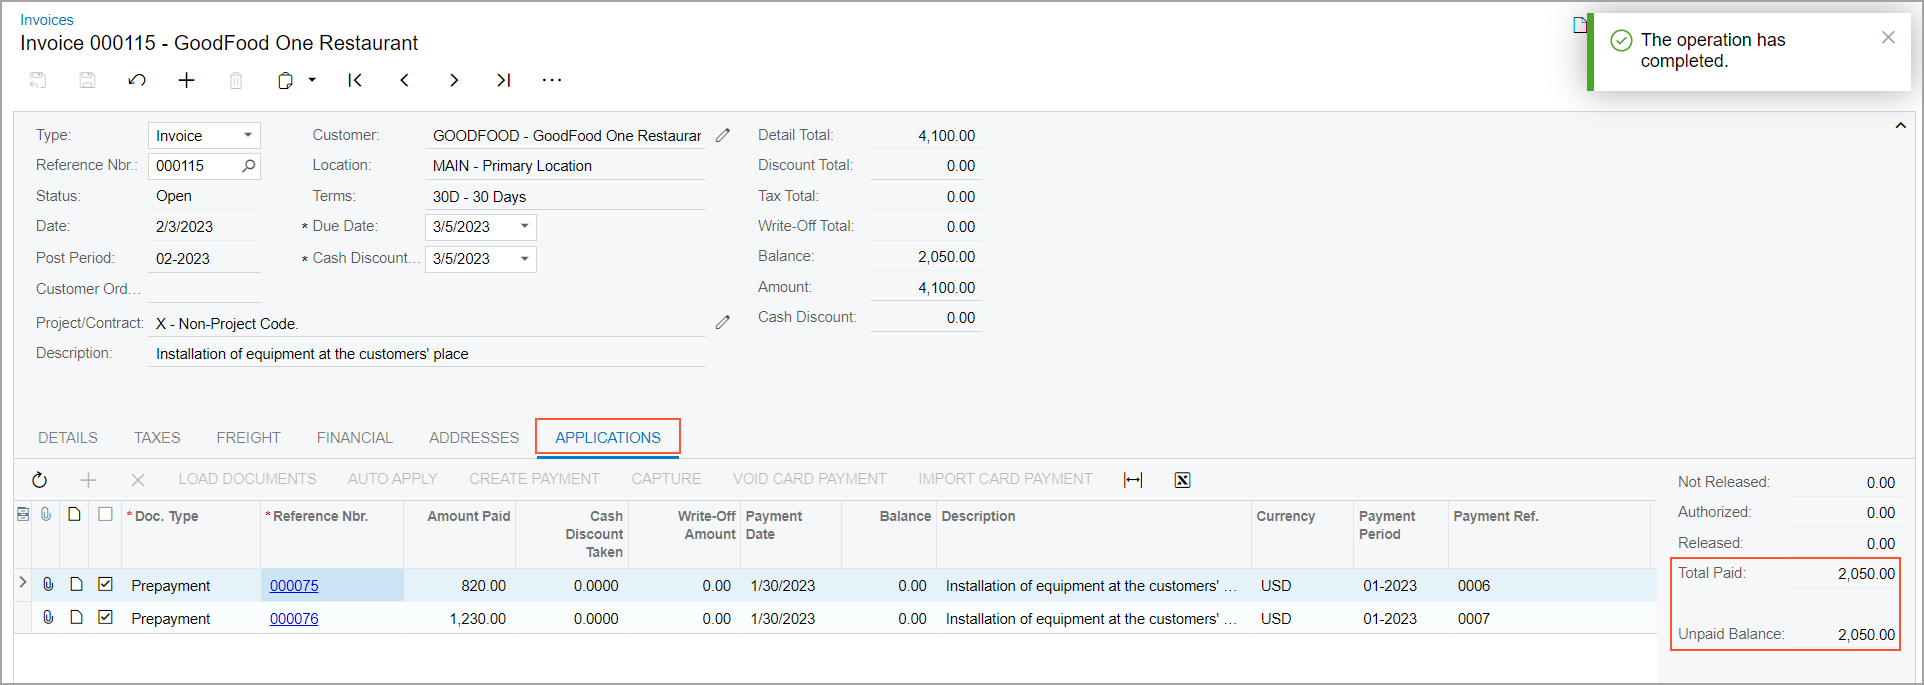
Also notice that the Total Paid and the Unpaid Balance amounts are indicated in the right panel of the Application tab. Verify that the Total Paid is 50% of total appointment billable amount.
- On the form toolbar, click Remove Hold and then
Release.
In the Summary area of the Invoices form, review the invoice balance (Balance) to be paid is 2,050.00.
- On the More menu, click Pay.
The system opens the document of the Payment type on the Payments and Applications (AR302000) form, with the amount to be paid equal to 2,050.00, which is specified in the Payment Amount box in the Summary area of the form.
- Click Remove Hold and Release.