Multiple Customer Discounts: To Create Multiple Discounts and Explore Their Application
In this activity, you will create discounts of multiple types and learn how the system applies a combination of discounts to an AR invoice.
Story
Starting in January 2025, the SweetLife Fruits & Jams company is offering a discount of $100 to local customers who order 10 or more days of the offline training course.
In addition, SweetLife has offered a 15% discount to all customers who purchase $200 or more in a single order.
Suppose that on January 30, 2025, one of the SweetLife's local customers, FourStar Coffee & Sweets Shop (COFFEESHOP), bought 12 days of the offline training course and 5 days of the online training course for which your company is offering a 12% discount effective on 1/30/2025 for more than 5 days of training.
Acting as SweetLife's accountant, you need to define the discounts for the OFLCOURSE and ONLCOURSE non-stock items, which will be applied automatically.
Finally, you need to create and post the AR invoice for FourStar Coffee & Sweets Shop in the system, making sure that the three discounts are applied to this invoice.
Configuration Overview
In the U100 dataset, the following tasks have been performed to support this activity:
- On the Enable/Disable Features (CS100000) form, the Customer Discounts feature has been enabled to support the discount functionality.
- On the Non-Stock Items (IN202000) form, the ONLCOURSE and OFLCOURSE non-stock items have been created.
- On the Customer Price Classes (AR208000) form, the LOCAL customer price class has been created.
- On the Customers (AR303000) form, the COFFEESHOP customer has been created and assigned to the LOCAL customer price class.
Process Overview
To configure a group discount for particular non-stock items, you will create a discount code on the Discount Codes (AR209000) form, and then configure this discount on the Discounts (AR209500) form. You will activate the automatic line discount (LIITE00000) and automatic unconditional document discount (UNCON00000), which you deactivated earlier.
You then will create an AR invoice on the Invoices and Memos (AR301000) form and review how the discounts defined in the system are applied to the invoice. You will release the invoice on this form, and you will review the GL batch on the Journal Transactions (GL301000) form.
Finally, you will deactivate the discounts.
System Preparation
To prepare the system, do the following:
- As a prerequisite activity, complete the Automatic Customer Discounts: To Set Up Automatic Line Discounts to configure the discount by quantity for the LOCAL customer price class.
- As a prerequisite activity, complete the Automatic Customer Discounts: To Set Up Automatic Customer-Specific and Unconditional Document Discounts to configure the unconditional document discount of 15% for documents of $200 or more.
- Launch the MYOB Acumatica website with the U100 dataset preloaded, and sign in to the system as an accountant by using the johnson username and the 123 password.
- In the info area, in the upper-right corner of the top pane of the MYOB Acumatica screen, make sure that the business date in your system is set to 1/30/2025. If a different date is displayed, click the Business Date menu button and select 1/30/2025. For simplicity, in this lesson, you will create and process all documents in the system on this business date.
- On the Company and Branch Selection menu, also on the top pane of the MYOB Acumatica screen, make sure that the SweetLife Head Office and Wholesale Center branch is selected. If it is not selected, click the Company and Branch Selection menu button to view the list of branches that you have access to, and then click SweetLife Head Office and Wholesale Center.
Step 1: Activating the Automatic Line Discount by Amount for a Particular Customer Price Class
To activate the LIITE00000 automatic line discount by amount for a particular customer price class, do the following:
- Open the Discounts (AR209500) form.
- In the Discount Code box, select LIITE00000.
- In the Discount Sequence box, select LIITE00001.
- In the Summary area, select the Active check box.
- On the form toolbar, click Save to save your changes.
Step 2: Activating the Automatic Unconditional Document Discount
To activate the UNCON00000 unconditional document discount, do the following:
- Open the Discounts (AR209500) form.
- In the Discount Code box, select UNCON00000.
- In the Discount Sequence box, select UNCON00001.
- In the Summary area, select the Active check box.
- On the form toolbar, click Save to save your changes.
Step 3: Configuring the Automatic Group Discount for Particular Non-Stock Items
To create the automatic group discount for the OFLCOURSE and ONLCOURSE non-stock items, do the following:
- Open the Discount Codes (AR209000) form.
- On the form toolbar, click Add Row, and specify the
following settings in the added row:
- Discount Code: GRITE00000
- Description: Automatic group discount for items
- Discount Type: Group
- Applicable To: Item
- Auto-Numbering: Selected
- Last Number: GRITE00000
These settings define discounts of this discount code as automatic group discounts that are applicable to specific items.
- On the form toolbar, click Save.
- Open the Discounts (AR209500) form.
- On the form toolbar, click Add New Record, and specify
the following settings in the Summary area:
- Discount Code: GRITE00000
- Discount By: Percent
- Break By: Quantity
- Active: Selected
- Description: Automatic group discount for courses
With these settings, the discount (of the discount code you just defined for automatic group discounts that are applicable to specific items) is by percent, with break points by quantity.
- On the Discount Breakpoints tab, click Add
Row on the table toolbar, and specify the following settings in
the added row:
- Pending Break Quantity: 5
- Pending Discount Percent: 12
- Pending Date: 1/30/2025
The discount of 12% is applicable to a group with a quantity of 5 or more.
- On the Items tab, click Add Row on the table toolbar, and in the Inventory ID column, select OFLCOURSE.
- Add another row, and in the Inventory ID column, select ONLCOURSE.
- On the form toolbar, click Save.
- On the form toolbar, click Update Discounts to make the discount you have just added effective.
- In the Update Discounts dialog box, which opens, leave
1/30/2025 in the Filter Date box, and click
OK.
On the Discount Breakpoints tab, notice that the system has cleared the Pending Date column and the Effective Date column now contains 1/30/2025.
Step 4: Creating the AR Invoice and Exploring Discount Application
To create the AR invoice for FourStar Coffee & Sweets Shop and observe how the system automatically applies the discounts, do the following:
- Open the Invoices and Memos (AR301000) form.
- On the form toolbar, click Add New Record, and specify
the following settings in the Summary area:
- Type: Invoice
- Customer: COFFEESHOP
- Date: 1/30/2025
- Post Period: 01-2025
- Description: Offline and online training courses
- On the Details tab, click Add Row
on the table toolbar, and specify the following settings in the added row:
- Branch: HEADOFFICE
- Inventory ID: OFLCOURSE
- Quantity: 12
- UOM: DAY
- Unit Price: 45
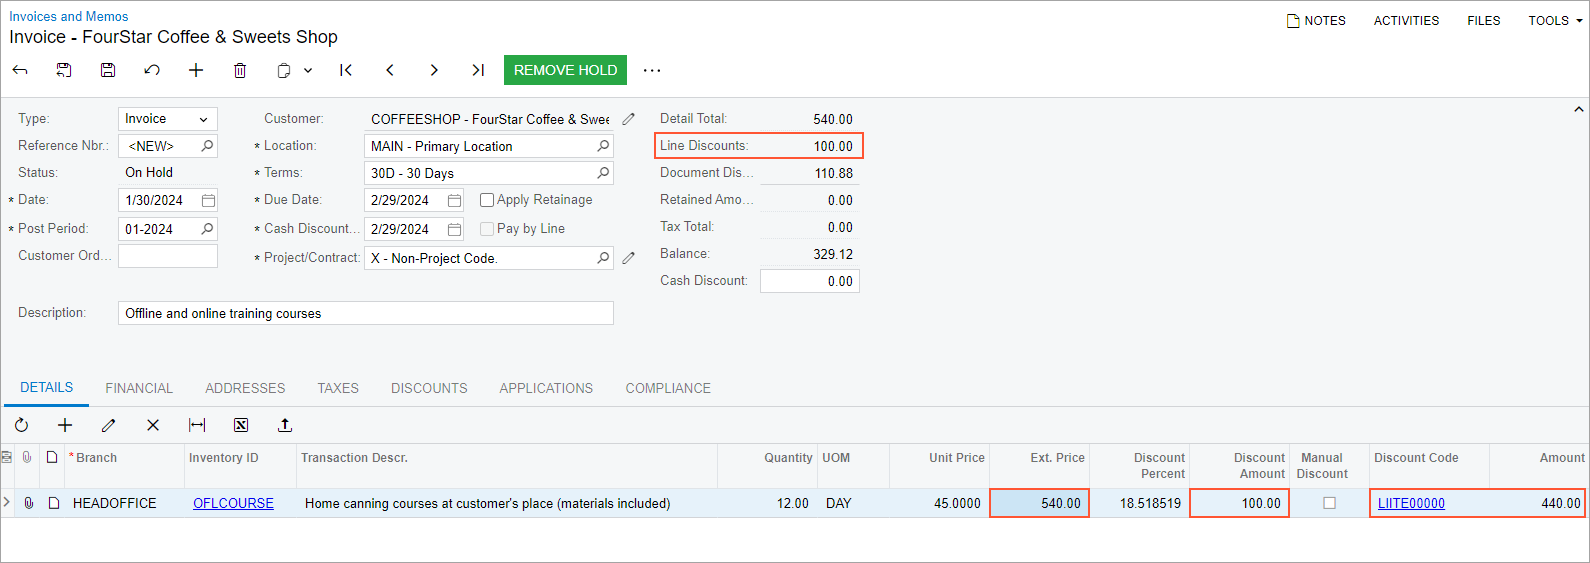
Notice that the Discount Code column in the line now contains LIITE00000. This is the automatic line discount of $100 that you configured for 10 or more days of offline training on January 30, 2025.
The Ext. Price column shows the amount before the discount (540) and the Amount column shows the amount with the automatic line discount applied (440).
The Discount Amount column shows the discount amount ($100). The same amount is shown in the Line Discounts box in the Summary area (see the following screenshot).
Figure 1. Invoice with automatic line discount applied 
- Click Add Row on the table toolbar, and specify the
following settings in the added row:
- Branch: HEADOFFICE
- Inventory ID: ONLCOURSE
- Quantity: 5
- UOM: DAY
- Unit Price: 13
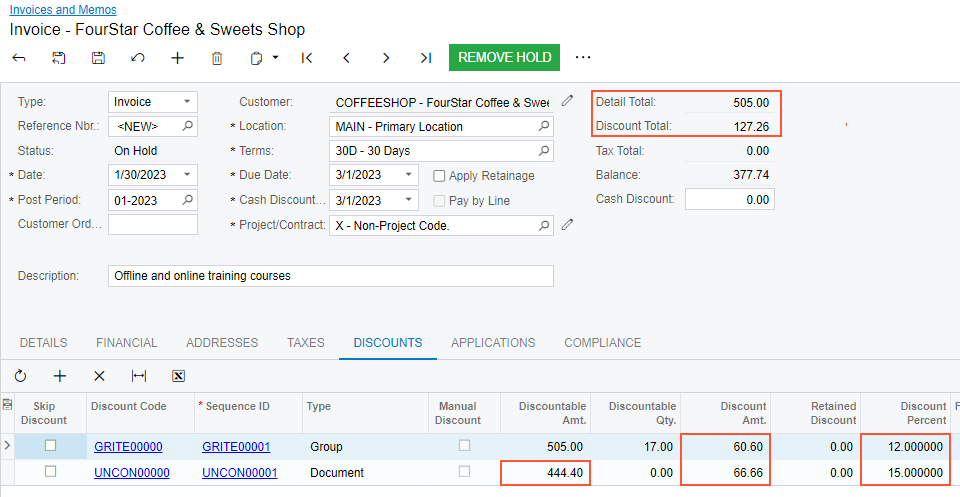
Review the Discounts tab. Notice that lines have been added for the following discount codes, whose automatic discounts have been also applied to the AR invoice:
- The GRITE00000 discount code (the group discount of 12% for
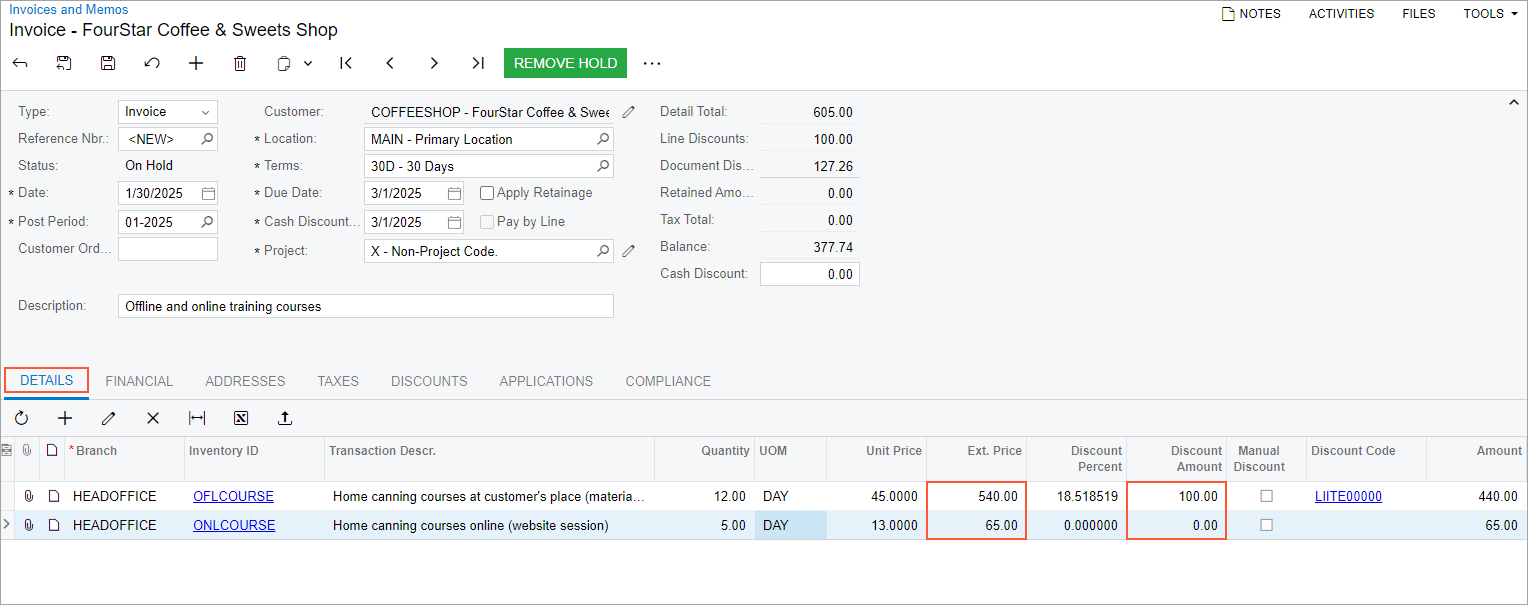
offline training on 1/30/2025). The Discountable Amt. for this discount is 505, which is the total amount for the OFLCOURSE and ONLCOURSE non-stock items after the line discount is applied ($540 + $65 - $100) (see the Ext. Price and Discount Amount columns on the Details tab in the following screenshot).
Figure 2. Details tab of the Invoices and Memos form with the automatic line discount applied 
The Discount Percent column of the Discounts tab contains the discount percent (12), and the Discount Amt. column contains the discount amount, which is automatically calculated by the system (60.60).
- The UNCON00000 discount code (the unconditional document discount
of 15% for amounts of $200 or more on 1/30/2025). The Discountable Amt. for this discount is 444.40, which is the total amount for the OFLCOURSE and ONLCOURSE non-stock items after the group discount is applied ($505 - $60.60). The Discount Percent column shows the discount percent (15), and the Discount Amt. column shows the discount amount (66.66), which is automatically calculated by the system (see the following screenshot).
Figure 3. Invoice with multiple discounts applied 
- On the form toolbar, click Remove Hold to assign the invoice the Balanced status, and then click Save.
Step 5: Releasing the AR Invoice and Reviewing the GL Transaction
To release the invoice, review the corresponding GL transaction, and analyze which accounts were updated, do the following:
- While you are still on the Invoices and Memos (AR301000) form, click Release on the form toolbar to release the invoice.
- On the Financial tab, click the link in the Batch Nbr. box.
- On the Journal Transactions (GL301000) form, which opens, review the
GL batch.
The 40000 - Sales Revenue account is credited in the amount of $505 ($440 + $65), and the 11000 Accounts Receivable account is debited in the amount of $377.74 (the balance of the invoice). The 53000 - Discount Given account is debited in the amount of the group and document discounts applied to the invoice ($127.26), as shown in the following screenshot.
Figure 4. GL batch with applied multiple discounts 
Tip:The applied discounts and the document amounts may differ if you have skipped any steps in this activity or previously configured any other applicable discounts.
Step 6: Making the Created Discounts Inactive
To make the discounts used in this lesson inactive so that they will not affect other documents later, do the following:
- Open the Discounts (AR209500) form.
- In the Summary area, specify the following settings:
- Discount Code: LIITE00000
- Sequence: LIITE00001
- Clear the Active check box to make the discount inactive.
- Save your changes.
- In the Summary area, specify the following settings:
- Discount Code: UNCON00000
- Sequence: UNCON00001
- Clear the Active check box to make the discount inactive.
- Save your changes.
- In the Summary area, specify the following settings:
- Discount Code: GRITE00000
- Sequence: GRITE00001
- Clear the Active check box to make the discount inactive.
- Save your changes.
