
Sales Invoice for Discounted Orders: To Add Discounted Sales Orders to a Sales Invoice
In this activity, you will configure two automatic document discounts. You will then explore how these discounts are applied to sales orders and learn how the system applies discounts to sales invoices that are prepared based on sales orders with different document discounts. Also, you will learn how to update the discount amount.
Story
Suppose that to facilitate sales in 2025, the SweetLife Fruits & Jams company has decided to introduce discounts for some customers. For FourStar Coffee & Sweets Shop (COFFEESHOP), $70 discount should be applied to sales orders when the total amount of all lines is $200 or more. For local customers, SweetLife is offering a 20% discount for sales orders when the total amount of all lines is $400 or more.
- A customer-specific document discount of $70
- A document discount of 20% specific for the LOCAL customer price class
You also need to create two sales orders for the FourStar Coffee & Sweets Shop customer, and notice how these discounts are applied.
Further suppose that before you have processed the sales orders, the sales manager has informed you that the discount percent for the second order changed to 25%. You need to update the discount percent in the second sales order and issue one invoice for both sales orders.
Configuration Overview
In the U100 dataset, the following tasks have been performed for the purposes of this activity:
- On the Enable/Disable Features (CS100000) form, the Customer Discounts feature has been enabled to support the discount functionality.
- On the Stock Items (IN202500) form, the APJAM08 and APJAM32 stock items have been created.
- On the Customer Price Classes (AR208000) form, the LOCAL customer price class has been created.
- On the Customers (AR303000) form, the COFFEESHOP customer has been created and assigned to the LOCAL customer price class.
Process Overview
You will add discount codes on the Discount Codes (AR209000) form, and then configure automatic document discounts on the Discounts (AR209500) form. You will create sales orders for a particular customer on the Sales Orders (SO301000) form, to which discounts can be applied.
You will update the discount on the Discounts form. On the Sales Orders form, you will recalculate the prices of the sales order being prepared.
To complete the processing of the sales orders, you will create and confirm a shipment for the sales orders on the Shipments (SO302000) form. On the Invoices (SO303000) form, you will create a sales invoice for two sales orders, making sure that the automatic document discounts for these sales orders are applied, and then release the invoice.
Finally, you will deactivate the discounts.
System Preparation
To prepare the system, do the following:
- Launch the MYOB Acumatica website with the U100 dataset preloaded, and sign in to the system as an accountant by using the johnson username and the 123 password.
- In the info area, in the upper-right corner of the top pane of the MYOB Acumatica screen, make sure that the business date in your system is set to 1/30/2025. If a different date is displayed, click the Business Date menu button and select 1/30/2025. For simplicity, in this lesson, you will create and process all documents in the system on this business date.
- On the Company and Branch Selection menu, also on the top pane of the MYOB Acumatica screen, make sure that the SweetLife Head Office and Wholesale Center branch is selected. If it is not selected, click the Company and Branch Selection menu button to view the list of branches that you have access to, and then click SweetLife Head Office and Wholesale Center.
Step 1: Configuring the $70 Automatic Document Discount
You will configure the $70 automatic document discount to be applicable to only specific customers (at this time, only the FourStar Coffee & Sweets Shop). Do the following:
- Open the Discount Codes (AR209000) form.
- On the form toolbar, click Add Row, and specify the
following settings in the added row:
- Discount Code: DOC0100000
- Description: Automatic document discount by customer
- Discount Type: Document
- Applicable To: Customer
- Auto-Numbering: Selected
- Last Number: DOC0100000
These settings define discounts of this discount code as automatic document discounts that are applicable to specific customers (which will be only the FourStar Coffee & Sweets Shop in this example).
- On the form toolbar, click Save.
- Open the Discounts (AR209500) form.
- On the form toolbar, click Add New Record, and specify
the following settings in the Summary area:
- Discount Code: DOC0100000
- Discount By: Amount
- Break By: Amount (inserted by default)
- Active: Selected
- Description: Automatic document discount for COFFEESHOP (by amount)
With these settings, the discount (of the discount code you just defined for automatic document discounts that are applicable to specific customers) is by amount, with break points by amount.
In this case, the value in the Break By box is inserted automatically based on the discount code configuration and cannot be changed by the user.
- On the Discount Breakpoints tab, click Add
Row on the table toolbar, and specify the following settings in
the added row:
- Pending Break Amount: 200
- Pending Discount Amount: 70
- Pending Date: 1/30/2025
The automatic document discount of $70 is applicable to a document with an amount greater than or equal to $200.
- On the Customers tab, click Add Row on the table toolbar, and in the Customer column, select COFFEESHOP. This automatic document discount is applicable to only this customer.
- On the form toolbar, click Save.
- On the form toolbar, click Update Discounts to make the discounts you have just added effective.
- In the Update Discounts dialog box, which opens, leave
1/30/2025 in the Filter Date box, and click
OK.
On the Discount Breakpoints tab, notice that the system has cleared the Pending Date column and the Effective Date column now contains 1/30/2025.
Step 2: Configuring the 20% Automatic Document Discount
To configure the 20% automatic document discount for local customers, do the following:
- Open the Discount Codes (AR209000) form.
- On the form toolbar, click Add Row, and specify the
following settings in the added row:
- Discount Code: DOC0200000
- Description: Automatic document discount by customer price class
- Discount Type: Document
- Applicable To: Customer Price Class
- Auto-Numbering: Selected
- Last Number: DOC0200000
These settings define discounts of this discount code as automatic document discounts that are applicable to specific customer price classes (which will be only the LOCAL customer price class in this example).
- On the form toolbar, click Save.
- Open the Discounts (AR209500) form.
- On the form toolbar, click Add New Record, and specify
the following settings in the Summary area:
- Discount Code: DOC0200000
- Discount By: Percent
- Break By: Amount (inserted by default)
- Description: Automatic document discount for local customers (by percent)
With these settings, the discount (of the discount code you just defined for automatic document discounts that are applicable to specific customer price classes) is by percent, with break points by amount.
In this case, the value in the Break By box is defined automatically based on the discount code configuration and cannot be changed by the user.
- On the Discount Breakpoints tab, click Add
Row on the table toolbar, and specify the following settings in
the added row:
- Pending Break Amount: 400
- Pending Discount Percent: 20
- Pending Date: 1/30/2025
The automatic document discount of 20% is applicable to a document with an amount greater than or equal to $400.
- On the Customer Price Classes tab, click Add Row on the table toolbar, and in the Price Class ID column, select LOCAL. This is the only price class to which the discount is applicable.
- On the form toolbar, click Save.
- On the form toolbar, click Update Discounts to make the discount you have just added effective.
- In the Update Discounts dialog box, which opens, leave 1/30/2025 in the Filter Date box, and click OK.
Step 3: Creating Sales Orders and Exploring Discount Application
To create two sales orders for the COFFEESHOP customer and observe how discounts are applied, do the following:
- Open the Sales Orders (SO301000) form.
- On the form toolbar, click Add New Record and specify the
following settings in the Summary area:
- Order Type: SO
- Customer: COFFEESHOP
- Date: 1/30/2025
- Description: Apple jam 8 oz
- On the Details tab, click Add Row
on the table toolbar, and specify the following settings in the added row:
- Branch: HEADOFFICE
- Inventory ID: APJAM08
- Warehouse: WHOLESALE
- Quantity: 40
- UOM: PIECE
- Unit Price: 5.15
- On the Discounts tab, review the document discount that
has been applied to this sales order.
The DOC0100000 discount in the amount of $70 has been applied because the total amount of the order lines exceeds the break point of $200 (the value in the Discountable Amt. column is $206).
- On the form toolbar, click Save to save the sales order.
- Create another sales order by clicking Add New Record on
the form toolbar and specifying the following settings in the Summary area:
- Order Type: SO
- Customer: COFFEESHOP
- Date: 1/30/2025
- Description: Apple jam 32 oz
- On the Details tab, click Add Row
on the table toolbar, and specify the following settings in the added row:
- Branch: HEADOFFICE
- Inventory ID: APJAM32
- Warehouse: WHOLESALE
- Quantity: 25
- UOM: PIECE
- Unit Price: 16.60
- On the Discounts tab, review the document discount that
has been applied to this sales order.
The DOC0200000 discount in the amount of $83 (which is 20%) has been applied because the total amount of the order line meets the break point criterion of being $400 or more (the value in the Discountable Amt. column is 415).
- On the form toolbar, click Save to save the sales order.
Step 4: Updating the Discount Percent in a Sales Order
To update the discount percent for the DOC0200000 discount code in the sales order, do the following:
- While you are still on the Sales Orders (SO301000) form, on the Discounts tab, make sure that the sales order with the DOC0200000 discount code applied is opened.
- Click the DOC0200000 code in the Discount Code column. The Discounts (AR209500) form will open in a pop-up window.
- For the only row in the table on the Discounts form, specify the following settings:
- Pending Break Amount: 400
- Pending Discount Percent: 25
- Pending Date: 1/30/2025
- On the form toolbar, click Update Discounts to make the updated discount effective.
- In the Update Discounts dialog box, which opens, leave
1/30/2025 in the Filter Date box, and click
OK.
On the Discount Breakpoints tab, notice that the system has cleared the Pending Date column and the Effective Date column now contains 1/30/2025.
- Close the pop-up window and return to the sales order on the Sales Orders form.
- On the More menu (under Other), click Recalculate Prices.
- In the Recalculate Prices dialog box, which opens, leave
the default values and click OK.
On the Discounts tab, notice that the amount in the Discount Percent column has been updated to reflect the new value of 25%.
Figure 1. Updated discount on the Discounts tab of the Sales Orders form 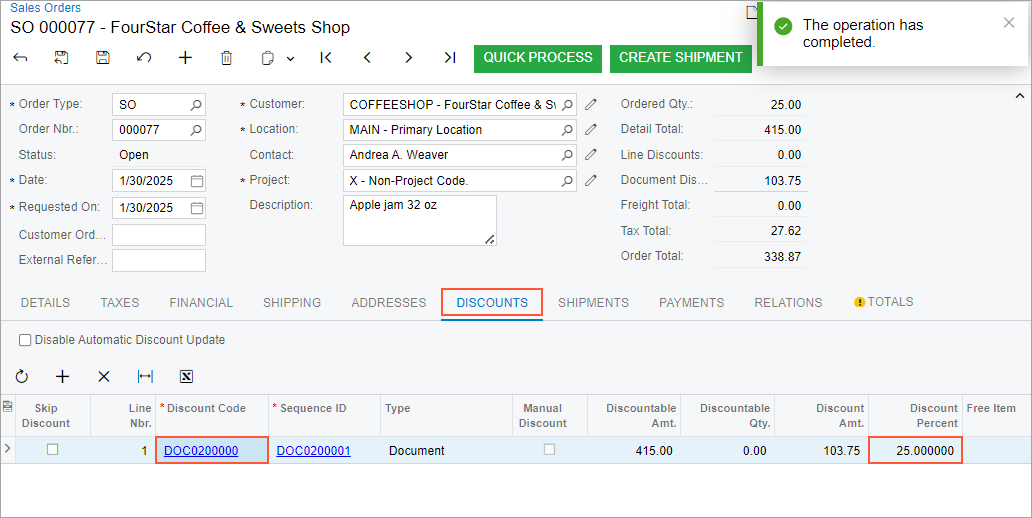
- On the form toolbar, click Save to save the sales order.
Step 5: Preparing a Sales Invoice for Both Sales Orders
To prepare a sales invoice for both sales orders, do the following:
- While you are still on the Sales Orders (SO301000) form, on the form toolbar, click Create Shipment.
- In the Specify Shipment Parameters dialog box, leave the default values and click OK.
- On the Shipments (SO302000) form, which opens with the newly created shipment, review the shipment details in the Summary area.
- On the Details tab, click Add Order on the table toolbar.
- In the Summary area of the Add Sales Order dialog box,
which opens, open the lookup table for the Order Nbr.
box, and select the sales order in the amount of $148.07 (see the following
screenshot). You created this order in Step 3.
Figure 2. The added sales order for the shipment 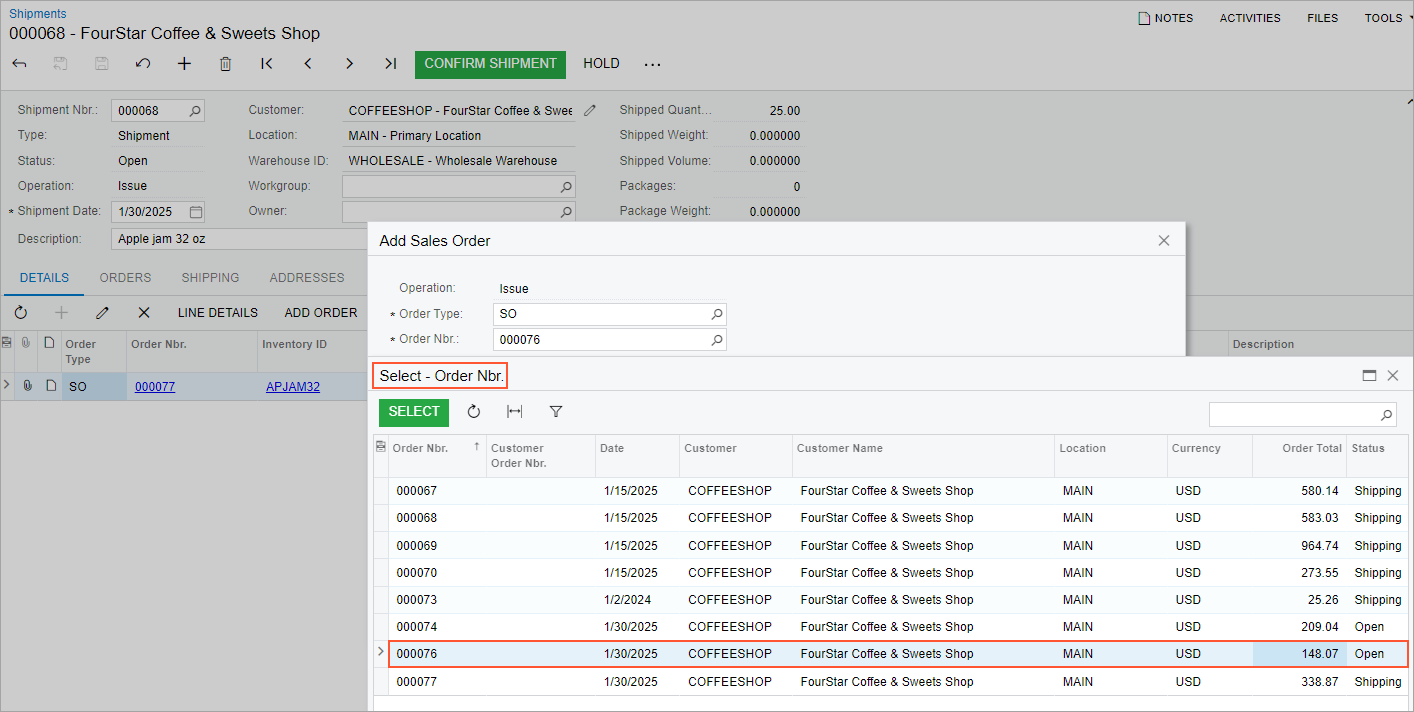
- In the table of the dialog box, select the unlabeled check box for the sales order line with the APJAM08 item and click Add & Close.
- On the form toolbar, click Save.
- On the form toolbar, click Confirm Shipment.
You have created and confirmed a single shipment for the sales orders that you created earlier in this activity.
- On the form toolbar, click Prepare Invoice.
- On the Invoices (SO303000) form, which opens with the prepared invoice, review the invoice that has been created for both sales orders.
- On the Discounts tab, review the discounts that have been
applied to the invoice generated from the sales orders.
As the following screenshot shows, the table contains two lines, one with the DOC0100000 automatic document discount in the amount of $70, and the other with the DOC0200000 automatic document discount by percent (25%) in the amount of $103.75.
Figure 3. Sales invoices with applied automatic document discounts 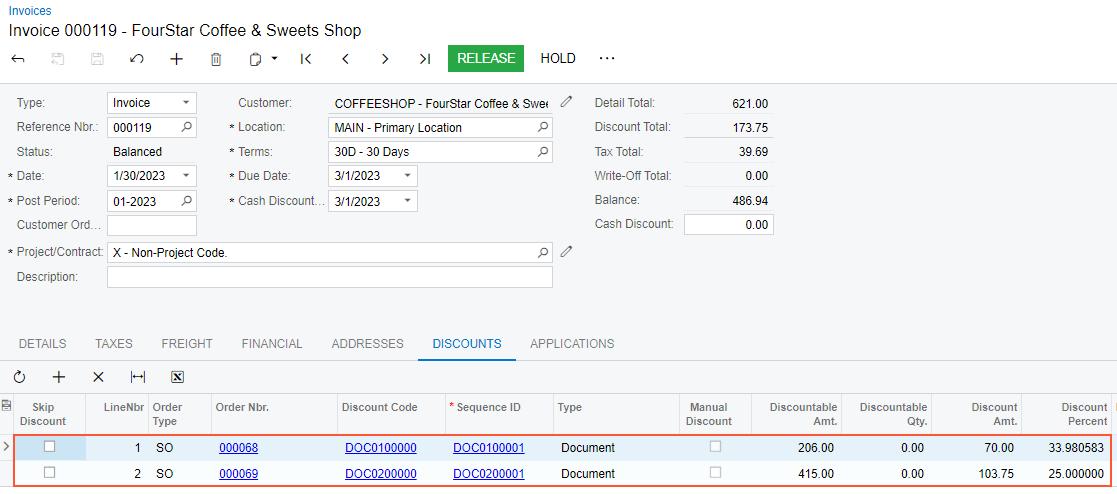
Tip:The amounts may be different from the ones in this step if some lessons in this course were skipped or the sales prices of stock items listed in the Configuration Overview section have not been defined in the system. - On the form toolbar, click Release to release the invoice and complete the processing of sales order.
Step 6: Making the Created Discounts Inactive
To make the discounts you created in this lesson inactive so that they will not affect other documents later, do the following:
- Open the Discounts (AR209500) form.
- In the Summary area, specify the following settings:
- Discount Code: DOC0100000
- Sequence: DOC0100001
- Clear the Active check box to make the discount inactive.
- Save your changes.
- In the Summary area, specify the following settings:
- Discount Code: DOC0200000
- Sequence: DOC0200001
- Clear the Active check box to make the discount inactive.
- Save your changes.