
Service Contracts: To Create and Process a Service Contract Billed at Time of Service
In this activity, you will create and process a service contract that is billed after each appointment has taken place based on what was done during the appointment.
Story
Suppose that the GoodFood One Restaurant customer requires appointments on Mondays and Fridays of each week for one year, starting next week, and is willing to sign a contract. The service to be performed is the cleaning of the customer's equipment. The service manager of the SweetLife Service and Equipment Sales Center (Maia Davis) needs to create a service contract in MYOB Acumatica, and create a schedule of appointments, which will allow employees to generate appointments for each upcoming week.
Acting as the service manager, you need to create a contract, create a schedule for the appointment generation, activate the contract, and generate the appointments for the first two weeks.
Configuration Overview
In the U100 dataset, the following configuration tasks have been performed to prepare the system for this activity to be performed:
- On the Enable/Disable Features (CS100000) form, the Equipment Management feature (under Service Management) has been enabled.
- On the Branch Locations (FS202500) form, the WEST BRIGHTON branch location has been configured.
- On the Service Order Types (FS202300) form, the MRO service order type has been configured to generate sales orders to bill customers for provided services. That is, the Sales Orders option has been selected under Generated Billing Documents in the Billing Settings section. Also in this section, the IN sales order type has been selected as the Order Type for Invoice so that the processing of sales orders does not require shipments.
- On the Billing Cycles
(FS206000) form, the following settings have been specified for the AP AP
billing cycle:
- Run Billing For: Appointments
- Group Billing Documents By: Appointments
Based on these billing cycle settings, a separate billing document is generated for each appointment; this document presents the details of each service of the appointment.
- On the Customers (AR303000) form, the GOODFOOD (GoodFood One Restaurant) customer has been defined. The AP AP billing cycle has been specified for the customer on the Billing tab.
- On the Non-Stock Items (IN202000) form, the CLEANING non-stock item has been created. For this item, the Service is selected in the Type box on the General tab, and Time is selected in the Billing Rule box on the Price/Cost tab.
- On the Equipment (FS205000) form, the FSE00007 (Commercial citrus juicer with a production rate of 1.5 litres per minute) target equipment has been defined.
- On the Employees (EP203000) form, EP00000040 (Maia Davis) has been created, and the Staff Member in Service Management check box has been selected on the General Info tab.
- On the User Profile (SM203010) form, the SWEETEQUIP default branch and WEST BRIGHTON default branch location have been specified for Maia Davis.
Process Overview
In this activity, you will create a service contract on the Service Contracts (FS305700) form, create an appointment schedule on the Service Contract Schedules (FS305100) form, and then activate the contract on the Service Contracts form. You will then generate appointments for the contract on the Generate Maintenance from Contract Schedules (FS500300) form.
Step 1: Creating the Service Contract
To create the service contract billed at the time of service for the GoodFood One Restaurant, do the following:
- On the Service Contracts (FS305700) form, click Add New Record.
- In the Summary area, specify the following settings:
- Customer: GOODFOOD - GoodFood One Restaurant
- Description: Cleaning contract
- On the Summary tab (Contract
Settings section), specify the following settings for the
contract:
- Start Date: 1/30/2025
- Expiration Type: Expiring
- Duration: 1 Year
- Schedule Generation Type: Appointments
- In the Billing Type box of the Billing Settings section, make sure that At Time of Service is selected. This setting means that the service contract will be billed after an appointment generated for it has taken place, based on what was done during the appointment.
- On the form toolbar, click Save.
Step 2: Creating an Appointment Schedule and Activating the Contract
Add a schedule to the service contract and activate the contract as follows:
- While you are still viewing the service contract on the Service Contracts (FS305700) form, on the
Schedules tab, click Add
Schedule.
The Service Contract Schedules (FS305100) form opens in a pop-up window.
- In the Summary area, in the Service Order Type box, make sure that MRO is selected.
- In the Scheduled Start Time box, select 10:00 AM.
- On the Details tab, add a row and specify the following
settings in the row:
- Inventory ID: CLEANING
- Target Equipment ID: FSE00007
- On the Recurrence tab, in the
Frequency box, select Weekly
and do the following in the Weekly Settings section:
- Leave Every 1 Week(s).
- Select the Monday and Friday check boxes. Clear Sunday.
- Leave the check boxes cleared for the remaining days of the week.
- Save your changes and close the pop-up window.
The system has created the schedule and added it to the Schedules tab of the Service Contracts form.
- On the Service Contracts form (to which you returned when you
closed the window with the Service Contract Schedules form), on the More
menu, click Activate.
The system changes the status of the contract from Draft to Active.
Step 3: Generating Appointments from the Contract
To generate appointments from the service contract, do the following:
- Open the Generate Maintenance from Contract Schedules (FS500300) form.
- In the Summary area, specify the following settings:
- Customer: GOODFOOD - GoodFood One Restaurant
- Generate Up To: 2/13/2025
- In the table, select the check box in the row with the schedule that you have created in the previous step.
- On the form toolbar, click Process.
The system opens the Processing dialog box, in which you can see the status of the process.
- After the processing has successfully completed, in the Processing dialog box, click Close.
The appointments have been generated for the service contract until 2/13/2025.
Step 4: Reviewing the Appointments Generated for the Service Contract
Review the appointments that have been generated for the service contract as follows:
- On the Service Contracts (FS305700) form, open the service contract that you created in the previous step.
- On the More menu (under Inquiries), click Appointment History.
- On the Appointment Summary (FS400100) form, which opens, clear the Staff Member box in the Selection area.
- In the To Scheduled Date box, select 2/13/2025.
The list of appointments generated for the selected service contract is displayed in the table (see the following screenshot).
Figure 1. The appointments generated for the service contract 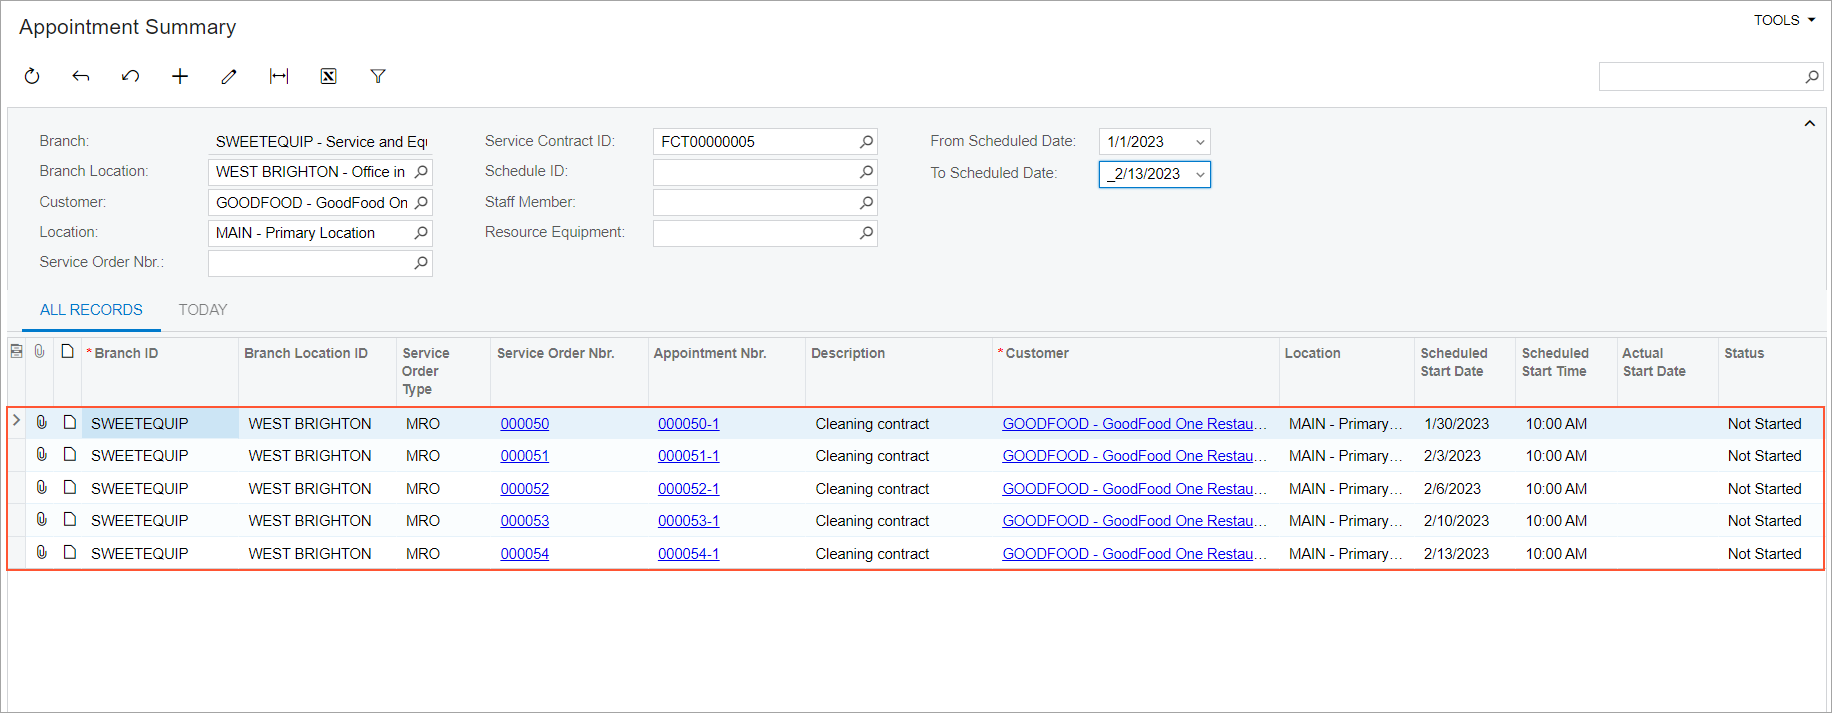
- Click an appointment reference number in the Appointment Nbr. column. The system opens the Appointments (FS300200) form. On the Details tab, confirm that the system has added the line from the Details tab of the Service Contract Schedules (FS305100) form. On the Other tab, notice that the reference numbers of the source service contract and source schedule are specified.