
Subcontracts: Process Activity
This activity will walk you through the process of working with a subcontract.
Story
Suppose that on March 15, 2025, the ToadGreen company hires a subcontractor, Standard Hardware Company, to install windows and doors in the hotel that is being built by ToadGreen. Both parties agree that the Standard Hardware Company will perform the installation of windows, the installation of doors and frames, and the building an entrance. Normally, this subcontractor does not require the printing of documents, but for this subcontract, the construction project manager of the ToadGreen company has decided to create and print the subcontract. On March 25, 2025, when the subcontractor finishes its part of the work and sends an invoice to ToadGreen, ToadGreen’s project manager will create a bill and pay for the provided services.
Acting as the construction project manager, you will process all the needed documents in the system.
Configuration Overview
In the U100 dataset, the following tasks have been performed to support this activity:
- On the Enable/Disable Features (CS100000) form, the Construction feature has been enabled.
- On the Vendors (AP303000) form, the HARDCO (Standard Hardware Company) vendor has been created.
- On the Projects (PM301000) form, the HOTEL project has been created.
- On the Non-Stock Items (IN202000) form, the SUBCONTR non-stock item, which represents the work performed by subcontractors, has been created.
Process Overview
To record the work performed by a subcontractor for the project, you will create a subcontract document with the subcontractor (vendor) on the Subcontracts (SC301000) form. Then you will print the subcontract. After that, you will create a bill for the provided services on the Bills and Adjustments (AP301000) form, create a payment for the bill on the Checks and Payments (AP302000) form, prepare the check on the Process Payments / Print Checks (AP505000) form, and release it on the Release Payments (AP505200) form.
System Preparation
Before you start working with subcontracts, do the following:
- Launch the MYOB Acumatica website, and sign in as a construction project manager by using the ewatson username and the 123 password.
- In the info area, in the upper-right corner of the top pane of the MYOB Acumatica screen, make sure that the business date in your system is set to 3/15/2025. If a different date is displayed, click the Business Date menu button, and select 3/15/2025 on the calendar. For simplicity, in this activity, you will create and process all documents in the system on this business date.
- On the Projects Preferences (PM101000) form, on the General tab (General Settings section), select the Internal Cost Commitment Tracking check box. Save your changes to the project accounting preferences. This exposes the committed values of the budget.
Step 1: Creating a Subcontract
To create a subcontract, do the following:
- On the Subcontracts (SC301000) form, add a new record.
- In the Summary area, specify the following settings:
- Vendor: HARDCO (Standard Hardware Company)
- Date: 3/15/2025
- Start Date: 3/15/2025
- Description: Installation of windows, doors, and building of an entrance
- On the Details tab, add lines with the following
settings.
Inventory ID Project Project Task Cost Code Line Description UOM Ext. Cost SUBCONTR HOTEL 08 08-510 Windows EA 650000 SUBCONTR HOTEL 08 08-200 Doors and frames EA 442000 SUBCONTR HOTEL 08 08-800 Entrance EA 2000000 - In the Summary area, in the Subcontract Total box, make sure that the total is 3,092,000.
- On the Financial tab, clear the Do Not Print check box.
- On the form toolbar, click Remove Hold to assign the subcontract the Pending Printing status.
- On the Projects (PM301000) form, open the HOTEL project.
- On the Cost Budget tab, make sure that the committed cost
budget lines has been updated with the subcontract line amounts with the same
project task and cost code, as shown in the following screenshot.
The
Original Committed Amount and Committed
Open Amount has been increased by the amount in the
corresponding subcontract lines.
Figure 1. Cost budget updated with the subcontract amount 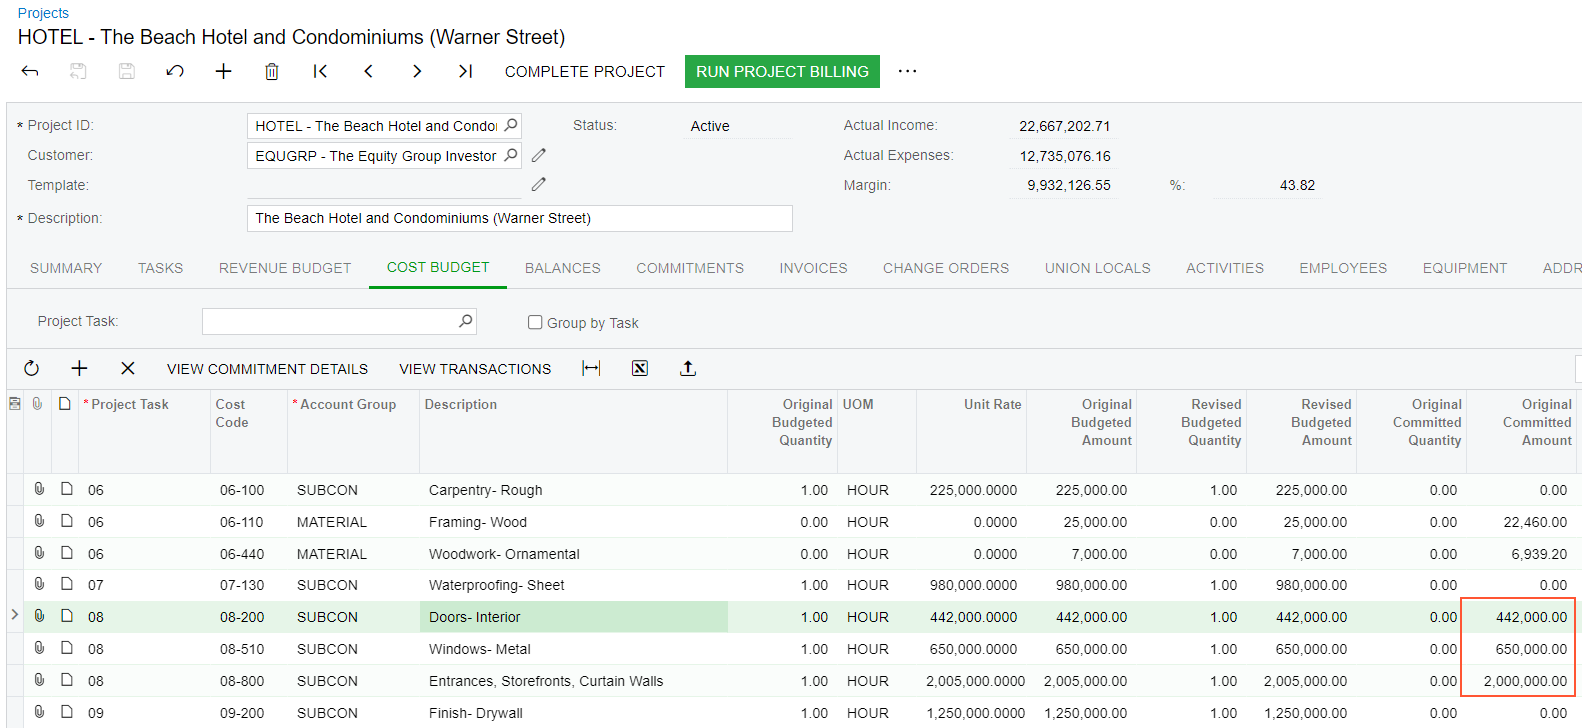
Step 2: Printing the Subcontract
To prepare the printable version of the subcontract, do the following:
- On the Subcontracts (SC301000) form, open the subcontract that you have created earlier in this activity, and click Print on the form toolbar. The system opens the printable version of the subcontract on the Subcontract (SF) (SC641000) report form.
- Review the printable version of the subcontract, and close the browser tab with
the printable subcontract to return to the subcontract on the Subcontracts form.Attention:For the purposes of this activity, you do not need to actually print the subcontract. In a production setting, you would click Print on the form toolbar to print the subcontract before closing the browser tab.
- Press Esc to refresh the form. Notice that the system has changed the subcontract status to Open.
Step 3: Paying for the Performed Work
To create the bill to pay for the subcontractor work, do the following:
- In the info area, in the upper-right corner of the top pane of the MYOB Acumatica screen, set the business date to 3/25/2025.
- While you are still on the Subcontracts (SC301000) form, click Enter AP Bill on the form toolbar. The Bills and Adjustments (AP301000) form opens with the prepared accounts payable bill.
- On the form toolbar, click Remove Hold to assign the bill
the Balanced status, and then click Release to
release the
bill.
On release of the bill for subcontract, the system transfers the billed amount from the Committed Open Amount to the Committed Invoiced Amount in the corresponding cost budget lines on the Cost Budget tab of the Projects (PM301000) form.
- On the form toolbar, click Pay. The system prepares a payment and opens it on the Checks and Payments (AP302000) form.
- On the form toolbar, click Remove Hold to assign the payment the Pending Print status, and then click Print/Process.
- On the Process Payments / Print Checks
(AP505000) form, which opens, click Process to process
the only selected line, which corresponds to the prepared payment. The system
opens a printable version of the check.Attention:For the purposes of this activity, you do not need to actually print the document. In a production setting, you would click Print on the form toolbar to print the check before closing the browser tab.
- Close the tab with the printable check. The system returns you to the tab with the Release Payments (AP505200) form, which it has opened.
- On the Release Payments form, make sure that the unlabeled check box is selected for the only line in the table, and on the form toolbar, click Process to release the AP payment. The system releases the payment and the payment application to the bill.
- In the Processing dialog box, which opens, click Close.
- On the Subcontracts form, again open the subcontract that you
have created earlier in this activity, which is now assigned the Closed
status. On the Billing tab, review the line that
corresponds to the bill that you have prepared for the subcontract. The bill is
also assigned the Closed status because it was paid in full.
Figure 2. The closed subcontract 
You have finished processing the subcontract.