
AI Assistant: Leveraging the AI Assistant
MYOB Acumatica 2026.1.1 introduces the AI Assistant—a chat window inside MYOB Acumatica where you can ask questions in plain language and quickly explore your data. Instead of checking multiple forms and reports to find answers, you can get answers immediately and act on them with just a click.
The AI Assistant can return answers as text summaries, tables, lists, charts, and pivot tables. You can jump directly to the relevant forms and records from the response.
To maximize the accuracy and relevance of the answers, you control which generic inquiries the AI assistant uses and how those inquiries are described in business language that's familiar in your company.
Working with this new tool is easy and straightforward. Read on to learn how you can leverage it.
What You Can Do with the AI Assistant
If you’re a user of the AI assistant, you can:
- Ask questions in everyday language: You can type a question using language you’d use with colleagues, such as What is this month's total income? or List 10 open invoices that were modified most recently.
- Drill down into records with just a click: If an answer includes the record ID or name, this ID or name is displayed as a link. Clicking the link opens the record in the main working area of the form—not in the chat window.
- Turn insights into dashboards and pivots: For certain answers, the AI Assistant offers to performs actions for you, such as creating a widget from a chart or generating a pivot table and placing it on a new dashboard. These actions also occur in the working area of the form, so you can build tools for further analytics straight from your conversation.
- Keep related questions together: Conversations are grouped into chats. Each chat stores your previous questions and answers—so you can return to your research later or build on it.
If you’re a system administrator, you can:
- Control which data the AI Assistant uses: Select the generic inquiries the AI Assistant should use; you can add or remove generic inquiries at any time. Only generic inquiries marked for AI use are used to answer your questions.
- Describe data in business language: Add short descriptions for specific fields and parameters and for the whole generic inquiry. These descriptions complement the technical structure and help the AI Assistant interpret questions more accurately.
- Monitor license usage: Track how many tokens you have used.
Review Your Sources
Behind the scenes, the AI Assistant relies on a defined set of generic inquiries and their descriptions. You can add more generic inquiries to this set or remove them from it. By default, the most popular generic inquiries are used as sources.
Add Generic Inquiries
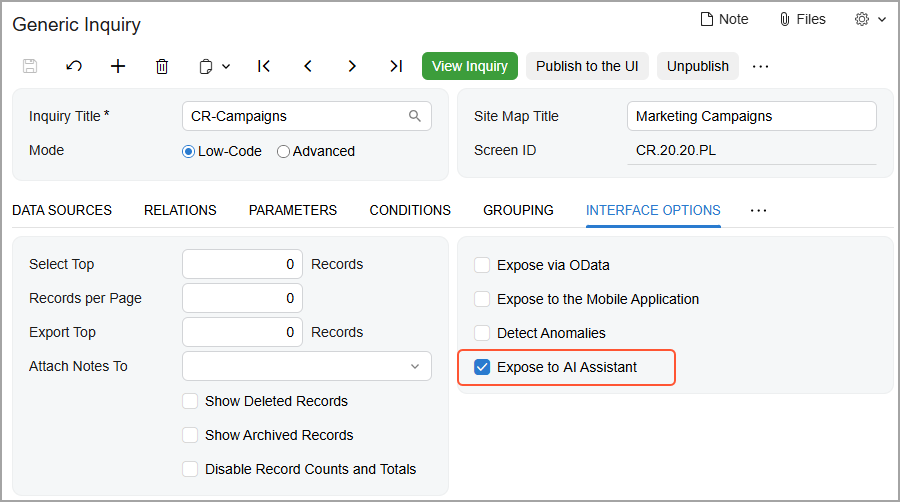
You can make any generic inquiry available to the AI Assistant by selecting the new Expose to AI Assistant check box on the Interface Options tab of the Generic Inquiry (SM208000) form, as shown below.
Add Descriptions
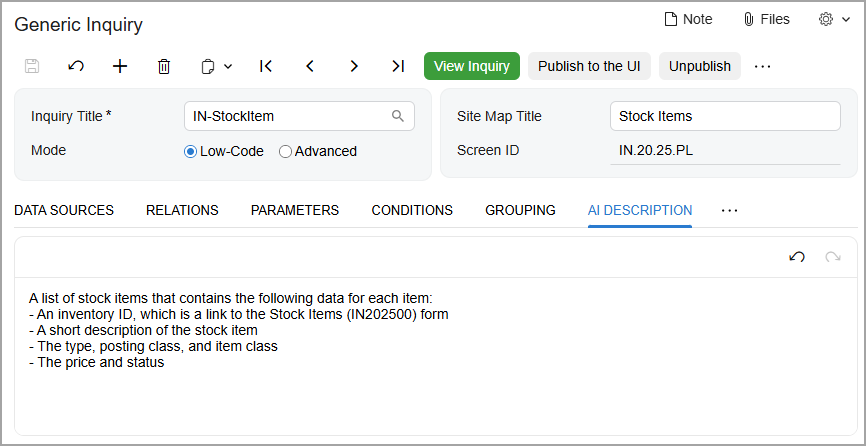
To help the AI Assistant understand users’ questions and provide better answers, you can add a description for the whole generic inquiry, as well as descriptions for any of its parameters and fields. You can use the rich text editor on the new Description for AI tab of the Generic Inquiry (SM208000) form to enter a short explanation of what the generic inquiry is for, as shown below.
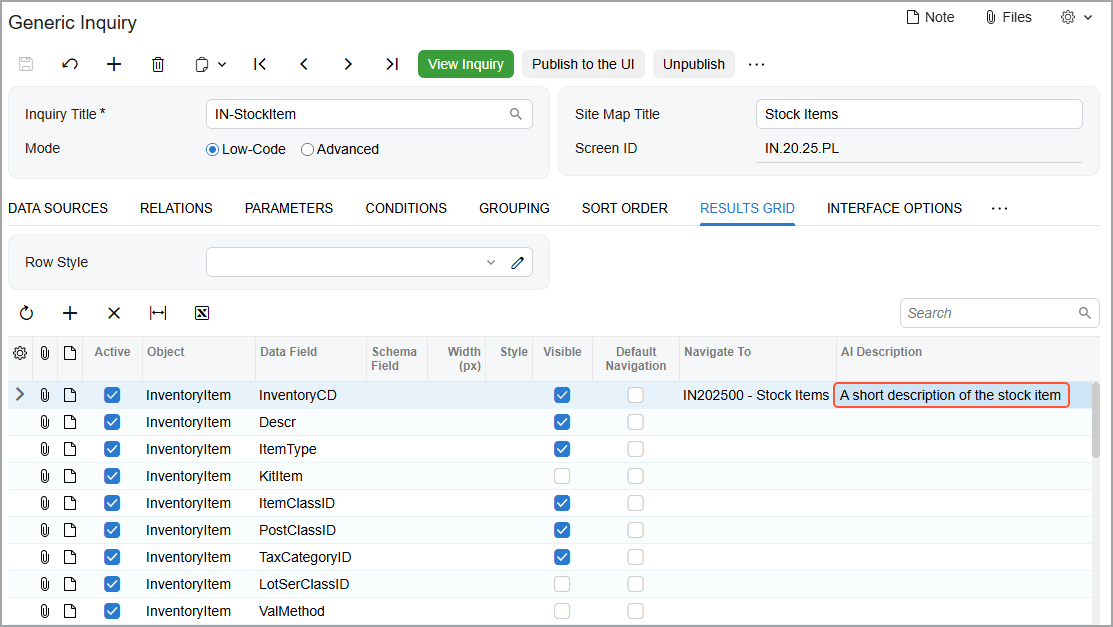
In the new Description for AI column on the Results Grid tab, add a short text for each data field—that is, column on the resulting inquiry form—where a explanation may be helpful (shown below).
Also, on the Parameters tab, you can add an instruction for using each parameter. (For example, for a date, you could enter Select the date up to which open invoices are included.)
The descriptions provide extra context that can improve answer quality, but specifying them is optional.
Process the Descriptions
After you expose a generic inquiry to the AI Assistant and add descriptions, you need to process this inquiry on the new AI Assistant Data Processing (ML503010) form. You either click Process All or select the needed records and click Process (Item 1 below). After the system processes the inquiries (Item 2), their data can be used by the AI Assistant.
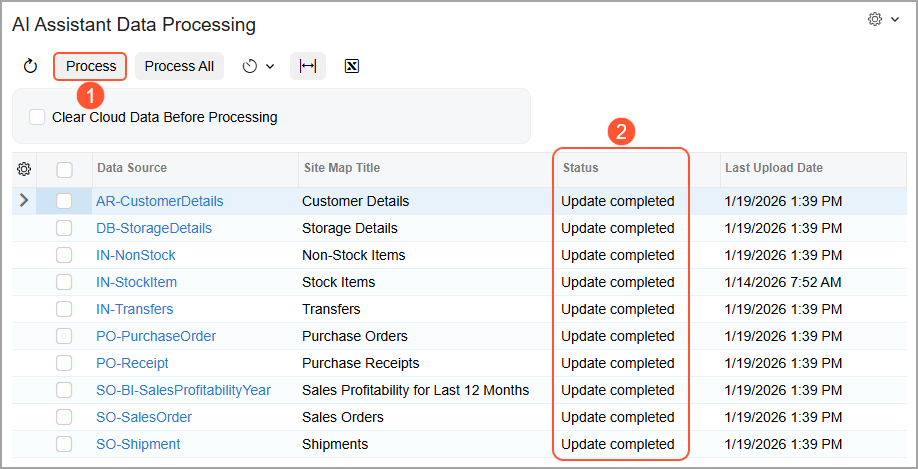
If you modify a generic inquiry, its status on the AI Assistant Data Processing (ML503010) form changes, indicating that this inquiry should be processed again, as shown below.
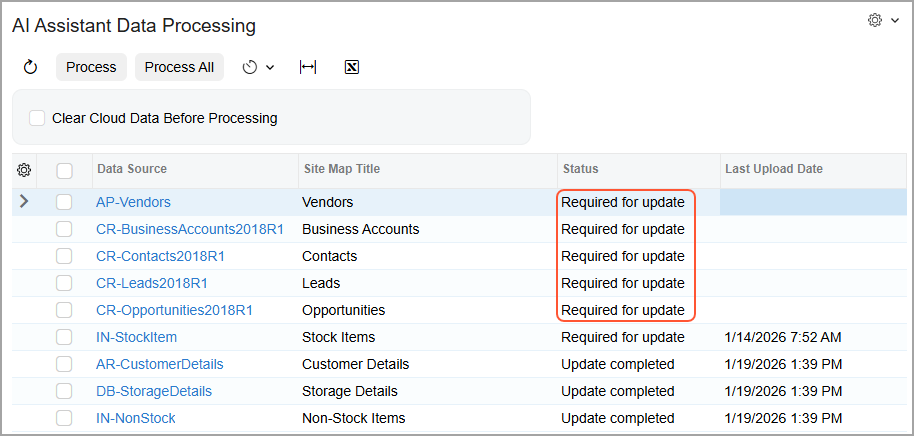
By default, the system uses the predefined AI Assistant GI Schema Upload schedule to process the descriptions. (This schedule runs once a week.) You can also run the process manually.
Use the New Role
To make it easier for you to work with the AI Assistant, the system includes the new AI Assistant User role. A user with this new role can open the AI Assistant and chat with it.
Also, users with the Administrator and Acumatica Support roles can use this functionality.
Ask Your Questions
After you've configured and processed generic inquiries, your AI Assistant is ready to use.
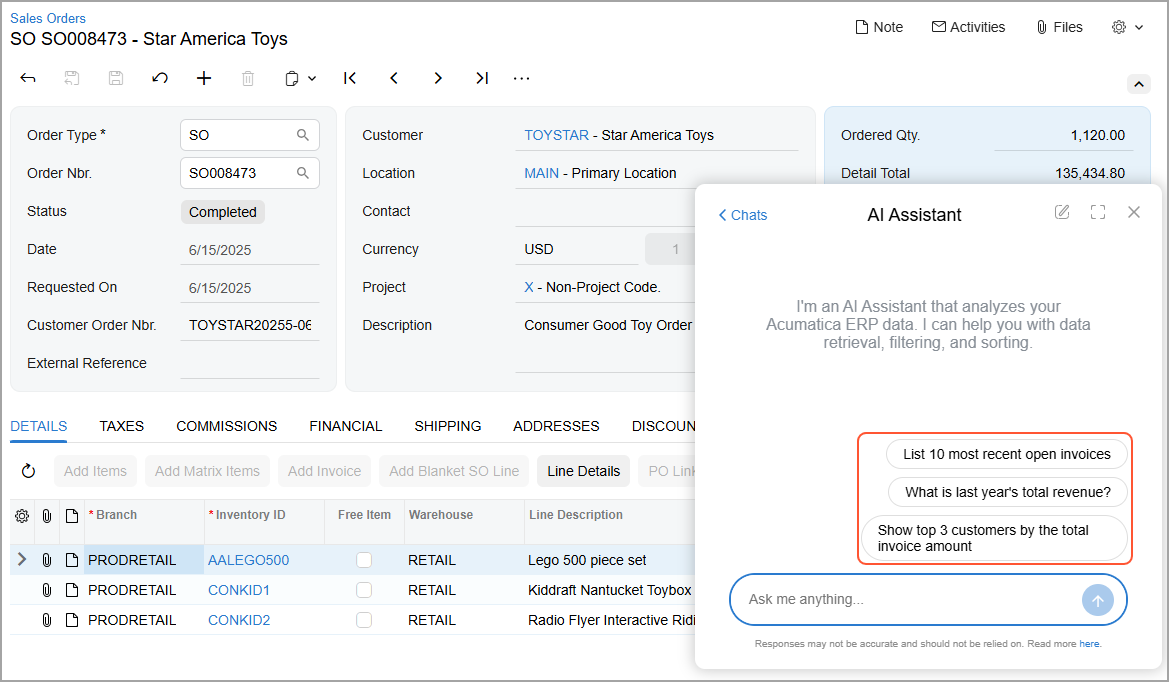
To start working with it, click  in the top pane. The chat window opens with the three predefined prompts (shown below).
You can click one of these prompts or type your own.
in the top pane. The chat window opens with the three predefined prompts (shown below).
You can click one of these prompts or type your own.
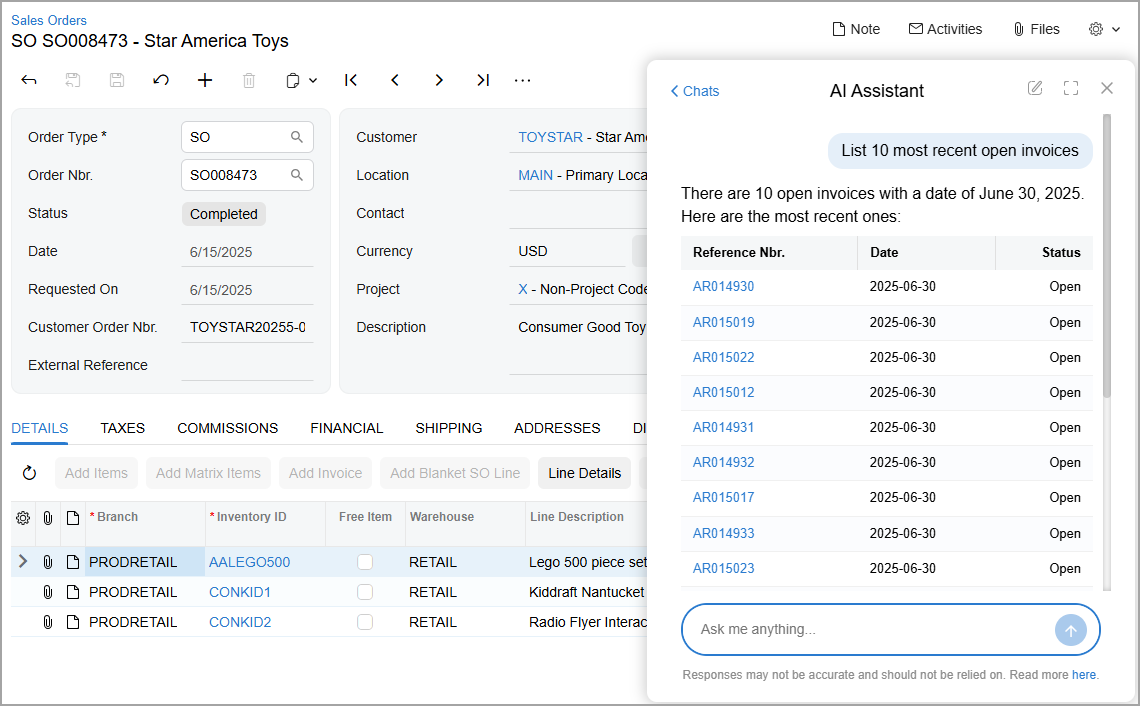
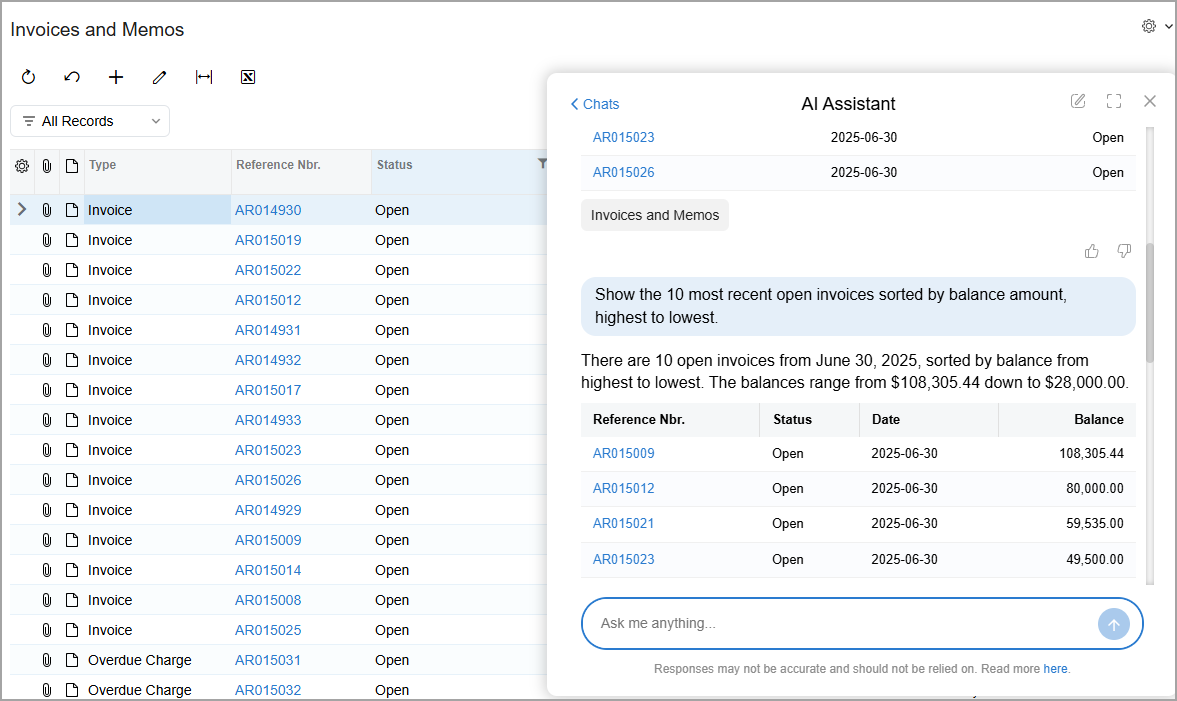
Suppose that you want to see the open invoices. The results that the AI Assistant provides are listed in a table (shown below).
You can click the link with the invoice reference number to open the invoice in the main working area. Alternatively, you can open the list of records created on the Invoices and Memos form (Item 1 below) or ask for more details (Item 2).
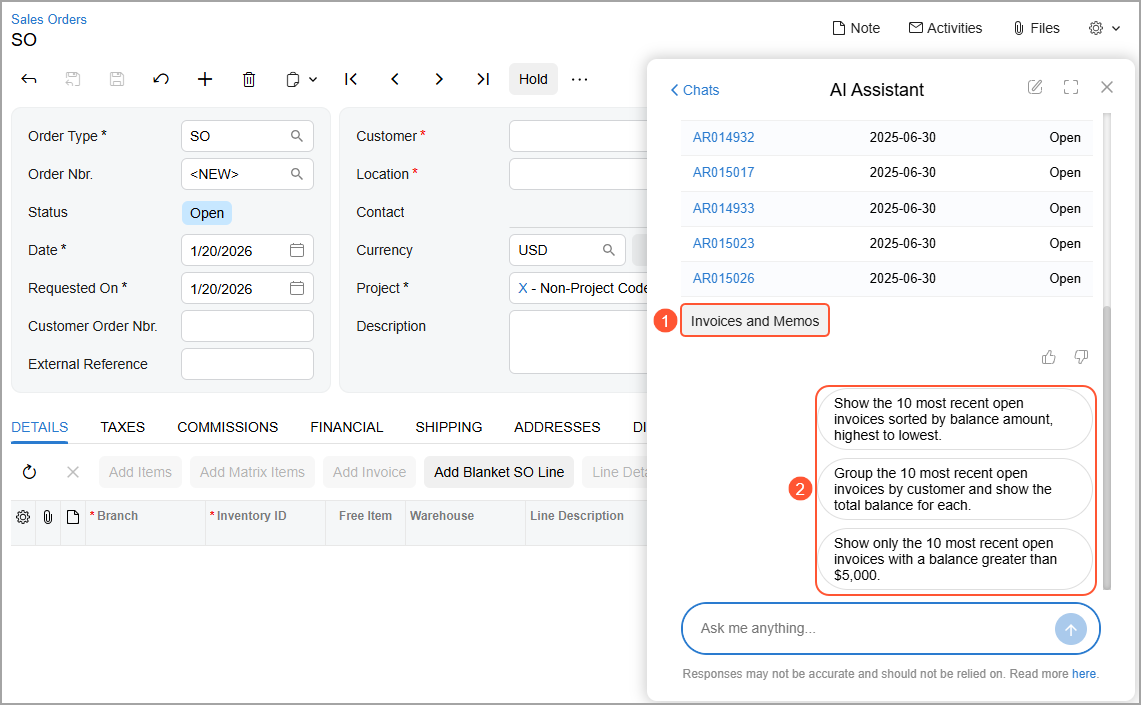
Notice that for the first follow-up prompt, the AI Assistant displays the results as text, a table, and a chart (shown in the next two screenshots). The columns in the chart are also links to the corresponding records. You can click View Chart to open a dashboard with this widget.
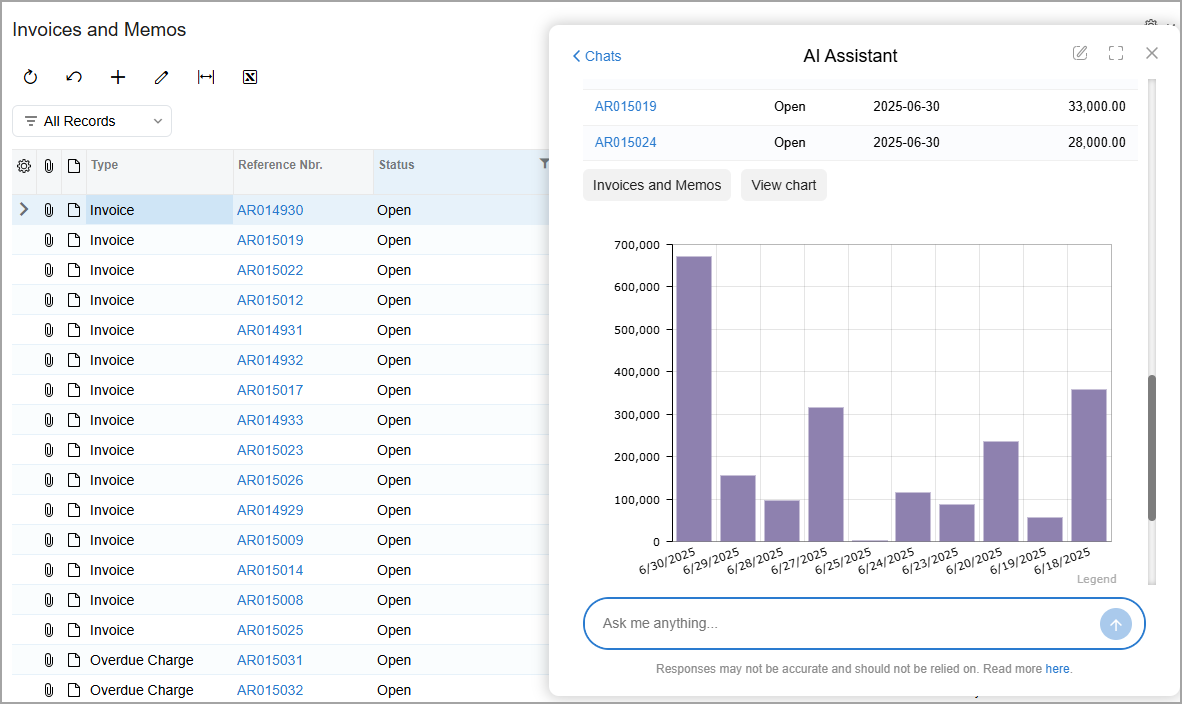
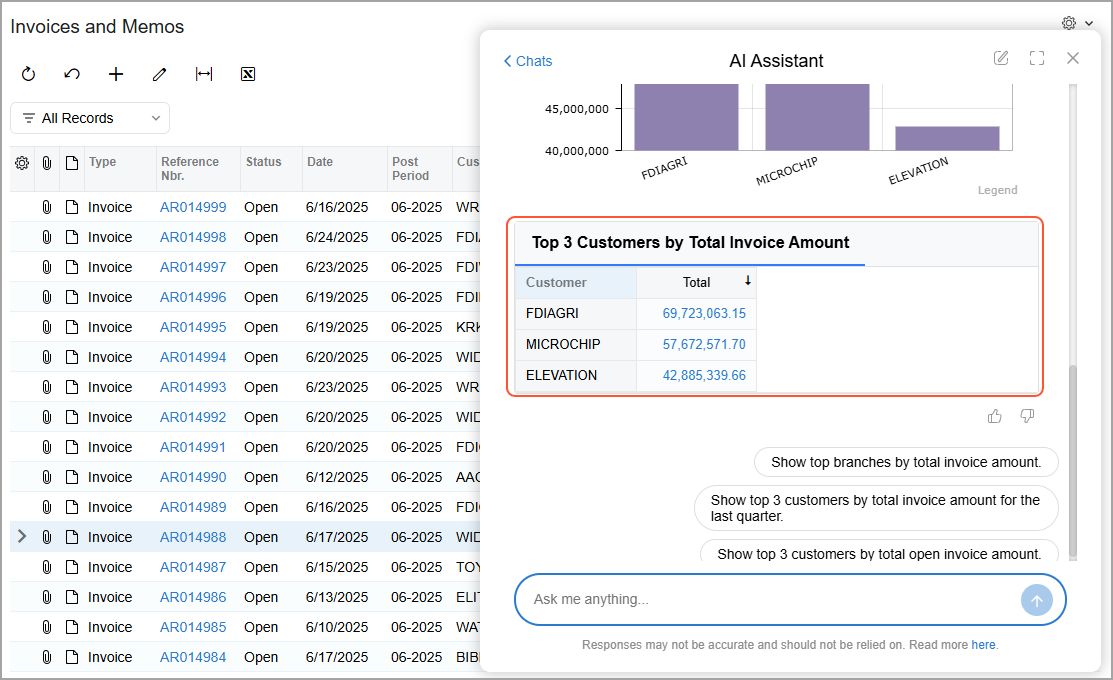
The AI Assistant can also organize data into a pivot table (shown below). Click the links in the table to open the corresponding records.
Manage Your Chats
Each time you click a predefined prompt or type a new one, the AI Assistant creates a chat. You can continue asking questions in this chat or go back to the list of chats, switch to another chat, or start a new one.
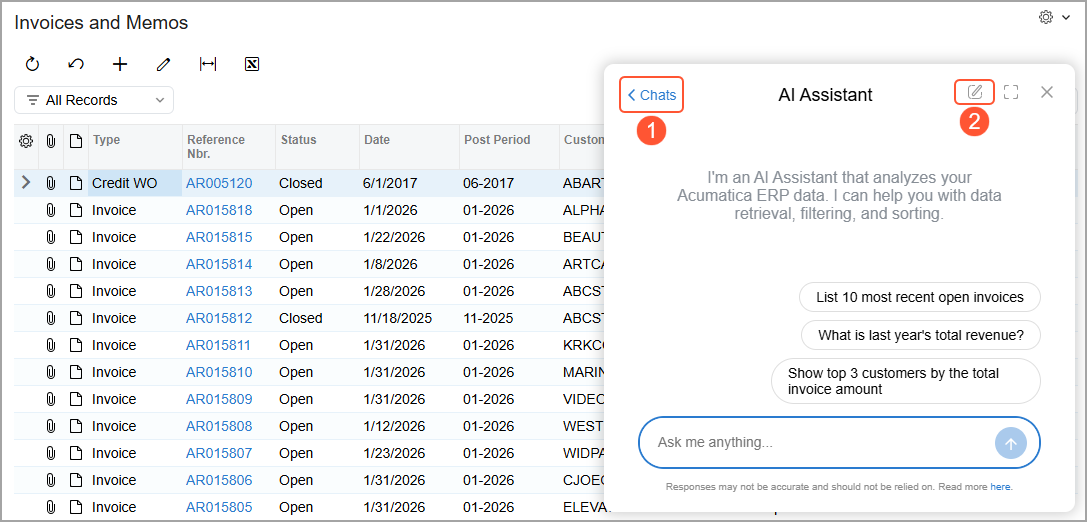
To get back to the list of chats, click the Chats link in the upper left corner of the window (Item 1 below). From this list, you can click another chat to switch to it. To start a new chat, click Create Chat (Item 2).
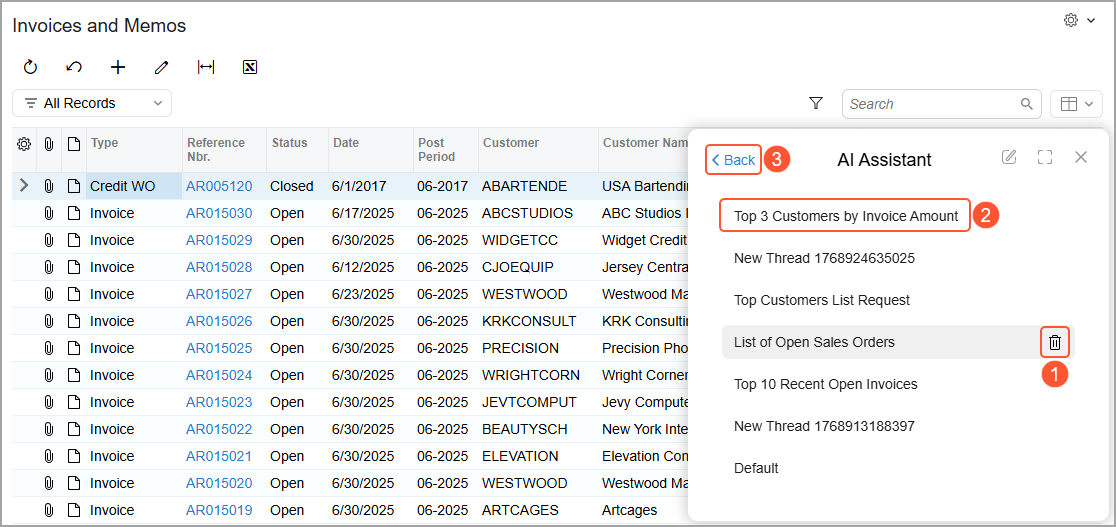
If you no longer need a chat, you can delete it (Item 1 below). Notice that the system has assigned a name to each chat based on your request (Item 2). Click the Back link to return to the previous chat (Item 3).
Monitoring Token Usage
To monitor your token usage, go to License Maintenance (201510) and check the AI Units license line. This shows your Limit, Usage, and Available units.

Learn More
For more information, see: