
Modern Customer Portal: A Reimagined Experience
MYOB Acumatica 2026.1.2 introduces the Modern Customer Portal—a reimagining of how your customers can use the portal to interact with your business online. Built on our Modern UI framework, this new portal delivers a streamlined experience and smooth integration with your MYOB Acumatica instance.
For brevity, we use portal users to refer to your customers’ employees—regardless of their roles—who use the Modern Customer Portal.
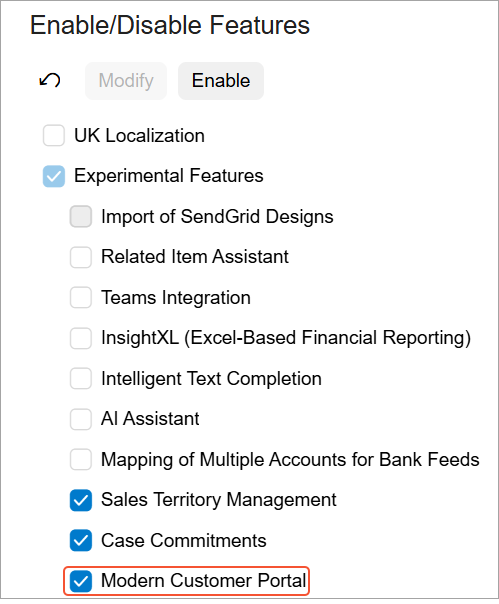
This functionality is available only if the Modern Customer Portal feature is enabled on the Enable/Disable Features (CS100000) form.
Let’s explore what the new portal delivers and how it benefits you.
What This Means for Your Business
With the Modern Customer Portal, you’ll save administrative time while giving your customers the ability to handle key interactions with your company:
- A centralized management approach means you no longer need to sign in to each customer portal separately. You can set up and maintain all portals from a single MYOB Acumatica form.
- Flexible configuration lets you tailor each portal to fit your brand and your customers’ needs.
- Role-based access ensures secure, controlled visibility for portal users without adding complexity.
- A modern, streamlined interface reduces support requests, increases satisfaction, and creates a more inviting shopping experience.
Enabling the Feature
On the Enable/Disable Features (CS100000) form, the new Modern Customer Portal feature switch has been introduced (see below). The Modern Customer Portal feature must be enabled before you can proceed with the portal configuration.
Requesting a Portal Instance
To get started, contact your business partner (or MYOB, if you are direct customer) to request a Modern Portal.
Managing All Your Portals in One Place
As an MYOB Acumatica administrator, you can use the centralized Portals (SP701000) form, shown below, to create and configure multiple portals directly in MYOB Acumatica—no need to sign in to each portal individually.
The General Tab
On the General tab of the form, you can turn on the availability of multiple categories and select the forms to be visible to portal users (Item 1).
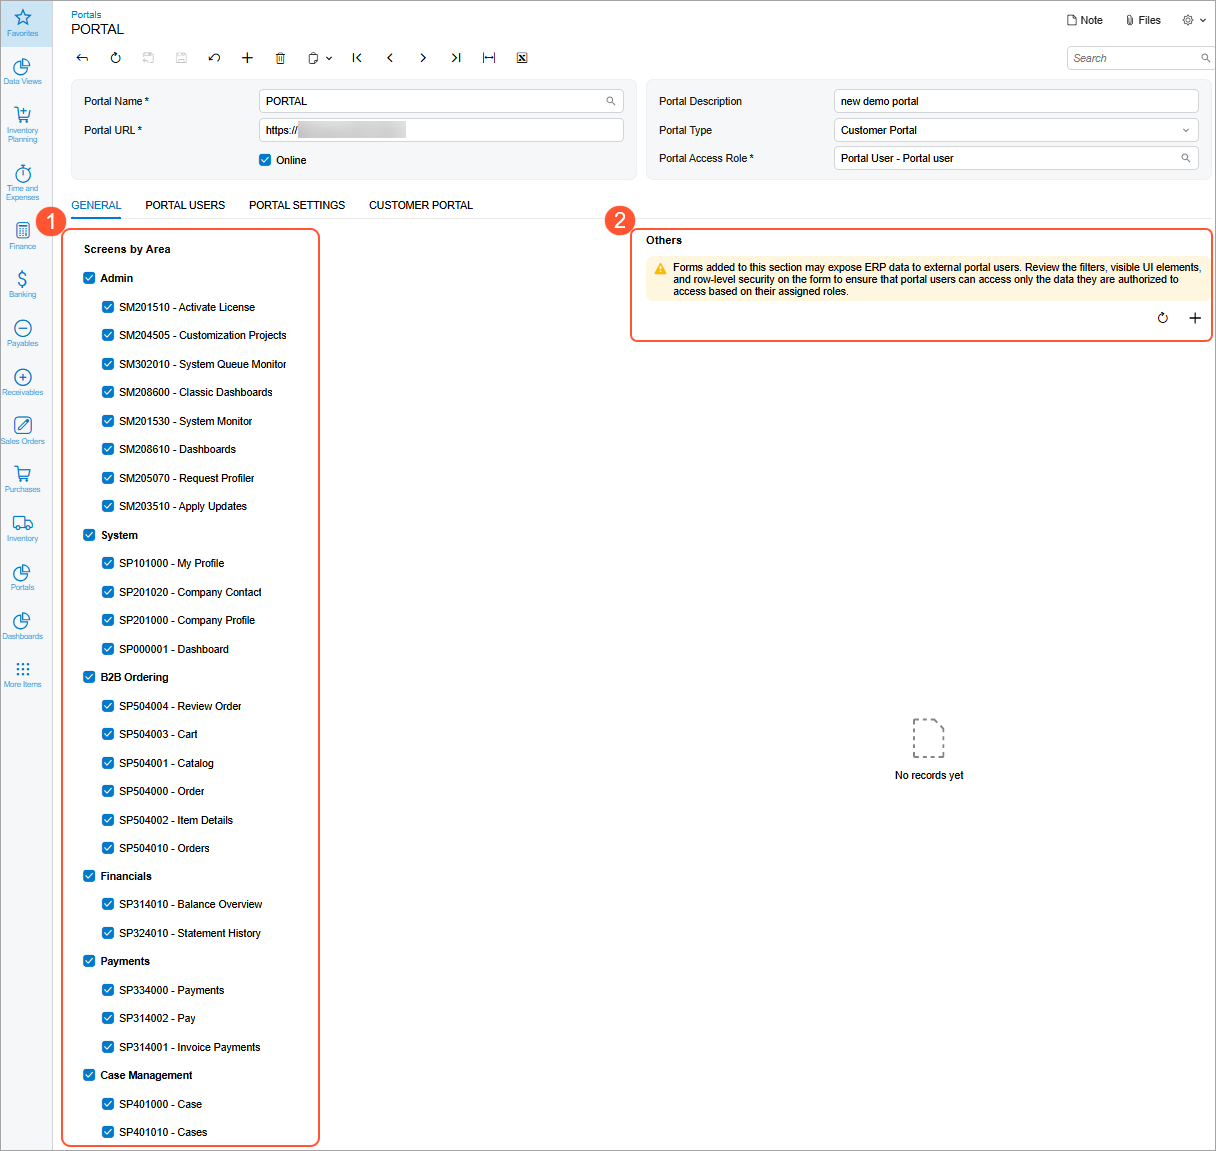
In the Others section (Item 2), you can select additional uncategorized forms that you want to make visible to portal users. These can include pivot tables, dashboards, or generic inquiry forms created in MYOB Acumatica and published to the portal.
If you add customized forms to the Modern Customer Portal, you must configure and verify all these forms' filters in MYOB Acumatica to prevent the exposure of sensitive customer data. Before publishing the forms, you should ensure that your company’s data is not visible to customers and that each customer’s data is hidden from other customers and their portal users.
For new forms made visible in the portal, you need to apply the required filtering so that portal users can access only the data authorized for their assigned roles. This includes properly configuring filters, visible UI elements, row-level security, and conditions by the customer’s associated business account.
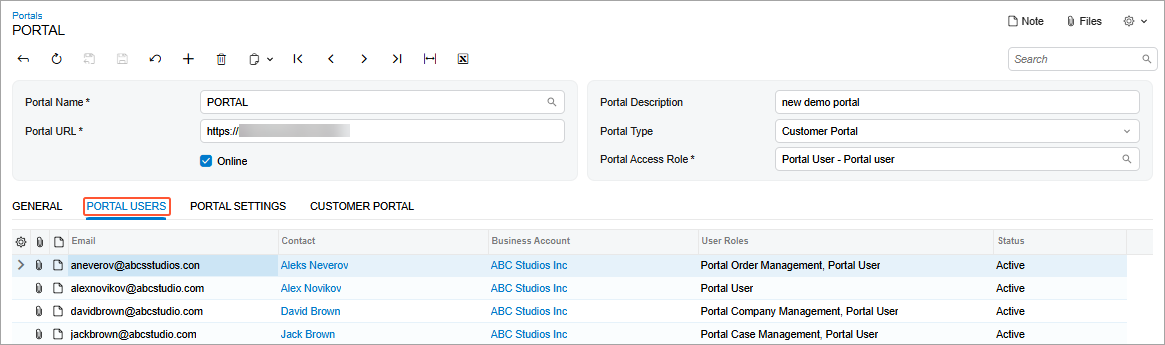
The Portal Users tab shows a list of this portal’s users, along with each user’s roles, email address, business account, and status.
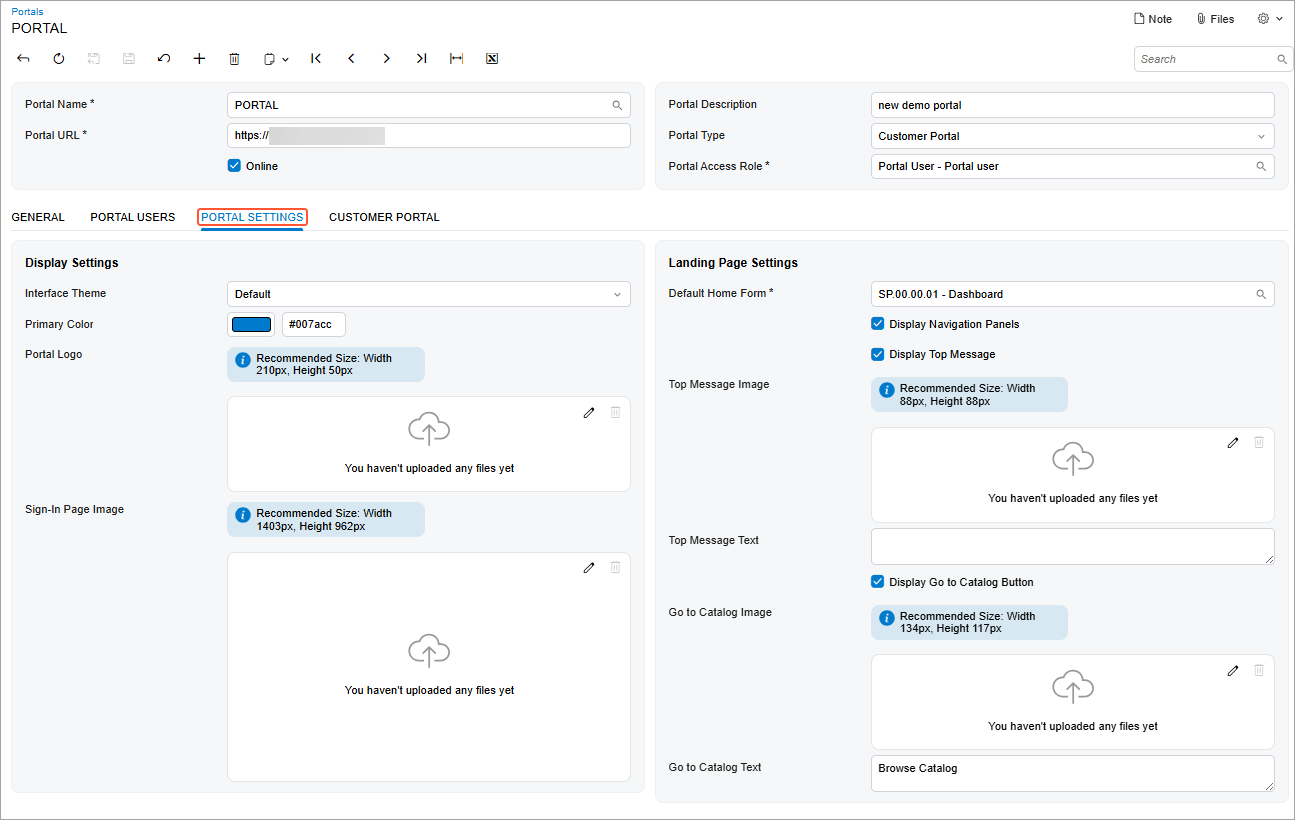
On the Portal Settings tab, you can specify the display and landing page settings to apply consistent branding.
On the Customer Portal tab, you can manage financial, payment, case, and order settings.
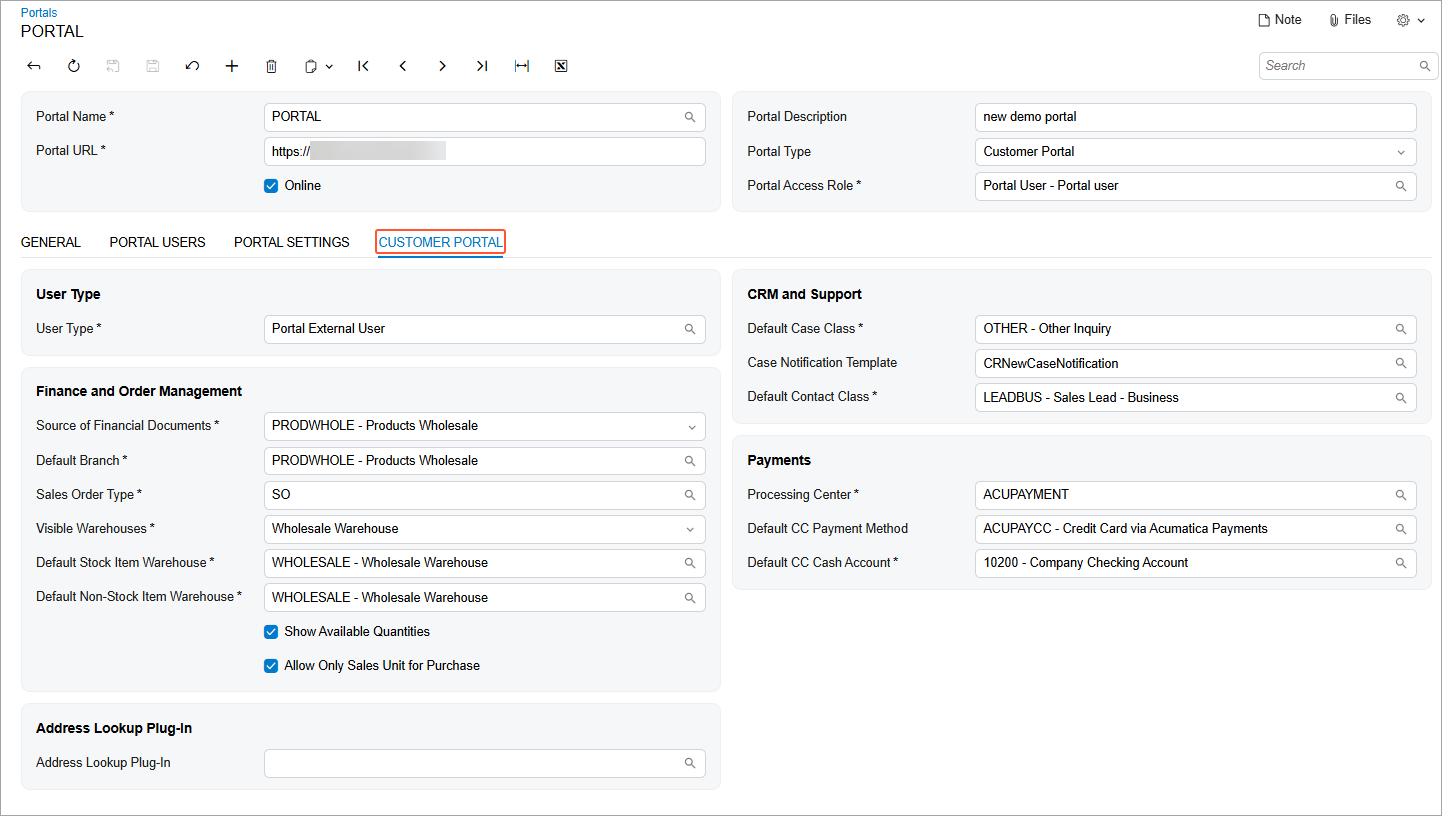
After specifying these settings, save your changes to create the portal.
Controlling Users’ Access with Ease
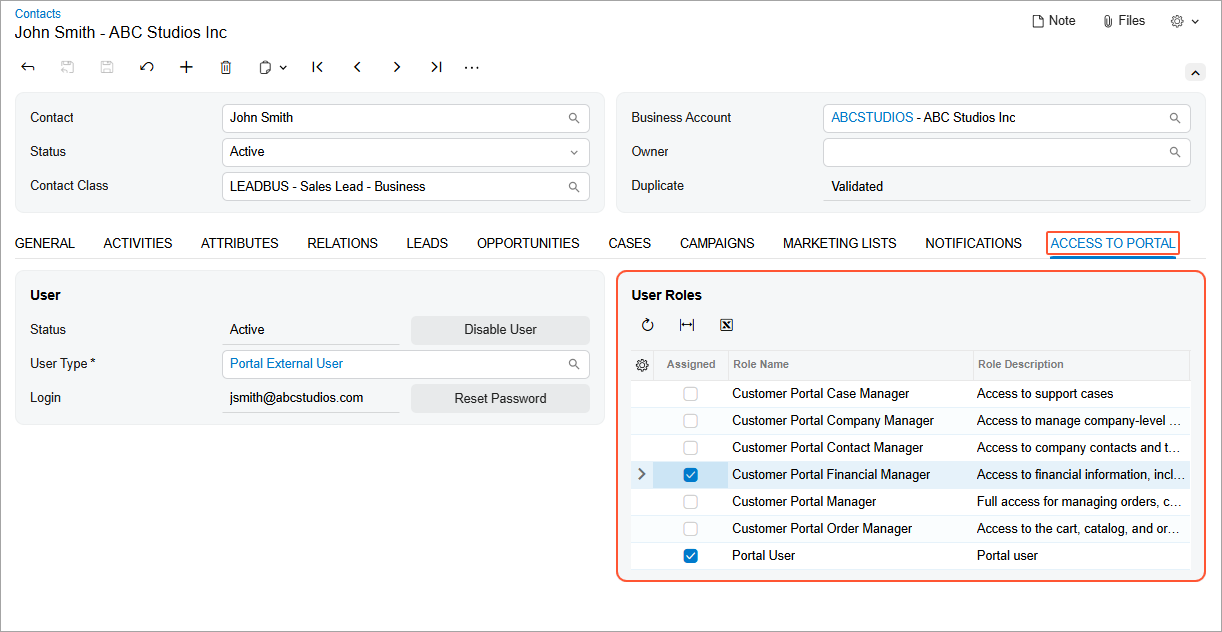
By using the smart role-based access model, you can control what each portal user—defined in your system as a contact—can see and do in the portal, based on their job responsibilities.
You can manage each portal user’s access on the Access to Portal tab of the Contacts (CR302000) form. In the User Roles table (shown below), assign one or more predefined roles that match this user’s job duties—giving them access to the right portal forms.
Beyond administrative efficiency, the new portal significantly enhances the customer experience.
Starting from a Modern, Comprehensive Home Page
The Modern Customer Portal delivers an updated interface based on the Modern UI. But the new portal isn’t just visually appealing—it also provides better performance and greater flexibility.
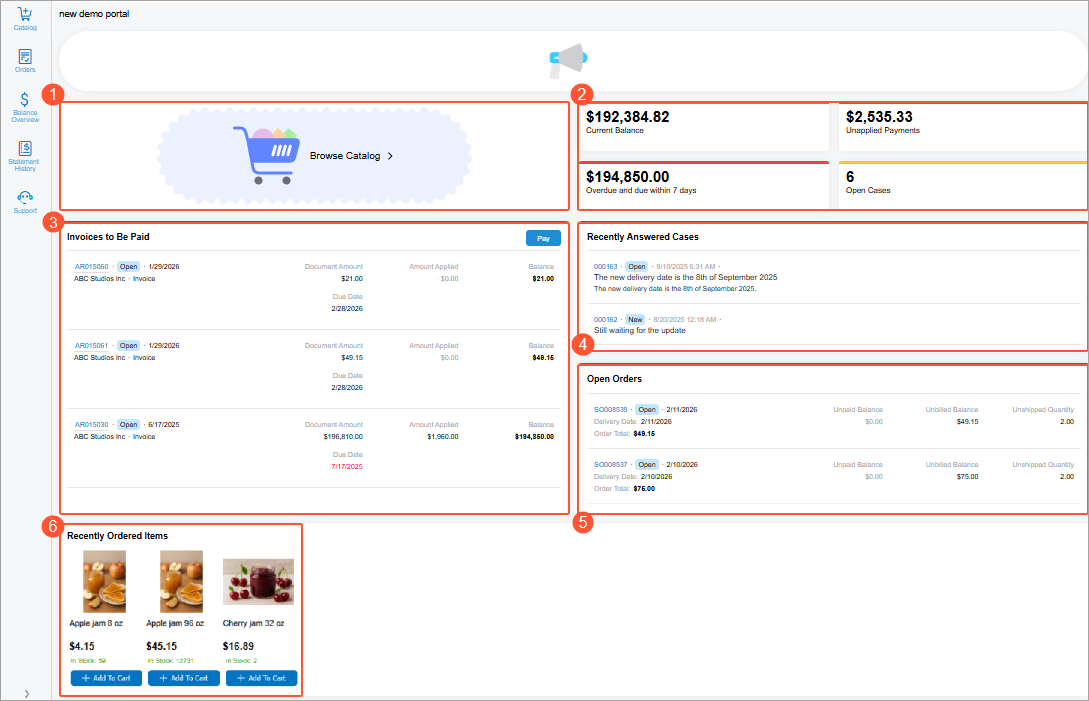
When portal users sign in, they go to the home page, which gives them the tools and information they need to get started:
- Browse Catalog (Item 1 below). This button provides one-click access to the catalog.
- Current Balance, Overdue and Due Within 7 Days, Unapplied Payments, and Open Cases (Item 2). These widgets show key financial data at a glance. Clicking any of the first three widgets opens the Balance Overview (SP314010) form; clicking Open Cases opens the Cases (SP401010) form.
- Invoices to Be Paid (Item 3). This list shows invoices and payments with the Open status. When the portal user clicks a link with a document’s number, a printable version of the document is downloaded to the computer. If the portal user clicks Pay, the Balance Overview form opens, showing invoices and payments with the Open status. The portal user can make partial or full payments.
- Recently Answered Cases (Item 4). This list shows the most recent cases to which the support team has responded. For each case, the system displays the case number (as a link), the status, the date and time of the latest update, and a preview of the latest message. Clicking the case number opens the case details on the Case (SP401000) form.
- Open Orders (Item 5). In this list, the portal user can view open orders. By clicking any order number, they can jump to the Order (SP504000) form to review the order’s details, print it, or even copy all items and quantities to the cart.
- Recently Ordered Items (Item 6). Here the portal user can click any previously ordered item to open it in the Item Details dialog box, view its details, and add it to the cart. Alternatively, they can click Add To Cart to add it directly.
Shopping with the Enhanced Catalog
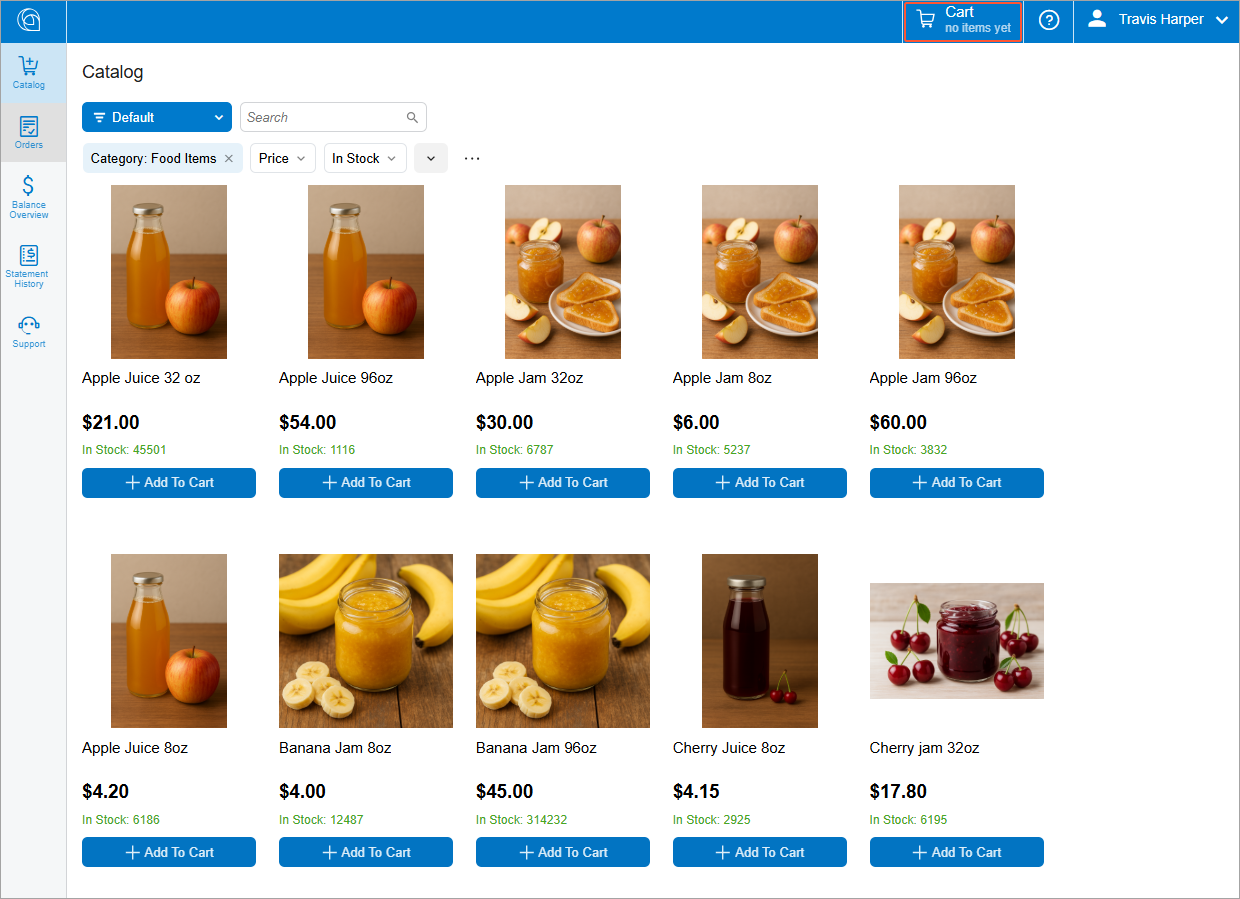
A portal user can now browse the catalog in the Modern Customer Portal and purchase products more efficiently. To do this, they add products directly to the cart on the Catalog (SP504001) form by clicking the Add To Cart button.
The Cart area always appears in the top pane (see below), regardless of which form is open—even when the cart is empty. When items are added, the Cart area instantly shows the updated quantity and total without the page reloading.
In addition, the portal user can add products to the cart through the Item Details dialog box (see below), which opens when they click the product image in the catalog or in the Recently Ordered Items section of the home page. In the dialog box, they can view the item’s description, specify additional settings, and add the item to their cart.
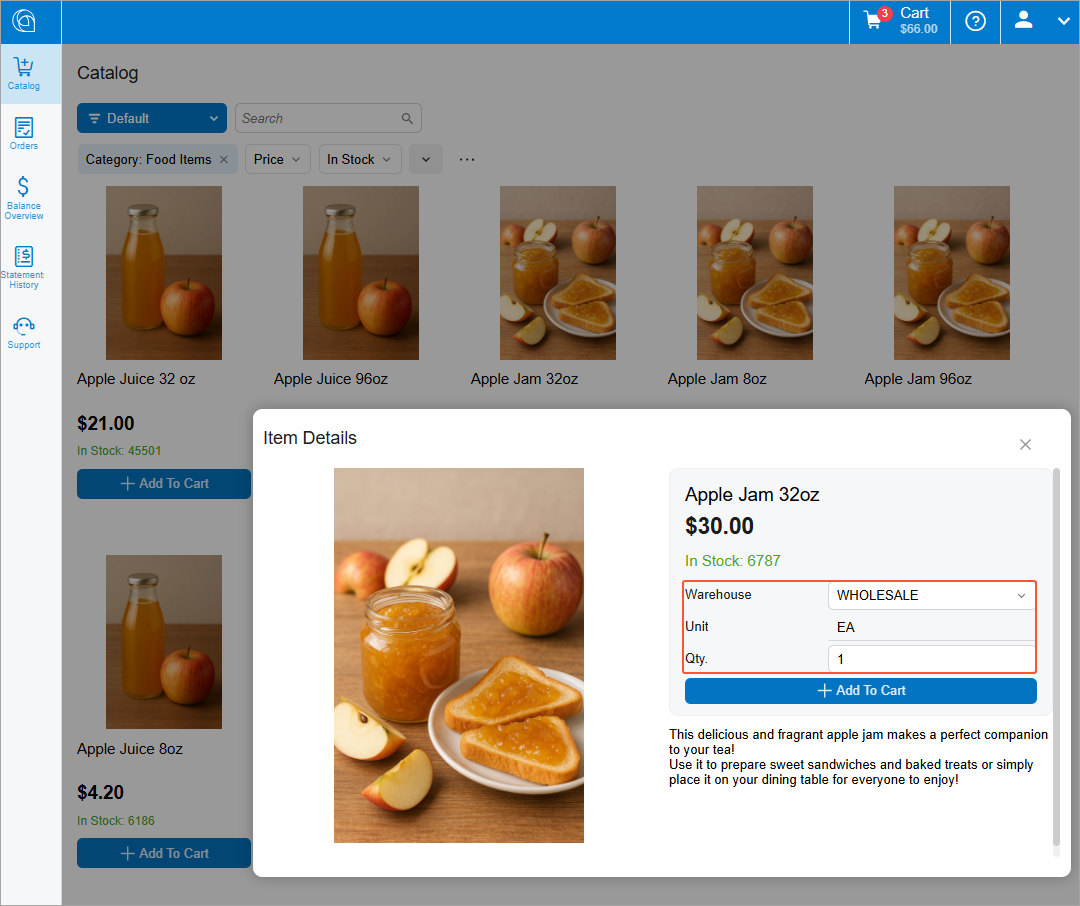
In this dialog box, the item quantity to be added is always shown; the portal user can change the default quantity before clicking Add To Cart.
The other boxes are shown based on the features enabled on the Enable/Disable Features (CS100000) form of MYOB Acumatica:
- Warehouse appears if the Inventory and Order Management
and Multiple Warehouses features are enabled. Tip:If only one warehouse is selected in the Visible Warehouses box on the Portals (SP701000) form, this warehouse is always used; the warehouse selector doesn’t appear.
- Unit appears if the Multiple Units of Measure feature is enabled.
Managing Financial Documents in One Place
Portal users with the appropriate access rights can work with financial documents and make payments in one place.
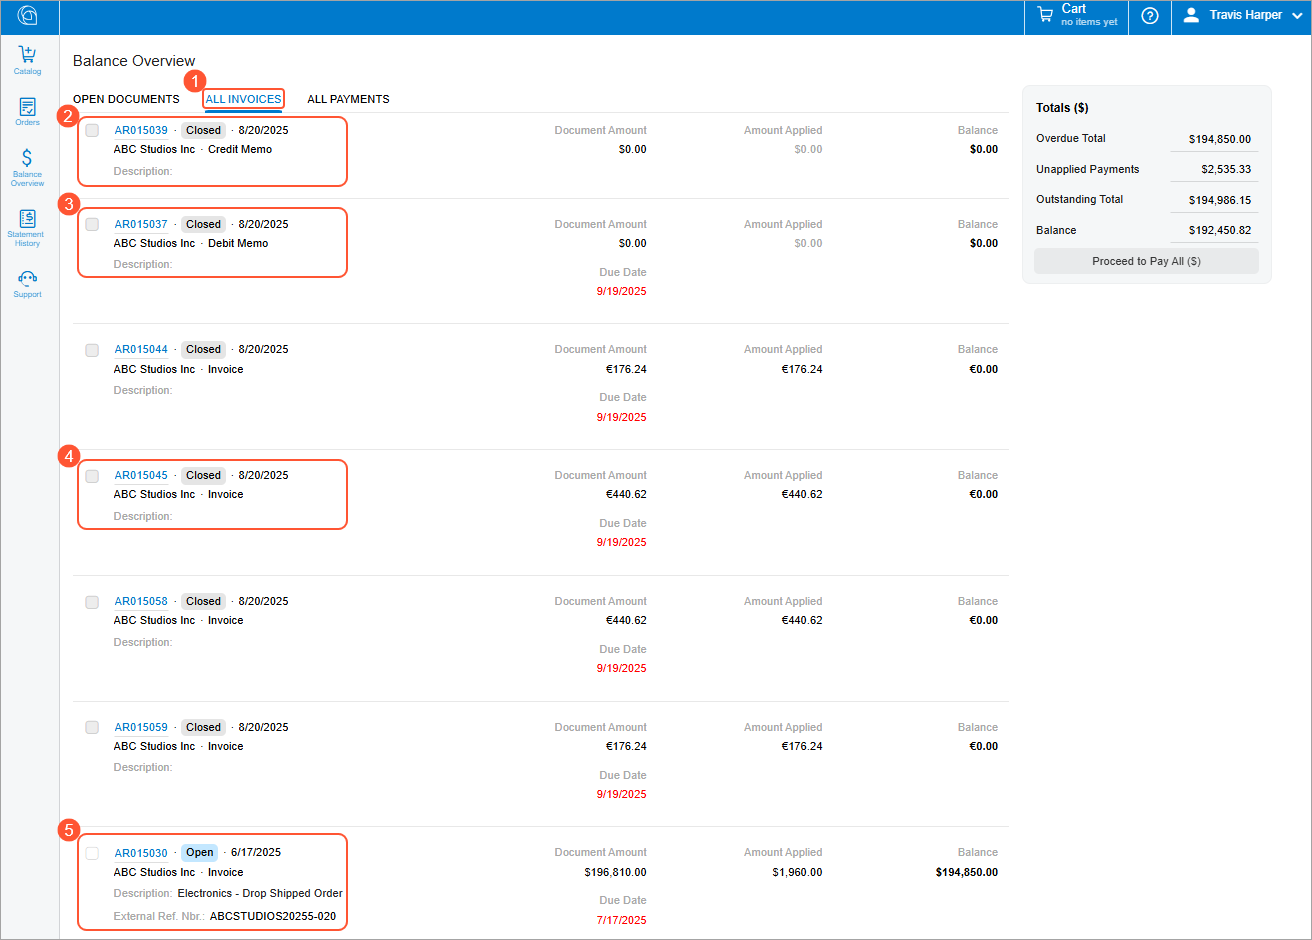
On the All Invoices tab (Item 1 below) of the Balance Overview (SP314010) form, they can access invoices (Item 4), credit and debit memos (Items 2 and 3), and overdue charges (Item 5).
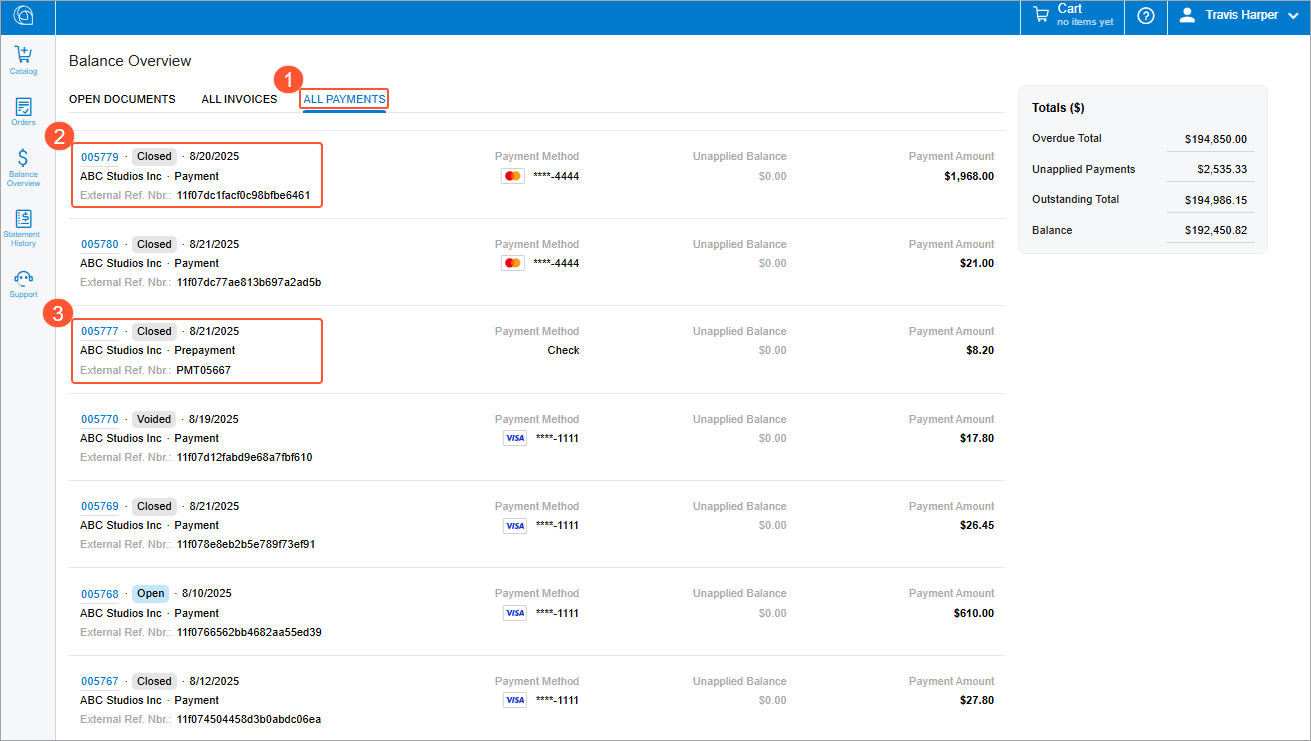
On the All Payments tab (Item 1 below) of the Balance Overview (SP314010) form, they can access payments (Item 2) and prepayments (Item 3).
On the Open Documents tab of the Balance Overview (SP314010) form, a portal user can initiate partial or full payments: They simply select the document or documents to be paid and then click Proceed to Pay, as shown below.
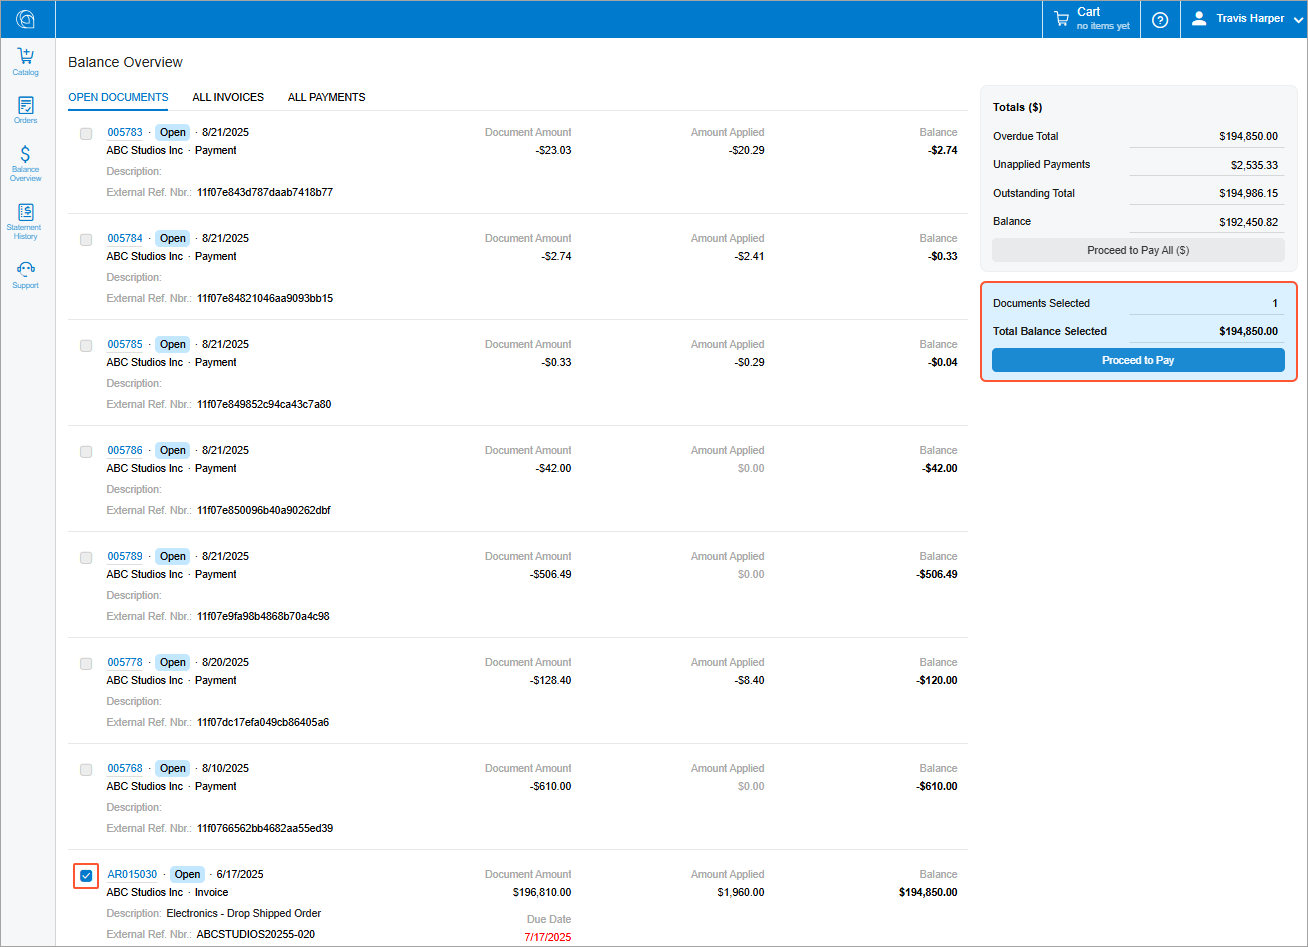
The system opens the Pay (SP314002) form, where the portal user can complete the payment.
Finding Financial Information Faster
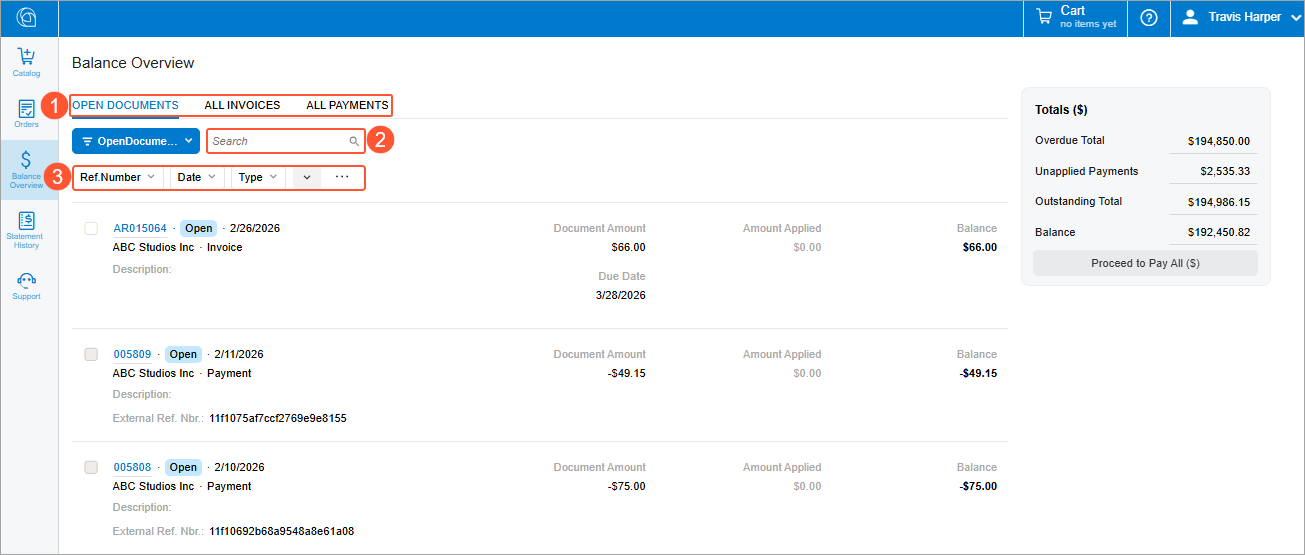
On the Balance Overview (SP314010) form, a portal user can view the relevant documents without switching pages. They can use intuitive tabs (Item 1 below) to view open documents, all invoices, or all payments. A Search box (Item 2) and filters (Item 3) also help them find the documents they need.
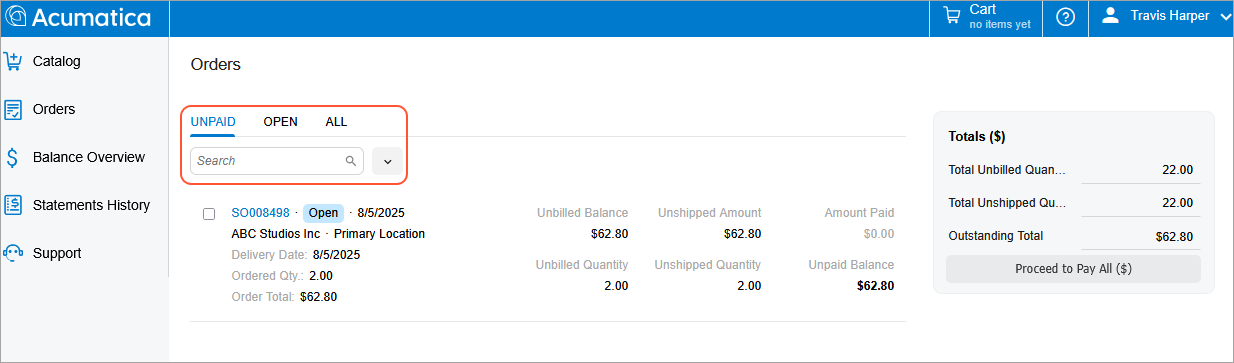
Similarly, on the Orders (SP504010) form, a portal user can use tabs, filters, and a Search box to view orders with the Unpaid and Open statuses—or to view all orders in the system.
Reviewing Payment, Shipment, and Tracking Details in One Place
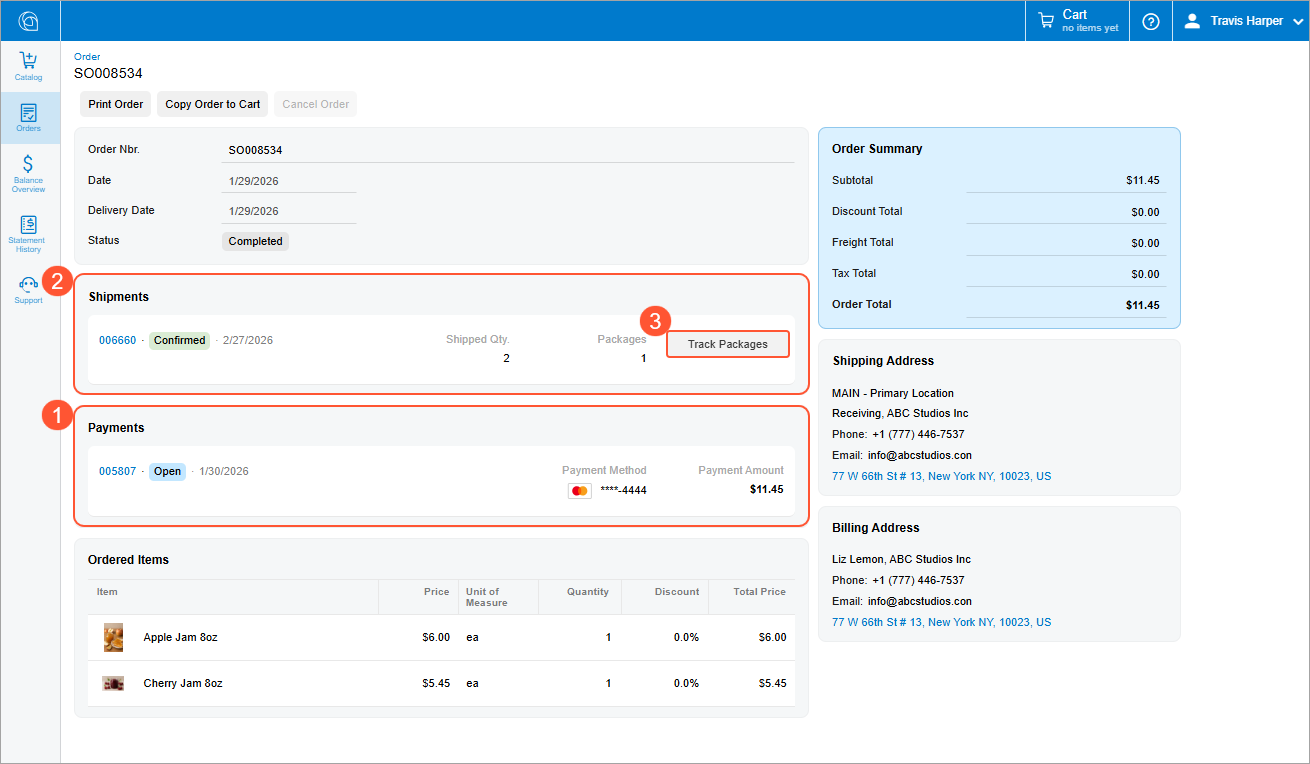
The Order (SP504000) form also provides a central place for a portal user to review the payment or payments applied to any order (Item 1 below), check the shipments created for the order (Item 2), and find their tracking numbers (Item 3).
Creating and Reviewing Cases
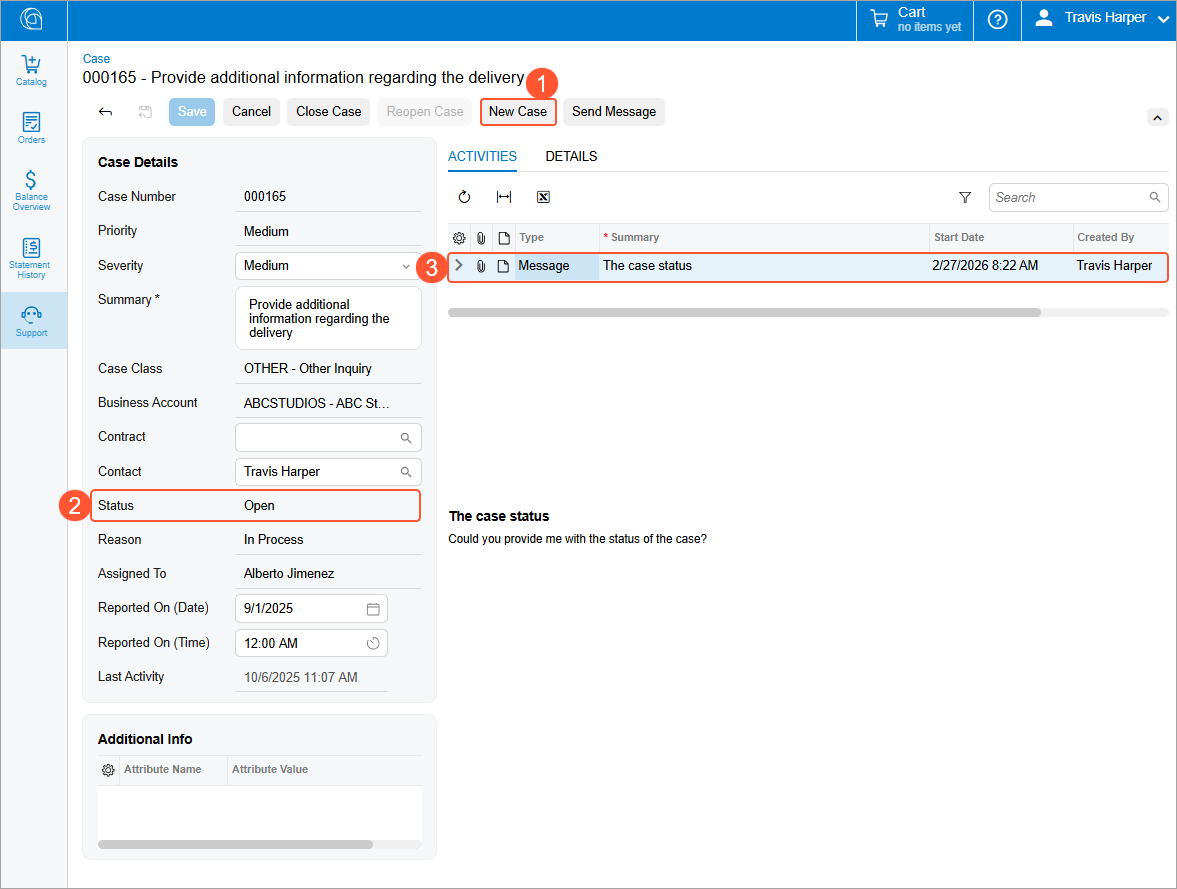
The Cases (SP401010) form, where portal users create cases, is integrated with the case management capabilities of MYOB Acumatica.
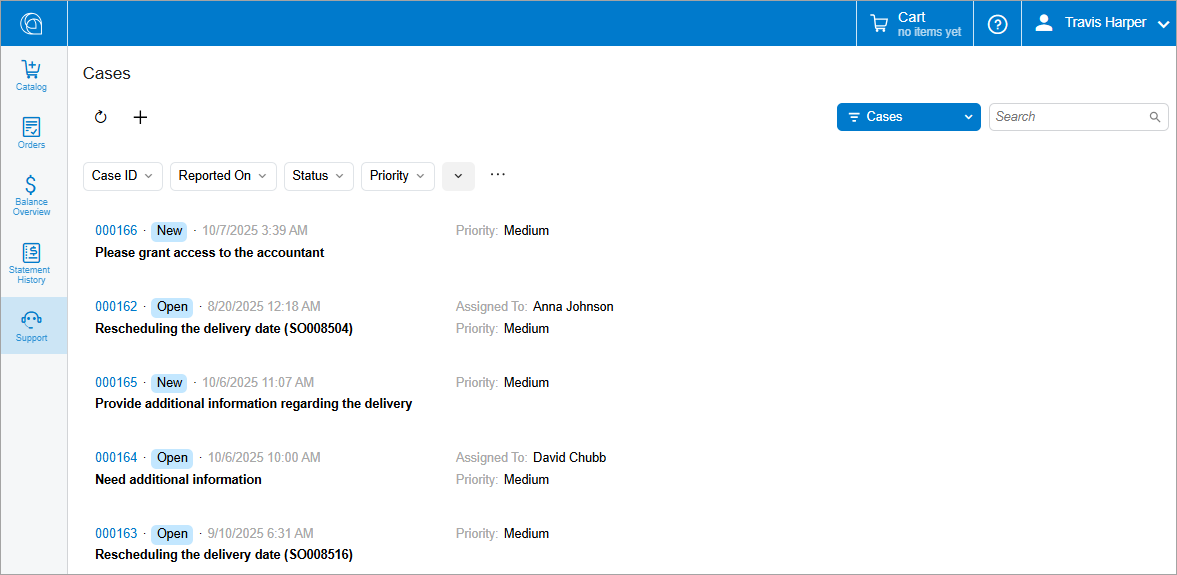
On the Case (SP401000) form, a portal user can create and submit a case to the MYOB Acumatica support team (Item 1 below), check the status of any case (Item 2), and use messages to communicate within the case (Item 3). The case records are shared and visible in both MYOB Acumatica and the Modern Customer Portal.
Limitations
- The Modern Customer Portal doesn't currently support adding any customized forms, dashboards, generic inquiries, and pivot tables from within the portal. You can add these forms to the Modern Customer Portal only from MYOB Acumatica.
- Administrators can perform system-wide form configuration only on the Catalog (SP504001) form. On other portal forms, this capability is not supported because the administrator is not linked to the customer account and thus can’t access customer data (order details, financial data, and cases).
- Configurable items are not supported in the Modern Customer Portal.
Key Benefits
For administrators:
- Centralized portal management reduces setup and maintenance time.
- Role-based access and predefined portal roles ensure security while simplifying user management.
- You can apply consistent branding across all customer touchpoints.
For your customers:
- A streamlined catalog and cart experience makes browsing and ordering faster.
- Integrated payments let portal users manage and complete all their payments in one place.
- Enhanced search capabilities help portal users find what they need quickly.
- Self-service capabilities empower portal users and reduce reliance on the support staff.
- The modern, responsive design improves usability across devices.
- Simplified navigation reduces the learning curve.
Learn More
For more details, see Modern Customer Portal for Administrators and Modern Customer Portal for Users.