To Create a Custom Form Template
To create a workable template for a custom form by using the New Screen wizard and include the template in a customization project, perform the following actions:
- Open the customization project in the Customization Project Editor. (See To Open a Project for details.)
- Select the Screens node in the navigation pane of the editor to open the Customized Screens page.
- On the page toolbar, click Create Screen, as item a in the screenshot below shows.
- In the Create Screen dialog box, which opens, specify values for input
controls as follows (item b in the screenshot):
- Screen ID: Enter an ID of a custom form in the XX.**.**.**
format, which consists of the following parts:
- Two-letter code of the functional area in MYOB AcumaticaAttention:You can use a single unique two-letter code for all custom forms in a solution. Please check the Pages folder of the website in the production environment to ensure that the code you want to use is not already used in the instance of MYOB Acumatica.
- Two-digit code indicating the form type:
- 10: Setup form
- 20: Maintenance form
- 30: Data entry form
- 40: Inquiry form
- 50: Processing form
- 60: Report form
- Two-digit code indicating the form sequential number
- Two-digit code indicating the subform sequential number
- Two-letter code of the functional area in MYOB Acumatica
- Graph Name: Enter a unique name for the new graph.
- Graph Namespace: By default, the New Screen wizard specifies the customization project name as the namespace ID. If you want to change the default ID, enter the ID of an existing or a new namespace for the new graph.
- Page Title: Enter the title to be used as the form title in MYOB Acumatica.
- Template: Select one of the following ASPX page templates for the
custom form.
Template Description Form (FormView) A record-editing page with one PXFormView container Grid (GridView) A record-editing page with one PXGrid container Tab (TabView) A record-editing page with one PXTab container FormTab A record-editing page with PXFormView and PXTab containers FormGrid (FormDetail) A master-detail editing page with PXFormView and PXGrid containers TabGrid (TabDetail) A master-detail page with PXTab and PXGrid containers - Site Map Parent: Select a parent site map node to place the form in this location in the site map of MYOB Acumatica.
- Screen ID: Enter an ID of a custom form in the XX.**.**.**
format, which consists of the following parts:
- Click OK (item c) to create the new form.
Figure 1. Using the New Screen wizard to create the new form 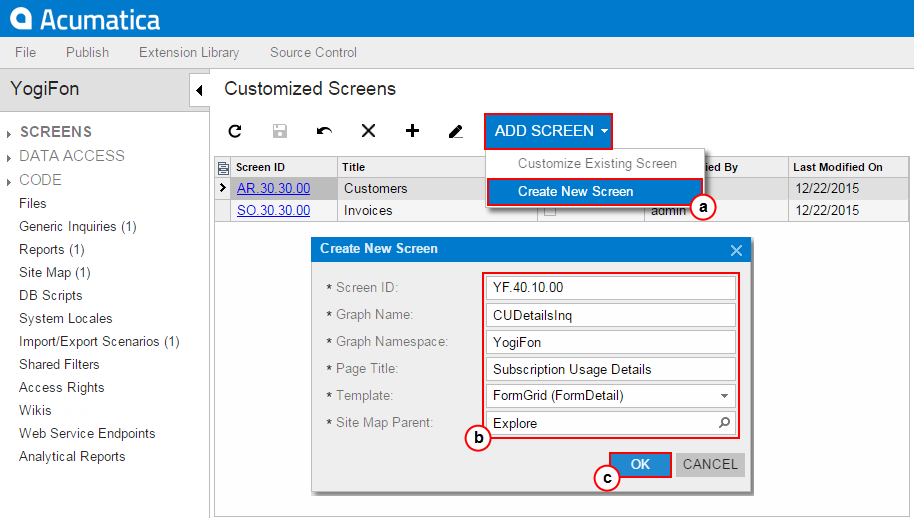
The wizard creates the form template and adds the following items to the customization project.
Item Description File Contains the Pages\XX\XX******.aspx file with the ASPX code template that has been selected for the new form. The name of the file corresponds to the value that is entered in the Screen ID box. The file is located in the Pages\XX folder of the MYOB Acumatica website, where XX is the two-letter code of the screen ID. File Contains the Pages\XX\XX******.aspx.cs file with the C# code for the ASPX page. Code Contains the code template of the business logic controller (BLC, also referred to as graph) for the new form. This item is saved in the database. When you publish the project, the platform creates a copy of the code in the file with the same name in the App_RuntimeCode folder of the MYOB Acumatica website. You can develop the code in Microsoft Visual Studio. Page Contains the link to the new page content, which you can later develop by using the Screen Editor. SiteMapNode Contains the site map object of the new form.
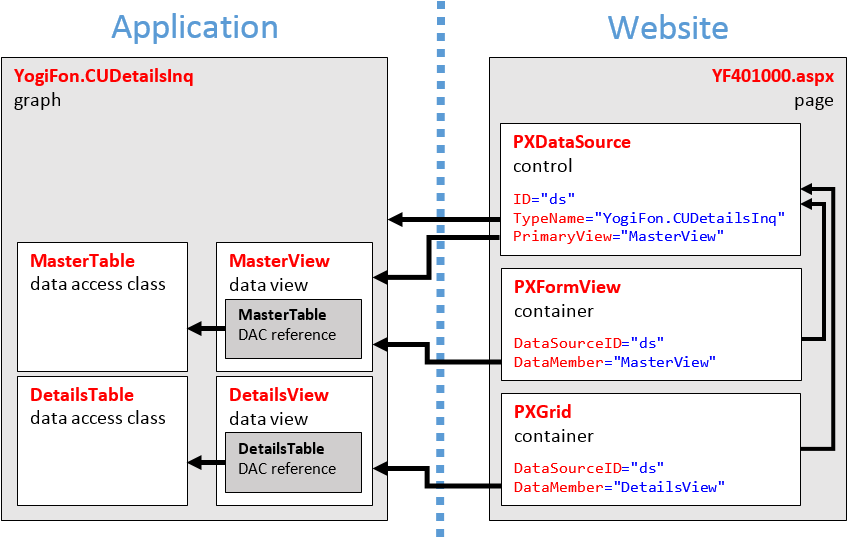
For example, if you enter in the Create Screen dialog box the values that are displayed in the screenshot above, the wizard creates code templates for both the CUDetailsInq business logic controller and the YF401000 page, which contain all the components required for the form template to work properly (see the following diagram).
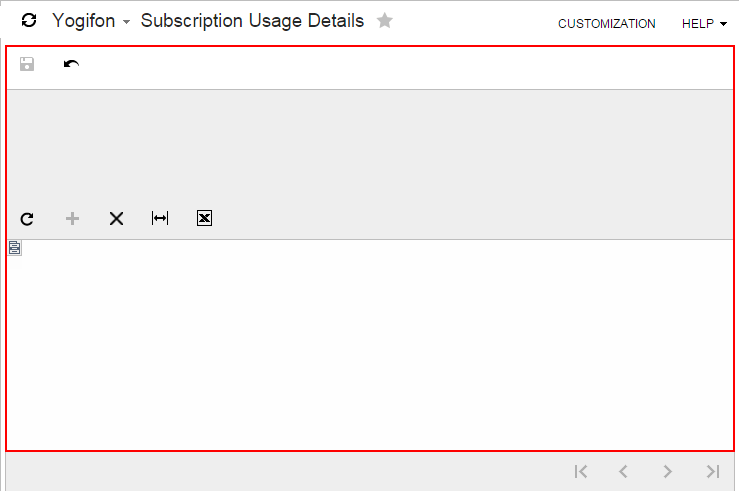
You can publish the customization project to ensure that it is valid and the custom form can be opened in the browser. At the moment, the form does not contain a control for a field, as the following screenshot shows.