
Timesheet Entry Module - Remote
Introduction
The IMS Timesheet Entry System captures employee hours, leave and allowance payment timesheet information that is destined for the IMS Payroll Partner system.
Only Waged and/or Salaried employees with pay frequencies of ‘Weekly’ and/or ‘Fortnightly’ can be processed by the module.
It is designed for managers, whom are on site or in remote locations, to enter timesheets for their employees only, run summary reports pertaining to timesheets entered for a particular Pay Period and create a file for importing into an IMS Payroll Partner payroll via a specific import format of the IMS Time Import utility.
The module also permits the entry of timesheets for multiple pay periods concurrently – this means that timesheets can be entered and reported on daily, even while the current payroll is being processed. This functionality can also be used to process multiple payrolls in advance, e.g. in early December the Timesheets can be entered for the 4-weekly pays from mid-December to mid-January.
Additionally, employee Permanent payments (as recorded on the Employee’s Permanent tab) can optionally be loaded into the Timesheet Entry timesheets when creating a new Pay Period.
User Security
A comprehensive user security function, if enabled, lets users access enter timesheets for employees within pre-defined Pay Points or Home Cost Codes. Employee pay rates can be hidden or, if displayed, can be overwritten if applicable. Access to other functions of the module can also be assigned at the user level.
If Salaried employees are accessed, no salary, daily or hourly rates are displayed within the module’s entry or reporting screens.
Remote Use
Remote use applies when there is no direct access, i.e. via networking, to the associated MYOB IMS Payroll Partner payroll company data from the physical location where the Timesheet Entry processing is to be performed.
The MYOB IMS Timesheet Entry Module will maintain a distinct set of database tables situated within a particular database folder. Information required for Timesheet Entry and validation of data will need to be made available on the remote site via an export facility, within the standard IMS Payroll Partner application, for the payroll company concerned. The file may then be emailed, for example, to the site where, within the module, a restore facility will import the data and update the appropriate database tables. Selection of employees within Pay Point or Home Cost Code range can be specified during the export of this data from the Payroll Partner application.
We recommend that you generate and forward a Validation file to a remote site prior to the entry of the next pay period timesheets to ensure that all employee and payment data is up to date, i.e. leave units as displayed on the Timesheet Entry screen. See page 4 for more information.
Installing the Module
Pre-requisites
In order to use the Timesheet Entry module, you will need to ensure that the following software is also installed on the PC where the MYOB IMS Payroll Partner application, and associated payroll company(s), reside:
-
MYOB IMS Payroll Partner Application V5.60 or later.
-
MYOB IMS Time Import Module v2.96 or later.
-
MYOB IMS Validation Data Export Utility v1.07 or later.
Installation
An email with a link will be sent to you. Click on the link and download the file (it will automatically save to your Downloads folder). Run the file to install.
The file should be installed to the same place as your MYOB IMS Payroll system.
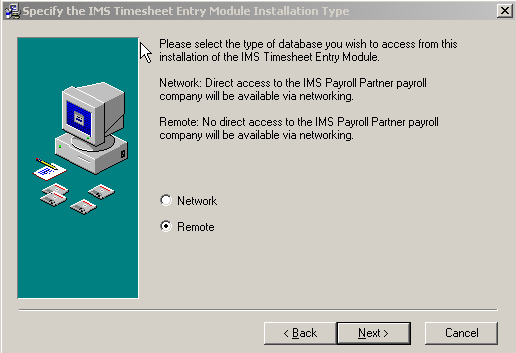
During the installation process this screen will be displayed, click the Remote option.
General Operating Procedures
Once a Timesheet Entry company has been created and configured to your requirements, the following processing process will need to be performed in the Timesheet Entry Module:
-
Create a new Pay Period > Control record for the pay period ending date. You can optionally select whether employee Permanent Payments are to be loaded for each employee for this pay period.
-
Import the Validation data file as generated from the payroll system, when and if applicable (see “Timesheet Entry Validation Data Utility” on page 4). This would need to be performed on a pay period frequency basis to ensure that Leave balances reflect those as held in the Payroll company, enable timesheets to be entered for any new employees or to access any new payments created since the last import. There would need to be consultation with the payroll clerk regarding the generation, and availability, of the file as exported from the payroll system containing this new data in this instance.
-
Enter timesheets for the Period Ending date as entered on the Timesheet Entry screen.
-
Produce reports, as required, to audit or reconcile timesheets entered for the period.
-
Export the transactions pertaining to the Period Ending Date via the Payroll Export Tab.
-
In the Payroll Partner company, open the pay period and import the transactions as exported from the Timesheet Entry module.
Remote Module Procedures
Timesheet Entry Validation Data Utility
The Timesheet Entry Data Validation module is also required when using the MYOB IMS Timesheet Entry module in a remote environment. It is advisable to generate and forward a Validation file to a remote site prior to the entry of the next pay period timesheets, to ensure that all employee and payment data is up to date, i.e. leave units as displayed on the Timesheet Entry screen.
Once installed, this module can be opened from MYOB IMS Payroll Partner at Tools menu > Files Export > Timesheet Entry > Validation Data Export.
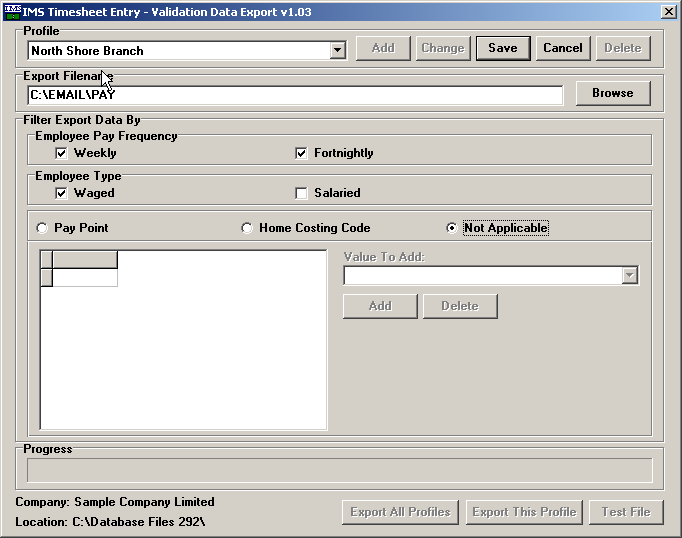
This utility exports timesheet entry related data, which is required only when the Timesheet Entry Module is being used a remote site.
Profile: Allows you to define multiple data export profiles (unique profile per remote site for example). The system will save the profile definition and you can choose which export profile to use. Click the Add button to set up a new profile.
Export Filename: Enter the path and name of the file to be generated. (The .zip extension will be appended to this file name once the file has been generated.)
Filter Export Data By: Enables selection of specific employees to be included in the export, i.e. employees whose timesheets are to be entered at the remote location.
Employee Pay Frequency: Weekly and/or Fortnightly employees.
Employee Type: Waged and/or Salaried employees.
Pay Point or Home Costing code: if applicable. The Pay Point, or Home Costing Code, selection list can be maintained by the Add and Delete buttons.
Export All Profiles: Begins compression/export process of predefined tables required for successful entry and validation of timesheets in a remote environment for all profiles.
Export This Profile: Begins compression/export process of predefined tables required for successful entry and validation of timesheets in a remote environment for the profile currently being accessed.
Test File: This button may be used once the file has been created to ensure that the created file can be read. This would be recommended if generating the file onto a floppy diskette for example to ensure the integrity of the media.
Welcome Screen
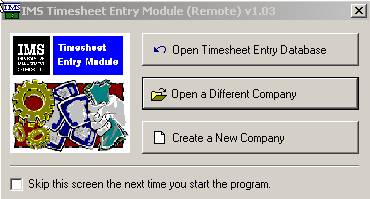
The Welcome Screen provides you with the option to open the database you last accessed, open another existing database or create a new Timesheet Entry database.
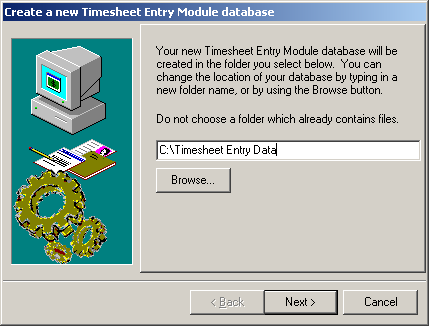
When creating a new company, this screen will be displayed. The default folder in which the database will be created can be overwritten.
Once you’re ready to create a Timesheet Entry Module database, a Validation Data Import file must be available—see page 4. This file contains information on the employees, for whom timesheets will be entered, and associated data such as Pay Points, Costing Codes and Payment Types as applicable. The following screen will be displayed during the initial database creation process for you to locate and import the Validation Data Import file:
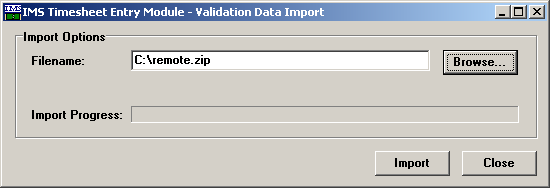
Use this window to import the data created above into the Timesheet Entry module. During the initial database creation process, an export file will need to be available when logging in to the module for the first time. Subsequent imports will need to be performed to update Timesheet Entry datasets as required.
Using the Timesheet Entry Module
Global Options Tab
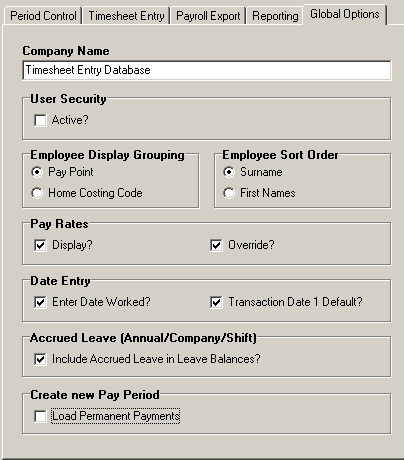
Once a Timesheet Entry company has been created then the business rules pertaining to the entry of timesheets can be defined. The Global Options tab lets you specify how the system should be configured at a global level. Access to the screen is restricted according to the User Security level assigned to the logged-on user (or not regulated if the User Security is inactive)—see “User Security Tab” on page 8 for more information.
Company Name: This field may be overwritten and is to identify the Timesheet Entry company currently logged on to.
User Security: Tick or clear this box to indicate whether user security access is required in this company. If it is ticked, the User Security tab (see page 8) becomes available to enable user profiles to be entered and defined.
Employee Display Grouping / Sort Order: The order in which employees will be grouped for selection when entering in timesheets. Grouping is by Pay Point or Home Costing Code (if applicable) and within that grouping by either Surnames or First Names.
Access to Salaried Employees, in addition to the option to exclude then when generating the ‘validation export’, can be restricted via the User Security facility.
Pay Rates: Whether pay rates are to be displayed during Timesheet Entry and Reporting. If ‘Display’ is selected then there is the facility to select whether pay rates, as displayed, can be overwritten during timesheet entry.
By default, pay rates for Salaried employees (Salary, daily or hourly rates) are never displayed in either Timesheet Entry or reporting. This is a non-optional feature.
Date Entry: Two options are available:
-
Enter Date Worked: If selected, will require a date against each timesheet payment entered. This date would represent the date on which the payment relates to and could be used to report on timesheets entered for a particular day and group timesheets by date. Each new data entry line reporting date will automatically default to the date as entered on the previous line This date is not passed to the payroll timesheets however can be used as the default for the payroll transaction date as detailed below.
-
Transaction Date 1 Default: This option can be activated if Enter Date Worked is selected and Transaction Dates have been activated in the master Payroll Company. If this option is selected then the Date Worked, as entered, will be used as the default for transaction date 1.
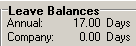
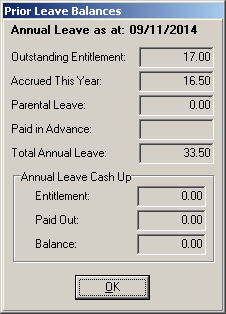
Accrued Leave (Annual/Company/Shift): Select whether accrued leave is to be included in the Annual, Company and/or Shift leave balances displayed at the bottom of the Timesheet Entry screen. If you place the cursor on the Annual, Company or Shift Leave description or balance field within the Timesheet Entry screen then a small ‘hand’ icon appears. Press the left mouse key and a window will be displayed containing the Outstanding and Accrued balance for the leave in question.
In this example, the option not include Accrued leave has been selected and the Annual Leave balance reflects this by only displaying the Outstanding balance:
When the Annual Leave Balance pop-up is displayed the current Accrued balance can be reviewed:
Create new Pay Period > Load Permanent Payments: the default setting for the Load Permanent Payments option on the Period Control tab. If selected this can be overwritten when creating a new Pay Period within the module.
User Security Tab
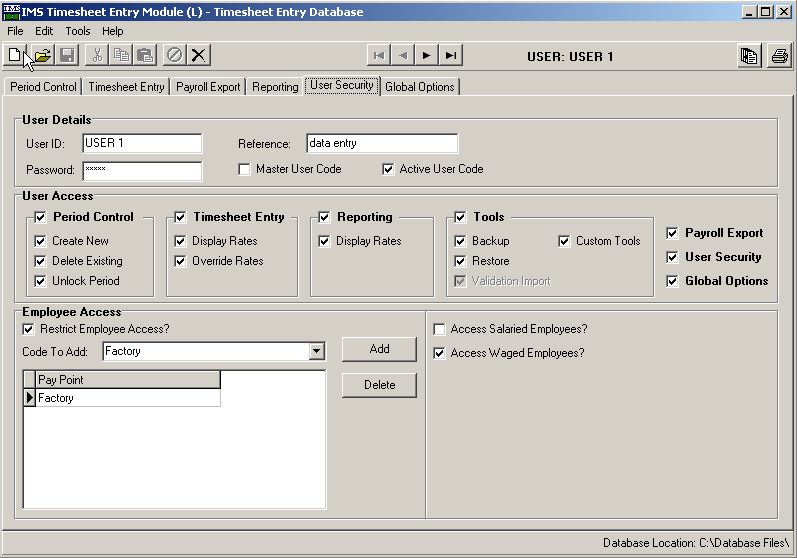
This tab is available if User Security has been activated on the Global Options tab as detailed above.
User access codes (User IDs) and passwords can then be defined along with the appropriate levels of access to the processing functions of the module and, in the case of users with access to employee data, the groups of employees accessible. If User Security is activated then at least one Master User Code must be created.
Employee Access restrictions and the control grid (see illustration) are enabled when the Restrict Employee Access User Security option is active. The groups of employees accessible by any one user are assigned by adding Pay Points or Home Costing Codes to the grid that becomes active. This will not apply however, if the user has Master User Code status.
In addition, access to Salaried and/or Waged employees can be granted here.
Once activated, users will be required to provide a valid User ID and Password in order to be granted access to the database. Access within the module would then be limited according to the settings granted on the User Security tab for the user.
Pay Period Control Tab
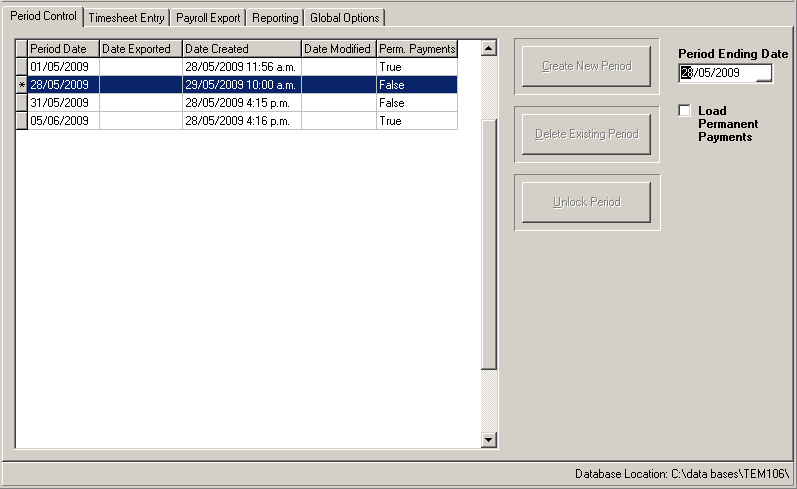
The Period Control page displays a list of the pay periods (in period date sequence) that have already been created/processed and allows creation of new Period Control records by clicking the Create New Period button.
When the Create New Period button is clicked, you need to select a unique period ending date before the record can be saved.
You can load Employee Permanent Payments as stored on the Employee’s Permanent tab in MYOB IMS Payroll Partner. Only those Permanent payments that are appropriate (refer to page 6 of this document) for data entry are selected for Loading and no deductions are considered.
By default, the period currently selected on the Period Control page will be the period for which data is displayed in the Timesheet Entry section of the application. Timesheet Entry, Reporting and the Exporting of Timesheet transactions are all driven by the selection of the appropriate Period Date. This will enable future period to be entered in advance and exported at the appropriate time.
The Delete Existing Period button lets you delete any old Pay Period transactions entered and exported permanently from the data sets. The Unlock Period button lets you access pay period transactions that have been previously exported to MYOB IMS Payroll.
Timesheet Entry Tab
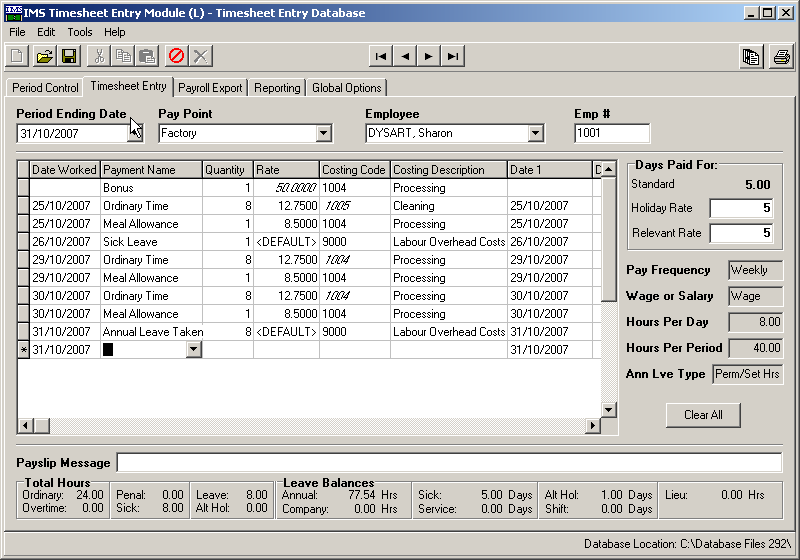
The Timesheet Entry tab enables the entry of Payments for an existing Period and is very similar to the Timesheet Entry process within Payroll Partner.
The common area allows selection of, and displays, the currently selected Period Ending Date which the entered transactions will pertain to, Employee selection grouping (Home Costing Code or Pay Point as selected within Global Options and user access as selected for the user), Employee Name and user allocated employee number if applicable. Employees will be available for selections as per the group method selected and the Employment Type (Waged and/or Salaried). Transaction records displayed on this page can be created, modified or deleted as necessary, however if the record to be modified or deleted has already been exported (identified by the presence of a "Date Exported" value), confirmation will be sought from the operator before the change is applied.
The columns on the main table of the Transaction Entry tab are as follows:
Date Worked: (Optional): If Date Worked entry has been selected within Global Options then this field will be available. Once the first date has been entered, then subsequent transactions / employees will have this date as the default until overwritten. Until the initial date entered is modified, the cursor will be placed in the Payment Name data entry field for subsequent payments entered so that there will be no requirement to access the Date Worked field until a new date is to be entered. If a payment pertains to the Pay Period in general, i.e. a bonus to be paid then the date may be left blank. Timesheet records will be displayed in Date Worked sequence if Date Worked is entered else in the Sequence as designated on the Payment master record.
Payment Name: (Required): The Data Entry code, Payment Description or selection from the drop down box may be used when selecting payments.
The following payment calculation types will not be available for selection: Calculation Method of Fixed (with Default Quantity other than Input Value) and Percentage of Earnings. If required, these payments should be entered against the employee on the employee’s Permanent tab in MYOB IMS Payroll Partner.
Quantity: (Required): Enter the quantity associated with the payment. For all Leave type payments, i.e. sick, annual leave etc the units entered should reflect the unit the leave is held in for that employee, i.e. Hours or Days (this information is displayed at the bottom of the screen).
‘SALARY’ payment transaction quantities should be entered as whole, or part, ‘DAY’ units.
Rate: (Optional ) This field will be available if ‘Payment Rate Display and/or Maintenance’ has been selected) at Global and User level.
For Leave type payments such as Annual Leave and Sick Leave etc, the rate field will contain the literal <DEFAULT> and will not be maintainable. The rate paid for leave type payments will be determined, and assigned, during the calculation process within the payroll system. For all other payments the rate may be manually overwritten (if permitted) within the rate field or selected via the drop down Rate Override facility.
For ‘Salary’ type transactions the rate field will contain <DAILY>, or <Default> for Salaried hourly rates, and will not be maintainable.
Costing Code / Description: Required if Costings have been activated within the payroll company.
Date 1, Date 2 and Comments: (Optional and available if activated with the payroll company).This information would be passed to the payroll system and will appear within the timesheets and optionally printed on payslips. Date 1 may default to the Date Worked entered if active and selected within Global Options.
Date Exported: Presence of date indicates that the transaction has previously been exported to the payroll and confirmation will be sought from the operator before the transaction can be modified or deleted.
The total hours entered, current leave balances (as accrued to the date displayed) and the employee’s standard Hours Per Day and Hours Per Period figures as defined in IMS Payroll Partner.
See the Global Options section on page 6 for information on Leave balances displayed.
Entering Leave For Salaried Employees:
If a leave transaction is entered for a salaried employee then a negative salary day transaction must be entered to offset that payment. Bear in mind that a salary payment for the full pay period is generated automatically within the payroll system and therefore a Salary period transaction must not, and need not, be entered. Any leave transactions entered for the current pay period, for a salaried employee, must have a corresponding negative daily quantity entered if the leave taken pertains to the current pay period.
Example:
A Salaried employee is paid ‘Weekly’ and within that week takes 2 days annual leave. ‘Annual Leave Taken’ is entered as a quantity of 2 days (rate of <Default>). A ‘Salary’ transaction is then entered for a quantity of -2 days to reflect the fact that 2 days of salary have been paid as Annual Leave (rate of <DAILY>)
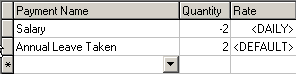
The transactions would be entered in the Timesheet entry module as per this example with the Salary transaction quantity entered as a negative.
Once imported into the Payroll Company, the transactions will look like this:
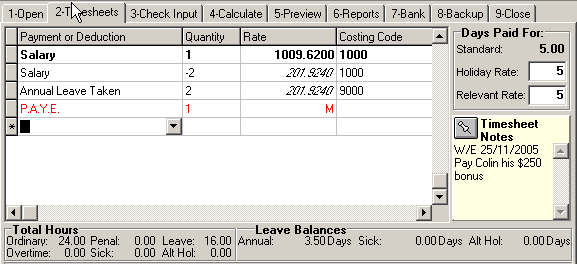
This salaried employee will be paid his normal Salary of $1009.42 for the week - minus 2 days of salary at $201.9240 per day plus 2 days of Annual Leave at $201.9240 per day.
‘SALARY’ payment transaction quantities are to be entered as whole, or part, ‘DAY’ units.
The Days Paid For: section is disabled for Salaried Employees; however, the Total Hours field at the bottom of the screen reflects what has been entered within the module.
It is not recommended that additional leave pertaining to another pay period be entered in the Timesheet Entry Module for Salaried or Waged employees without notifying the payroll clerk. Adjustments to other payments and deductions quantities, not to mention PAYE, will need to be made once the transactions have been imported into the payroll company.
Reporting Tab
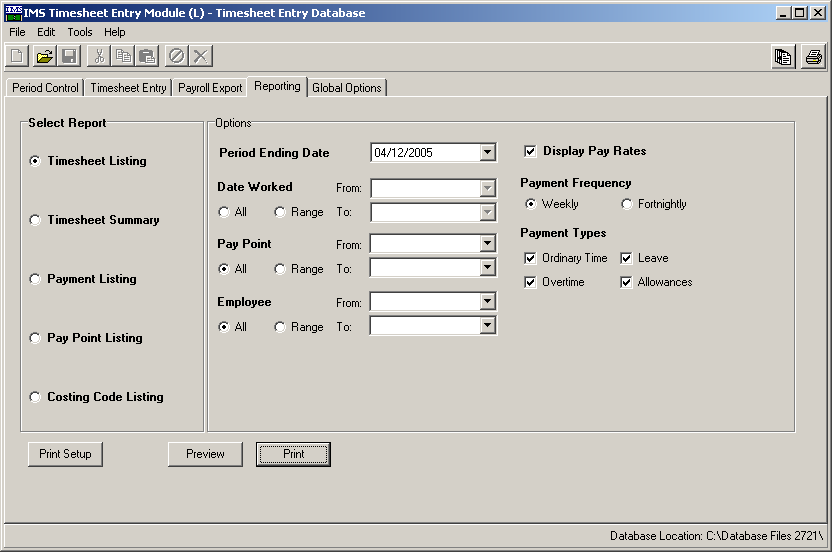
The report tab lets you generate reports pertaining to the entry and validation of timesheets.
All reports can be previewed, printed and/or generated to other file formats such as PDF etc.
In the following report descriptions, ‘Ordinary Time’ will incorporate any ‘Salary’ Transactions entered. In addition, salary, daily or hourly rates for Salaried employees are never printed and are therefore not included in the ‘Display Pay Rates’ option.
Timesheet Listing
This report will list timesheets as entered for the selected Period Ending Date. In addition the following selection criteria may be applied:
-
Date Worked (if applicable)
-
Pay Point or Home Cost Code
-
Employee
-
Payment Frequency (Weekly or Fortnightly)
-
Payment Types – Ordinary Time, Overtime, Leave, Allowances
-
Printing of Pay Rates may be suppressed.
This report is in the same print format as the Sundry Reports – Transaction Listing – Timesheet report available within Payroll Partner.
Timesheet Summary
This report will list timesheets as entered for the selected Period Ending Date. In addition the following selection criteria may be applied:
-
Date Worked (if applicable)
-
Pay Point or Home Cost Code
-
Employee
-
Payment Frequency (Weekly or Fortnightly)
-
Payment Types – Ordinary Time, Overtime, Leave, Allowances
-
Printing of Pay Rates may be suppressed.
-
Details or Totals only report.
-
Suppress Payment Summaries and Display Values instead of Rates in Totals.
If the Date Worked option has been enabled, the detailed report will list payments per each day within the pay period, i.e. 7 or 14 days. Those payments with no assigned date will be grouped under a separate column. A summary can be printed showing payment units entered for each day and totalled for the period.
Payment Listing
This report is in the same print format as the Sundry Reports – Payment Code Listing available in MYOB IMS Payroll Partner with the additional facility to suppress the printing of Pay Rates.
Pay Point Listing
This report is in the same print format as the Sundry Reports – Pay Point Listing available in MYOB IMS Payroll Partner.
Costing Code Listing
This report is in the same print format as the Sundry Reports – Costing Code Listing available in MYOB IMS Payroll Partner.
Payroll Export
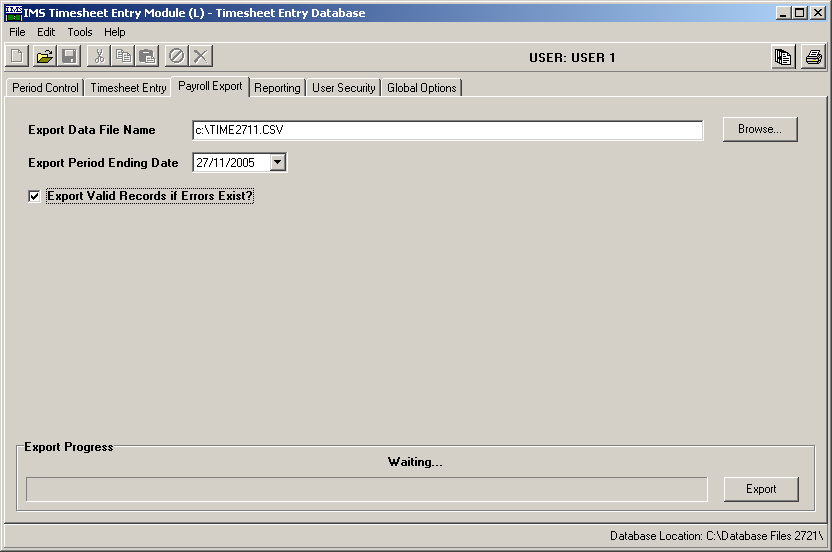
This tab lets you generate a file containing timesheets, as entered for a specific Period Ending Date. This file would then be made available to the Payroll department for importation into the payroll system once the relative Pay period has been opened.
For a successful data export, a valid directory and file name must be entered.
If any of the data exported for the selected period has previously been exported, the system will seek confirmation from the operator to proceed before the export process executes.
Export processing is initiated by clicking the "Export" button at the bottom of the page. As the procedure executes a progress bar will display the completion status of the export. An export file can be generated with valid records if errors are detected by selecting the ‘Export Valid Records if Errors Exist’ option otherwise if errors exist then the export file will not be generated.
Once data export process is complete, a report that lists the payments included in the export file, and/or an error listing if applicable, will be offered for preview and printing. The exported file can then be imported into the appropriate ‘opened’ pay period within the IMS Payroll Partner Timesheet ‘Import’ facility using the ‘Timesheet Entry Module’ format only.
Importing The File Into MYOB IMS Payroll Partner:
In MYOB IMS Payroll Partner, selected the Time Import Module > Timesheet Entry Module option from the Tools menu.
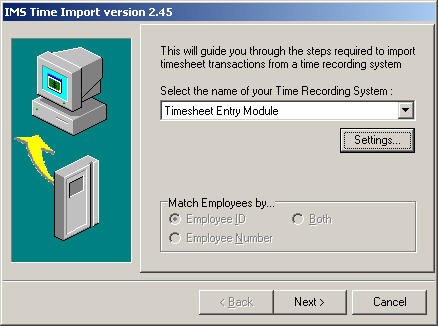
The Settings button lets you control how the import is to handle current Permanent payments residing in the payroll Timesheet entry tab only if the import file as generated from within the module contains Permanent Payments which were loaded when the Pay Period was created. If the Pay Period was created without the ‘Load Permanent Payments’ selected then these setting are ignored for that import.
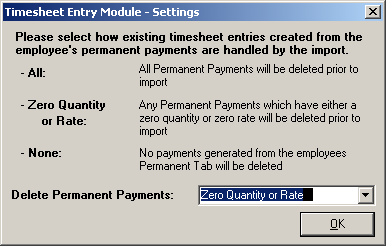
There are three options associated with how the current import should handle timesheet payments (as generated within the Payroll from employees Permanent tab when the current pay period was opened) only if the the import file includes ‘Permanent Payments’. The options available refer to the deletion of Employee Permanent Payments which are automatically copied into the Timesheet Entry facility within the Payroll when the Payroll Pay period was opened and optionally imported when opening the corresponding Pay Period within the Timesheet Entry Module.
-
ALL: All Permanent Payments will be deleted prior to the import.
-
Zero Quantity or Rate: Only those Permanent Payments which either have a zero quantity or zero raette will be deleted prior to the import.
-
None: No Permanent Payments will be deleted prior to the import.
The Permanent Payments referred to are only those which were imported into the module as per the filtering rules. The purpose of these options is to prevent Timesheet Entry payments doubling up in the payroll if they were loaded into the Timesheet Entry Module:
The import will produce an audit of all transactions deleted if the import file contains Permanent Payments and either the All or Zero Quantity or Rate option was selected.
The Payroll Export function is not available in the Demonstration version of the software.