
Multi Company Management Module
Introduction
The IMS Multi Company Management module (MCM) has been designed to help with IRD Reporting requirements where there are two or more payroll companies to report on. The module can benefit the following organisations:
-
IMS Payroll Client with two or more payroll companies under the same tax umbrella, i.e. same IRD Number. Returns from each company will be consolidated into one return for the period.
-
IMS Payroll Client processing two or more payroll companies with different IRD Numbers (you are not a registered Bureau or PAYE Intermediary). In this instance the module can still be used but the information for each separate payroll company would need to be submitted separately. This can be achieved by activating / deactivating each payroll company individually within the ‘Payroll Register’ tab for ‘IRD Reporting’ then processing the IRD reports/files for those companies in turn.
-
Registered Bureaus Service providers. You prepare returns on behalf of other employers. If you are also an employer you have an option to use myIR for your own employer returns. You will need to indicate this when you register so that your own and your clients’ returns are stored in one workspace. Otherwise you may register as an employer and as an agent separately and have the returns stored in a separate workspace. To use myIR as a bureau or to file multiple returns for different companies (ie companies with different IRD Numbers) you will need to contact IRD on 0800 377 772 before you register.
-
Registered PAYE Intermediaries. You prepare returns on behalf of other employers under the umbrella of a registered PI. If you are also an employer you have an option to use myIR for your own employer returns. You will need to indicate this when you register so that your own and your clients’ returns are stored in one workspace. Otherwise you may register as an employer and as an agent separately and have the returns stored in a separate workspace.
This module runs separately from the MYOB IMS Payroll Partner application; however, the physical location of all participating payroll companies must be accessible from the location where this module is installed.
The module optionally provides registered PAYE Intermediaries functionality to comply with their IRD reporting requirements. Please refer to the document ‘PI MCM Overview’ if you are, or intend to become, a registered PAYE Intermediary.
Benefits of the MCM Module
-
A dashboard snapshot of relevant information regarding each registered company which would be particularly advantageous when:
-
Scheduling an upgrade of the IMS Payroll application (which requires all payrolls to be in a ‘Closed’ state), checking which version the payroll is currently under and doing a backup of each registered company at the start and end of a new tax reporting year.
-
Checking the payroll processing state of each company when preparing IRD reports.
-
Ability within the dashboard to display only the information you are concerned with and the facility to rearrange the Payroll Register tab columns to your preference.
-
The facility to combine all registered company payroll information into ONE file for submission to myIR within each reporting format. This includes the electronic filing of the EI, EDF, EMS, KED and, additionally for PAYE Intermediaries the EPS, EAS and SCF exports. Additionally, an ‘IRD Authorised Deduction report’ can be generated for all registered companies.
-
The facility to backup all, or a selection of, companies at the same time provided no users are currently logged into the payroll companies selected.
-
If all the payroll companies in the Payroll Register are under the same tax umbrella then the module functionality will negate the requirement to manually generate an IRD file from within each separate payroll company and then consolidate these files into one for submission to the IRD.
-
Audit reporting of all processes to clearly indicate what has been extracted / backed up and whether any exceptions were encountered during the process.
-
Facility to generate IR reports to PDF files which could then be emailed to the appropriate company / client / manager.
The MCM Interface
Payroll Register
This tab is the dashboard for the module and the main body of the tab is used to register, retain and display relevant payroll company information pertaining to the module’s functionality. For those companies you wish to Register for access within the module processes the Payroll company database location must be accessible within a local or networked environment where applicable.
The Payroll Register tab is refresh upon activation of the module. As the Payroll Status, e.g. “Opened” or “Closed”, will be dynamic then it may be a requirement to refresh the dashboard display fields. This may be achieved by either using the ‘Refresh Item’ button corresponding to a particular registered company or the global ‘Refresh Register’ button at the bottom of the screen to refresh ALL registered companies. It is recommended that, where appropriate, the individual company ‘Refresh Item’ button be used as this would be the quickest method to re-display the status of an individual payroll company.
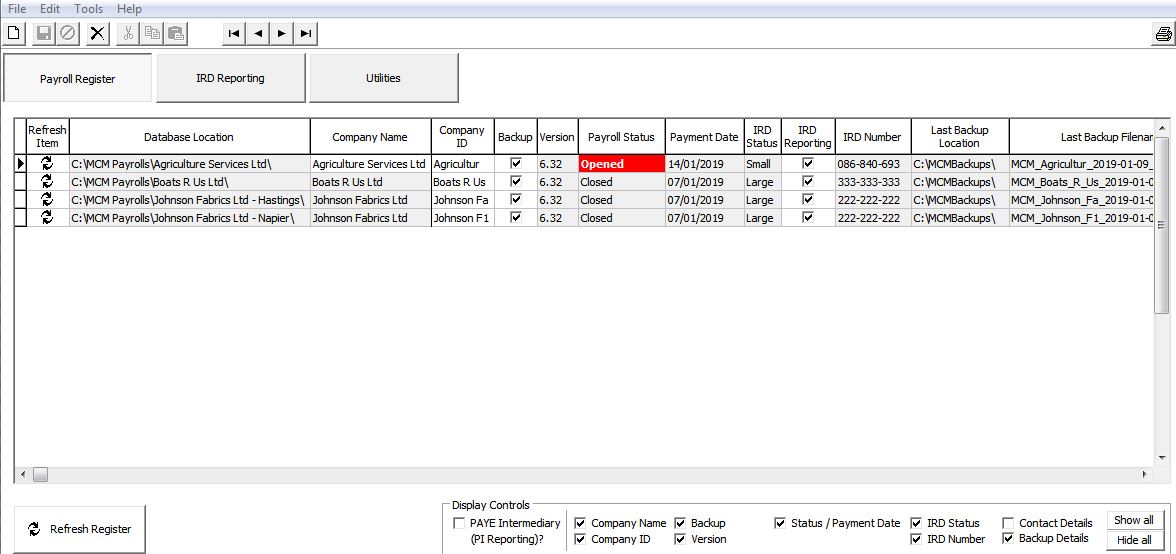
Display Controls
PAYE Intermediary (PI Reporting): If your utilisation of this module is not pertaining to the services of a registered PAYE Intermediary then de-select this control. All references and options pertaining to PAYE Intermediaries will no longer be displayed or available.
All of the other controls relate to the display of specific display columns. The Show All and Hide All options are a quick method to help achieve your requirements.
Payroll Register Display Columns
-
Refresh Item: This icon can be selected to refresh the display columns for the company concerned.
-
Database Location: The physical location path of the selected company. Once registered if the company location changes then the company would need to be re-registered by locating the new location via the Browse facility.
-
Company Name: The name of the Payroll company as held on the ‘Company Information - Company’ tab within the payroll.
-
Company ID: This field originally defaults to the first 10 characters of the Company Name and may be maintained however the contents must be unique within the register. The ID can be optionally used in the construction of the backup file within the ‘Utilities – Company Backup’ facility.
-
Backup: This option will assist with the selection of payroll companies to be included in the ‘Utilities – Company Backup’ facility however options within that facility can override this selection if required.
-
Version: The current version the payroll company has been upgraded to.
-
Payroll Status: The last processing cycle stage performed within the payroll company: ‘Opened – Timesheets – Calculated – Reported – Banked – Backed Up – Closed’. All status’s except ‘Closed’ are displayed in RED.
-
Payment Date: The Payment Date of a currently ‘Opened’ payroll period or of the last payroll period processed when the payroll is in a ‘Closed’ state.
-
IRD Status: Whether the company is a ‘Large’ or ‘Small’ company as per IRD criteria and as indicated in the ‘Company Information – Company’ tab within the payroll company.
-
IRD Reporting: Whether this company is to be included in the IRD reporting facility by default. If for example you have a test company you may wish to register but not include in any reporting facilities then de-select this option.
-
PI Reporting: This column will only be displayed if ‘PAYE Intermediary’ is selected and under that condition whether the particular payroll company is to be included in ‘PAYE Intermediary’ Reports by default. For reporting purposes, a company can be registered for either IRD Reporting, PAYE Intermediary reporting or neither.
-
IRD Number: The company IRD Number as held on the ‘Company Information – Company’ tab.
-
Contact Name: The company Contact Name as held on the ‘Company Information – Company’ tab. (Display Deselected in above screen shot).
-
Contact Number: The company Contact Phone number as held on the ‘Company Information – Company’ tab. (Display Deselected in above screen shot).
-
Last Backup Location: The location of the last backup if performed within the module’s ‘Company Backup’ facility.
-
Last Backup FileName: The file name within the above location of the last backup if performed within the module’s ‘Company Backup’ facility.
-
Last Backup Date: The date of the last backup if performed within the module’s ‘Company Backup’ facility.
Registering Companies
The location of each of the participating payroll companies must be registered on this screen. The ‘Browse’ button can be used to locate the payroll company concerned and if a company’s location is subsequently modified then the company will need to be re-registered manually. Initially all new payroll companies will need to be registered manually and removed if they are no longer processed.
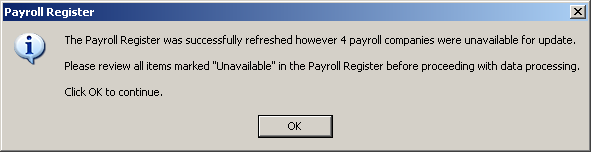
When accessing the module if a registered company cannot be located (ie: the location of the Database folder has been moved) a message will be displayed, as per the example below, informing the user that one or more companies cannot be located as per their current location parameters. After ‘OK’ has been selected the Payroll Register will be displayed and those companies which cannot be located will have ‘Unavailable’ displayed in red in their ‘Payroll Status’ column. The user can then use the ‘Browse’ button to re-register the company or the Delete icon to remove it from the Registry.
IRD Reporting
The main function for IRD Reporting is the facility to consolidate reporting data for all registered companies flagged to be included in the IRD Reporting facility. If two or more companies are under the same tax umbrella, i.e. have the same Company IRD Number, then the information will be consolidated and the company reported as a whole. One file containing specific reporting data for all participating companies will be generated and this may then be submitted to IRD via their myIR website and processed accordingly. Each individual IRD Reporting format will be accompanied by a summary of data reported on for each participating company. Only those companies registered as per the Payroll Register tab for IRD Reporting will be included in the following available processes as detailed in the following sections:
-
EI Export – Payday Filing.
-
EDF Export – Electronic Deduction Form.
-
EMS Export – Employer Monthly Schedule.
-
KED Export – KiwiSaver Employment Details.
-
IRD Authorised Deductions – report only.
Payday Filing (EI Export)
This function consists of two separate reports/exports - the Employee Details export/report and the EI Return export/report. The IRD requires both files to be filed via the myIR portal for every pay period processed within each payroll company. The Employee Details export will only generate for a pay period where new employees commenced employment or terminated within the pay period.
If an Employee Details export is generated for a pay period then this should be uploaded to the myIR portal prior to upload of the EI Return export to myIR.
The EI Return export file replaces the Employer Monthly Schedule (EMS) from 1 April 2019. Once registered for myIR and Payday Filing the EMS becomes obsolete.
EI Returns must be filed within two days of the payment date specified for the pay period processed.
-
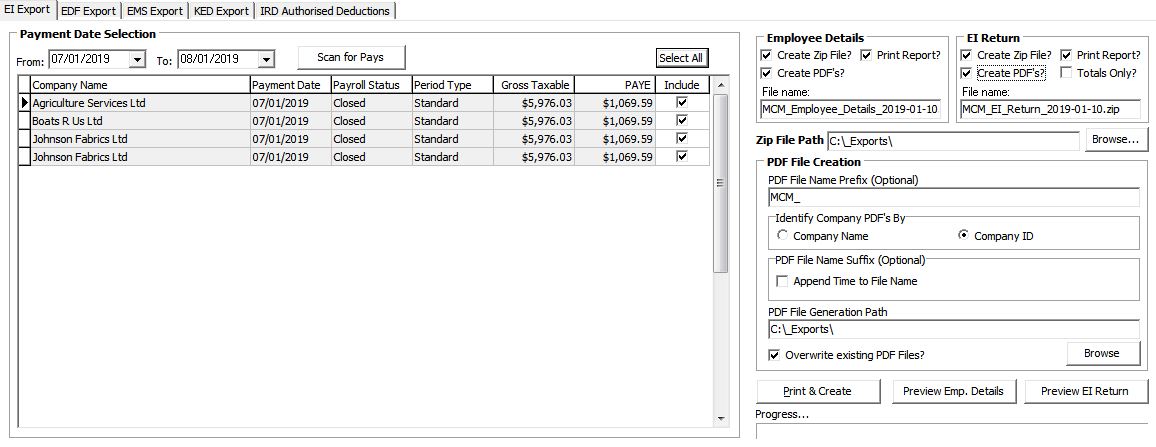
Payment Date Selection: Select a range of Payment Dates to include for the exports. The From and To dates will default to the current system date. Once set clicking on the Scan for Pays button will provide a list of all payroll companies which have a payment date within the date range specified. While pays with an open pay period will be displayed these can not be exported until the pay period has been closed and are provided for information only. The Include column allows for selection/deselection of individual payroll companies for export.
-
Employee Details / EI Return: the selections for each report/export have been broken into two sections as per the descriptions below. This allows printing/exporting of either export independently from each other or together as required.
-
Create Zip File?: Select to create the myIR Payday zip file for submission to the IRD.
-
Print Report?: Select this option to Print a report only or to incorporate the report print with the ‘Create’ option.
-
Totals Only on EI Return (Listing) Report?: Select this option to report on Company Totals only on the generated report of companies processed. This option will print a breakdown of individual payroll companies incorporated in any consolidation process i.e.: reporting on two or more payroll companies with the same IRD Number.
-
Create PDFs?: Select this option if you wish to create individual reports per company in PDF format. If selected the following options will be displayed and are available:
-
PDF File Name Prefix (Optional): Optionally declare a prefix for the name of each individual company PDF report file. This field can be left blank.
-
Identify Company PDF’s By: This options enables the user to select whether the individual PDF file names are to include either the ‘Company Name’ or ‘Company ID’ as per the Payroll Register tab. This will ensure that the naming conventions are unique.
-
PDF File Name Suffix (Optional): Optionally declare a suffix for the name of each individual company PDF file to Append Time to File Name.
-
PDF File Generation Path: Select the location the individual company PDF files are to be generated in.
-
Overwrite Existing PDF Files?: Select whether any PDF files in the selected location above with an identical name are to be automatically overwritten.
The ‘Create’ button can then be used to generate the individual PDF reports per company. The creation of the myIR Electronic file and PDF reports can be done in conjunction with each other if both options are selected. PDF reports cannot be previewed.
-
Zip File Path: Enter the Path (folder location) for where you wish to create the Payday files. You may use the Browse to assist with this.
-
File name: Enter the name of the Payday file you wish to create. By default the filename is set to uniquely identify both the Employee Details and EI Return files but can be overwritten for one off exports as required. Ensure the filename has a .zip extension to indicate file type.
-
Print & Create / Print / Create: Use this option to ‘Print’, ‘Print & Create’ or ‘Create’ the Payday audit / file(s) depending on which option you have selected. The file path and name will be printed in the report header when the file is created.
-
Preview Emp. Details / EI Return: Use these options to ‘Preview’ either the Employee Details or EI Return listings.
The generated Employee Details and EI Return listings will print on a new page for each company all employee information for the company with Company Totals or optionally Company Totals only for the EI Return. The user will be notified during the process if any payroll companies have an open pay period with a payment date which falls within the reporting payment date range selected. At this point the process can be cancelled so that the payroll in question can be closed to ensure that the data is included in this reporting period or the process can be elected to ignore the payroll company in question and continue.
Electronic Deduction Form (EDF) Export:
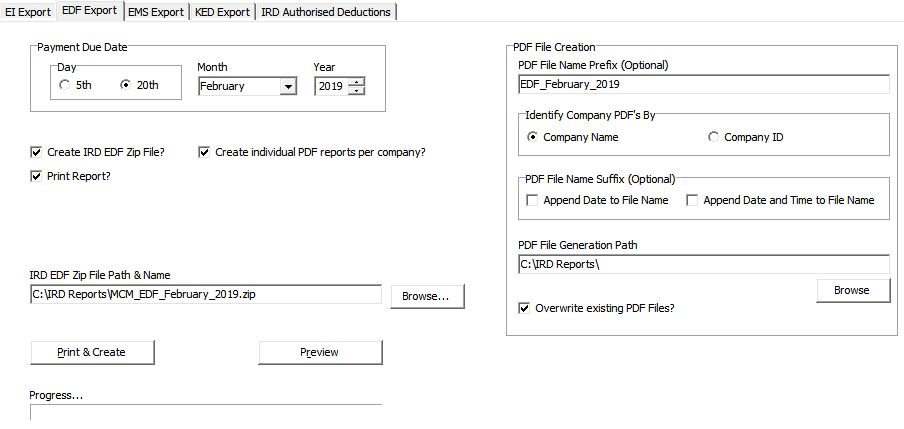
This facility enables an IRD export file (EDF) and associated report to be generated for a selected pending Payment Due Date – 5th or 20th of the month selected.
Payment Due Date
5th Day:
-
For ‘Large’ Employers the reporting period will be from the 16th – last day (inclusive) of the month preceding the month nominated.
20th Day:
-
For ‘Large’ Employers the reporting period will be from the 1st to the 15th (inclusive) of the nominated month.
-
For ‘Small’ Employers the reporting period will be from the 1st to the last day (inclusive) of the month preceding the nominated month.
Options
Create IRD EDF Zip File?: Select this option if you wish for the ‘EDF’ file to be created as per the File Path & Name parameter.
Create individual PDF reports per company?: Select this option if you wish to create individual reports per company in PDF format. If selected the following options will be displayed and available:
PDF File Creation
PDF File Name Prefix (Optional): Optionally declare a prefix for the name of each individual company PDF report file. This field can be left blank.
Identify Company PDF’s By: This option enables the user to select whether the individual PDF file names are to include either the ‘Company Name’ or ‘Company ID’ as per the Payroll Register tab. This will ensure that the naming conventions are unique.
PDF File Name Suffix (Optional): Optionally declare a suffix for the name of each individual company PDF file:
-
Append Date to File Name
-
Append Date and Time to File Name
PDF File Generation Path: Select the location the individual company PDF files are to be generated in.
Overwrite Existing PDF Files?: Select whether any PDF files in the selected location above with an identical name are to be automatically overwritten.
The ‘Create’ button can then be used to generate the individual PDF reports per company. The creation of the IRD Electronic file and PDF reports can be done in conjunction with each other if both options are selected. PDF reports cannot be previewed.
Print Report?: Select this option to Print a report only or to incorporate the report print with the ‘Create’ option.
IRD EDF Zip File Path & Name: Enter the Path (Location) and name of the EPS file you wish to create. You may use the Browse to assist with this. The naming of this file should be done taking into account the following suggestions:
-
A unique period based name.
-
Inclusion of type of return to differentiate it from other returns which may be required to be filed in the future.
-
A .zip extension to indicate file type.
Print & Create / Print / Create: Use this option to ‘Print’, ‘Print & Create’ or ‘Create’ the EDF audit / file depending on which option you have selected. The file path/name will be printed in the report header when the file is created.
Preview: Use this option to ‘Preview’ the ‘EDF’ file creation audit.
The Audit will report, on a new page for each company processed, the associated deduction totals as per the current IR345 pre-printed format (IRD Number, Period Ending, PAYE – Child Support – Student Loan – KiwiSaver and ESCT Deduction totals). A totals page will print the accumulated totals for all companies and a count of companies processed.
Employer Monthly Schedule (EMS)
This facility will enable an IRD export file (EMS) and associated report to be generated for a selected Tax Reporting Period.
From 1 April 2019 the EMS file creation becomes obsolete; however, the EMS function can still be used for historical reporting purposes.
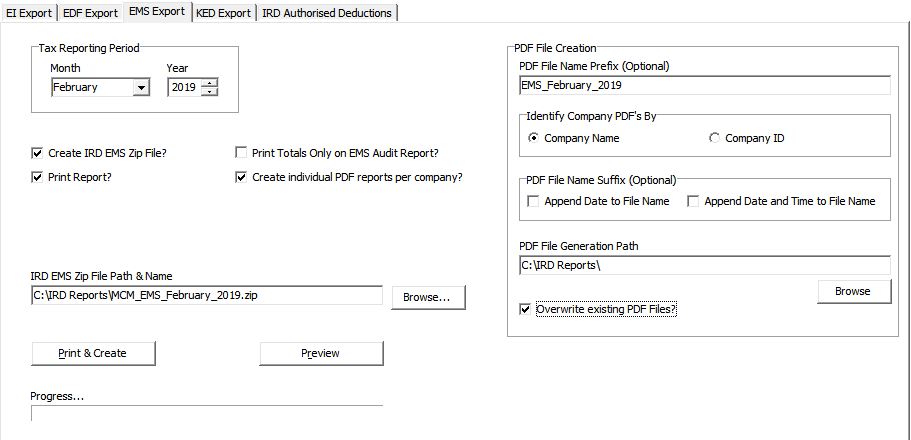
Tax Reporting Period: Select the Month and Year Reporting Period.
Create IRD EMS Zip File?: Select this option to create the IRD EMS zip file for submission to the IRD.
Print Totals Only on EMS Audit (Listing) Report?:
Select this option to report on Company Totals only on the generated report of companies processed. This option will print a breakdown of individual payroll companies incorporated in any consolidation process i.e.: reporting on two or more payroll companies with the same IRD Number.
Print Report?: Select this option to Print a report only or to incorporate the report print with the ‘Create’ option.
Create individual PDF reports per company?: Select this option if you wish to create individual reports per company in PDF format. If selected the following options will be displayed and available:
PDF File Creation
PDF File Name Prefix (Optional): Optionally declare a prefix for the name of each individual company PDF report file. This field can be left blank.
Identify Company PDFs By: This options enables the user to select whether the individual PDF file names are to include either the ‘Company Name’ or ‘Company ID’ as per the Payroll Register tab. This will ensure that the naming conventions are unique.
PDF File Name Suffix (Optional): Optionally declare a suffix for the name of each individual company PDF file:
-
Append Date to File Name
-
Append Date and Time to File Name
PDF File Generation Path: Select the location the individual company PDF files are to be generated in.
Overwrite Existing PDF Files?: Select whether any PDF files in the selected location above with an identical name are to be automatically overwritten.
The ‘Create’ button can then be used to generate the individual PDF reports per company. The creation of the IRD Electronic file and PDF reports can be done in conjunction with each other if both options are selected. PDF reports cannot be previewed.
IRD EMS Zip File Path & Name: Enter the Path (Location) and name of the ‘EMS’ file you wish to create. You may use the Browse to assist with this. The naming of this file should be done taking into account the following suggestions:
-
A unique period based name.
-
Inclusion of type of return to differentiate it from other returns which may be required to be filed in the future.
-
A .zip extension to indicate file type.
Print & Create / Print / Create: Use this option to ‘Print’, ‘Print & Create’ or ‘Create’ the EDF audit / file depending on which option you have selected. The file path/name will be printed in the report header when the file is created.
Preview: Use this option to ‘Preview’ the EMS file listing.
The generated EMS listing will print on a new page for each company all employee information for the company with Company Totals or optionally Company Totals only. The user will be notified during the process if any payroll companies have an open pay period with a payment date which falls within the reporting month. At this point the process can be cancelled so that the payroll in question can be closed to ensure that the data is included in this reporting period or the process can be elected to ignore the payroll company in question and continue.
KiwiSaver Employment Details (KED)
This facility will enable an IRD export file (KED) and associated report to be generated for a selected Reporting Period. Only those companies registered for ‘IRD Reporting’ will be included in this process.
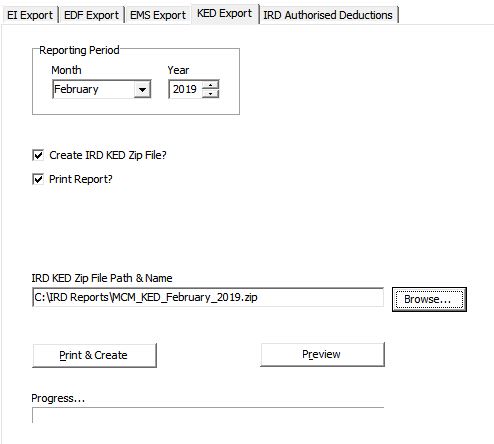
Reporting Period – Month & Year: Select the Month and Year Reporting Period.
Create IRD KED Zip File?: Select to create the IRD KED zip file for submission to the IRD.
IRD KED Zip File Path & Name: Enter the Path (Location) and name of the KED file you wish to create. You may use the Browse to assist with this. The naming of this file should be done taking into account the following suggestions:
-
A unique period based name.
-
Inclusion of type of return to differentiate it from other returns which may be required to be filed in the future.
-
A .zip extension to indicate file type.
Print & Create: Use this option to ‘Print’ or ‘Print & Create’ the KED audit / file. The file path/name will be printed in the report header when the file is created.
Preview: Use this option to ‘Preview’ the KED file audit.
The report will list on a new page per company the KiwiSaver Employment details in the format generated within the payroll application.
IRD Authorised Deductions Report
This report will only be relevant if within any of the registered companies an ‘IRD Authorised’ deduction (deductions as per a IRD Deduction Notice) has been in effect within the Reporting period.
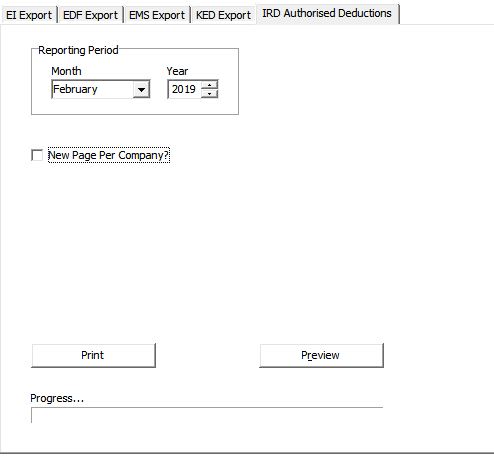
Reporting Period – Month & Year: Select the Month and Year Reporting Period.
New Page per Company?: Select if each Company report is to be on a new page.
Print: Use this option to ‘Print’ the IRD Authorised Deductions Report.
Preview: Use this option to ‘Preview’ the IRD Authorised Deductions Report
The report will print, optionally on a new page for each company, the employees name, IRD number, amount of the deduction.
Utilities
Company Backups
This Utilities option provides a facility to quickly backup all, or any, of the registered companies.
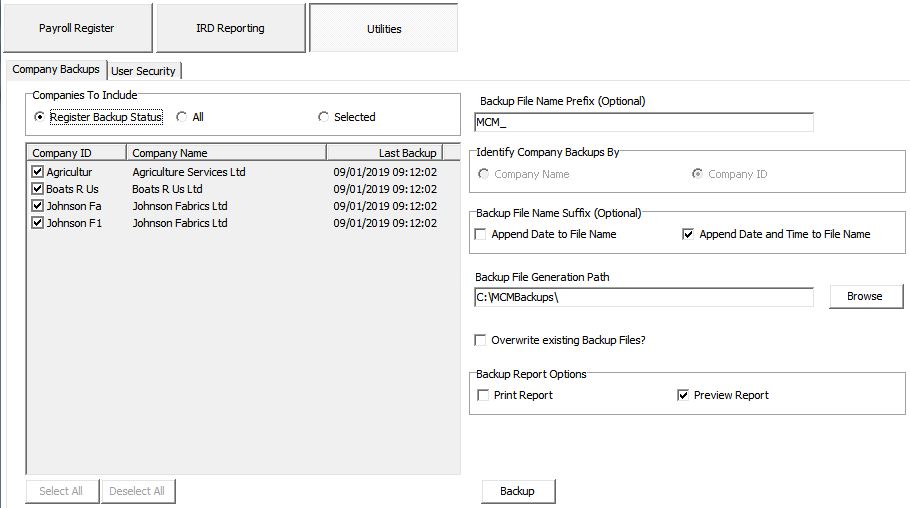
Companies to Include: Companies to backup can be selected via the following methods:
-
Register Backup Status: Only include those companies whom have the ‘Backup’ indicator on the ‘Payroll Register’ tab selected.
-
All: Backup ALL registered companies irrespective of their registered ‘Backup’ indicator setting.
-
Selected: Only backup those companies as indicated on the selection display. The ‘Select All’ and ‘Deselect All’ buttons can be used to assist in the selection process.
Backup File Name Prefix (Optional): Optionally declare a prefix for the name of individual company backup files. This field can be left blank.
Identify Company Backups By: This option enables the user to select whether the backup file name is to include either the Company Name or Company ID as per the Payroll Register tab. This will ensure that the naming conventions are unique.
Backup File Name Suffix (Optional): Optionally declare a suffix for the name of each individual company backup file:
-
Append Date to File Name
-
Append Date and Time to File Name
Backup File Generation Path: Select the location the individual company backup files are to be generated in.
Overwrite Existing Backup Files?: Select whether any backup files in the selected location above with an identical name are to be automatically overwritten. The Backup Report will identify the companies which had an existing Backup file overwritten.
Backup Report Options
Print: Automatically print the Backup Report when the backup process has completed.
Preview: Preview the Backup Report when the Backup Process has completed.
Running the Backup
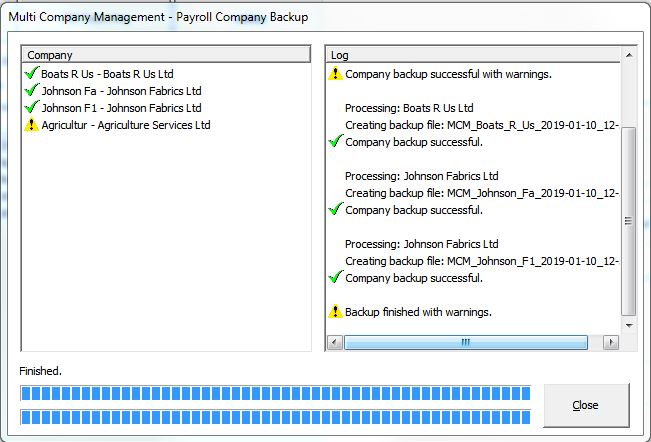
The Backup button will commence to backup each company as per the selections. During the Backup the following screen will be displayed displaying a log for each company showing any warnings the user should be made aware of.
Critical Warnings
These are some of the Critical Warnings which will prevent the company to be successfully backup up:
-
Access to company Location no longer available.
-
Write permission to the designated location where the backup files are to be generated.
-
Zip file errors.
-
Exclusive rights to the payroll company has not been achieved due to a user accessing the company at the time of backup. In this case the User will be identified only if User Security is activated within that particular company.
Non-Critical Warnings
These warnings will be notifiable but will not prevent the company being backed up:
-
Company was not in a ‘Closed’ state.
-
‘Overwrite existing Backup Files?’ option was not selected and a zip file already exists as per the naming conventions selected. The user will be prompted to either overwrite the file or omit the backup process for the company concerned.
The Backup log will then be able to be printed detailing whether the backup was successfully achieved or detailing any Critical and Non-critical warnings concerning each company.
The Last Backup Location, File Name and Date displays on the Register tab will be updated accordingly.
User Security
This tab will enable User access to the module to be activated and set up. The functionality of User Security within the module is the same as within the Payroll Application with the exception that User Security will only provide authorised access to the module as a whole and not individual processes within the module.
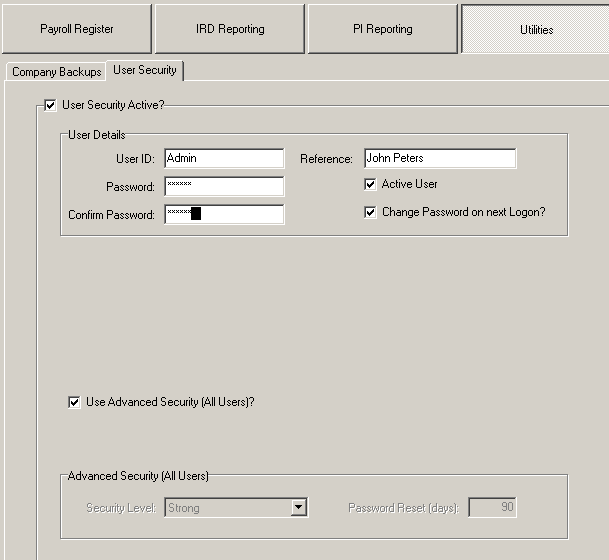
User Security Active?: Select to activate this facility.
User Details
User ID: The unique login name that will be used to identify this user.
Reference: The full name or description of this user account.
Password: The secret password that will be used to access this account. You will be required to re-enter the password to confirm.
Active User Code: Tick this box to make the user active. Only active users will be accepted at the logon screen.
Change Password on next Logon?: If 'Advance Security (All Users) ' is activated for the module then you may select this option to force the user in question to re-enter a new password when they log on for the first time. Therefore, the administrator can allocate a temporary password which will be redundant when the user declares the new password.
Options
Advanced Security: If selected, Advanced Security will apply to all users within the module. This facility is to force all users to change their password after a certain time period has elapsed (# of days). This would occur after the time period has passed and when the user next logs onto the company.
There are two levels of security which can be assigned to passwords:
-
Strong: Password must be at least 6 characters in length and contain at least 1 non-numeric character and at least 1 numeric character.
-
Simple: Password must be at least 6 characters in length.
All passwords have a maximum length of 12 characters.
Password Reset (Days): The number of days after which the user will be required to enter a new password during the logon process. The new password will be validated according to the Security Level selected for the company.
Other Functions
Print Setup Dialog
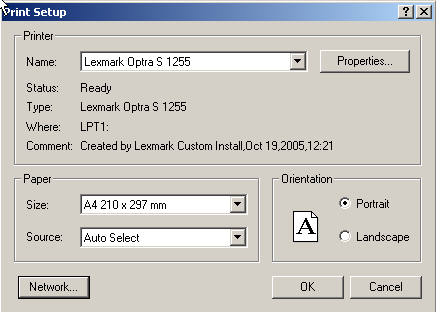
This dialog is accessed by clicking “Print Setup” on the File menu or the “Print Setup” button on the Reporting page.
The Print Setup dialog allows you to specify which printer you wish to use in the current session and to modify the settings for the selected printer.
System Backup & Restore
Backup and Restore
The database used by the MCM module to store Payroll Registry and the module control parameters can be ‘Backed Up’ and ‘Restored’ from the ‘Tools’ menu.
These Backup and Restore facilities will not backup or restore any Registered payroll companies as this may be achieved via the ‘Utilities – Company Backups’ tab.
Registered Companies Backup (for Support Purposes)
In the unlikely event of a processing error occurring within the module, and to assist IMS Support to identify and address the issue in a timely manner, the ‘Registered Companies Backup (for Support Purposes’ option is available.
This facility will backup for each Registered Payroll company only those datasets required by IMS support to help determine the cause of any issue. This backup, if and when requested by IMS Support, can be run and the single zip file produced can then be emailed to IMS for analysis. This will negate the necessity for each of the Companies registered to be backed up, and sent, separately to IMS and thus help ensure a speedy resolution should any issue arise.