
Time Import
Overview
The Time Import module allows you to import timesheet transactions from a time recording system into IMS Payroll. It has standard interfaces with a number of time recording systems including Amano Time Clock, Laurenka, IMS Online, Kronos, Simplex WinStar, TimeScan, NZA Gold Job Costing, Nimbus Job Costing, Exchequer Enterprise, Sybiz Vision Job Costing, Greentree Job Costing and many more.
There is also a standard CSV format that can be used to integrate with any non-standard system. The CSV specifications are included at the end of this document.
Prerequisites
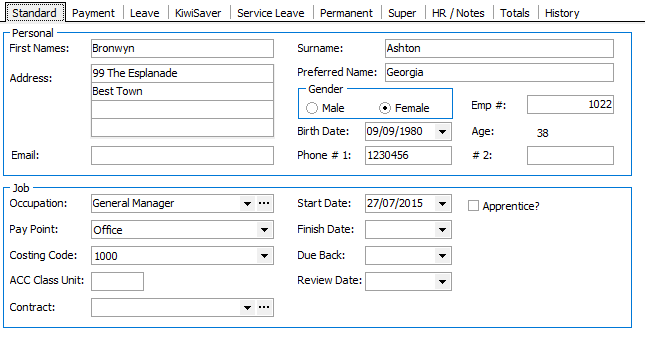
Before you can use the Time Import module, your time recording system must be set up to use the correct employee numbers to communicate with IMS Payroll. Employee numbers are assigned on the Standard tab:
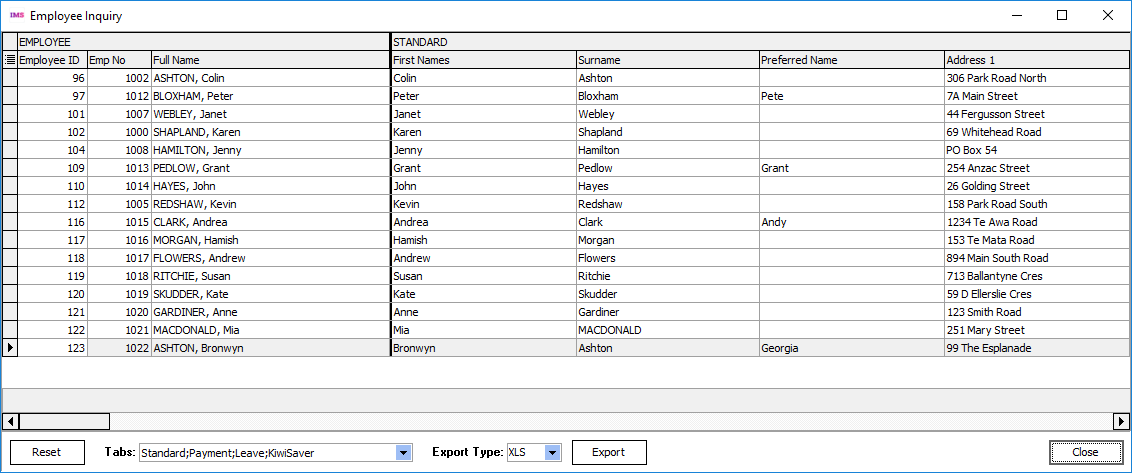
 MYOB IMS Payroll has an internal EmployeeID which can be used instead of the Employee Number. To find the EmployeeID for your employees, go to the Employee tab and click the Find button ( ). EmployeeIDs appear on the Employee Inquiry window that opens:
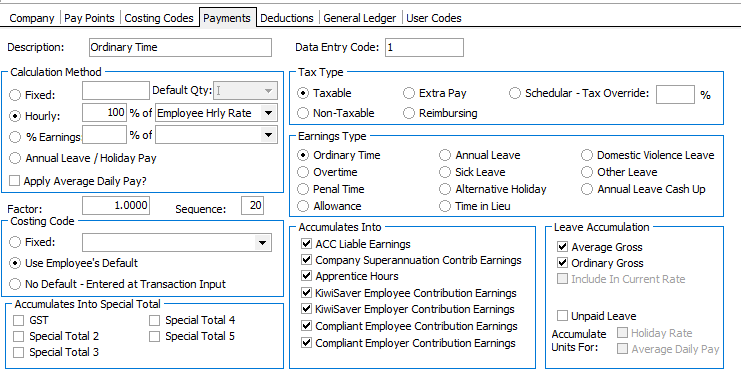
Payments also need to be linked—IMS Payroll uses the Data Entry Code field to do this. In the example below this shows that the code to be used in your time recording system for “Ordinary Time” is 1.
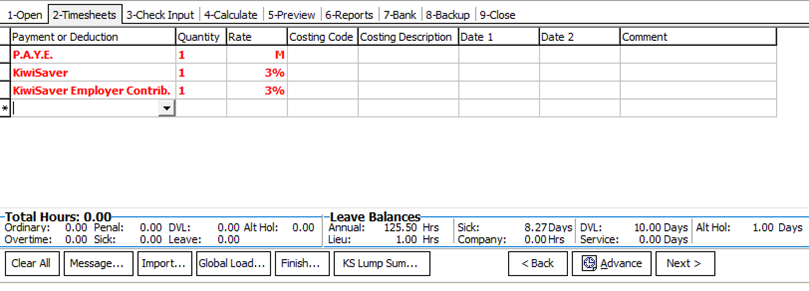
Review all payments set up on the employee’s Permanent tab and make sure there is nothing in here that could be duplicated as part of your Time Import. In the example below, Ordinary Time has been added in the Permanent tab. If Ordinary Time was coming through in the Time Import this would need to be removed.

Payroll Processing
To use the Time Import module, create the file in your time recording system and save it in an appropriate folder, then open the pay as normal.
Go to Step 2 – Timesheets and click the Import button.
The Time Import module can also be run by selecting File Import > Time Import from the Tools menu. If the Time Import option is unavailable, your pay is not open.
You will be asked to select your time recording system and specify whether you are matching your employees by Employee Number or Employee ID (or both):
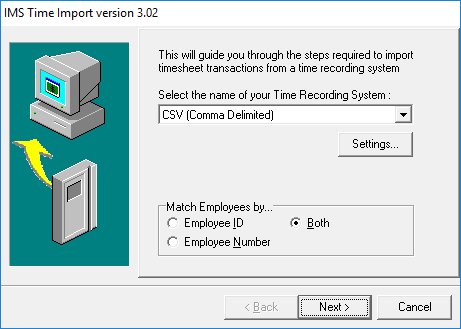
If this is the first time you are importing from the selected time recording system, you will need to click Settings and configure the settings for that system (see page 5).
Click the Next button to continue. You will then need to browse to where your import file is located:
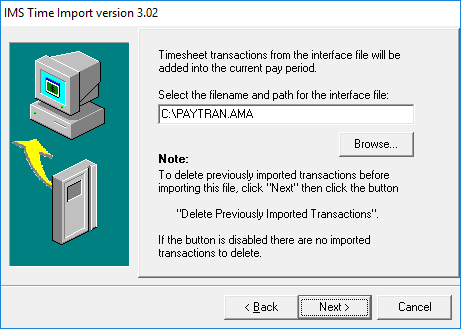
Select the import file and click Next to continue. If you have already performed a time import and you want to repeat it, you can choose to delete the previously imported transactions; in any case click Finish to perform the import.
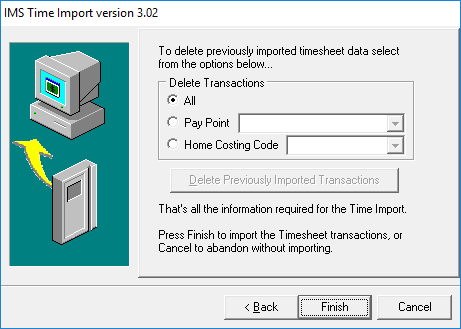
A progress bar displays the progress of the import as it reads the file and creates timesheet entries. When the import process is complete, a message will be displayed. If any errors were found, you will be given the option of printing out an error report.
The error report will list any errors found in the import file, typical errors are:
-
Employee #9999 not foundChange the Employee identifier used in your time recording system to match the ‘EmployeeID’ in IMS Payroll Partner.
-
Employee #9999 invalid Allowance CodeYou are using an allowance code identifier that you have not associated with a Payment Data Entry Code within the payroll.
If there are errors it will show the error report. These can be manually entered or corrected in the import file. The import process can then be re-run.
When importing, the program will create timesheet transactions, based on the information in the import file. These transactions will be added to any existing timesheet transactions already present in the timesheet entry screen. Only the previously imported transactions, i.e. those not manually entered, will be deleted if the file was re-imported in conjunction with selecting the Delete Previously Imported Transactions option.
Time Import Settings
The first you select your time recording system on the first screen of the Time Import module, click the Settings button to set up options that control how transactions from the selected time recording system are imported into IMS Payroll.
Depending on the time recording system you are using you may get a screen similar to one of the following.
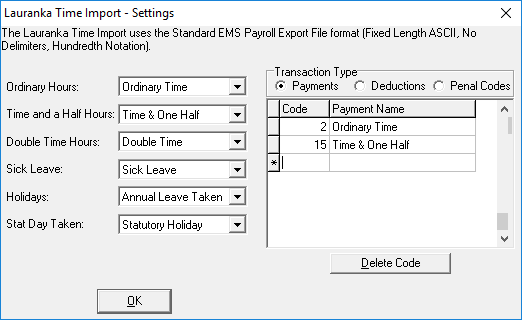
If your Time recording system uses different payment codes to IMS Payroll you can use this screen to match the two digit payment codes to your Time recording System to the appropriate payment in IMS Payroll.
In the example below the Payment code of 2 in the Laurenka system matches up to Ordinary Time in IMS Payroll.
CSV Time Import Format
IMS Payroll has a standard CSV Time Import that can be used to integrate with any time recording systems. The file to be imported into IMS Payroll is comma delimited and will have the following format:
|
Field |
Format |
Description |
Example |
|
Employee ID or Employee Number |
Integer |
Unique Employee Identifier |
“100” |
|
Data Entry Code |
Alpha |
The Pay Partner Data Entry Code |
“T1” |
|
Transaction Units |
Number |
A Quantity |
“40” |
|
Cost Code |
Alpha |
A Pay Partner Cost Code |
“1001” |
|
Unit Rate |
Number |
A Dollar Amount or ***Rate Code*** |
“HR3” |
|
Date 1 |
dd/mm/yyyy |
Transaction Reference Date 1 |
“03/08/2002” |
|
Date 2 |
dd/mm/yyyy |
Transaction Reference Date 2 |
“04/08/2002” |
|
Comment |
Alpha |
Transaction Comment |
“Weekend Callout” |
100,T1,40,1001,HR3101,T1,37.5,1001,101,T2,5,1020,105,MEAL,1,1001,8.50100,T2,25,1001,HR3,03/08/2002,04/08/2002,Weekend Callout 100,Days,5,,6100,T1,40,1001,HR3101,T1,37.5,1001,101,T2,5,1020,105,MEAL,1,1001,8.50100,T2,25,1001,HR3,03/08/2002,04/08/2002,Weekend Callout 100,Days,5,,6Example file:
Field Notes
|
Field |
Description |
|
EmployeeID / Employee Number |
During import processing the system will attempt to locate the number provided in this field according to the setting chosen on the first screen of the IMS Time Import module. If you select the "Employee Number" option IMS Time Import will attempt to match the value to an existing user-defined Employee Number. If you select the "Employee ID" option IMS Time Import will attempt to match the value to an existing system-defined Employee ID. If you select the "Both" option the value will be matched primarily to a valid Employee Number or secondarily to a valid Employee ID. If a valid match can be made the system then checks that the Employee is not terminated and is included in the current pay period. |
|
Data Entry Code |
The data entry code for the payment or deduction. This code is set up on creation of a new payment or deduction in Payroll Partner. The maximum length of the field is 10 characters. Reducing Balance deductions, Bank (direct credit) deductions that require the entry of a bank account number at transaction input, and Rated (i.e. percentage) deductions cannot be loaded using this format. Alternatively, a user defined code for ‘Days Paid For: Holiday and Average Daily Pay rate’ calculations can be used for overriding the ‘Days Paid for’ each pay run. This unique identification code will be used to identify the ‘Days Paid For’ record and must be set up on the CSV Settings window—see page 8. |
|
Transaction Units |
The quantity or number of units. This is the actual number of units to be paid and relates to the payment or deduction code. The field has a maximum of 2 decimal places. If the quantity relates to a ‘Days Paid For’ record then the quantity will be used to override the number of ’Days Paid For Holiday Rate’ field within timesheet entry. |
|
Cost Code |
The Cost Code for this payment. If this is blank the system will check to see whether the payment has a default cost code or whether to use the Employees cost code. |
|
Unit Rate |
This field has a maximum of 4 decimal places and represents the amount payable per unit. This field can be blank however if it is, a default rate must be available within the payroll system. A valid numeric value found in this field including 0 (zero) will override the default rate for the transaction. A ***Rate Code*** from the following list will override the default transaction rate with the listed employee rate: - HR1 – Hourly Rate 1 HR2 – Hourly Rate 2 HR3 – Hourly Rate 3HR4 – Hourly Rate 4 HR5 – Hourly Rate 5 PPR – Per Period Rate PDR – Per Day Rate Rate Codes are accepted for Payments but not for Deductions. If the rate relates to a ‘Days Paid For’ record then the Unit Rate will be used to override the number of ‘;Days Paid For Average Daily Pay Rate’ field within timesheet entry. |
|
Date 1 |
The first Transaction reference date (optional). This option must first be activated within the Payroll company. |
|
Date 2 |
The second Transaction reference date (optional). This option must first be activated within the Payroll company. |
|
Comment |
Comment relating to the transaction – optional and maximum of 30 characters. This option must first be activated within the Payroll company. If the CSV file is to be created via Excel and you wish to import any of the following fields: Date 1, Date 2 or Comments please ensure that on the first row a valid comment or double quotes are entered in cell “H” (Comment cell). If you are using Excel and Comments to generate Multi Labour Item descriptions for interfacing to Quickbooks Job Costing please ensure that the Multi Labour Item descriptions are enclosed in the characters [ and ]. The characters within the delimiters will be encased in Double Quotes within the Payroll Timesheets Comment field. |
CSV Settings
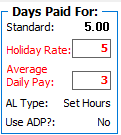
The standard CSV import allows you to import the Holiday Rate Days and Average Daily Days into IMS Payroll. If you enter DAYS into the ‘Days Paid For’ Identification Code field, then if a Days row is found, the Time Import module takes the Transaction Units (column 3) as the Holiday Rate days and the Unit Rate (column 5) as the Average Daily Pay days.
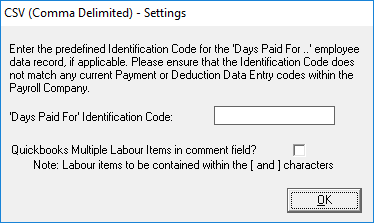
This will import the days on Step 2 – Timesheets:
Formats that use the standard CSV format:
-
NZA Gold Job Costing
-
Nimbus Job Costing
-
Sybiz Vision Job Costing
-
TNA 2000
-
Workforce Central
-
Maxim
-
Systime
-
ADI Time
-
Cashbook Complete