
Batch Picking: General Information
If the Advanced Picking feature is enabled on the Enable/Disable Features (CS100000) form, you can optimize and speed up the warehouse operations needed for fulfilling the order by using the batch picking workflow.
In this topic, you will read about the batch picking workflow in MYOB Acumatica. The workflow in this topic is based on the assumption that your system has the recommended configuration described in Batch Picking: Implementation Checklist.
Learning Objectives
In this chapter, you will do the following:
- Enable the needed system features
- Specify the minimum required configuration for the batch picking workflow
- Learn the recommended settings that you can specify to make the system fit your business requirements
- Prepare a batch picking worksheet
- Pick and pack items in a batch
- Confirm a shipment after packing the items
Applicable Scenario
You use batch picking if you need to optimize the processes of picking and packing items for a group of orders to be shipped. With a batch picking flow, the warehouse manager prepares a batch picking worksheet with a batch of orders to be shipped, prints the related pick lists, and gives the pick lists to the pickers who will perform this work. In batch picking, each pick list generally includes items from multiple sales orders. The pickers collect the items listed in the pick lists from the specified warehouse locations and bring these items to the sorting location. A pack line operator prints packing slips for the shipments ready for packing and give these packing slips to a packer. The packer sorts the picked items by shipments and packs them into boxes.
General Process of Batch Picking
The workflow of fulfilling orders with batch picking is shown in the following diagram.
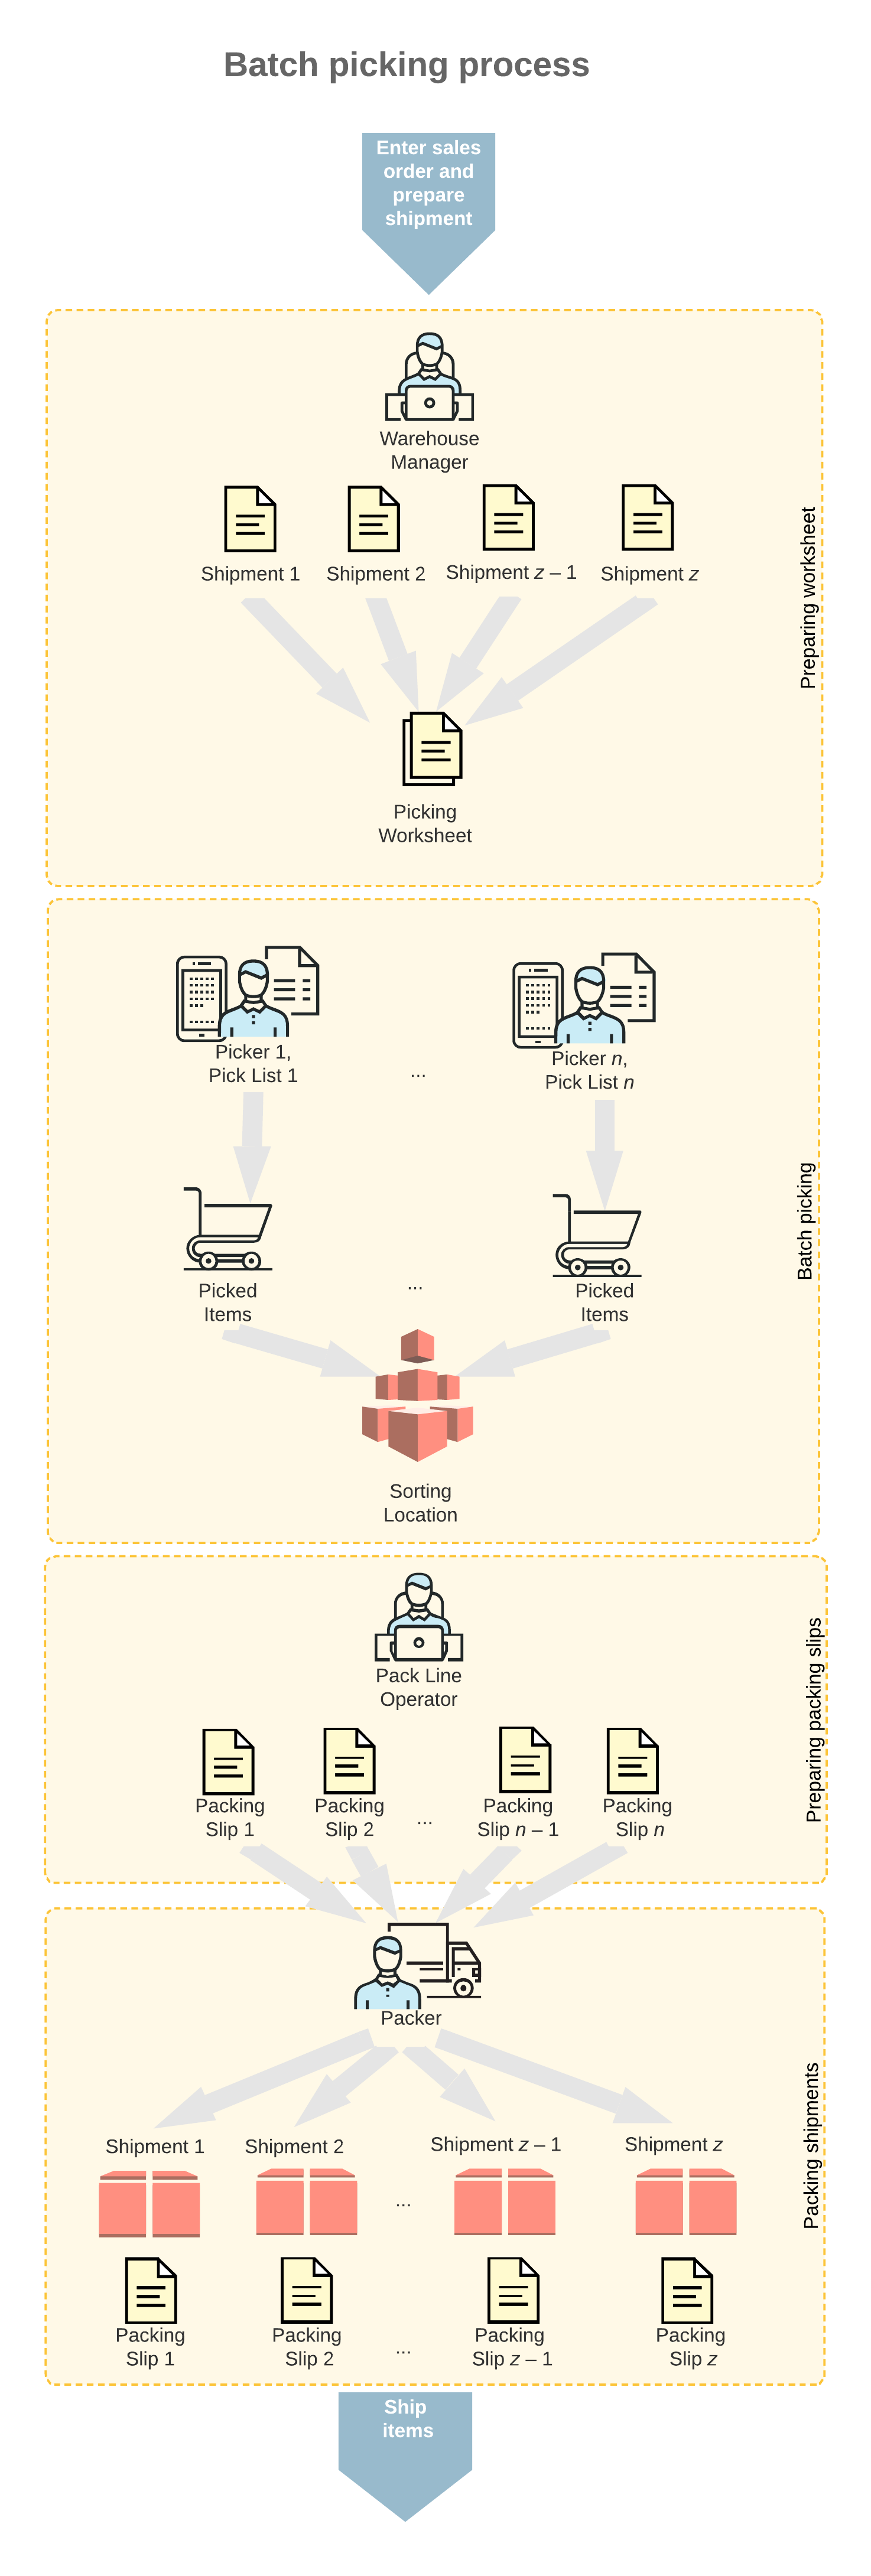
Processing a batch includes the following processes performed by the following persons:
- A warehouse manager opens the Create Pick Lists (SO503050) form, selects the shipments to be processed in a batch, specifies the maximum number of pickers, creates a picking worksheet, and prints the batch pick lists.
- Each warehouse worker acting as a picker opens the Pick, Pack, and Ship (SO302020) form (or the corresponding screen in the Acumatica mobile app), switches to Pick mode, and scans the reference number of the batch pick list. Then the picker goes through the warehouse, picks the items from the needed locations, and scans their barcodes and quantities. Then the picker transfers the items to the sorting location and confirms the pick list.
- A pack line operator verifies that batch is picked and prints the packing slips on the Picking Worksheets (SO302500) form.
- A warehouse worker acting as a packer opens the Pick, Pack, and Ship form (or the corresponding screen in the Acumatica mobile app), switches to Pack mode, and scans the reference number of the batch pick list. Then the packer scans the barcode of the box to which the items are being packed, and scans the barcodes and the quantity of items being packed. After all the items are packed, the packer confirms the shipment.
The following sections describe the workflow for a warehouse manager, a picker, a pack line operator, and a packer. By understanding the workflow for each of these employees, you can better understand the batch picking workflow as a whole in a warehouse.
Workflow for a Warehouse Manager
The workflow of a warehouse manager involves the actions shown in the following diagram.
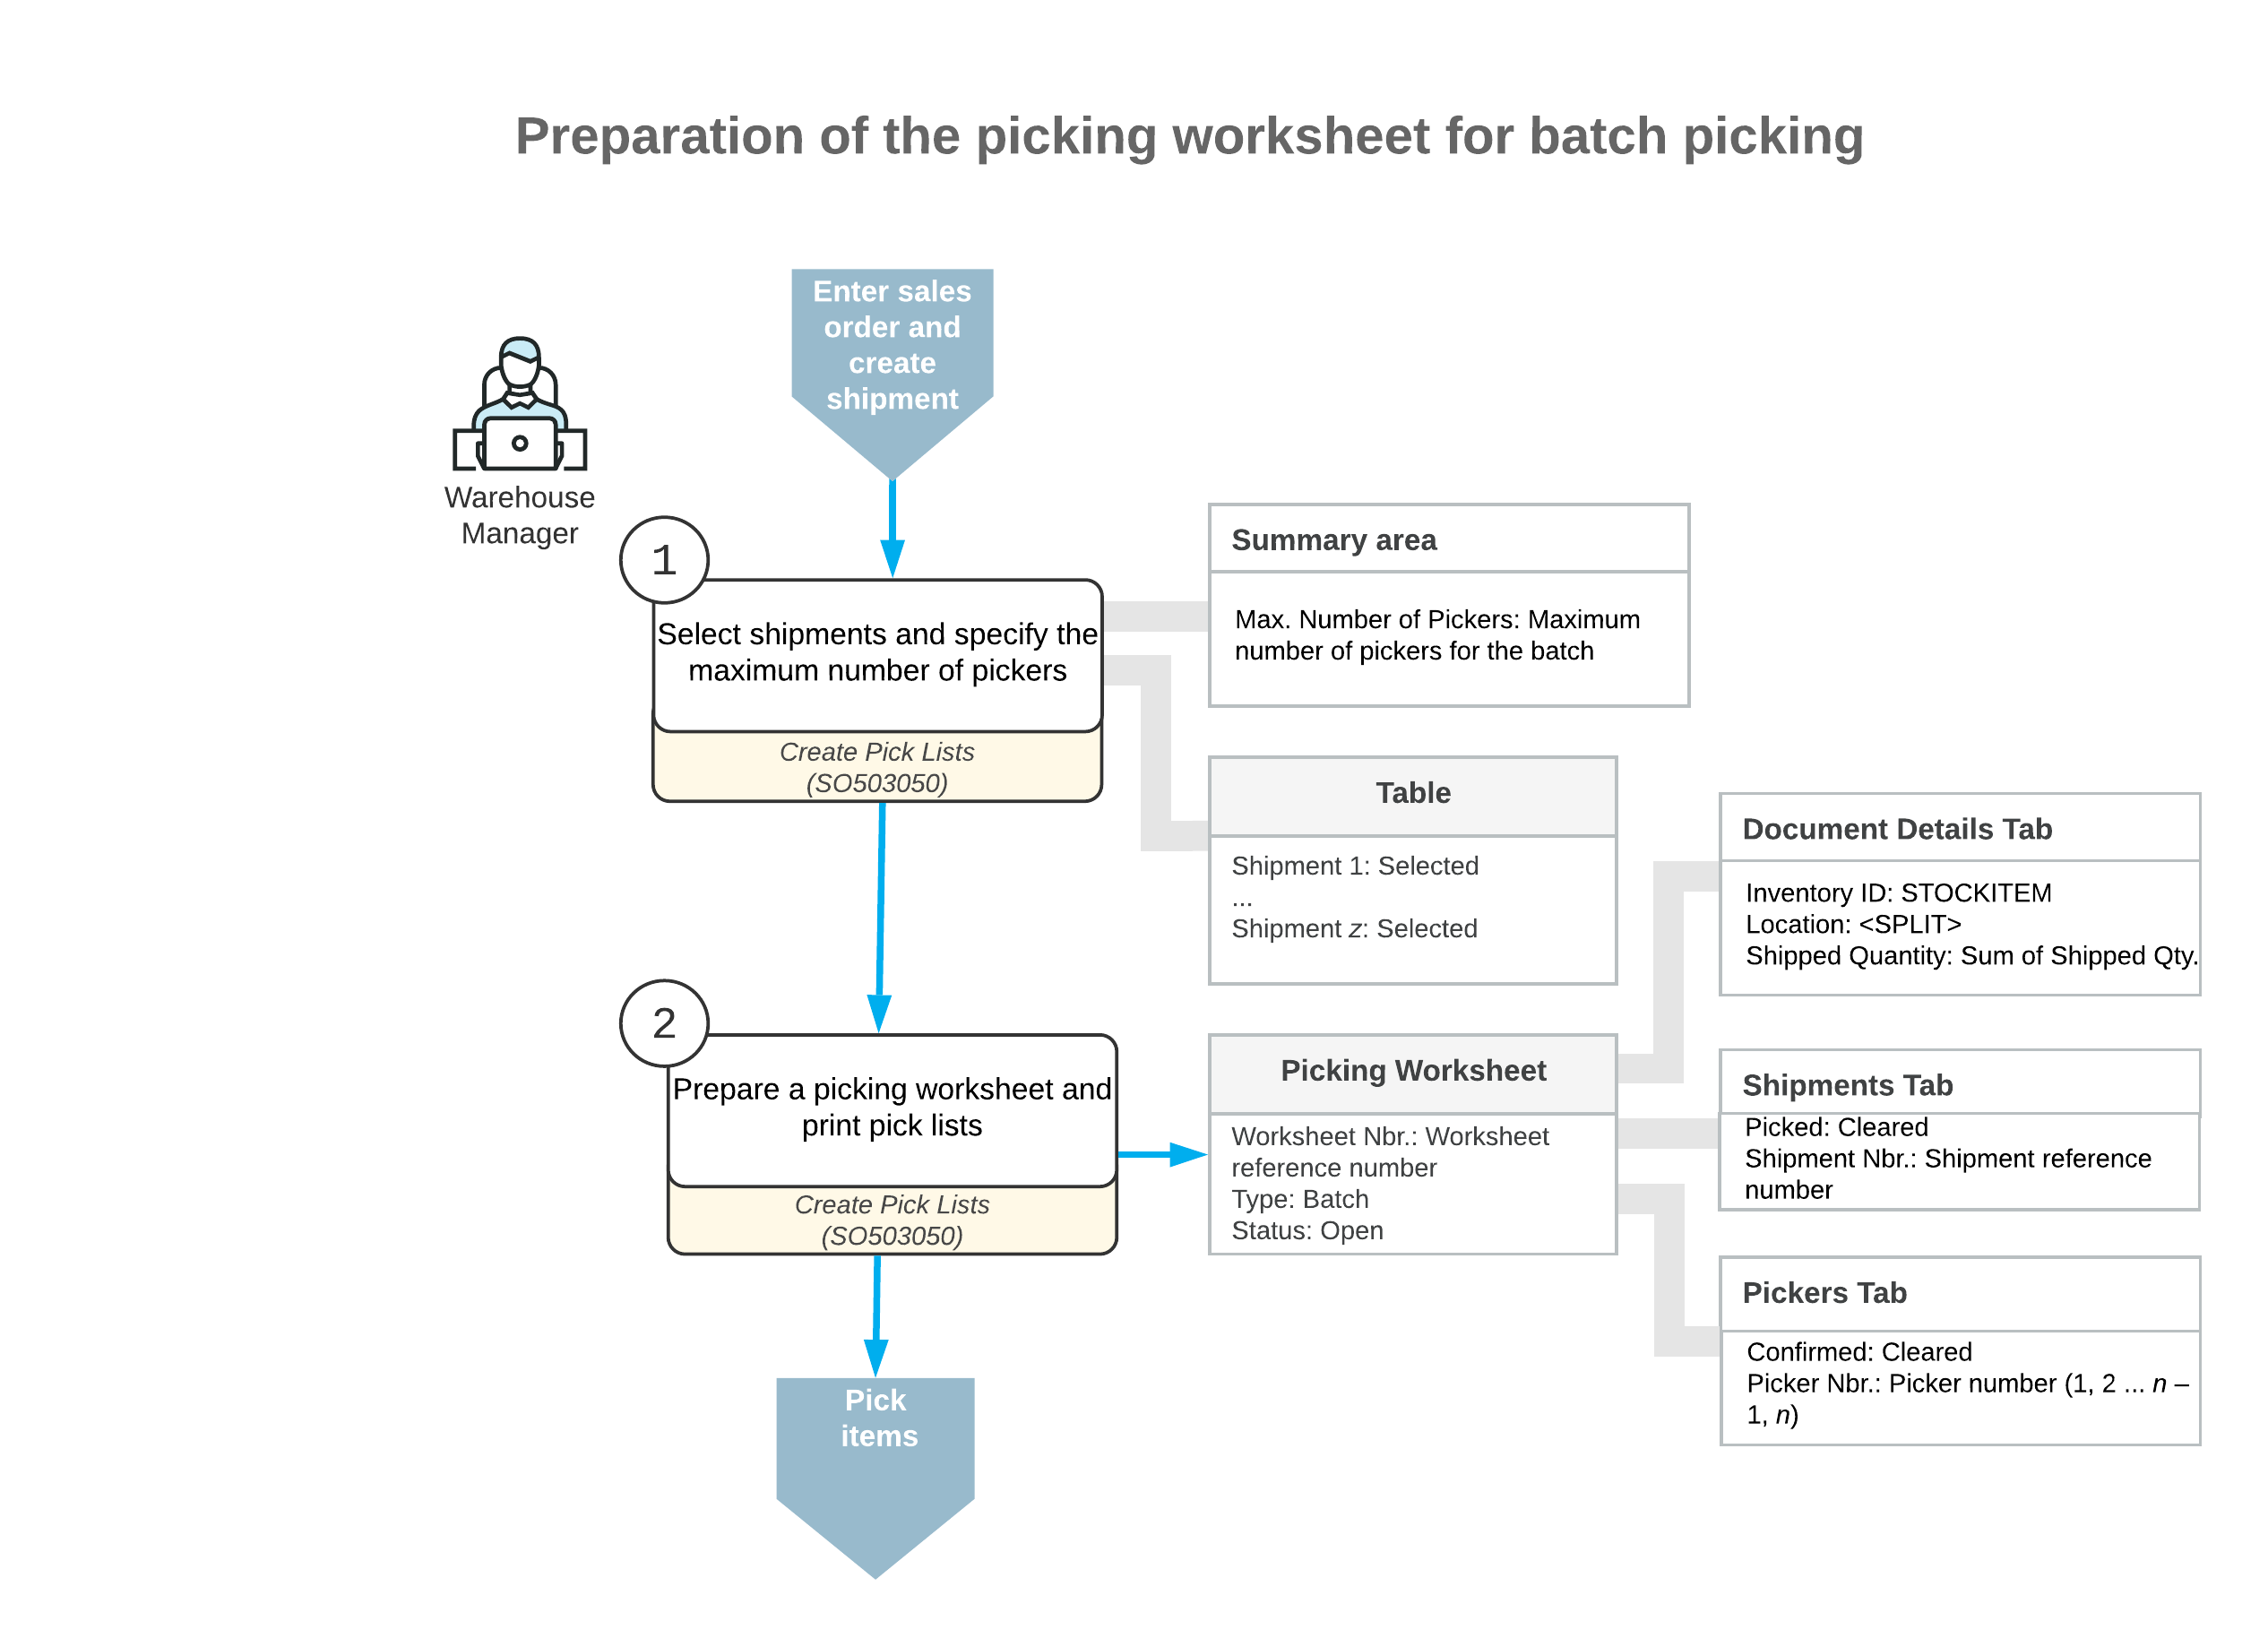
To prepare a batch picking worksheet, the warehouse manager performs the following steps:
- Selects the type of picking worksheet to be prepared.
The warehouse manager opens the Create Pick Lists (SO503050) form and selects the Create Batch Pick Lists action.
- Specifies the number of pickers.
To specify the maximum number of pickers who are currently available to be assigned to a batch, the manager enters the value in the Max. Number of Pickers box.
- Selects the shipments.
In the table, the manager selects the unlabeled check boxes in the lines with the shipments to be included in the picking worksheet.
- Creates a picking worksheet and selects the pickers.
On the form toolbar, the manager clicks Process to create the picking worksheet for the selected shipments and to print the pick lists for the batch. Then the manager gives these pick lists to the pickers (that is, the warehouse workers who will perform the picking).
Cancellation of a Picking Worksheet
If a batch picking worksheet has the Picking status on the Picking Worksheets (SO302500) form and none of its shipments have been completely picked yet, the warehouse manager can click Cancel Worksheet on the More menu to cancel this worksheet.
When a picking worksheet is canceled, the system assigns the Canceled status to it, cancels all the created pick lists, and removes all the related shipments from the picking worksheet. For all rows on the Details tab, the Picked Qty. becomes 0.
After cancellation, the shipments from the canceled worksheet are no longer associated with this worksheet and can be added to another worksheet. These shipments can still be reviewed on the Shipments tab of the Picking Worksheets form; the Unlinked check box is selected for each shipment on the tab.
The process of physically distributing already-picked goods back to their storage locations is not covered by the picking workflow; this should be done manually according to the pick lists of the canceled worksheet.
Workflow for a Picker
The workflow for a picker involves the actions shown in the following diagram.
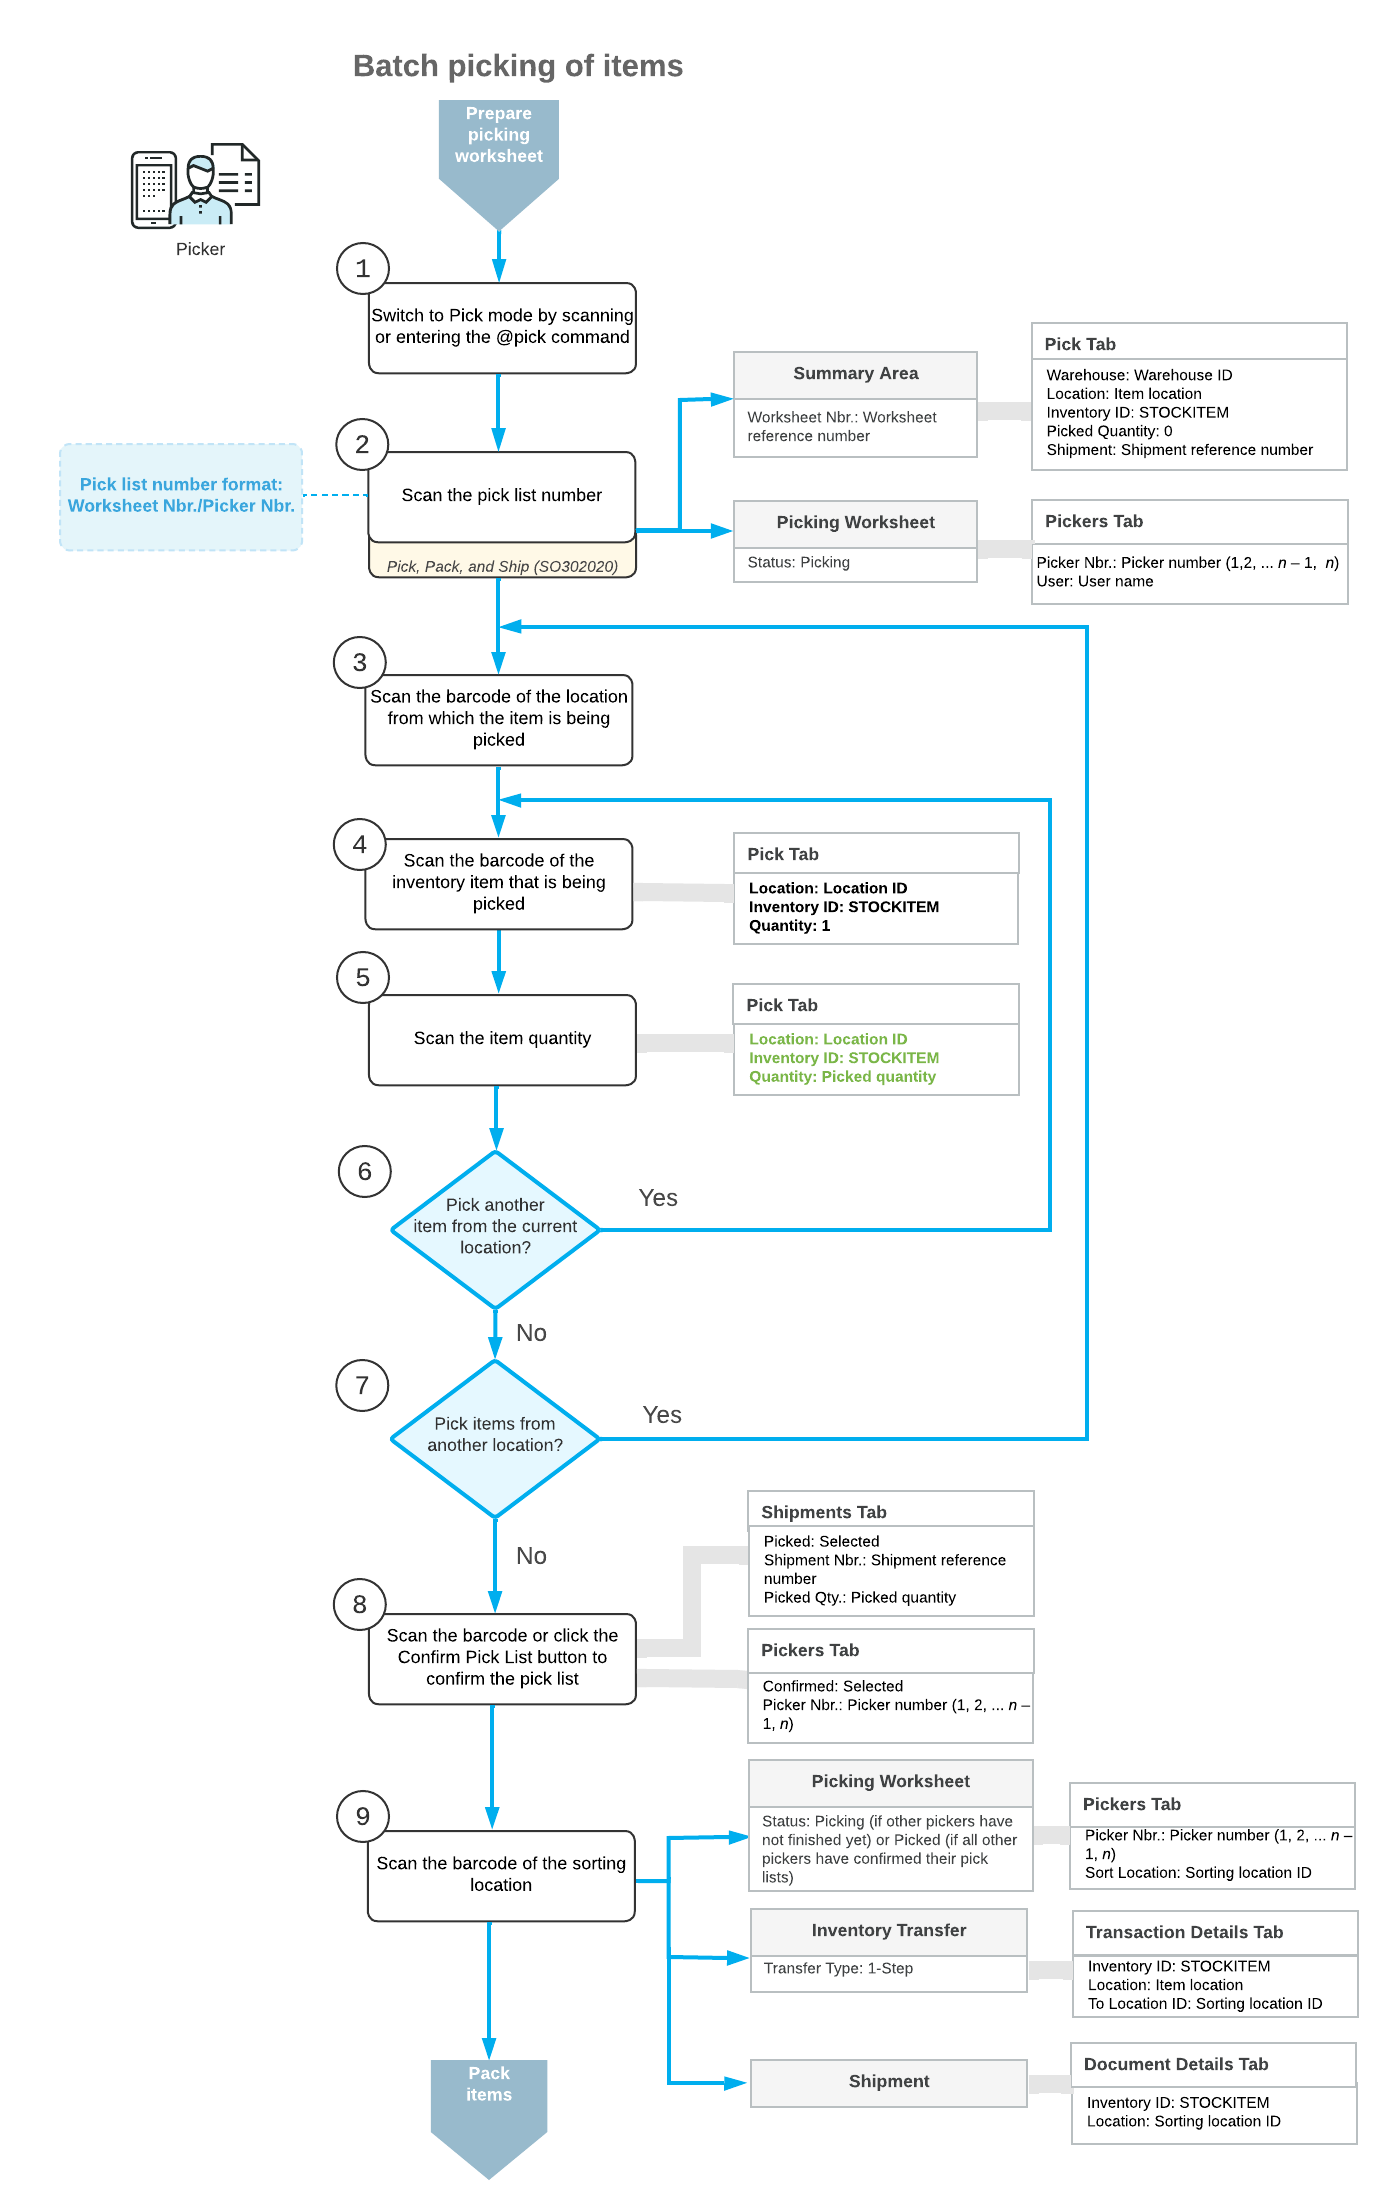
To pick the items for a batch pick list, the picker performs the following steps:
- Switches to Pick mode.
The picker opens the Pick, Pack, and Ship (SO302020) form (or the corresponding screen in the Acumatica mobile app) and switches to Pick mode by scanning or entering @pick barcode.
- Scans the number of the batch pick list.
To start the automated processing, the picker scans the reference number of the batch pick list. This reference number has the Worksheet Nbr./Picker Nbr. format, where Worksheet Nbr. is the reference number of the related picking worksheet, and the Picker Nbr. is the reference number of the picker assigned to this worksheet (for example, 000001/1). The system displays the lines of the scanned document in the table and inserts the reference number of the picking worksheet that is currently selected for processing in the Shipment Nbr. box.
- In each location from the pick list, picks the items as follows:
- Scans the location barcode.
When the picker scans the barcode of the location from which the item is picked, the system searches for the location in the lines of the picking worksheet that is currently selected.
- Scans the item barcode.
When the picker scans the item barcode of the picked item, the system searches for the item in the lines of the currently selected document. The system displays the picked quantity in the Picked Quantity column and highlights the line (in bold if the line has been picked partially, or in green if the line has been picked in full). If the UOM defined by the barcode of the scanned item corresponds to a non-base unit of measure, the system converts the item quantity defined by this barcode to the picked quantity in the base unit of measure for this item.
- Optional: Scans the item quantity.
To change the picked quantity in the line that is currently being processed, the picker switches to Quantity Editing mode by clicking the Set Qty button on the form toolbar (or by scanning or entering the *qty barcode) and manually entering the quantity in the UOM defined by the barcode of the scanned item.
If the pick list contains lines of multiple sales orders with the same item and location, the picker can enter the consolidated quantity of these lines. The system will automatically distribute the entered quantity among the lines with this item.
- Picks another item.
If another item needs to be picked from the currently selected location, the picker scans the item barcode (returns to the second substep of this step) and repeats the process for the item.
- Picks items from another location.
If the picker needs to pick items from another location, the picker scans the location barcode (returns to the first substep of this step) and repeats the process for the location.
- Scans the location barcode.
- Completes the picking process.
If the picker has finished picking all items in the pick list, the picker scans the *confirm*pick barcode or clicks the Confirm Pick List button on the form toolbar.
- Scans the barcode of the sorting location.
When the picker brings the picked items to the sorting location, the picker scans the barcode of this location. The system creates and releases an inventory transfer transaction with the lines with the picked items to record the movement of items within the warehouse. In the transaction lines, the location from which the items were picked is specified as the source location, and the sorting location is specified as the destination location. On release of the inventory transfer, the system updates the picked quantity and in the lines of shipments for which the items have been picked, changes the initial location to the sorting location.
After the picker finishes the batch picking and brings the items to the sorting location, the picker gives the batch pick list to a pack line operator.
Workflow for a Pack Line Operator
To start the packing of the batch, the pack line operator performs the following steps:
- Verifies that all pickers have completed the picking for the batch.
The pack line operator opens the batch picking worksheet on the Picking Worksheets (SO302500) form, and on the Shipments tab, makes sure that all shipments included in the batch have been picked (which is indicated by the Picked check box being selected in each line).
- Prints the packing slips.
The pack line operator prints packing slips for the shipments of the batch by opening the picking worksheet on the Picking Worksheets form and clicking Print Packing Slips on the form toolbar.
After the pack line operator prints the packing slips, this employee gives them to a packer working at the sorting location.
Workflow for a Packer
The workflow of a packer involves the actions shown in the following diagram.

To pack the items for shipping, the packer performs the following steps:
- Switches to Pack mode.
The packer opens the Pick, Pack, and Ship (SO302020) form (or the corresponding screen in the Acumatica mobile app) and switches to Pack mode by scanning or entering the @pack barcode.
- Scans the shipment number.
To start the automated processing, the packer scans the reference number of the shipment in the packing slip. The system shows the shipment lines in the table and inserts the reference number of the document in the Shipment Nbr. box.
- For each box being packed for the selected shipment, does the following:
- Scans the barcode of the box.
The packer scans the barcode of the box into which the items will be packed.
- Scans the item barcode.
When the packer scans the barcode of the packed item, the system searches for the item in the lines of the shipment that is currently selected. If the UOM defined by the barcode of the scanned item corresponds to a non-base unit of measure, the system converts the item quantity defined by this barcode to the packed quantity in the base unit of measure for this item. The system shows the packed quantity in the Packed Quantity column, and highlights the line (in bold if the line has been processed partially, or in green if the line has been processed in full).
- Optional: Scans the item quantity.
To change the packed quantity in the line that is currently being processed, the packer switches to Quantity Editing mode by scanning or entering the *qty barcode, and manually enters the quantity in the UOM defined by the barcode of the scanned item.
- Packs another item.
If another item needs to be packed in the current box, the packer returns to scanning the item barcode (returns to the second substep of this step) and repeats the process for the item, or proceeds to the next step if all items have been packed in the box.
- Confirms the box.
If all items have been packed in the box, the packer confirms the current box by scanning the *ok barcode or by clicking the OK button.
- Optional: Enters the box weight.
If the Confirm Weight for Each Package check box is selected on the Warehouse Management tab of the Sales Orders Preferences (SO101000) form, the system requires the packer to confirm the weight of each box after the package is confirmed.
If the packer wants to accept the automatically calculated weight of the box, they can do that by clicking OK on the form toolbar or by scanning the *ok command. If the packer wants to change the calculated weight of the box, they must enter the new value to continue to the next step.
- Optional: Enters the new package dimensions.
If the Confirm Dimensions for Packages with Editable Dimensions check box is selected on the Warehouse Management tab of the Sales Orders Preferences (SO101000) form and the packer confirms a package that includes a box with the Editable Dimensions check box selected on the Boxes (CS207600) form, the system requires the packer to confirm the existing dimensions or enter different dimensions for the box.
If the packer wants to accept the default dimensions of the box, they can do that by clicking OK on the form toolbar or by scanning the *ok command. If the packer wants to change the dimensions of the box, they must enter the length, width, and height (in this order) in one string with a space as a separator to continue to the next step.
The following example shows the entry of dimensions: 20 15 40.
- Packs another box.
If more items need to be packed for the current shipment, the packer returns to scanning the barcode of the box barcode (returns to the first substep of this step) and repeats the process for another box.
- Scans the barcode of the box.
- Completes the packing process.
If the packer has finished the packing operation and shipping options do not need to be specified, the packer scans the *confirm*shipment barcode or clicks the Confirm Shipment button on the form toolbar. The system confirms the shipment that is currently being processed, and prints labels for the packed boxes.