
Project Quotes: To Process a Project Quote Based on an Opportunity
This activity will walk you through the process of creating a project quote from an opportunity and creating a project based on the project quote.
Story
Suppose that the HM's Bakery and Cafe customer has ordered a juicer for one of its restaurants, along with the installation and training services from the SweetLife Fruits & Jams company. The sales manager of SweetLife has created an opportunity for the provision of the juicer and the services. Acting as SweetLife's estimator, you will create a project quote for this opportunity, and confirm the project quote with the customer.
Then you will convert the project quote to the project.
Configuration Overview
In the U100 dataset, the following tasks have been performed to support this activity:
- For the purposes of this activity, the following features have been enabled on
the Enable/Disable Features (CS100000) form:
- Projects, which provides support for the project management functionality
- Project Quotes, which provides the ability to create project quotes
- Customer Management, which provides the customer relation management (CRM) functionality, including management of opportunities
- On the Opportunities (CR304000) form, the 000001 opportunity has been created. A note and a file have been attached to the opportunity.
- On the Project Templates (PM208000) form, the PROGRESS project template has been configured with the PHASE1 and PHASE2 project template tasks.
- On the Account Groups (PM201000) form, the REVENUE, MATERIAL, SUBCON, and LABOR account groups have been created.
- On the Stock Items (IN202500) form, the JUICER15 stock item has been configured.
- On the Non-Stock Items (IN202000) form, the INSTALL and TRAINING non-stock items have been configured.
Process Overview
On the Opportunities (CR304000) form, you will initiate the creation of a project quote for the opportunity created for the customer. On the Project Quotes (PM304500) form, you will then create the project quote and specify all required settings, including the estimation lines and the project template to be used for project creation. You will also print the project quote and email it to the customer for review.
Once the project quote has been confirmed with the customer, you will convert the project quote to a project.
System Preparation
Before you begin performing the steps of this activity, perform the following instructions to prepare the system:
- Launch the MYOB Acumatica website, and sign in to a company with the U100 dataset preloaded; you should sign in as project accountant by using the brawner username and the 123 password.
- In the info area at the upper-right corner of the top pane of the MYOB Acumatica screen, make sure that the business date is set to 1/30/2026. If a different date is displayed, click the Business Date menu button and select 1/30/2026 from the calendar. For simplicity, you'll create and process all documents in this activity using this business date.
Step 1: Creating a Project Quote
To create a project quote for an opportunity, do the following:
- On the Opportunities (CR304000) form, open the 000001 opportunity, and in the Summary area, notice that the amount in the Detail Total box is equal to 3,500.00.
- On the form toolbar, click Create Quote.
- In the Create Quote dialog box, which opens, do the
following:
- Select Project Quote as the Quote
Type.
Notice that the Set New Quote as Primary check box is selected.
- Click Create & Review.
The system creates a project quote based on the opportunity and opens the project quote on the Project Quotes (PM304500) form. Notice the following:
- In the Summary area, the Primary check box is selected, which means that the project quote is the primary quote of the opportunity, whose identifier is shown in the Opportunity ID box. The description of the quote has been copied from the opportunity.
- On the form title bar, the icon to the left of Notes is shaded in yellow, and (1) is shown after Files, indicating that the project quote has a note and an attached file, which have been copied from the opportunity.
- Select Project Quote as the Quote
Type.
- In the Summary area of the Project Quotes form, specify the
following settings:
- Project Template: PROGRESS
- New Project ID: HMBAKERY1
When you select the project template, the system fills in the relevant elements of the project quote with the settings specified for the template.
- On the Project Tasks tab, make sure that two tasks have been copied from the selected project template. Notice that the Default check box is selected for the PHASE1 task. The project task is specified as the default task of the project quote because this task is the default task of the selected project template.
Step 2: Estimating the Revenue and Costs of the Project Quote
To estimate the revenue and costs of the project quote based on the customer's order, do the following:
- While you are still viewing the project quote on the Project Quotes (PM304500) form, on the
Estimation tab, add a line with the following
settings:
- Inventory ID: JUICER15
- Quantity: 1
- Project Task: PHASE1 (inserted automatically)
- Cost Code: 00-000
- Cost Account Group: MATERIAL (inserted automatically)
- Add a second line with the following settings:
- Inventory ID: INSTALL
- Quantity: 4
- Project Task: PHASE1 (inserted automatically)
- Cost Code: 00-000
- Cost Account Group: SUBCON (inserted automatically)
- Add a third line with the following settings:
- Inventory ID: TRAINING
- Quantity: 8
- Project Task: PHASE2
- Cost Code: 00-000
- Cost Account Group: LABOR (inserted automatically)
The added lines specify estimated costs by project task and inventory item.
- In each of the added lines, change Ext. Price to 0, and make sure the Revenue Account Group column is empty. When this quote is converted to a project, the system will convert these lines to cost budget lines of the project.
- On the same tab, add a revenue line with the following settings:
- Description: The juicer with installation
- Ext. Price: 2900
- Project Task: PHASE1 (inserted automatically)
- Cost Code: 00-000
- Revenue Account Group: REVENUE
- On the same tab, add second revenue line with the following settings:
- Description: Training of employees
- Ext. Price: 400
- Project Task: PHASE2
- Cost Code: 00-000
- Revenue Account Group: REVENUE
Notice that for each of the added revenue lines, the Ext. Cost is 0 and the Cost Account Group column is empty. When this quote is converted to a project, the system will convert these lines of the quote to revenue budget lines of the project.
- Save your changes to the project quote.
In the Summary area, notice that the amount in the Total Sales box is 3,300.00, which is the total of the values in the Ext. Price column on the Estimation tab. The amount in the Total Cost box is 2,640.00, which is the total of the values in the Ext. Cost column on the Estimation tab. The gross margin amount of the quote is $660 (20%).
- On the Opportunities form, again open the 000001
opportunity, and notice the following:
- In the Summary area, the Detail Total of the opportunity has been changed to the total sales of the created project quote (3,300.00).
- On the Quotes tab, where the project quote you created is listed in the table, the total sales of the quote is shown in the Detail Total column (3,300.00). Also, the check box in the Primary column is selected, which means that this is the primary project quote of the opportunity.
Step 3: Confirming the Project Quote with the Customer
To confirm the project quote, do the following:
- On the Project Quotes (PM304500) form, open the project quote that you have created earlier in this activity.
- On the form toolbar, click Submit. The system changes the status of the quote to Approved; you can no longer edit the quote's settings.
- On the form toolbar, click Send to send the project quote to the customer. The system changes the status of the project quote to Sent.
- On the Activities tab, click the link in the Summary column of the only line. The system opens the email on the Email Activity (CR306015) form. On the form title bar, notice that (1) is shown after Files: the system has generated the ready-to-print version of the quote and attached the generated PDF to the email. The email has been sent to the customer's email address, which is specified on the Addresses tab of the Project Quotes form.
- Close the form and return to the project quote on the Project Quotes form.
- On the form toolbar, click Print to print the project
quote.
The system navigates to the Project Quote (PM604500) report, which is the same report as has been attached to the email. The printed form lists the estimated revenue of the project quote, which the customer needs to review and agree to.
- Click Back in the browser window to return to the project quote on the Project Quotes form.
- On the More menu, click Mark as Accepted. The project quote is assigned the Accepted by Customer status.
Now you can convert the agreed quote to a project.
Step 4: Creating a Project Based on the Project Quote
To create a project based on the project quote, do the following:
- While you are still viewing the project quote on the Project Quotes (PM304500) form, on the form toolbar, click Convert to Project to convert the quote to a project.
- In the Convert to Project dialog box, which opens, select
the following check boxes:
- Copy Notes to Project
- Copy Files to Project
- Leave the other check boxes cleared, and click OK.
The system closes the dialog box, changes the status of the project quote to Closed, creates a project based on the project quote, and opens the created project on the Projects (PM301000) form.
On the form title bar, notice that the icon to the left of Notes is shaded in yellow, and that (1) is shown after Files, indicating that the project has a note and an attached file, which have been copied from the project quote (and were previously copied from the opportunity).
- Make sure that the needed settings have been specified for the created
HMBAKERY1 project as follows:
- In the Summary area, the Template box shows the project template based on which the project quote has been created (PROGRESS).
- On the Summary tab, in the Quote section, the number of the corresponding project quote is shown in the Quote Ref. Nbr. box.
- On the Tasks tab, two project tasks have been copied from the project quote. Notice that the check box in the Default column is selected for the PHASE1 task, indicating that it is the default task of the created project.
- On the Revenue Budget tab, two revenue budget lines have been created based on the estimation lines of the project quote with the specified revenue account group.
- On the Cost Budget tab, three cost budget lines have been created based on the estimation lines of the project quote with the specified cost account group.
- On the Balances tab (see the following
screenshot), the Income Totals matches the total
sales of the project quote ($3,300), and the Expense
Totals matches the total cost of the project quote
($2,640).
Figure 1. The balances of the project created based on the project quote 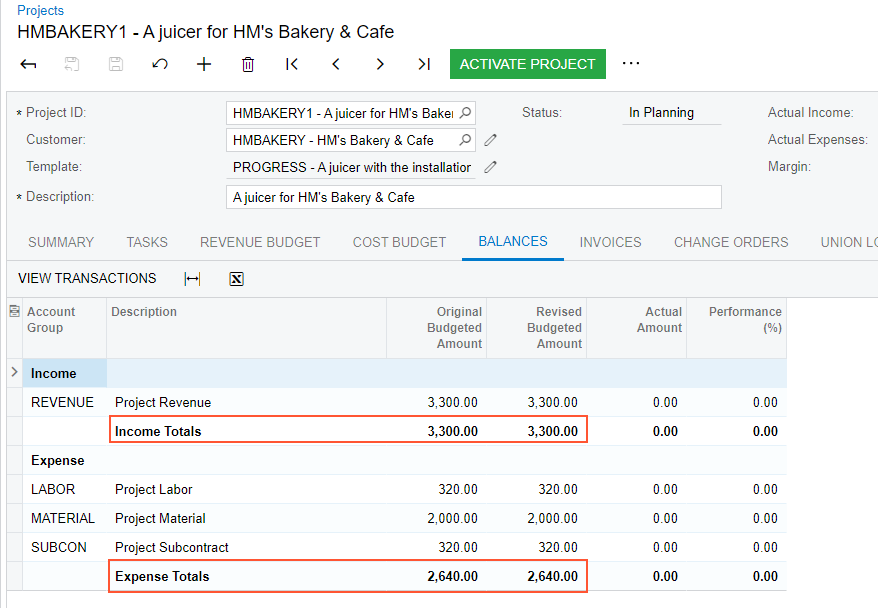
- On the Opportunities (CR304000) form, open the 000001 opportunity, and on the Activities tab, make sure that the email created for the project quote is listed in the table.
- On the Quotes tab, in the Project ID column, make sure that the identifier of the created project (HMBAKERY1) is shown.
You have created a project quote based on an opportunity and converted this project quote to a project.