
Project Creation and Processing: To Create a Fixed-Price Project
This activity will walk you through the process of initial creation of a simple fixed-price project.
Story
Suppose that the Lake Cafe customer has ordered a juicer from the SweetLife Fruits & Jams company, along with two hours of site review and four hours of installation services. The work will start on 1/1/2025 and must be completed by 1/30/2025. SweetLife's project accountant has decided to create a project to track costs and revenues for the performed work. The project will be completed in two phases: Phase 1 will be the site review, and phase 2 will involve the sale and installation of the juicer. To track the progress of each phase separately, the project accountant has decided to define the phases as separate project tasks. Also, the project accountant will specify the revenue budget information for each project task and inventory item.
The project will be billed once, when both of the project tasks are completed. Also, the project accountant has decided to skip the creation of pro forma invoices, because all amounts have already been budgeted and agreed upon with the customer, so the direct AR invoice will be created during the billing process.
Acting as the project accountant, you will create the new project and specify all needed settings.
Configuration Overview
In the U100 dataset, the following tasks have been performed to support this activity:
- On the Enable/Disable Features (CS100000) form, the Projects feature has been enabled to support the project accounting functionality.
- On the Stock Items (IN202500) form, the JUICER10 stock item has been defined.
- On the Non-Stock Items (IN202000) form, the SITEREVIEW and INSTALL non-stock items have been defined.
- On the Billing Rules (PM207000) form, the PROGRESS billing rule has been defined. This rule is configured for gradually billing the projects at a fixed contract amount.
Process Overview
On the Projects (PM301000) form, you will create a new project and specify its general settings on the Summary tab. Then on the Tasks tab, you will add the project tasks that will be performed during the completion of a project. On the Revenue Budget tab, you will define the planned revenue budget for the project.
System Preparation
To sign in to the system and prepare to perform the instructions of the activity, do the following:
- Launch the MYOB Acumatica website, and sign in to a company with the U100 dataset preloaded; you should sign in as Pam Brawner by using the brawner username and the 123 password.
- In the info area, in the upper-right corner of the top pane of the MYOB Acumatica screen, make sure that the business date in your system is set to 1/1/2025. If a different date is displayed, click the Business Date menu button, and select 1/1/2025 on the calendar.
Step 1: Creating a Project and Specifying Its General Settings
To create a new project and specify basic settings for it, do the following:
- On the Projects (PM301000) form, create a new record.
- In the Summary area, specify the following settings:
- Project ID: INSTLAKE01
- Customer: LAKECAFE (Lake Cafe)
- Project Manager: EP00000001 (Pam Brawner)
- Description: Installation project for Lake Cafe
- On the Summary tab, specify the following settings:
- Revenue Budget Level: Task and Item
You select this option to include more detail in the revenue budget structure. With this setting, you will be able to select an inventory item in a revenue budget line.
- Cost Budget Level: Task and Item
You select this option to include more detail in the cost budget structure. With this setting, you will be able to select an inventory item in a cost budget line.
- Start Date: 1/1/2025
- End Date: 1/30/2025
- Change Order Workflow: Cleared
You clear this check box because for this simple fixed-price project, no changes will be required.
- Billing Currency: USD (selected automatically)
- Billing Period: On Demand
You select the On Demand billing period to indicate that the billing can be performed at any time.
- Billing Rule: PROGRESS
This predefined rule will be specified by default in all project tasks added to the project.
Tip:For details on configuring billing rules for billing by progress, see Billing Rules: Progress Billing and Billing Rules: To Configure a Progress Billing Rule. - Create Pro Forma Invoice on Billing:
Cleared
You are clearing this check box because you want to create accounts receivable invoices when you bill the project without preliminary creation of pro forma invoices.
- Revenue Budget Level: Task and Item
- Save your changes to the project (which currently has the In Planning status shown in the Status box of the Summary area).
Step 2: Adding Project Tasks
To add project tasks to the project, do the following:
- On the Tasks tab, add to the project the two tasks listed
in the following table by clicking Add Row on the table
toolbar for each and specifying the listed identifier, task type, and
description in the row.
Task ID Type Description PHASE1 Cost and Revenue Task Site review PHASE2 Cost and Revenue Task Installation Notice that the PROGRESS billing rule has been automatically specified for both added tasks.
- On the table toolbar, click Activate Tasks to change the status of the added tasks from In Planning to Active.
- Save your changes to the project.
Notice that the project still has the In Planning status even though you have activated both of its project tasks.
Step 3: Specifying the Project Revenue Budget
To specify the project revenue budget, do the following:
- On the Revenue Budget tab, add each line of the project
revenue budget that is listed in the following table by clicking Add
Row and specifying the listed settings in the row.
Project Task Inventory ID Account Group Original Budgeted Quantity Unit Rate PHASE1 SITEREVIEW REVENUE 2.00 50.00 PHASE2 JUICER10 REVENUE 1.00 1,500.00 PHASE2 INSTALL REVENUE 4.00 100.00 - Make sure that the original and revised values in the revenue budget lines have
been calculated, as shown in the following screenshot.
Figure 1. Revenue budget of a fixed-price project 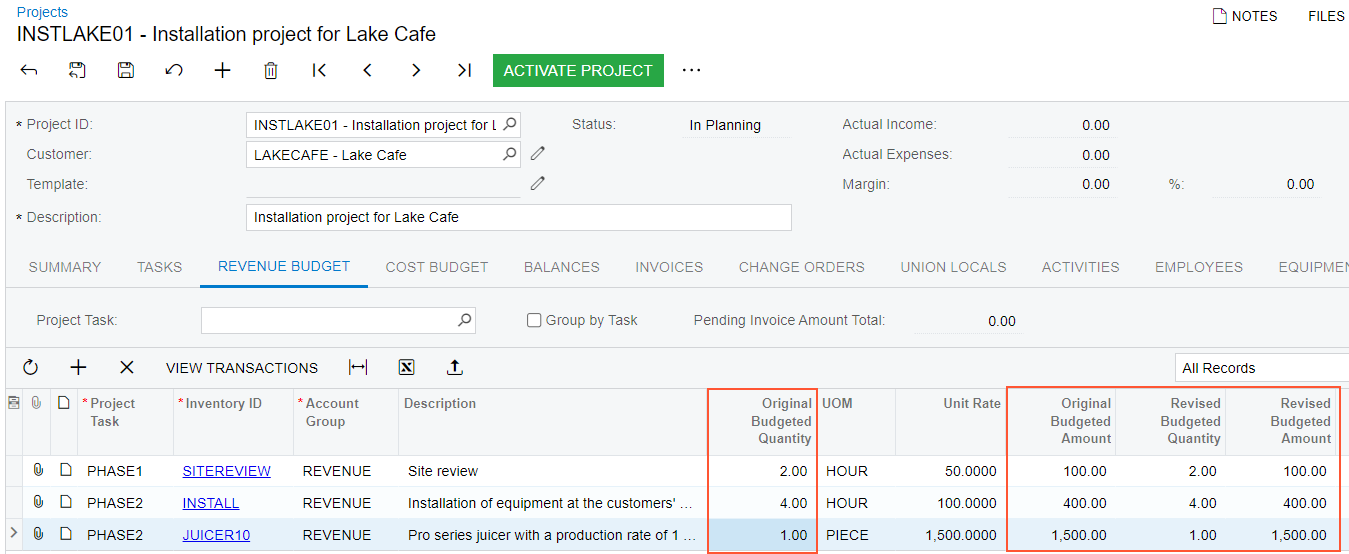
For each budget line, the system automatically calculated the Original Budgeted Amount as the Original Budgeted Quantity multiplied by the Unit Rate. The system also filled in the Revised Budgeted Quantity and Revised Budgeted Amount columns with the values of Original Budgeted Quantity and Original Budgeted Amount columns, respectively.
- Save your changes to the project.
You have not configured the cost budget for the project because you do not need to track if the project expenses are within the budgeted values. When you enter project transactions that represent the project expenses, the system will automatically populate the cost budget with the actual values.
You have finished configuring the project. Now you can complete the Project Creation and Processing: To Process a Fixed-Price Project activity to practice completing the project lifecycle.