
Pro Forma Invoices: To Process a Pro Forma Invoice for a Project
In this activity, you will learn about the workflow of a pro forma invoice that has been prepared for a project.
Story
Suppose that the HM's Bakery and Cafe customer has ordered juicers from the SweetLife Fruits & Jams company, along with the following services: site review, installation, and employee training on operating the juicers. SweetLife's project accountant has created a project that should be billed on demand as the juicers are installed and all the services are provided. Before the invoice is sent to the customer for payment, the customer has requested a pro forma invoice to be submitted for acceptance. The site review has taken place, the juicers have been delivered and installed, and SweetLife's consultant has provided the training. After that, the project accountant has entered project transactions and updated the progress of the project.
Acting as the project accountant, you will bill the customer, print the pro forma invoice, and email the invoice to the customer for approval on 1/30/2026. Then you will release the pro forma invoice and the associated accounts receivable invoice.
Configuration Overview
In the U100 dataset, the following tasks have been performed to support this activity:
- On the Enable/Disable Features (CS100000) form, the Projects feature has been enabled to support the project management functionality.
- On the Projects (PM301000) form, the HMBAKERY5 project has been created and the PHASE1, PHASE2, PHASE3, PHASE4, and PHASE5 project tasks have been created for the project. The revenue budget level of the project is Task and Item. On the Summary tab (Billing and Allocation Settings section), the Create Pro Forma Invoice on Billing check box has been selected for the project. With this setting, the system creates a pro forma invoice for the project when you run project billing.
- On the Project Transactions (PM304000) form, the PM00000008 batch of project transactions related to the project has been created and released.
Process Overview
On the Projects (PM301000) form, you will initiate the creation of a pro forma invoice for the project. Then you will review the created pro forma invoice on the Pro Forma Invoices (PM307000) form. You will then print the pro forma invoice, email the invoice, and release it on the same form. On the Invoices and Memos (AR301000) form, you will release the accounts receivable invoice created based on the pro forma invoice.
System Preparation
To sign in to the system and prepare to perform the instructions of the activity, do the following:
- Launch the MYOB Acumatica website, and sign in to a company with the U100 dataset preloaded; you should sign in as project accountant by using the brawner username and the 123 password.
- In the info area at the upper-right corner of the top pane of the MYOB Acumatica screen, make sure that the business date is set to 1/30/2026. If a different date is displayed, click the Business Date menu button and select 1/30/2026 from the calendar. For simplicity, you'll create and process all documents in this activity using this business date.
- On the Projects Preferences (PM101000) form, on the General tab (General Settings section), make sure Detailed is selected in the Revenue Budget Update box.
Step 1: Creating and Processing a Pro Forma Invoice
To prepare and process a pro forma invoice for the project, do the following:
- On the Projects (PM301000) form, open the
HMBAKERY5 project. On the Cost Budget tab,
review the cost budget of the project. Notice that the Actual
Amount of each line equals the original budgeted amount, which
means the corresponding project transaction has been created and released.Tip: You can review the transactions that correspond to each cost budget line on the Project Transaction Details (PM401000) form, which opens if you click the line and then click View Transactions on the table toolbar. The transactions have the Billable check box selected and the Billed check box cleared, which means the transactions are ready for billing and have not been billed yet.
- On the Revenue Budget tab, review the revenue budget lines of the project, and make sure that the Pending Invoice Amount of the revenue budget lines is nonzero. In the Summary area, notice that the Pending Invoice Amount Total is equal to 2,700.00. You can bill the project for this amount.
- On the form toolbar, click Run Billing.
The system creates a pro forma invoice and opens it on the Pro Forma Invoices (PM307000) form.
- On the Progress Billing tab, make sure that the pro forma invoice includes five progress lines. Review the invoice lines that have been created based on the revenue budget lines of the project. The Progress Billing Total in the Summary area is 2,700.00.
- In the Summary area, in the Project box, click the link
to review how the creation of the pro forma invoice has affected the revenue
budget of the project. The system opens the Projects form
with the HMBAKERY5 project selected.
On the Revenue Budget tab, notice that amounts from the Pending Invoice Amount column have been moved to the Draft Invoice Amount column, and now the Pending Invoice Amount of all the revenue budget lines is 0. In the Summary area, notice that the Pending Invoice Amount Total is also 0.
- Return to the Pro Forma Invoices form with the pro forma invoice that you have prepared earlier.
- On the Time and Material tab, make sure that the pro
forma invoice includes three time and material lines that have been created
based on the transactions prepared for billing. The Time and Material
Total in the Summary area must be 7,750.00.Tip: You can review the transactions that correspond to each line in the Transaction Details dialog box, which opens if you click the line and then click View Transaction Details on the table toolbar.
- On the More menu, click Print to generate the printable version of the pro forma invoice. The system navigates to the Pro Forma Invoice (PM642000) report and opens the printable version of the pro forma invoice.
- Click Back in the browser window to go back to the pro forma invoice on the
Pro Forma Invoices form, and on the More menu, click
Email to send the invoice as an email to the
customer.
The system creates an email by using the notification template defined for the project on the Mailing & Printing tab of the Projects form, attaches the printed report, and sends the email to the customer by using the email address specified in the Bill-To Contact section on the Addresses tab of the Pro Forma Invoices form, which is copied from the project from the Bill-To Contact section on the Addresses tab of the Projects form.
- On the form toolbar, click Remove Hold to assign the pro forma invoice the Open status.
- On the form toolbar, click Release. The system creates the accounts receivable invoice based on the pro forma invoice and assigns the Closed status to the pro forma invoice.
Step 2: Processing an AR Invoice
To process the accounts receivable invoice that was generated based on the pro forma invoice, do the following:
- While you are viewing the pro forma invoice on the Pro Forma Invoices (PM307000) form, on the Financial tab, click the AR Ref. Nbr. link to open the accounts receivable invoice that was created.
- On the Invoices and Memos (AR301000) form, which opens, notice that
all progress billing and time and material lines of the pro forma invoice have
been copied to the Details tab of the accounts receivable
invoice (see below). The settings in these lines cannot be edited, except in the
Salesperson ID column.
Figure 1. The AR invoice prepared based on the pro forma invoice 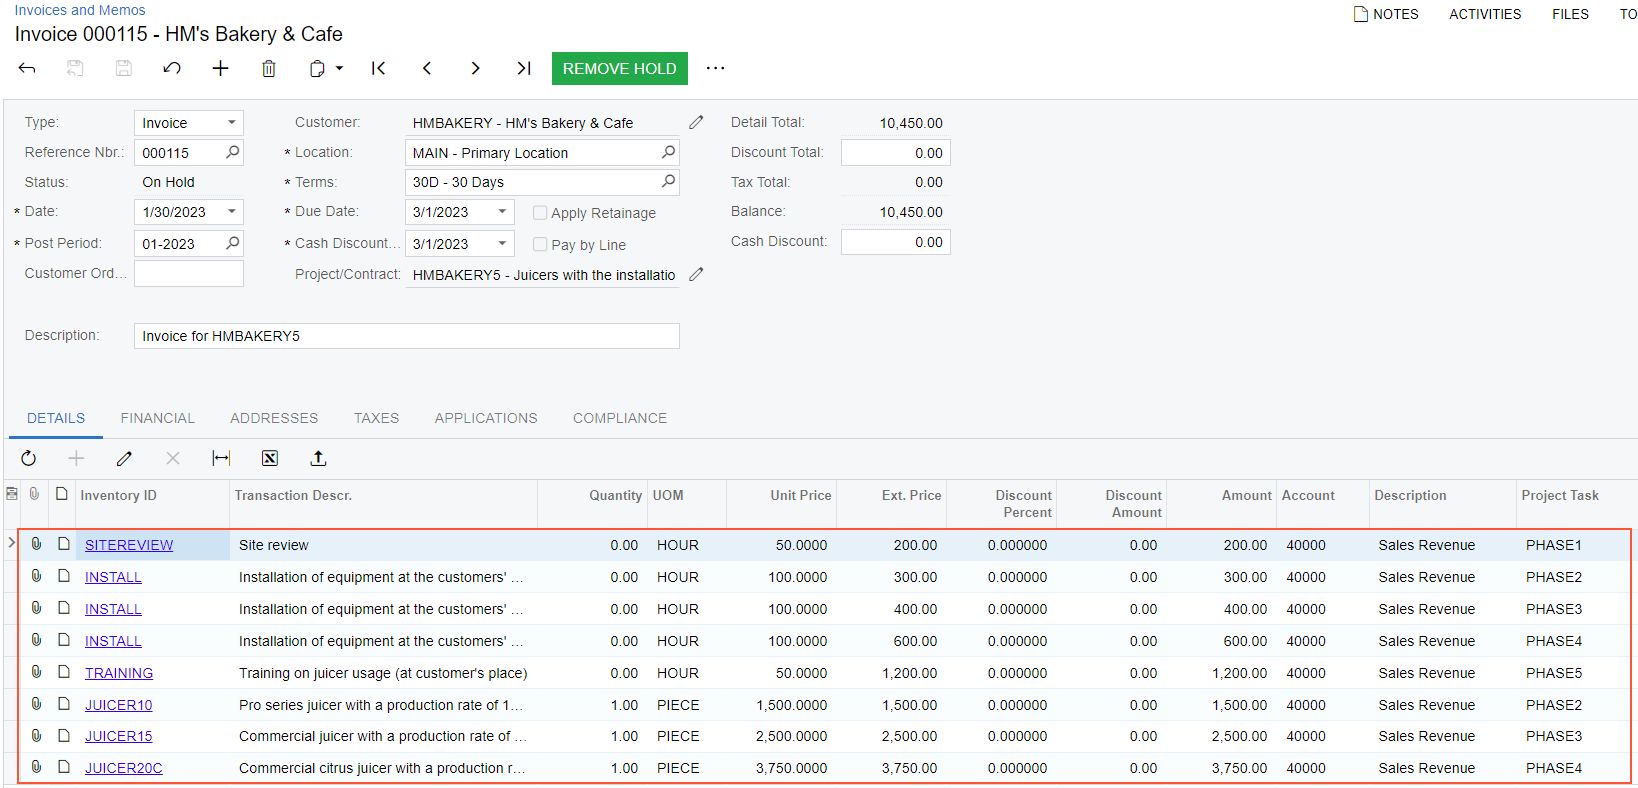
- On the form toolbar, click Remove Hold to assign the accounts receivable invoice the Balanced status, and then click Release.
- On the Financial tab, click the link in the
Batch Nbr. box. On the Journal Transactions (GL301000) form, which opens, review the created general ledger
transactions.
Notice that eight transaction lines have the project and project task specified. For these GL transactions, the system created the corresponding project transactions. For the transactions with the X project specified (the non-project code), the system created no project transactions.
- Return to the accounts receivable invoice that you have prepared on the Invoices and Memos form.
- On the More menu (under Inquiries), click Project Transactions to review the corresponding project transactions.
- On the Project Transaction Details (PM401000) form, which opens, review the project transactions related to the AR invoice. Notice that eight transactions have AR Invoice in the Orig. Doc. Type column and the reference number of the accounts receivable invoice you have released in the Orig. Doc. Nbr. column. These transactions also have the reference number of the general ledger batch you have just reviewed in the GL Batch Nbr. column.
- On the Projects form, open the HMBAKERY5 project, and review the Invoices tab. Notice that in the only line, the reference numbers of the prepared pro forma invoice and the corresponding accounts receivable invoice are shown in the Pro Forma Reference Nbr. and AR Reference Nbr. columns, respectively. The total billed amount in the AR Doc. Orig. Amount column is $10,450.
- On the Revenue Budget tab, make sure the
Actual Amount of revenue budget lines was updated on
release of the AR invoice. Also, make sure that the following new revenue budget
lines have been created based on the billed project transactions:
- The line with the PHASE2 project task and the JUICER10 inventory item
- The line with the PHASE3 project task and the JUICER15 inventory item
- The line with the PHASE4 project task and the JUICER20C inventory item
Notice that the lines now have actual values and that the original budgeted values in these lines are 0.
You have finished processing the pro forma invoice and the AR invoice for the project.