
Pro Forma Invoices: To Create a Pro Forma Invoice for a Project Manually
The following activity will walk you through the process of creating a manual pro forma invoice for a project.
Story
Suppose that the HM's Bakery and Cafe customer has ordered juicer installation from the SweetLife Fruits & Jams company, along with employee training on operating the juicers. SweetLife's project accountant has created a project that should be completed in two stages and billed monthly. The start date of the project is 1/15/2025.
- Forty percent of installation services; this amount has a fixed price that has been agreed upon with the customer
- A site review that was not initially budgeted and has been requested by the customer as an addition
- Six hours of employee training provided on 1/25/2025 by a senior consultant
Acting as the project accountant, you will enter a manual pro forma invoice and review how the project budget has been affected.
Configuration Overview
In the U100 dataset, the following tasks have been performed to support this activity:
- On the Enable/Disable Features (CS100000) form, the Projects feature has been enabled to support the project accounting functionality.
- On the Projects (PM301000) form, the HMBAKERY9 project has been created and the PHASE1 and PHASE2 project tasks have been created for the project. The revenue budget of the project includes a line with the PHASE1 task and the INSTALL inventory item; in the line, 40 is specified in the Completed (%) column. On the Summary tab (Billing and Allocation Settings section), the Create Pro Forma Invoice on Billing check box has been selected for the project, and the Billing Period is Month.
- On the Billing Rules (PM207000) form, the COMBINED billing rule has been created; it has been assigned to both project tasks of the HMBAKERY9 project on the Projects form.
Process Overview
You will create a pro forma invoice for the project on the Pro Forma Invoices (PM307000) form. You will add time and material line and progress billing lines to the pro forma invoice and release it. Finally, you will review the corresponding project on the Projects (PM301000) form and review how the pro forma has affected the project budget.
System Preparation
To sign in to the system and prepare to perform the instructions of the activity, do the following:
- Launch the MYOB Acumatica website, and sign in to a company with the U100 dataset preloaded; you should sign in as a project accountant by using the brawner username and the 123 password.
- In the info area, in the upper-right corner of the top pane of the MYOB Acumatica screen, make sure that the business date in your system is set to 1/30/2025. If a different date is displayed, click the Business Date menu button and select 1/30/2025 on the calendar. For simplicity, in this activity, you will create and process all documents in the system on this business date.
Step 1: Creating a Project Transaction
To enter the project transaction for the provided training, perform the following steps:
- On the Project Transactions (PM304000) form, add a new record.
- In the Summary area, specify the following description: 6 hours of training for HMBAKERY9.
- In the table, add a transaction line by clicking Add Row
on the table toolbar and specifying the following settings in the row:
- Project: HMBAKERY9
- Project Task: PHASE1
- Cost Code: 00-000
- Account Group: LABOR
- Description: Employee training, 6 hours
- Inventory ID: CONSULTSR
- Quantity: 6
- Unit Rate: 45.00
- Date: 1/25/2025
- In the Summary area, make sure that the total billable amount is $270.
- Save your changes.
- On the form toolbar, click Release to release the project transactions.
Step 2: Creating a Pro Forma Invoice
Create the pro forma invoice for the project by doing the following:
- On the Pro Forma Invoices (PM307000) form, add a new record.
- In the Summary area of the form, specify the following settings:
- Project: HMBAKERY9
- Invoice Date: 1/30/2025
- Post Period: 01-2025
- Description: January pro forma invoice: site review, installation, and training
- On the Progress Billing tab, click Load Lines. The system uploads the only budgeted line in the amount of 112 (which is 40% of the completion amount that was specified in the project budget).
- Add one more progress billing line that represents site review, and specify the
following settings:
- Account Group: REVENUE
- Project Task: PHASE1
- Description: Site review performed
- Total Completed (%): 100
- Amount: 250
- Save the pro forma invoice.
- On the Time and Material tab, click Upload Unbilled Transactions.
- In the Upload Unbilled Transactions dialog box, which opens, select the unlabeled check box in the only line, which is the project transaction that represents 6 hours of training provided on 1/25/2025. Click Upload & Close. The system adds a time and material line for the project transaction to the pro forma invoice. Make sure that the Amount to Invoice in the line is 337.50.
- In the Summary area, make sure that the pro forma invoice total amount in the Invoice Total box is 699.50.
- On the form toolbar, click Remove Hold, and then click Release to release the pro forma invoice. The system has released the pro forma invoice and generated the corresponding AR invoice.
Step 2: Reviewing the Project Budget
Review how the entered and released pro forma invoice has affected the project budget by doing the following:
- On the Projects (PM301000) form, open the HMBAKERY9 project.
- On the Invoices tab, make sure that the pro forma invoice that you have entered is now shown in the table.
- On the Revenue Budget tab, notice that two new revenue
budget line have appeared, as the following screenshot shows. Also notice that
Pending Invoice Amount Total in the Summary area is
0; the pending invoice amount for the 40% of completion of the
revenue budget line for installation was moved to Draft Invoice
Amount when you created and processed the manual pro forma
invoice.
Figure 1. The project budget updated by the manual pro form forma invoice 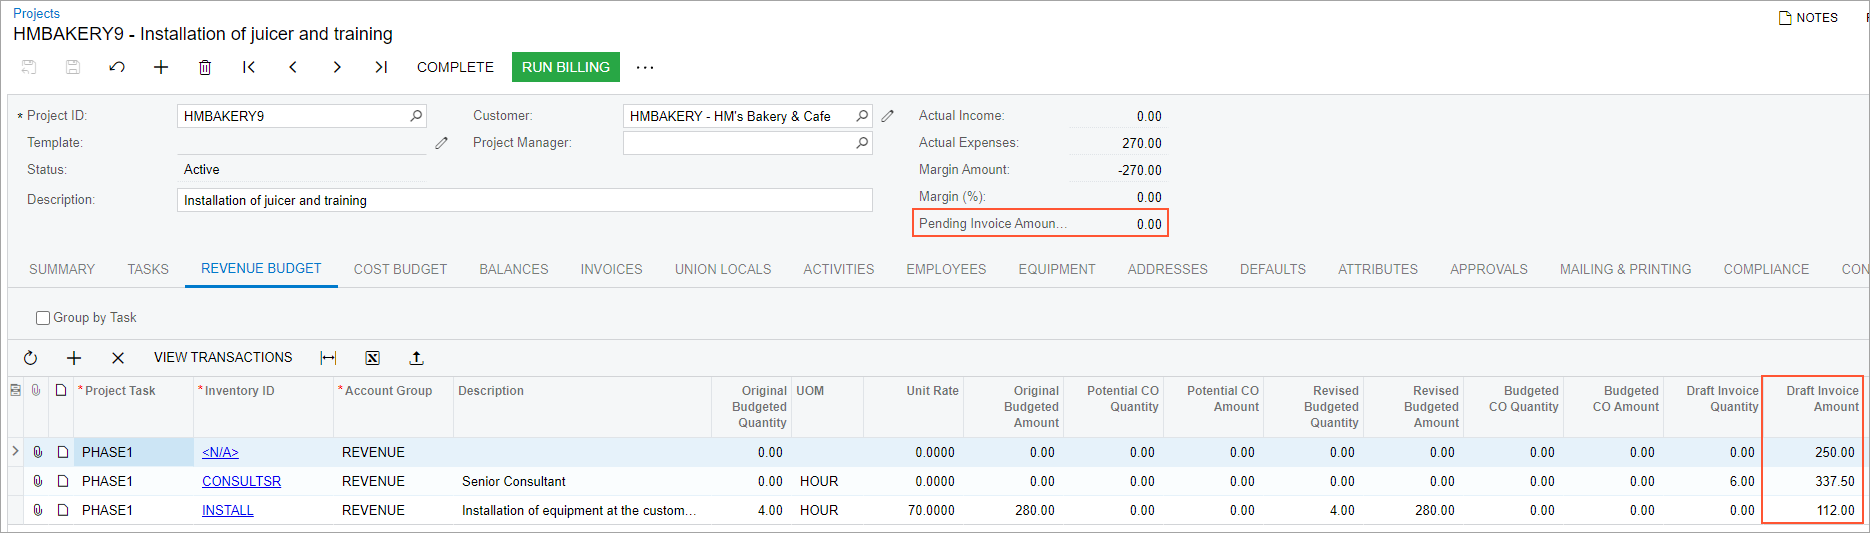
You have manually entered a pro forma invoice. Now you can send it to the customer for acceptance.