
Project Budget: To Restructure the Budget
This activity will walk you through the process of reestablishing the budget structure of a project.
Story
Suppose that the Lake Cafe customer has ordered a juicer, along with the services of installation and training of employees on operating the juicer from the SweetLife Fruits & Jams company. SweetLife's project accountant has decided that the revenue budget level of the project should include inventory items, created the project to account for the provided material and work, and entered project transactions.
Suppose that later the project accountant realizes that an extra level of detail of the revenue budget is not necessary. After restructuring the revenue budget and removing inventory items from the budget detail, the project accountant bills the customer. After the billing, it becomes clear that the previous level of detail of the revenue budget fitted the reporting requirements better and it is necessary to restructure the budget again.
Acting as the project accountant, you will restructure the project budget before and after the billing.
Configuration Overview
In the U100 dataset, the following tasks have been performed to support this activity:
- On the Enable/Disable Features (CS100000) form, the Projects feature has been enabled to support the project management functionality.
- On the Projects (PM301000) form, the LAKECAFE project has been created and the PHASE1 and PHASE2 project tasks have been created for the project. The Task and Item revenue budget level has been specified for the project and three revenue budget lines have been added.
- On the Project Transactions (PM304000) form, the PM00000024 batch of project transactions related to the project has been created and released.
Process Overview
You will adjust the project budget and save project budget revisions on the Projects (PM301000) form. On the same form, you will initiate the project billing. You will complete the billing on the Invoices and Memos (AR301000) form. You will then adjust the project budget one more time on the Projects form and recalculate the project balances on the Recalculate Project Balances (PM504000) form.
System Preparation
To sign in to the system and prepare to perform the instructions of the activity, do the following:
- Download the LAKECAFE_Budget_1.xlsx and LAKECAFE_Budget_2.xlsx files to your computer.
- Launch the MYOB Acumatica website, and sign in to a company with the U100 dataset preloaded; you should sign in as project accountant by using the brawner username and the 123 password.
- In the info area at the upper-right corner of the top pane of the MYOB Acumatica screen, make sure that the business date is set to 1/30/2026. If a different date is displayed, click the Business Date menu button and select 1/30/2026 from the calendar. For simplicity, you'll create and process all documents in this activity using this business date.
Step 1: Restructuring the Project Budget
To save the original version of the project budget and restructure the budget, do the following:
- Open the Projects (PM301000) form.
- In the Project ID box, select LAKECAFE.
- To create a backup of the original revenue budget of the project, do the
following:
- On the table toolbar of the Revenue Budget tab,
click Export to Excel.
The system exports the revenue budget to an Excel file.
- On your computer, locate the created file, and rename it to LAKECAFE_Revenue_Budget_1.xlsx.
- On the table toolbar of the Revenue Budget tab,
click Export to Excel.
- To attach to the project the file with the exported revenue budget, do the
following:
- On the form title bar, click Files.
- In the Files dialog box, click
Upload
Files, and select the
LAKECAFE_Revenue_Budget_1.xlsx file that you
have just
downloaded.
The system uploads the selected file to the project and shows the file in the table of the dialog box.
- In the line with the uploaded LAKECAFE_Revenue_Budget_1.xlsx file, click the Edit link.
- On the Versions tab of the File Maintenance (SM202510) form, which opens, enter Revision 1 of the revenue budget in the Comment column for the uploaded file.
- Save your changes to the file, and close the browser tab with the File Maintenance form to return to the Projects form.
- Close the Files dialog box.
- On the Revenue Budget tab, delete each of the three budget lines by clicking the line and then clicking Delete Row on the table toolbar.
- On the Summary tab (Project Properties section), select Task as the Revenue Budget Level.
- On the table toolbar of the Revenue Budget tab, click
Load Records from File, and upload the revenue budget
from the LAKECAFE_Budget_1.xlsx file, which you have
downloaded with the course. While you are uploading the lines, leave the default
column mapping.
The uploaded revenue budget should have two lines with the budgeted amounts of $2,900 and $400.
- Save your changes to the project.
You have restructured the revenue budget of the project and attached previous budget revision to the project. In the next step, you will bill the project.
Step 2: Billing the Project
To bill the project, do the following:
- While remaining on the Projects (PM301000) form, on the
form toolbar, click Run Billing.
The system creates an accounts receivable invoice and opens it on the Invoices and Memos (AR301000) form.
- On the form toolbar, click Remove Hold to assign the invoice the Balanced status, and then click Release to release the accounts receivable invoice.
- Close the form and return to the Projects form with the LAKECAFE project selected.
- Press Esc to refresh the form.
You have billed the project. In the next step, you will restructure the revenue budget of the project again.
Step 3: Restructuring the Project Budget After Billing
To perform one more budget revision after billing, while you are still viewing the LAKECAFE project on the Projects (PM301000) form, do the following:
- To create a backup of the current revision of the revenue budget of the project,
do the following:
- On the table toolbar of the Revenue Budget tab,
click Export to Excel.
The system exports the revenue budget to an Excel file.
- On your computer, locate the created file and rename it to LAKECAFE_Revenue_Budget_2.xlsx.
- On the table toolbar of the Revenue Budget tab,
click Export to Excel.
- To upload the current revision of the revenue budget of the project to the file
with the original revenue budget, do the following:
- On the form title bar, click Files.
- In the line with the uploaded LAKECAFE_Revenue_Budget_1.xlsx file, click the Edit link.
- On the form toolbar of the File Maintenance (SM202510) form, which opens, click Upload New Version.
- In the File Upload dialog box, which opens, select Upload File click the area right of the Choose File, and select the LAKECAFE_Revenue_Budget_2.xlsx file you have downloaded.
- Click Upload to upload the selected file.
The system uploads the selected file as a new file version and closes the dialog box.
- On the Versions tab of the File Maintenance form, enter Revision 2 of the revenue budget in the Comment column for the uploaded file with the Version ID of 2.
- Save your changes to the file, and close the browser tab with the File Maintenance form to return to the project on the Projects form.
- Close the Files dialog box, and press Esc to refresh the form.
- On the Revenue Budget tab, make sure the revenue budget lines have nonzero amounts in the Actual Amount column that the system updated during the project billing.
- Delete each of the two budget lines by clicking the line and then clicking Delete Row on the table toolbar.
- On the Summary tab (Project Properties section), select Task and Item as the Revenue Budget Level.
- On the table toolbar of the Revenue Budget tab, click
Load Records from File, and upload the revenue budget
from the LAKECAFE_Budget_2.xlsx file, which you have
downloaded with the course. While you are uploading the lines, leave the default
column mapping.
The uploaded revenue budget should have three lines with the budgeted amounts of 400, 2,500, and 400. Notice the revenue budget lines now have 0 in the Actual Amount and Actual Quantity columns. Now you need to validate the project balances to recalculate the revenue budget in accordance with the related invoices.
- Save your changes to the project.
- On the More menu, under Budget Operations, click
Recalculate Project Balance.
The system validates the balances of the LAKECAFE project and recalculates the amounts and quantities affected by invoices. On the Revenue Budget tab, review the revenue budget. Notice that the system has updated the actual amounts and quantities of the budget lines, as shown below.
Figure 1. Project budget after restructuring and validation 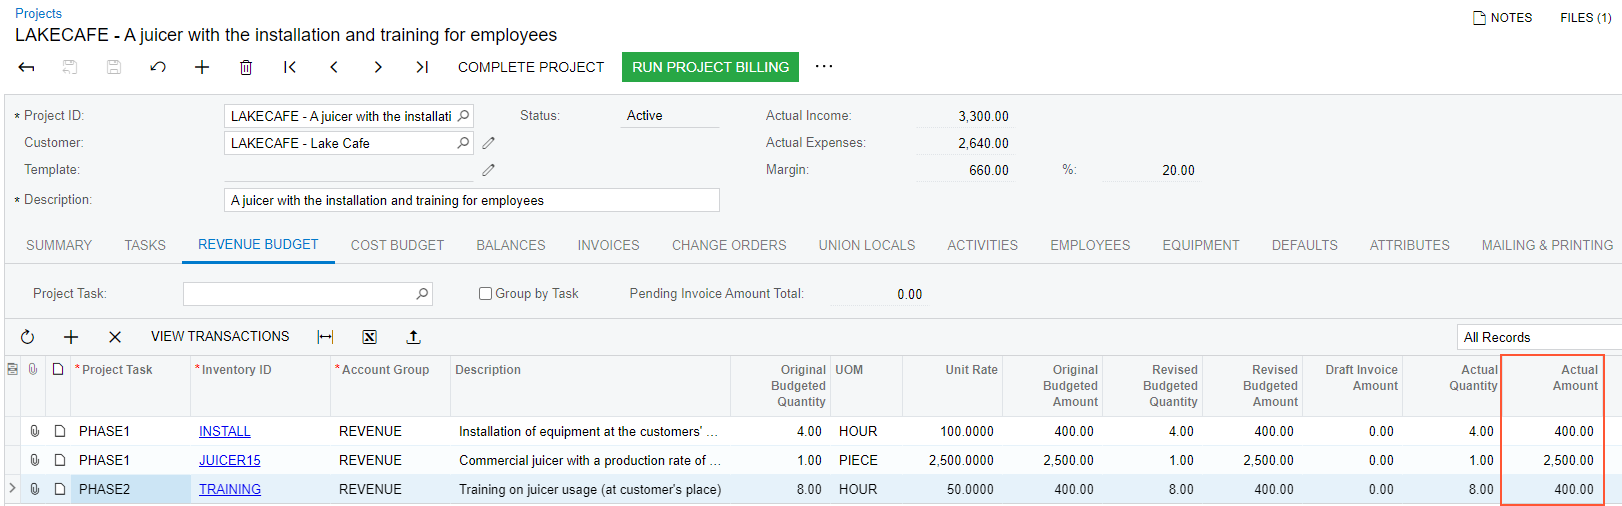
You have finished restructuring of the project budget and have validated the budget's actual values.