Transactions with Approval: Implementation Activity
In the following implementation activity, you will learn how to set up approvals for GL transactions.
Story
Suppose that according to the policy of SweetLife Fruits & Jams, specific GL transactions that users create directly in the general ledger have to be reviewed by a financial supervisor. These transactions include GL transactions with the Normal type that have an amount exceeding $150 and are posted to the 81000 (Other Expenses) account. If the transaction amount exceeds $150, it can be posted after it has been approved by the financial supervisor. If a transaction is rejected, the financial supervisor must specify the reason for rejection.
Acting as a system administrator, you need to configure an approval map for this type of transactions and assign Anna Johnson, a financial supervisor, as the approver for these transactions.
Process Overview
In this activity, you will first enable the Approval Workflow feature on the Enable/Disable Features (CS100000) form. On the Approval Maps (EP205015) form, you will create an approval map, specifying the approver, the conditions for GL transactions, and the actions to be performed on approval of the GL transactions that match those conditions. Finally, on the General Ledger Preferences (GL102000) form, you will add the approval map on the Approval tab and specify the email template for it.
System Preparation
Before you start configuring approvals for GL transactions, launch the MYOB Acumatica website, and sign in to a company with the U100 dataset preloaded. You should sign in as the system administrator with the gibbs username and the 123 password.
Step 1: Enabling the Needed Feature
To enable the Approval Workflow feature, do the following:
- On the Enable/Disable Features (CS100000) form, click Modify on the form toolbar.
- Under the Platform group of features, select the Approval Workflow check box.
- On the form toolbar, click Enable to enable the feature.
Step 2: Creating an Approval Map for GL Transactions
To create and configure an approval map, do the following:
- Open the Assignment and Approval Maps (EP205500) form.
- On the form toolbar, click Add Approval Map.
- On the Approval Maps (EP205015) form, which is
opened, specify the following settings in the Summary area:
- Name: GL Transactions
- Entity Type: Journal Transactions
- In the Steps pane, click Add Step, and click the Rule node.
- On the Conditions tab, make sure that the following
settings are specified:
- Description: Rule (inserted by default)
- Active: Selected
- On the table toolbar, click Add Row, and specify the
following settings in the added row:
- Brackets: (
- Entity: GL Batch
- Field Name: Debit Total
- Condition: Is Greater Than
- Value: 150
- Brackets: -
- Operator: And
- Click Add Row again, and specify the following settings
for the second row:
- Brackets: -
- Entity: GL Batch
- Field Name: Currency
- Condition: Equals
- Value: USD
- Brackets: -
- Operator: And
- Click Add Row again, and specify the following settings
for the third row:
- Brackets: -
- Entity: GL Transaction
- Field Name: Account
- Condition: Equals
- Value: 81000
- Brackets: )
- On the form toolbar, click Save.
The following screenshot shows the conditions specified on the Conditions tab.
Figure 1. The Conditions tab 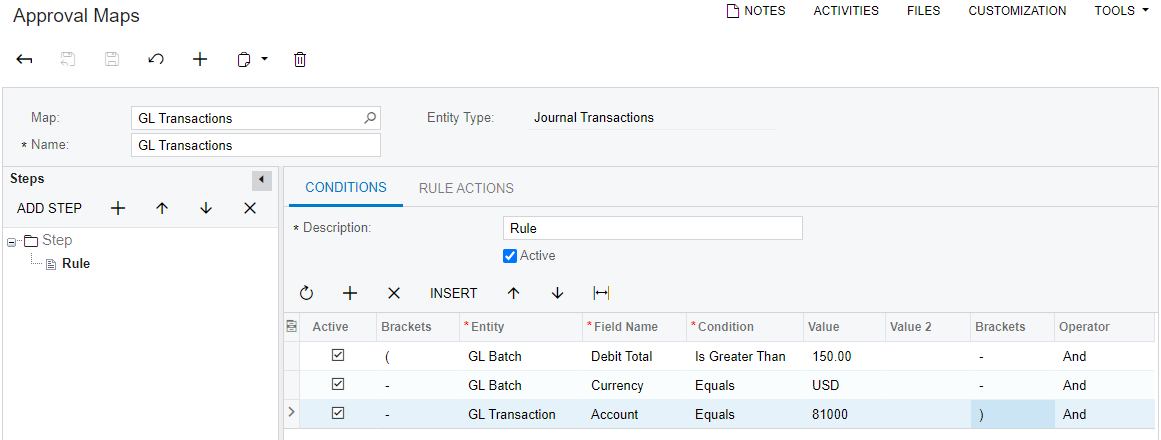
- On the Rule Actions tab, specify the following
settings:
- Approver: Employee
- Employee: Anna Johnson
- Reason for Rejection: Is Required
- On the form toolbar, click Save to save your changes.
Step 3: Specifying Approval Settings for GL Transactions
To specify the settings for approval of GL transactions, do the following:
- Open the General Ledger Preferences (GL102000) form.
- On the Approval tab, click Add Row on the table toolbar.
- In the added row, specify the following settings:
- Type: Normal
- Approval Map: GL Transactions
This is the approval map that you created in Step 2.
- Pending Approval Notification: Journal
Transaction Approval
This is the predefined email template used for journal transactions. In a production environment, you would review and update the template, if necessary, or create a new one based on the predefined template.
- On the form toolbar, click Save to save your settings.