
Order Synchronization: To Configure and Import Shopify Payments
The following activity will walk you through the configuration of the system so that you can import payments based on the Shopify Payments payment method from the Shopify store to MYOB Acumatica.
Story
Suppose that the SweetLife Fruits & Jams company wants to accept card payments in the Shopify store. The company sells its products in the United States, where Shopify Payments is supported.
Further suppose that the company management wants to import the Shopify Payments fees to MYOB Acumatica for tracking purposes.
Acting as an implementation consultant helping SweetLife to set up the synchronization of data between MYOB Acumatica and the Shopify store, you need to configure Shopify Payments as a card payment provider in the Shopify store, configure the card payment processing in MYOB Acumatica, and then configure the import of card payments from the Shopify store to MYOB Acumatica.
Configuration Overview
In the U100 dataset, the following tasks have been performed to support this activity:
- On the Enable/Disable Features (CS100000) form, the Integrated Card Processing feature has been enabled.
- On the Cash Accounts (CA202000) form, the 10250ST cash account has been created.
- On the Entry Types (CA203000) form, the SHOPIFYFEE entry type of the Disbursement type has been defined.
Process Overview
In this activity, you will do the following:
- On the Accounts Receivable Preferences (AR101000) form, activate integrated card processing.
- On the Processing Centers (CA205000) form, define a processing center.
- On the Processing Centers form, connect the processing center to the Shopify store.
- On the Payment Methods (CA204000) form, define a payment method that will represent payments based on the Shopify Payments store payment method.
- In the admin area of the Shopify store, activate the Shopify Stores payment option.
- On the Shopify Stores (BC201010) form, map the Shopify Payments store payment method with the payment method defined in MYOB Acumatica.
- On the Shopify Stores (BC201010) form, map the Shopify fees to the entry types defined in MYOB Acumatica.
- On the storefront of the Shopify store, create a test sales order paid by card.
- In the admin area of the Shopify store, review the created test sales order.
- On the Prepare Data (BC501000) form, prepare the sales order for synchronization; on the Process Data (BC501500) form, process the sales order data prepared for synchronization.
- On the Sales Orders (SO301000) form, review the imported sales order.
System Preparation
Before you complete the instructions in this activity, do the following:
- Make sure that the following prerequisites have been met:
- The Shopify store has been created and configured, as described in Initial Configuration: To Set Up a Shopify Store.
- The connection to the Shopify store has been established and the initial configuration has been performed, as described in Initial Configuration: To Configure the Store Connection.
- Launch the MYOB Acumatica website with the U100 dataset preloaded, and sign in with the
following credentials:
- Username: gibbs
- Password: 123
- Sign in to the admin area of the Shopify store as the store administrator in the same browser.
Step 1: Activating Integrated Card Processing
To activate integrated card processing, do the following:
- On theAccounts Receivable Preferences (AR101000) form, in the Data Processing Settings section, select the Enable Integrated CC Processing check box.
- On the form toolbar, click Save.
Step 2: Creating the Processing Center
To create the processing center that will be connected to the Shopify Payments payment gateway, do the following:
- On the Processing Centers (CA205000) form, create a new record.
- In the Summary area, specify the following settings:
- Proc. Center ID:
SHOPIFYPAY
This processing center represents the connection to the Shopify store for the credit card processing transactions from the online store.
- Name: Shopify Payments
- Cash Account: 10250ST - Company Merchant
Account
This cash account determines the currency in which the system will make the authorization and capture credit card transactions.
- Active: Selected
- Payment Plug-In (Type): Shopify Payments API
plug-in
The selected payment plug-in is a card processing plug-in supplied with MYOB Acumatica that interacts with the Shopify store.
- Proc. Center ID:
SHOPIFYPAY
- On the Plug-In Parameters tab, in the table row of the STORENAME parameter, select SweetStore - SP in the Value column.
- On the form toolbar, click Save.
- On the form toolbar, click Test Credentials to test the
connection settings.
If the test connection is successful, the system will display the following confirmation message in the Result dialog box, which opens: The credentials were accepted by the processing center.
Step 3: Configuring a Payment Method That Represents Shopify Payments
To create the SHOPIFYPAY payment method for all payments by credit card, do the following:
- On the Payment Methods (CA204000) form, create a new record.
- In the Summary area, specify the following settings:
- Payment Method ID: SHOPIFYPAY
- Active: Selected
- Means of Payment: Credit Card
When you set Means of Payment to Credit Card, on the Settings for Use in AR tab, the Integrated Processing check box becomes selected, and the Processing Centers tab appears.
- Description: Shopify Payments
- Use in AP: Cleared
- Use in AR: Selected (default state)
- Require Remittance Information for Cash Account: Cleared
- On the Allowed Cash Accounts tab, do the following:
- On the table toolbar, click Add Row.
- In the new row, select the 10250ST cash account in the Cash Account column.
- Make sure the Use in AR check box is selected.
- On the Processing Centers tab, add a row, and specify the
following settings in the row:
- Proc. Center ID: SHOPIFYPAY
- Active: Selected
- Default: Selected
- On the form toolbar, click Save to save your changes.
Step 4: Activating Shopify Payments in the Shopify Store
To activate the Shopify Payments payment provider in the Shopify store, do the following:
- In the lower left of the admin area, click Settings.
- In the left menu of the page that opens, click Payments. The Payments page opens.
- In the Shopify Payments section, click Complete account setup.
- On the Complete account setup page, which opens, click Submit details.
- On the Set up Shopify Payments page, which opens, do the
following:
- In Step 1 of 4, in the I'm running my store as section, select the An individual option button.
- In the lower right, click Next.
- In Step 2 of 4, in the Account
representative section, specify the following
settings:
- First name: Your first mane
- Last name: Your last mane
- Date of birth Name: Your date of birth
- Social Security number (SSN): Your SIN, for example, 345555555
- Email: Your email
- Phone number: 516 555 0150
- In the Residential address section, specify the
following settings:
- Country/region: United States (selected by default)
- Address: 2330 Hoffman Avenue
- City: Elmont
- State: New York
- ZIP code: 11003
- In the lower right, click Next.
- In Step 3 of 4, in the Industry
type section, specify the following settings:
- Category: Food and drink
- Sub-category: Candy, nuts, and confectionaries
- Description of products or services: Fresh fruit, berries, and jams
- In the lower right, click Next.
- In Step 4 of 4, in the section with the company
details, click Confirm.
The section with the company details rolls up and the next section with the account representative details unrolls.
- In the section with the account representative details, click
Confirm.
The section with the account representative details rolls up and the Review terms section unrolls.
- In the Review terms section, click Confirm.
- In the lower right, click Submit for verification.
The Complete account setup page opens with a notification saying that your information has been submitted for verification.
Step 5: Configuring Test Mode for the Payment Provider
To configure test mode for the Shopify Payments payment provider in the Shopify store, do the following:
- While you are signed in to the admin area of your Shopify store and reviewing the store settings, in the left menu, click Payments.
- On the Payments page, which opens, in the Shopify Payments section, click Manage.
- On the Shopify Payments page, which opens, in the
Test mode section, switch on the only toggle to
enable the test mode for the payment provider.
When the test mode is switched on, at the top of the page, the Test mode status appears on the right of the page name.
- At the top of the page, click Back.
The Payments page opens. In the Shopify Payments section, notice that the Test mode status has appeared right to the section name.
- In the Payment capture method section, select the Manually option button.
- Clear Send a warning 1 days before an authorization expires to <your email> check box.
- At the top of the page, in the Unsaved changes bar, click Save.
Step 6: Creating the Mapping for the Shopify Payments Store Payment Method
To map the Shopify Payments store payment method to the payment method defined for it in MYOB Acumatica, do the following:
- On the Shopify Stores (BC201010) form, select the SweetStore - SP store.
- In the table on the Payments tab, in the existing
row of the SHOPIFY_PAYMENTS store payment method, specify the following
settings:
- Active: Selected
- Store Currency: USD (inserted by default)
- ERP Payment Method: SHOPIFYPAY
- Cash Account: 10250ST
- Proc. Center ID: SHOPIFYPAY
- On the form toolbar, click Save to save your changes.
Step 6: Mapping the Shopify Fees
To map Shopify fees to entry types, while you are still viewing the Shopify Stores (BC201010) form, do the following:
- On the Payments tab, in the table, click the row with the SHOPIFY_PAYMENTS store payment method.
- On the toolbar of the Payment Fees table, click Add Row.
- In the added row, specify the following settings:
- Fee Type: processing_fee
- ERP Entry Type: SHOPIFYFEE
- On the form toolbar, click Save to save your changes.
Step 7: Creating an Order Through the Storefront
To purchase a jar of jam, so that you can later import the order and review the credit card payment, in the Shopify store, do the following:
- In the left menu of the admin area, under Sales Channels, hover over the Online Store sales channel, and click the View your online store icon, which appears right of the channel, to open the storefront.
- On the storefront, start typing plum in the search bar, and in the list of search results, click Plum jam 96 oz.
- On the page for the Plum jam 96 oz product, change the quantity to
3 and click Add to cart. In the pop-up, click
Check out.
The checkout page opens.
- In the Contact section, in the Email or mobile phone number box, specify melody@example.com.
- In the Delivery section, fill in the shipping address
boxes as follows:
- Country/region: United States
- First name: Melody
- Last name: Keys
- Address: 3402 Angus Road
- City: New York
- State: New York
- ZIP code: 10003
- In the Shipping method section, make sure that Economy is selected.
- In the Payment section, specify the following card
settings under Credit card:
- Card number: 4242 4242 4242 4242
- Expiration date: 12/25
- Security code: 123
- Name on card: Melody Keys (inserted by default)
- Select the Use shipping address as billing address check box.
- At the bottom of the page, click Pay now to place and pay your order. The order confirmation page opens.
Step 8: Reviewing the Sales Order in the Admin Area
To review the sales order that you placed in the previous step, in the admin area of the Shopify store, do the following:
- In the left menu, click Orders.
- On the Orders page, which opens, click the row of the order for Melody Keys.
- On the order details page, which opens, review the order details.
At the top of the page, notice the order number which is represented by the prefix # followed by four digits. In the URL of the order page, after /orders/, note the order identifier. This is the identifier that will be shown in MYOB Acumatica, in the External ID column on the Process Data (BC501500) form and on the Sync History (BC301000) form.
Tip:You can change the format of the order number on the General settings page in the Shopify admin area.Notice that the payment status is Authorized.
- In the payment section, click Capture payment.
- In the Capture payment dialog box, which opens, click
Accept.
Notice that the payment status of the order has changed to Paid.
- Under Timeline, expand the first listed link, which
indicates that the order total amount has been captured, and then expand the
Information from the gateway link.Tip:You may need to refresh the page to make the link appear in the timeline.
Notice the Transaction fee total amount, which is the Shopify Payments fee associated with the payment transaction.
Step 9: Importing the Sales Order
To prepare the sales order data for synchronization and then process it, in MYOB Acumatica, do the following:
- On the Prepare Data (BC501000) form, specify the following settings in the Summary area:
- Store: SweetStore - SP
- Prepare Mode: Incremental
- In the table, select the check box in the unlabeled column in the row of the Sales Order entity, and on the form toolbar, click Prepare.
- In the Processing dialog box, which opens, click Close to close the dialog box.
- In the row of the Sales Order entity, click the link in the Ready to Process column.
- On the Process Data (BC501500) form, which opens with the SweetStore - SP store and the Sales Order entity selected, select the unlabeled check box in the only row, and click Process on the form toolbar.
- In the Processing dialog box, which opens, click Close to close the dialog box.
Step 10: Reviewing the Imported Sales Order
To review the settings of the imported sales order, do the following:
- On the Sync History (BC301000) form, specify the following
settings in the Summary area:
- Store: SweetStore - SP
- Entity: Sales Order
- On the Processed tab, in the row of the sales order that you have just imported, click the link in the ERP ID column.
- On the Sales Orders (SO301000) form, which opens for the
imported order in a pop-up window, review the settings of the order (see the
following screenshot).
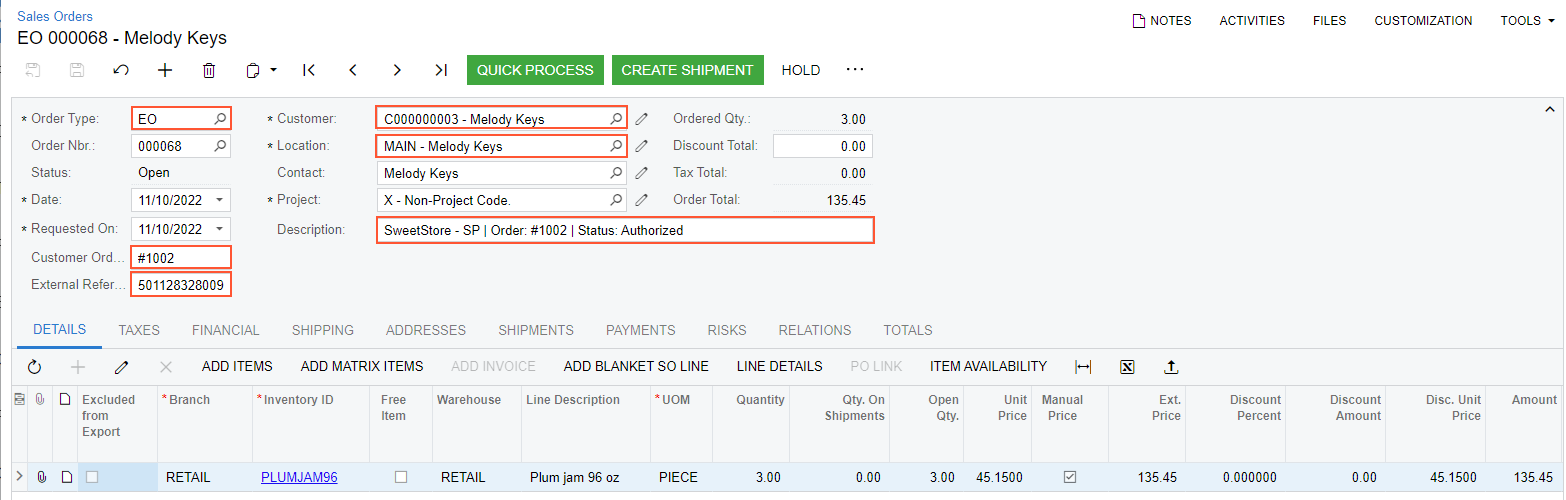
In the Summary area, notice the following:
- The imported order has the EO type (shown in the Order Type), which is configured on the Shopify Stores (BC201010) form to be assigned to all sales orders imported from the SweetStore - SP store.
- In the Customer Order Nbr. box, the order number assigned to the order in the Shopify store is displayed.
- In the External Reference box, the order identifier assigned to the order in the Shopify store and the name of the store are displayed.
- The Date of the sales order is the same as the date on which the order was created in the Shopify store.
- In the Description box, the store name, the order number and the payment status of the order are displayed.
- The Customer and Location boxes display the information about the customer and customer location that were created in MYOB Acumatica during the import of the sales order; both were created during the order placement in the Shopify store. The customer and location IDs were generated based on the customer numbering sequence and location numbering sequence specified on the Shopify Stores (BC201010) form
- On the Payments tab, review the details of the created
payment document of the Prepayment type.
The document includes the external credit card transaction associated with the purchase. The number of the transaction (which in Shopify is shown in the Timeline section) is displayed in the Payment Ref. column. The transaction's status, which is Captured, is displayed in the Proc. Status column, and the payment's status, which is Balanced, is displayed in the Status column.
Step 11: Reviewing the Shopify Fees
To review the Shopify fees in the imported payment, while you are still viewing the Sales Orders (SO301000) form, do the following:
- On the Payments tab, click the link in the
Reference Nbr. column.
The Payments and Applications (AR302000) form opens in a new pop-up window with the payment selected.
On the Charges tab, notice that the Shopify processing fee that you mapped in this activity has been imported with the payment, as the following screenshot shows. The 61900 account is the default offset account associated with the SHOPIFYFEE entry type.
Figure 1. The imported Shopify fees 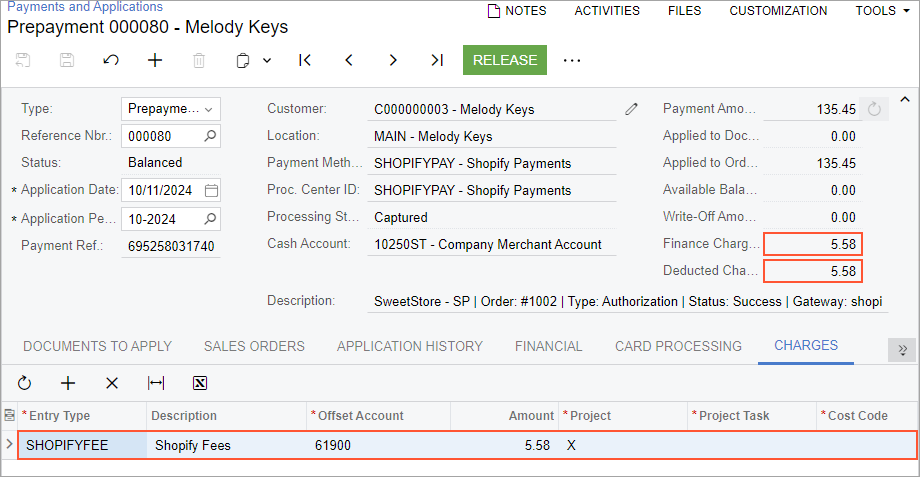
- On the form toolbar, click Release to release the payment.
- Close the pop-up windows with the Payments and Applications and Sales Orders forms.
- On the Account Details (GL404000) form, in the Selection area,
specify the following settings to review the charges for the Shopify
processing:
- Company/Branch: RETAIL
- Account: 61900
In the table, review the Shopify processing fee that debited the offset account associated with the SHOPIFYFEE entry type when you released the payment.
In a production setting, you would create and confirm the shipment and prepare the invoice, which is beyond the scope of this activity.