
Import of Taxes: To Set Up Tax Synchronization
The following activity will walk you through the process of setting up the synchronization of taxes between the Shopify store and MYOB Acumatica.
Story
Suppose that SweetLife is using MYOB Acumatica and Avalara AvaTax for calculating and reporting taxes on the goods and services it sells. The company currently sells products and needs to collect taxes only in New York State.
As an implementation consultant helping SweetLife to set up a Shopify store, you need to set up the tax calculation in the store for New York State and then make sure that the taxes calculated for online orders appear correctly in sales orders imported to MYOB Acumatica.
Configuration Overview
For the purposes of this activity, a company profile has been defined for SweetLife in an Avalara AvaTax sandbox account.
In the U100 dataset, the following tasks have been performed to support this activity:
- On the Tax Providers (TX102000) form, the AVALARA tax provider has been created, a connection to the Avalara AvaTax account has been established, and the SweetLife branches have been mapped to a company profile defined for SweetLife in the AvaTax account.
- On the Tax Zones (TX206000) form, the AVALARA tax zone has been defined.
- On the Tax Categories (TX205500) form, the TAXABLE and EXEMPT tax categories have been defined. These tax categories have been assigned to item classes on the Item Classes (IN201000) form, and to individual stock and non-stock items on the Stock Items (IN202500) and Non-Stock Items (IN202000) forms, respectively.
- On the General tab of the Order Types (SO201000) form, for the EO - eCommerce Order order template, the Disable Automatic Tax Calculation check box (the Order Settings section) has been cleared.
Process Overview
In this activity, you will do the following:
- In the admin area of the Shopify store, review the tax regions where you will collect sales tax on products sold to customers.
- On the Enable/Disable Features (CS100000) form, enable the External Tax Calculation Integration feature.
- On the Tax Categories (TX205500) and Tax Zones (TX206000) forms, review some of the tax-related entities that have been predefined in the U100 dataset.
- On the Shopify Stores (BC201010) form, specify the tax synchronization settings for your Shopify store.
- On the Substitution Lists (SM206026) form, review the mapping of tax categories between MYOB Acumatica and the Shopify store.
- On the Entities (BC202000) form, update the export filtering settings to include stock items of one more item class.
- On the Prepare Data (BC501000) form, prepare the stock item data for synchronization; on the Process Data (BC501500) form, process the prepared data.
- Review the exported items in the admin area of the Shopify store.
- To make sure that the tax applied to a sales order in the Shopify store is imported to MYOB Acumatica correctly, create an online order in the admin area of the Shopify store.
- Import the sales order to MYOB Acumatica by using the Prepare Data and Process Data forms.
- On the Sales Orders (SO301000) form, review the imported sales order.
System Preparation
Do the following:
- Make sure the connection to the Shopify store is established and the minimum configuration is performed as described in the prerequisite activity, Initial Configuration: To Configure the Store Connection.
- Make sure that the customers of the DEFAULT customer class have been exported to the Shopify store.
- Make sure that the integration with the Shopify Payments payment provider has been implemented, as described in Order Synchronization: To Configure and Import Shopify Payments.
- Sign in to the admin area of the Shopify store as the store administrator in the same browser.
Step 1: Configuring Sales Tax Collection in the Shopify Store
To make sure that tax collection is set up in your store for New York State, in the Shopify store, do the following:
- In the bottom of the left menu, click Settings.
- In the left menu of the page that opens, click Taxes and duties.
- On the Taxes and duties page, which opens, in the
Regional settings section, click the line with the
United States region in the table.Tip:If you do not see the needed region in the table, turn the list of regions with the arrow buttons below the table.
On the page that opens, notice that Shopify Tax is displayed in the Tax service section.
- In the Regions you're collecting in section, click Collect in new region.
- In the Collect sales tax dialog box, which opens, in the State box, select New York.
- Click Collect sales tax to save your changes and close the dialog box.
Step 2: Enabling the Needed Feature
To enable the External Tax Calculation Integration feature, which is required for integration of MYOB Acumatica with Avalara AvaTax, in MYOB Acumatica, do the following:
- Open the Enable/Disable Features (CS100000) form.
- On the form toolbar, click Modify.
- Under Third-Party Integrations, select the External Tax Calculation Integration check box.
- On the form toolbar, click Enable.
Step 3: Reviewing the Tax Configuration in MYOB Acumatica
To review the tax configuration that has been predefined in MYOB Acumatica, do the following:
- Open the Tax Categories (TX2055PL) form.
Notice that there are only two tax categories listed in the table (TAXABLE and EXEMPT). Tax categories in MYOB Acumatica determine whether exported products will be taxable or nontaxable in the Shopify store. In the following steps, you will review how these categories are mapped between MYOB Acumatica and the Shopify store.
- On the Tax Zones (TX206000) form, select the
AVALARA tax zone.
Notice that the External Tax Provider check box is selected, which indicates that this tax zone is used for setting up tax calculation by using an external tax provider, and AVALARA is selected as the tax provider.
Step 4: Configuring Tax Synchronization
To configure the synchronization of taxes between MYOB Acumatica and the Shopify store, in MYOB Acumatica, do the following:
- On the Shopify Stores (BC201010) form, select the SweetStore - SP store.
- On the Orders tab (Taxes section),
specify the following settings:
- Tax Synchronization: Selected
- Default Tax Zone: AVALARA
- Use as Primary Tax Zone: Selected
With these settings specified, a sales order placed in the Shopify store will be imported to MYOB Acumatica with sales taxes that have been calculated for the order in the Shopify store. Because the AVALARA tax zone has been selected as the primary tax zone, the taxes will be recalculated by the Avalara AvaTax service.
Note that the EO order type has been set up to recalculate taxes in the orders on invoice creation.
- In the Substitution Lists section, note the substitution
lists used for taxes (SPCTAXCODES) and tax categories
(SPCTAXCLASSES). These substitution lists are predefined and are
inserted as the default values in these boxes.Tip:For the purposes of this activity, you do not need to change the selected values. However, in a production environment, you can create other substitution lists on the Substitution Lists (SM206026) form and specify them in these boxes.
- On the form toolbar, click Save to save your changes.
Step 5: Reviewing the Substitution List for Tax Categories
To make sure that stock and non-stock items exported from MYOB Acumatica are assigned the correct tax category in the Shopify store, do the following:
- Open the Substitution Lists (SM206026) form.
- In the Substitution List box, select
SPCTAXCLASSES.
Notice that the table contains two rows, shown in the following table.
Original Value Substitution Value TAXABLE TRUE EXEMPT FALSE With these settings, non-stock and stock items that have the TAXABLE tax category in MYOB Acumatica, after being exported, have the Charge tax on this product check box selected, and items with the Exempt tax category have the same check box cleared.
Important:This mapping affects only the export of stock and non-stock items. If the state of the check box is changed for a product in the Shopify store and then a sales order with this item is placed and imported to MYOB Acumatica, the tax category that appears in the sales order is copied from the Tax Category box of the General tab of the Stock Items (IN202500) or Non-Stock Items (IN202000) form (depending on the type of the item). When taxes are recalculated in MYOB Acumatica, there might be discrepancies between the order tax amount in the Shopify store and the tax amount calculated in MYOB Acumatica. To avoid these discrepancies, make sure that the same changes are made to product tax settings in both systems (that is, that products are synchronized in a timely manner).
Step 6: Updating the Export Filter for Stock Items
To verify that stock items are exported to the Shopify store with the correct tax category, you need to synchronize (or resynchronize) them between the two systems. Before you do it, you need to update the filter for stock items so that more stock items are synchronized with the Shopify store (in this step, you will add stock items of the JUICER item class). Do the following:
- On the Entities (BC202000) form, specify the following
settings in the Summary area:
- Store Name: SweetStore - SP
- Entity: Stock Item
- On the Export Filtering tab, update the filtering
conditions by adding one more line and specifying the settings described in the
following table:
Active Opening Brackets Field Name Condition Value Closing Brackets Operator Selected ( Item Class Equals Jam - Or Selected - Item Class Equals Juicer ) And - On the form toolbar, click Save.
Step 7: Exporting the Stock Items
- On the Prepare Data (BC501000) form, specify the following
settings in the Summary area:
- Store: SweetStore - SP
- Prepare Mode: Full
- Date Range: Cleared
- In the table, select the check box in the unlabeled column in the row of the Stock Item entity.
- On the form toolbar, click Prepare.
- In the Processing dialog box, which opens, click Close to close the dialog box.
- In the row of the Stock Item entity, click the link in the Ready to Process column.
- On the Process Data (BC501500) form, which opens with the SweetStore - SP store and the Stock Item entity selected, click Process All on the form toolbar.
- In the Processing dialog box, which opens, click Close to close the dialog box.
Step 8: Viewing the Synchronized Stock Items in the Store
To review the items that have been synchronized between MYOB Acumatica and the Shopify store and verify that they have been exported to the Shopify store with the correct tax category, in the Shopify admin area, do the following:
- In the left menu, click Products.
- On the Products page, click the row of the Commercial citrus juicer with a production rate of 2 liters per minute product.
- On the product management page, which opens for the Commercial citrus juicer
with a production rate of 2 liters per minute product, review the
product details.
Notice that in the Pricing section, the Charge tax on this product check box is cleared. The system assigned this tax category to the product because the JUICER20C stock item is assigned the EXEMPT tax category in MYOB Acumatica.
- In the left menu, click Products to return to the Products page.
- On the Products page, click the row of the Kiwi jam 96 oz product.
- On the product management page, which opens for the Kiwi jam 96 oz
product, review the product details.
Notice that in the Pricing section, the Charge tax on this product check box is selected. The system assigned this tax category to the product because the KIWIJAM96 stock item is assigned the TAXABLE tax category in MYOB Acumatica.
Step 9: Creating a Sales Order in the Shopify Store
To make sure that the taxes applied to taxable products in an online order are imported correctly during the order synchronization, you need to create an order in the Shopify store and import it to MYOB Acumatica.
To create an order with the taxable and nontaxable products, in the admin area of the Shopify store, do the following:
- In the left menu, click Orders.
- On the Orders page, which opens, in the upper right, click Create order.
- On the Create order page, which opens, in the Products section, start typing Kiwi jam in the search bar.
- In the list of search results, select the check box next to Kiwi jam 96 oz, and click Add.
- In the Customer section, click in the search bar and in the menu that opens, select Melody Keys.
- In the Payment section, click Add shipping or delivery.
- In the Shipping or delivery options dialog box, which appears, select the Economy shipping rate, and click Done.
- In the Payment section, click .
For the purposes of this activity, assume that the payment was received outside Shopify.
- In the Mark as paid dialog box, which appears, click
Create order.
The system closes the Mark as paid dialog box and creates the order. At the top of the order page, which opens, notice that the system has assigned the order an order number, the Paid payment status, and Unfulfilled fulfillment status.
In the Paid section, in the Taxes row, notice the tax amount of $5.78 has been applied to the order.
- Expand the Tax details link in the Taxes row and
notice that the following taxes have been applied:
- New York State Tax 4%: $2.61
- New York City City Tax 4.5%: $2.93
- Metropolitan Commuter Transportation District 0.375%: $0.24
Notice the identifier of the order (which is the number in the page URL that follows /orders/). You will use it to identify this order during the order import.
Step 10: Importing the Sales Order
To import the sales order to MYOB Acumatica, in MYOB Acumatica, do the following:
- On the Prepare Data (BC501000) form, specify the following settings in the Summary area:
- Store: SweetStore - SP
- Prepare Mode: Incremental
- In the table, select the check box in the unlabeled column in the row of the Sales Order entity.
- On the form toolbar, click Prepare.
- In the Processing dialog box, which opens, click Close to close the dialog box.
- In the row of the Sales Order entity, click the link in the Ready to Process column.
- On the Process Data (BC501500) form, which opens with the SweetStore - SP store and the Sales Order entity selected, select the unlabeled check box in the row of the sales order that you created (which you can find by its identifier in the External ID column and empty ERP ID), and on the form toolbar, click Process.
- In the Processing dialog box, which opens, click Close to close the dialog box.
Step 11: Reviewing the Taxes in the Imported Sales Order
To review how the taxes are displayed in the imported sales order, do the following:
- On the Sync History (BC301000) form, specify the following
settings in the Summary area:
- Store: SweetStore - SP
- Entity: Sales Order
- On the Processed tab, in the row of the sales order that you have just imported (which you can locate by its external ID), click the link in the ERP ID column.
- On the Sales Orders (SO301000) form, which opens, review the
settings of the order, as shown in the screenshot below.
In the Summary area, the Tax Total amount matches the tax amount of the order in the Shopify store (which is $5.78).
In the table on the Taxes tab, review the taxes that have been applied to the order lines. Notice that the table shows the same taxes that you observed on the order page in the Shopify store.
Figure 1. Imported sales order with taxes 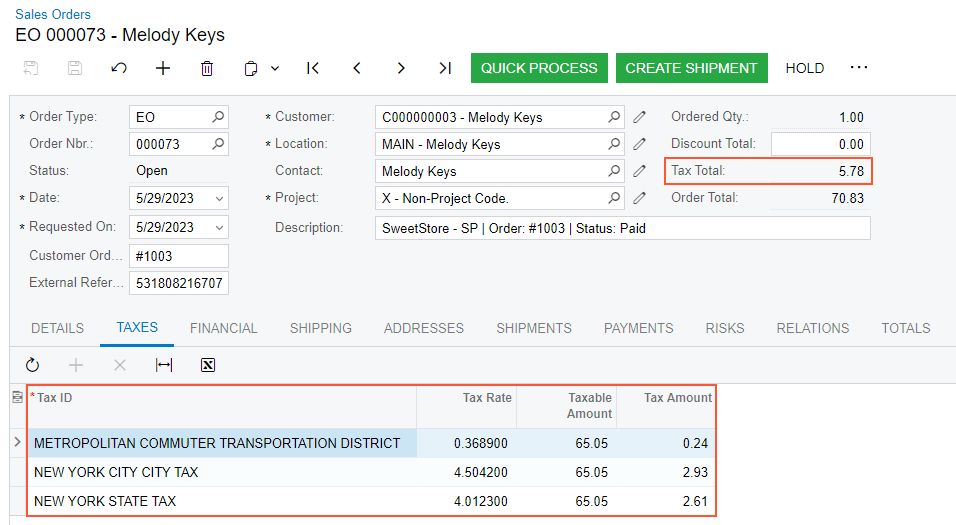
- Go to the Details tab. In the line with the KIWIJAM96 item, Tax Category is set to TAXABLE. This tax category has been copied from the Tax Category box of the General tab of the Stock Items (IN202500) form.