
Assignment Maps: To Configure a Lead Assignment Map
The following implementation activity will show you how to configure a lead assignment map in MYOB Acumatica.
Story
Suppose that you are an implementation consultant at the SweetLife Fruits & Jams company. You need to configure a lead assignment map in MYOB Acumatica in order to provide the marketing team with the ability to assign groups of leads to owners as follows:
- The Marketing Stores workgroup will be working with leads that represent supermarkets and other stores.
- The Marketing Food Services workgroup will be working with leads that represent restaurants, cafes, bakeries, and other food service companies.
Configuration Overview
In the U100 dataset, for the purposes of this activity, the following tasks have been performed:
- On the Employees (EP203000) form, the following employees
have been created:
- Bill Owen
- Joanne Simpson
- On the Company Tree (EP204061) form, the company tree has been configured and it includes the Marketing Stores and the Marketing Food Services workgroups in the Marketing department.
- On the Lead Classes (CR207000) form, the
following lead classes have been created:
- STORE (for leads that are supermarkets and other stores)
- BAKERY
- CAFE (which includes leads that are restaurants and cafes)
Process Overview
In this activity, you will do the following:
- Create a lead assignment map on the Assignment Maps (EP205010) form
- Specify the created assignment map as the default lead assignment map on the Customer Management Preferences (CR101000) form
System Preparation
Before you start configuring a lead assignment map, you should do the following:
- Launch the MYOB Acumatica website with the U100 dataset preloaded.
- Sign in to the system as implementation consultant Kimberly Gibbs by using the
following credentials:
- Username: gibbs
- Password: 123
- Make sure that on the Company and Branch Selection menu, in the top pane of the MYOB Acumatica screen, the SweetLife Head Office and Wholesale Center branch is selected.
Step 1: Creating a Lead Assignment Map
To create a lead assignment map, do the following:
- Open the Assignment and Approval Maps (EP205500) form.
- On the form toolbar, click Add Assignment Map. A new assignment map opens on the Assignment Maps (EP205010) form.
- In the Summary area of the form, do the following:
- In the Name box, type Default Lead Assignment Map.
- In the Entity Type box, select Leads.
- In the Rules tree, click Add Rule to add the rule for distributing the leads of the STORE class.
- On the Conditions tab, do the following:
- In the Description box, type Marketing Stores.
- Make sure that the Active check box is selected.
- On the table toolbar, click Add Row.
- In the Entity box, select Lead.
- In the Field Name box, select Lead Class.
- In the Condition box, select Equals.
- In the Value box, select STORE.
- On the Rule Actions tab, do the following:
- In the Assign Ownership To box, select Employee.
- In the Workgroup box, select Marketing
Stores as follows:
- Click the magnifier button.
- In the dialog box that contains the company tree select
- Double click Marketing Stores to cause the system to close the dialog box and insert this value in the Workgroup box.
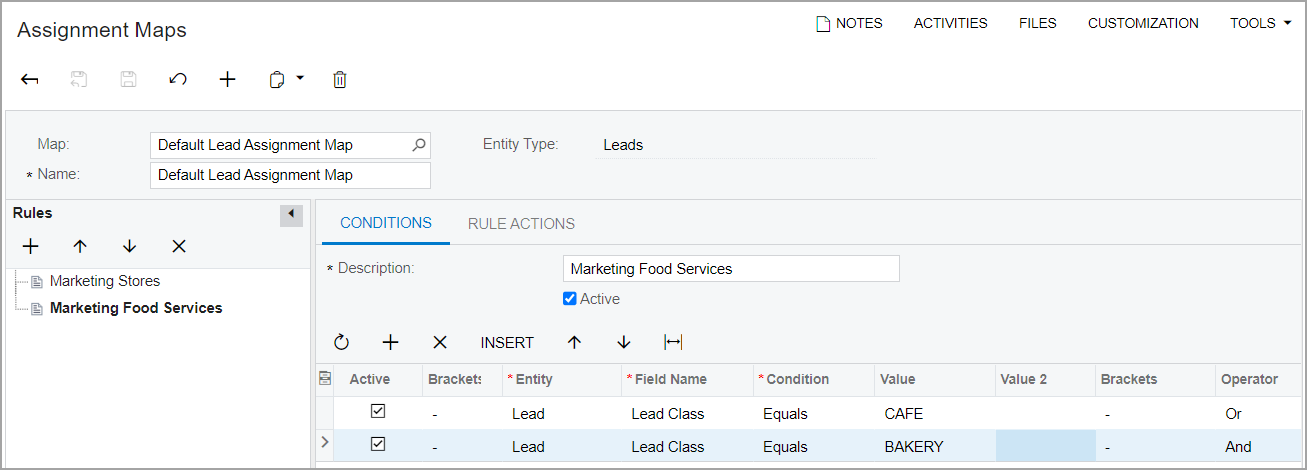
- In the Rules tree, click Add Rule to add the rule for distributing the leads of the CAFE and BAKERY classes.
- On the Conditions tab, do the following:
- In the Description box, type Marketing Food Services.
- Make sure that the Active check box is selected.
- On the table toolbar, click Add Row.
- In the Entity box, select Lead.
- In the Field Name box, select Lead Class.
- In the Condition box, select Equals.
- In the Value box, select CAFE.
- In the Operator box, select Or.
- On the table toolbar, click Add Row.
- In the Entity box, select Lead.
- In the Field Name box, select Lead Class.
- In the Condition box, select Equals.
- In the Value box, select BAKERY.
- On the Rule Actions tab, do the following:
- In the Assign Ownership To box, select Employee.
- In the Workgroup box, select Marketing Food
Services as follows:
- Click the magnifier button.
- In the dialog box that contains the company tree select
- Double click Marketing Food Services to cause the system to close the dialog box and insert this value in the Workgroup box.
- On the form toolbar, click Save.
You have created and configured Default Lead Assignment Map, as shown in the following screenshot. Now you need to specify this map on the Customer Management Preferences (CR101000) form.
Step 2: Selecting a Default Lead Assignment Map
To select a default lead assignment map, do the following:
- Open the Customer Management Preferences (CR101000) form.
- On the General tab, in the Lead Assignment Map box of the Assignment Settings section, select Default Lead Assignment Map.
- On the form toolbar, click Save.
You have selected the Default Lead Assignment Map as the default lead assignment map. Now users can mass-assign leads of the STORE, BAKERY, and CAFE classes on the Assign Leads (CR503010) form, and the system will distribute these leads according to the rules in this assignment map.