To Add a New Custom Form to a Project
To add a new custom form to a customization project, perform the following actions:
- Open the customization project in the Customization Project Editor. (See To Open a Project for details.)
- Click Screens in the navigation pane to open the Customized Screens page.
- On the page toolbar, click Create Screen.
- In the Create Screen dialog box, which opens, specify the following
parameters to create the files for the new form:
- Screen ID: The unique identifier of the new form
- Graph Name: The name of the new class of the business logic code for the form (also called graph)
- Graph Namespace: The namespace to which the new business logic class should be added
- Page Title: The title of the new form
- Template: The form template that provides the default set of containers on the form
- In the dialog box, click OK.Tip:Before you start editing the created screen in the Screen Editor, you must publish the customization project.
For the new form, the system creates the following items and adds them to the customization project:
- The .aspx and .aspx.cs files, which appear in the Files list of the project items.
- The .cs file with the business logic code for the form, which appears in the Code list of project items.
- The site map node, which appears in the Site Map list of project
items.Attention:
To give users the ability to navigate to the form in MYOB Acumatica, you need to specify the position of the new form in the UI by using Menu Editing mode and update the SiteMapNode item, as described in To Update a Site Map Node in a Project. For details on Menu Editing mode, see Menu Editing Mode in the Interface Guide.
- The Page item, with a name that corresponds to the new screen ID; this item appears in the Screens list of project items. This item contains the link to the new page content, which you can later develop by using the Screen Editor.
To obtain the actual files in the file system, publish the customization project after you have added the form to the project. After that, the following files are available on the file system:
- The .aspx and .aspx.cs files in the Pages/<First segment of ScreenID>/ folder of the website
- The .cs file with the business logic code in the App_RuntimeCode folder of the website
You can develop business logic code for the custom form in Microsoft Visual Studio later.
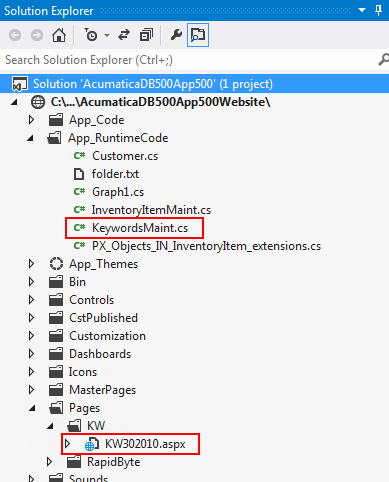
The screenshot below shows the files of the custom form that has been added to the customization project (through the Create Screen command) with the following parameters:
- Screen ID: KW302010
- Graph Name: KeywordsMaint

