
Menu Editing Mode
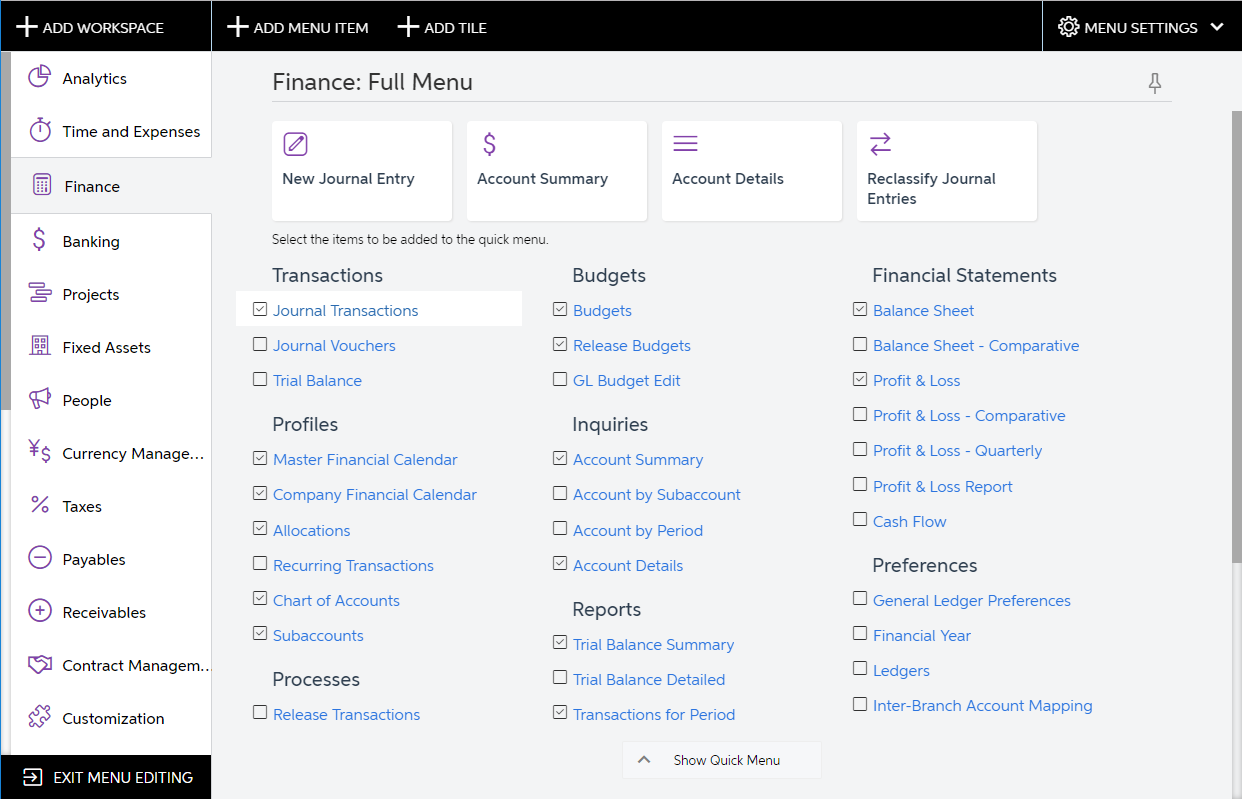
The buttons that appear in Menu Editing mode are described in the following table.
| Button | Description |
|---|---|
| Add Workspace | Opens the Workspace Parameters Dialog Box with the boxes blank so you can specify these parameters and add a workspace to the UI. |
| Add Menu Item |
Opens the Select Forms Dialog Box for the selected workspace.
The button is available when you first select a workspace in Menu Editing mode. |
| Add Tile |
Opens the Tile Parameters Dialog Box with the boxes blank so you can specify these parameters and add a tile to the selected workspace. The button is available when you first select a workspace in Menu Editing mode. |
| Menu Settings | Opens the Menu Settings menu. |
| Exit Edit Menu | Saves your changes and exits Menu Editing mode. |
Editing and Deletion of Menu Items
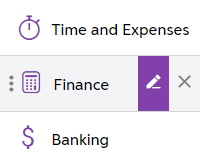
In the following tables, you can find descriptions of the pop-up toolbars for each item type.
| Button | Description |
|---|---|
| Edit | Opens the Workspace Parameters Dialog Box, which displays the parameters of the workspace. |
| Delete | Deletes the workspace and the tiles that belong to the workspace from the system. The forms that belong to the workspace remain in the system. |
| Button | Description |
|---|---|
| Edit | Opens the Category Parameters Dialog Box, which displays the parameters of the category. |
| Delete | Deletes the category from the system. The menu items under this category are moved to the Other category in each workspace. |
| Button | Description |
|---|---|
| Edit | Opens the Form Parameters Dialog Box, which displays the parameters of the form or report. Changes to the form or report parameters are visible in all the workspaces to which the form or report belongs. |
| Delete | Deletes the link to the form or report from the current workspace. The form or report remains in the system. |
| Button | Description |
|---|---|
| Edit | Opens the Tile Parameters Dialog Box, which displays the parameters of the tile. |
| Delete | Deletes the tile from the system. You cannot restore the tile after it is deleted. |
Dialog Boxes of Menu Editing Mode
In this section, you will find descriptions of all dialog boxes that you can open by using the buttons of Menu Editing mode.
| Element | Description |
|---|---|
| Icon | The icon that is displayed to the left of the workspace title. You can select an icon from the predefined list. |
| Area | The area under which the workspace is displayed on the More Items menu of the main menu. You can select an area from the predefined list. |
| Title | The title of the workspace. The title of the workspace should be unique among the workspaces in the system. If you type an existing title, the system displays a warning and does not create or update the workspace. |
| The dialog box contains the following buttons. | |
| OK | Saves your changes and closes the dialog box. |
| Cancel | Closes the dialog box without saving your changes. |
| Button | Description |
|---|---|
| Add | Adds to the workspace the forms, reports, or dashboards you have selected. |
| Add & Close | Adds to the workspace the forms, reports, or dashboards you have selected and closes the dialog box. |
| Close | Closes the dialog box without adding the selected forms, reports, or dashboards to the workspace. |
| Element | Description |
|---|---|
| Icon | The icon that is displayed on the tile button. You can select an icon from the predefined list. |
| Title | The title of the tile. The title of the tile should be unique among the tiles in the system. If you type an existing title, the system displays a warning and does not create or update the tile. |
| Form | The MYOB Acumatica form that is opened when a user clicks the tile. You can select a form from the predefined list. When you are selecting a form, you can type the first characters of the form ID or title, and the system filters the list by these characters. |
| Parameters | The form-specific parameters of the address line that the system adds to the form link when a user clicks the tile. |
| The dialog box contains the following buttons. | |
| OK | Saves your changes to the parameters of the tile and closes the dialog box. |
| Cancel | Closes the dialog box without saving your changes to the parameters of the tile. |
| Button | Description |
|---|---|
| Reset to Default Menu Settings | Displays a confirmation dialog box, and once confirmed, resets the settings of the whole menu (the main menu items and the workspace items) to the default settings. |
| Add Category | Opens the Category Parameters Dialog Box with blank boxes. |
| Element | Description |
|---|---|
| Title | The title of the category. The title of the category should be unique within the categories defined in the system. If you type an existing title, the system displays a warning and does not create or update the category. |
| The dialog box contains the following buttons. | |
| OK | Saves your changes and closes the dialog box. |
| Cancel | Closes the dialog box without saving your changes. |
| Element | Description |
|---|---|
| Category | The category under which the form or report is displayed in the workspace. |
| Title | The title of the form or report. You can specify a unique title, or you can specify a form or report title that exists in the system because forms and reports are identified by their IDs, not titles. |
| The dialog box contains the following buttons. | |
| OK | Saves your changes and closes the dialog box. |
| Cancel | Closes the dialog box without saving your changes. |