
To Add a Page Item for an Existing Form
You can add a Page item for an existing form to a customization project by using both the Customization Menu and the Element Inspector, or you can add the item in the Customization Project Editor.
The following sections provide detailed information:
To Add a Page Item by Using the Element Inspector
To add a Page item for an existing form to a customization project by using the Element Inspector, perform the following actions:
- Open the form in the browser.
- On the form title bar, click to launch the Element Inspector.
- On the form, select the UI element (or area) to be customized, to open the Element Properties Dialog Box for the element (or area).
- In the dialog box, click Customize.
- If there is no currently selected customization project and the inspector opens the Select Customization Project Dialog Box, select an existing customization project or create a new one.
MYOB Acumatica Customization Platform creates the Page item for the form, adds the item to the currently selected customization project, and opens the form in the Screen Editor.
The platform assigns to the new item a name that corresponds to the form ID.
To Add a Page Item on the Customized Screens Page
To add a Page item for an existing form to a customization project by using the Customization Project Editor, perform the following actions:
- Open the customization project in the editor. (See To Open a Project for details.)
- Click Screens in the navigation pane to open the Screens page.
- On the page toolbar, click Customize Existing Screen.
- In the Customize Existing Screen dialog box, which opens, specify the needed form and click OK.
As soon as you add the item, the Screen Editor opens for the form so that you can start changing the form layout.
To go back to the Screens page of the Customization Project Editor, click Screens on the navigation pane. You can see that the added form is saved to the list of project items.
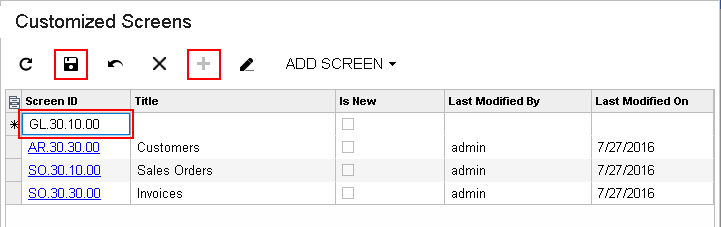
If you know the screen ID of the form, you can add the appropriate item directly to the table of the Customized Screens page. To do this, perform the following actions (shown in the screenshot below):
- On the page toolbar, click Add Row.
- In the Screen ID column of the new row, type the screen ID of the form.
- On the page toolbar, click Save to save the item to the project.
The screenshot below shows the screen ID of the Journal Transactions form entered in the table: GL301000. As soon as you specify the screen ID, press Tab on the keyboard to view the name of the form, which appears in the Title column; make you sure you are adding the item for the needed form.
To modify the layout of a form, open the Screen Editor for the form by clicking the Screen ID of the form in the table or in the navigation pane of the Customization Project Editor.