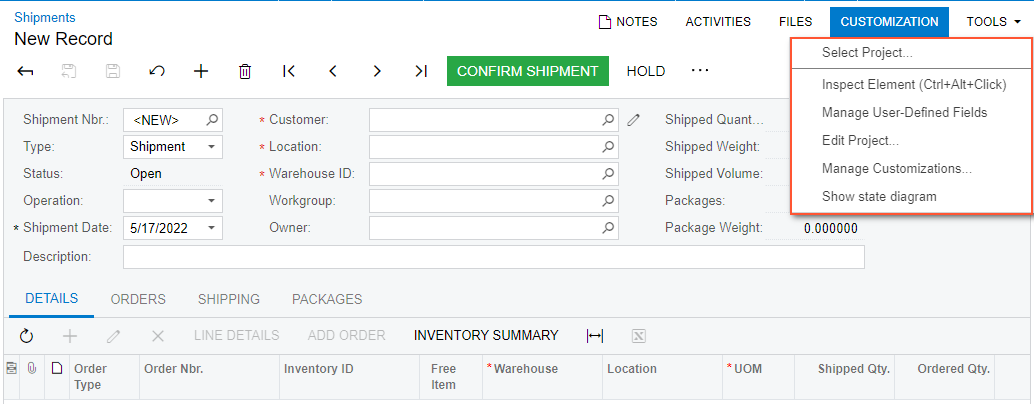
Customization Menu
You can access the Customization menu on the form title bar of an opened MYOB Acumatica form if your user account is assigned the Customizer role. (For details, see To Assign the Customizer Role to a User Account.)

Menu Commands
You can use the following customization-related menu commands.
| Command | Description |
|---|---|
| Select Project |
Opens the Select Customization Project dialog box, which you use to select an existing customization project or to specify the name of a new project for all modifications that you are going to perform. |
| Inspect Element |
Launches the Element Inspector, so that you can select a UI control on the current form and open the Element Properties dialog box for the selected control. You use this dialog box to inspect and customize the control. Tip:
You can use the keyboard shortcut Ctrl+Alt+Click to inspect elements on pop-up
windows and dialog boxes. If you have selected a customization project, all the modifications that you initiate in the inspector will be added to this current project. Otherwise, the Element Inspector opens the Select Customization Project dialog box. |
| Manage User-Defined Fields |
Opens the Edit User-Defined Fields (CS205020) form, where you can select user-defined fields for the current form from the previously defined list of attributes and user-defined fields (for details, see Managing Attributes and User-Defined Fields). This command appears only on data entry forms and reports. For details on how to add user-defined user fields, see To Add User-Defined Fields to a Form. |
| Edit Project |
Opens the Customization Project Editor for the currently selected customization project. |
| Manage Customizations |
Opens the Customization Projects (SM204505) form. |
| Show State Diagram |
Opens the State Diagram dialog box, which contains the workflow diagram for the selected form and the Customize Workflow button. If you click the Customize Workflow button, the system opens the Select Customization Project dialog box. In this dialog box, you select an existing customization project (or click New and then specify the name of the customization project to be created in the New Project dialog box) and click OK. This opens the Customization Project Editor, so that you can modify the workflow for the current form. For details, see Workflow Creation: General Information and Diagram View: General Information. If you have only one customization project, the system opens the Customization Project Editor for this project after you click Customize Workflow, without displaying the Select Customization Project dialog box. Tip:
This command is displayed for forms with workflows without composite
states. |
| Element | Description |
|---|---|
| The dialog box has the following element. | |
| Project Name |
Provides the ability to select an existing customization project. |
|
The dialog box has the following buttons. |
|
| OK |
Confirms your selection and closes the dialog box. |
| Cancel |
Cancels the operation and closes the dialog box. |
| New |
Opens the New Project dialog box, where you can create a new project. |
| Element | Description |
|---|---|
| The dialog box has the following element. | |
| Project Name |
The name of the customization project you are creating. Tip:
The customization project name is used as the namespace if you create an
extension library from the project. The first character of the name must be a
letter or the underscore symbol. |
|
The dialog box has the following buttons. |
|
| OK |
Creates an empty customization project with the specified name and closes the dialog box. Tip:
As soon as you click OK, the system creates a
customization project in the database. |
| Cancel |
Closes the dialog box without creating a customization project. |
