Integrating with Vizual PM
Introduction
The Vizual Personnel Manager – IMS Payroll Partner Integration Module has been provided to enable new employees to be created in IMS Payroll Partner and existing employees to be updated. This will remove the need of double entry in setting up and maintaining employees in a payroll company where integration is required. These notes and attached forms only relate to integration from People Inc to Payroll Partner.
The ability to integrate Vizual Personnel Manager to IMS Payroll Partner is available from in the Tools menu once the Integration module has been installed. This means that any Employee Insert and/or Update integration will be performed on the Payroll Company you are currently logged on to.
Dataflow Diagram & Options Sheet
This document must be read in conjunction with the Dataflow Diagram & Option Sheet document, which shows the flow of data from the Vizual Personnel Manager Software to the IMS Payroll Partner Software. There are two update functions: Insert Employee and Update Employee, and the options available to users may vary.
Column Headings
Vizual Personnel Manager and IMS Payroll Partner: Shows where the source and destination fields are located in each application. The Vizual Personnel Manager screen items have a screen number reference.
Insert Employee and Update Employee: These columns indicate which data fields are available to transfer—availability is indicated with ►.
Where fields have links and dependencies we have grouped these fields, e.g. if you want to update the Pay Frequency field, then you must also update Employee Type, Hours Per Day, Hours Per Period etc. Availability of a group is indicated with ► ►.
Tick Your Requirements: In these columns you can indicate which of the optional data fields you would like to be included when creating new employees or updating existing employees on an ongoing basis. Tick each of the optional data fields which you require - we have shaded and pre-ticked the boxes which are required fields and those whose values come from set-up defaults.
By default, the standard integration module will transfer ALL data fields having a status of “Optional” (as implicated by white fields on the Dataflow Diagram & Option Sheet supplied). Should you not require all of the default optional fields to be integrated, a custom interface will be required to effect your requirements. In this case, on the form tick those optional fields you do require for integration, ignoring those fields which are not required, and return to IMS. You will then be contacted to verify your requirements and be provided with an obligation free quotation to provide a custom interface.
Currently, information required in IMS Payroll Partner on the Employee Information > KiwiSaver tab will be populated with default values for a new employee being inserted, i.e. a new employee will have their Entry Status defaulted to “Not Eligible”. The KiwiSaver tab will need to be reviewed after the new employee has been inserted.
Field Notes
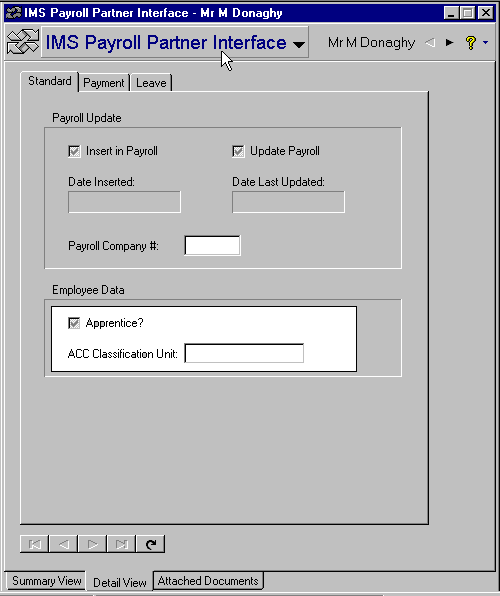
The following fields on the Standard tab of the IMS Payroll Partner Interface are relevant to the integration process. (See screen 6 in the “Screen Fields Required For Integration” section.)
Insert into Payroll: If selected in Vizual, this Employee will be selected for insertion into the Payroll Company. If the insertion is completed successfully then this indicator will be re-set to False (blank).
Update Payroll: If selected in Vizual, the selected fields for this Employee will be updated into the corresponding employee fields in the Payroll Company. This option will remain selected, and the employee data updated every time an Update integration is performed, until de-selected in Vizual.
Payroll Company #: If multiple payroll company interfaces are required from one Vizual company then a user defined and allocated company number identifier should be entered against the employee in Vizual; otherwise leave this field blank. When an Update or Insertion interface is activated the user can select a corresponding Payroll Company number to enable selection of employees to be actioned against the current Payroll company logged on to.
Other Notes
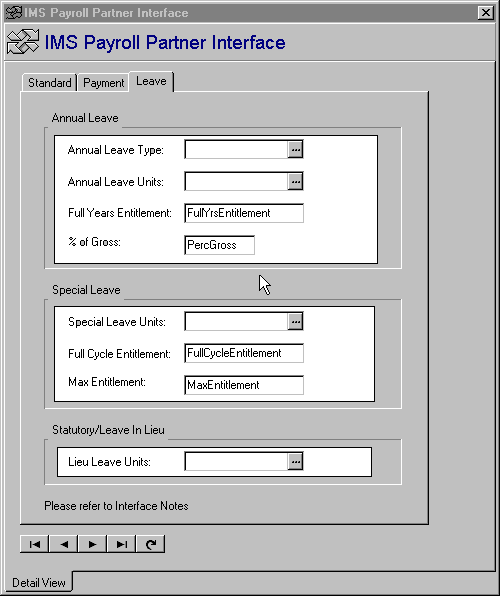
The following fields on the Leave tab of the IMS Payroll Partner Interface are relevant to the integration process. (See screen 8 in the “Screen Fields Required For Integration” section.)
Defaults can be automatically assigned by the payroll system when the employee is inserted into payroll. These defaults apply when only the Annual Leave Type field is entered on the Leave screen. This is done in the same manner as when an employee is set-up manually in the payroll system – the system will automatically set-up values for Annual Leave Fields dependent on the ‘Annual Leave Type’ selected.
The following table shows the defaults allocated during an Insert when the Annual Leave Type is selected:
|
Annual Leave Type |
Full Time(set hours) |
Part Time(variable hours) |
Casual |
|
Annual Leave |
|||
|
Annual Leave Units |
Days |
Hours |
Hours |
|
Full Yrs Entitlement |
20 |
160 |
0 |
|
% of Gross |
8 |
8 |
8 |
|
Sick Leave |
|||
|
Sick Leave Units |
Days |
Days |
Hours |
|
Full Cycle Entitlement |
5 |
5 |
0 |
|
Max Entitlement |
20 |
20 |
0 |
|
Alternative Leave |
|||
|
Alternative Leave Units |
Days |
Hours |
Hours |
The annual leave units for casual employees is irrelevant, as leave is accrued and paid out as a dollar value only and is not converted into hourly or daily values.
If employees have leave values which are different to the defaults detailed above, these can be set-up for new employees in Personnel Manager on the IMS Payroll Partner Interface screen, and will carry across to the payroll system when the employee is inserted. From that point on, any editing of the employee leave details must be done in IMS Payroll Partner.
Creation Of Vizual Pick Lists
The integration process requires certain fields to contain a range of required values to ensure a valid Insert or Update process. These fields have the facility to construct Pick Lists of valid contents pertaining to the particular field. It is highly recommended that these Pick Lists be constructed to ensure that the contents selected will be valid. These fields can be identified by the button located on the right hand side of the field which provides the ability to Add, Delete and Select contents of the field’s Pick List. The valid entries detailed below may be either in Upper or Lower case.
-
Employee Details And Employee Details > Contract
-
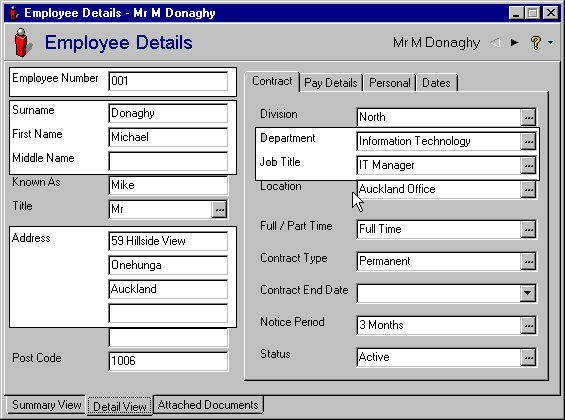
Department - Enter valid Payroll Pay Points.
-
Employee Details > Pay Details
-
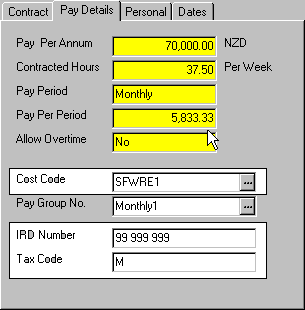
Cost Code – If the Costing Required? option has been enabled in the intended target payroll, enter valid Payroll Costing Codes.
-
IMS Payroll Partner Interface > Payment
-
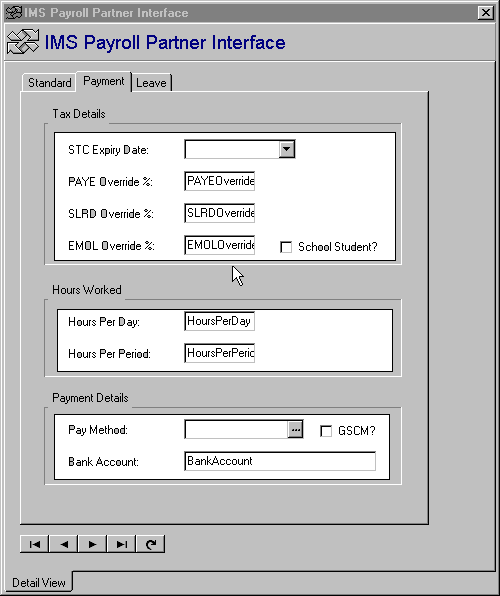
Pay Method - Valid entries are “Cash”, “Cheque” and “Bank”.
-
IMS Payroll Partner Interface – Leave
-
Annual Leave Type – Valid entries are “Full Time”, “Part Time” and “Casual”.
-
Annual Leave Units, Special Leave Units and Lieu Leave Units - Valid Entries Are “Hours” and “Days”.
Pre-Requisites
Each employee in MYOB IMS Payroll Partner must have a unique Employee Number entered into the Emp# field on the Employee tab.
The same numbering structure must be used in Personnel Manager to provide a unique matching key for employees in both systems. The Integration Insert function checks that the employee number assigned in Personnel Manager does not exist in payroll while the Update facility requires that the employee number does exist in payroll. It is important that once a number has been allocated in the payroll then this number is not changed.
The Employee Numbers of existing employees are listed in the Employee Listing report generated from the MYOB IMS Payroll Partner Sundry Reports screen. For more information on the Payroll Emp# field please refer to the Payroll Partner on-line help facility.
To enable the standard Integration function to process correctly, the IMS Payroll Partner Interface screen must have been imported and used in Vizual. You will receive this screen with the Integration Module. It is strongly advised that you backup your Personnel Manager databases prior to importing this screen. The Vizual Screen Designer function is required in order to import the IMS Payroll Partner Interface screen supplied by IMS into your Vizual application.
Ensure that the latest version of the MYOB IMS Payroll Partner application has been installed—contact the MYOB IMS Sales Department if you are unsure of the latest version.
Activation Pre-Requisites
-
To effect a successful integration, it is highly advised that there are no users in the People Inc company and no additional users in the Payroll Company excluding the user activating the integration.
-
The Payroll company to be integrated with Vizual must have a process status of “Closed”, i.e. ready to open a new pay period processing cycle.
-
If User Security is activated in MYOB IMS Payroll, the Vizual Interface option at Company > User Codes must be enabled for the user who is to perform the integration. In order to activate the “Vizual Interface” option the user must first have the Employee Maintenance and Payroll Processing options enabled.
-
It is strongly advised that a backup is performed prior to activating a Vizual Integration. Perform a backup at Tools menu > Backup.
Integration Process
Parameter Settings
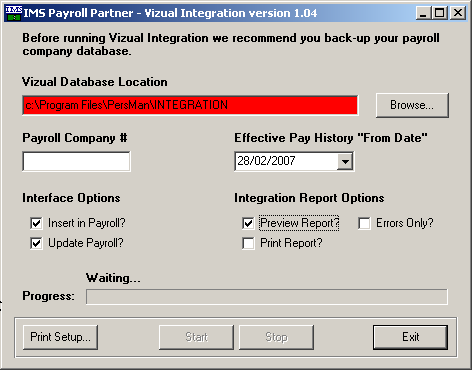
The Vizual Integration facility can be activated in MYOB IMS Payroll Partner at Tools menu > Vizual Integration. Once activated, the following parameters will require reviewing and selection based as per your requirements.
Configuration Options
Vizual Database Location: Enter, or browse for, the full location and name of the source Vizual Database.
Payroll Company #: Required if one Vizual Database is to interface to two or more Payroll Companies. This field can be used to enable identification of a particular payroll company which this employee will be processed in. If this is not a requirement then the field can be left blank; otherwise enter a pre-allocated Payroll Company for employee selection. This field is relevant to the usage, if applicable, of the field ‘Payroll Company #’ in the Standard Tab > IMS Payroll Partner Interface screen in Vizual.
Effective Pay History “From Date”: This field will be used in the selection of the current Vizual Pay History detail record, using the ‘From Date’ as the selection criteria.
A Pay History record must exist for an employee in order to perform a successful employee Insert or Update into Payroll.
To successfully insert an employee into Payroll, a Pay History record must exist with a ‘From Date’ prior, or equal to, the date selected in this parameter. Therefore if you want to insert new employees with Pay History ‘From Date’ set in the future, i.e. the employee’s first pay will be at the end of the month, then this parameter must be set to that date in order for the insert to be successful.
When updating employees in Payroll, the Pay Details of the Pay History record with the latest chronological ‘From Date’ which is prior, or equal to, the date selected in this parameter will be used for updating the employee payroll pay details.
In addition, if two or more records exist with the same selected ‘From Date’, then the first record which was physically entered would be used in the Insert or Update.
Insert in Payroll? For each new employee in Vizual to be inserted in the payroll system, the Insert In Payroll option on the IMS Payroll Partner Interface screen must be selected. Once an employee has been successfully inserted then this indicator will be re-set to False (blank) and the associated Date Insertion field will contain the date the insertion was performed.
Update Payroll? For each Vizual employee who already exists in the Payroll, the Update Payroll option on the IMS Payroll Partner Interface screen must be selected. This employee will be checked for a change of data every time the Update integration is performed. The associated Date Last Updated field will reflect the date when an update has been performed due to an actual data update. The Vizual Employee will be examined for data changes every integration process run until this indicator is manually switched off in Vizual.
Integration Report Options: Each Integration process will produce a report showing validation exceptions and employees successfully Inserted and/or Updated. This report may then be printed for reference in resolving any validation exceptions. One of the following options is required:
-
Preview Report? Select if you want to preview the report on screen. The report can then be printed from the preview if required.
-
Print Report? If selected the report will automatically be printed whether the preview is selected or not
-
Errors Only? If selected, the report will print Data Errors and System Status messages only.
Validation
Prior to inserting and/or updating an employee in payroll, validation will be performed on certain fields as detailed on the appropriate forms. Standard validation will be performed on IRD Numbers, Bank Accounts etc.
During an Insert and/or Update process, if any field fails the validation routine then the employee will not be inserted / updated and an error report will be generated detailing why the integration failed for that particular employee. The integration will then process the next selected Vizual employee on record.
Once the errors have been corrected for the employee concerned the update / insert routine could then be re-run.
Auditing
If the appropriate sections of the Payroll Employee Information Auditing is activated in the Payroll Company Controls then an audit trail of an insertion or update will be generated. It is recommended that auditing be activated for all Standard, Payment and Leave options so a full audit of all integration fields are recorded. This audit would then be able to be reported on via the Payroll Sundry Reports - Employee Audit facility. (Integration audit information will be identified on the Audit Report with a source code of “VI”).
During an Update process only those fields selected for update which have changed will be audited.
Screen Fields Required For Integration
Fields used in the Personnel Manager interface are indicated in white. Refer to the section “Dataflow Diagram & Option Sheet” section for a cross reference to the screen number and associated fields.
Screen 1. Employee Details and Employee Details - Contract
Screen 2. Employee Details – Pay Details
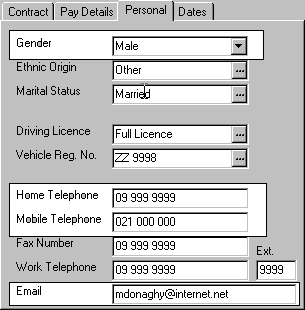
Screen 3. Employee Details – Personal
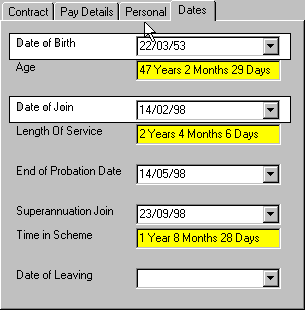
Screen 4. Employee Details – Dates
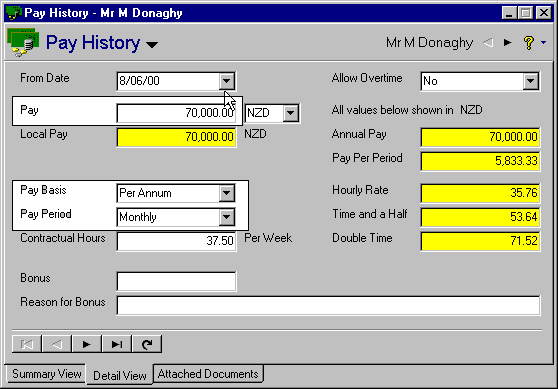
Screen 5. Absence & Payroll – Pay History
Screen 6. IMS Payroll Interface – Standard
Screen 7. IMS Payroll Partner Interface – Payment
Screen 8. IMS Payroll Partner Interface – Leave