Integration with People Inc.
Introduction
The People Inc. – IMS Payroll Integration Module enables new employees to be created in People Inc and automatically be updated in MYOB IMS Payroll Partner. This will remove the need for double entry in setting up and maintaining employees in a payroll company where integration is required. These notes and attached forms only relate to integration from People Inc to Payroll Partner.
The ability to integrate People Inc to IMS Payroll is available from within the Payroll “Tools” option once the Integration module has been installed. This means that any Employee Insert and/or Update integration will be performed on the Payroll Company you are currently logged on to.
Dataflow Diagram & Option Sheet
This document must be read in conjunction with the ‘Dataflow Diagram & Option Sheet’ document, which shows the flow of data from the People Inc Software to the MYOB IMS Payroll software. There are two update functions: Insert Employee and Update Employee, and the options available to users may vary.
The Dataflow Diagram & Option Sheet is available on the .
Column Headings
BTL People Inc and MYOB IMS Payroll: Shows where the source and destination fields and screens are located within each application. The People Inc screen items have a screen number reference.
Insert Employee and Update Employee: These columns indicate which data fields are available to transfer—availability is indicated with ►.
Where fields have links and dependencies we have grouped these fields, e.g. if you want to update the Pay Frequency field, then you must also update Employee Type, Hours Per Day, Hours Per Period etc. Availability of a group is indicated with ► ►.
Tick Your Requirements: In these columns you can indicate which of the optional data fields you would like to be included when creating new employees or updating existing employees on an ongoing basis. Tick each of the optional data fields which you require - we have shaded and pre-ticked the boxes which are required fields and those whose values come from set-up defaults.
By default, the standard integration module will transfer ALL data fields having a status of “Optional” (as implicated by white fields on the Dataflow Diagram & Option Sheet supplied). Should you not require all of the default optional fields to be integrated, a custom interface will be required to effect your requirements. In this case, on the form tick those optional fields you do require for integration, ignoring those fields which are not required, and return to IMS. You will then be contacted to verify your requirements and be provided with an obligation free quotation to provide a custom interface.
Field Notes
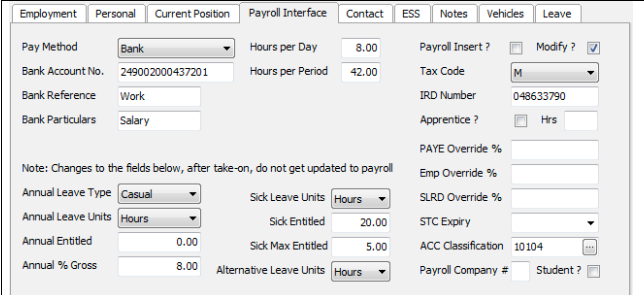
The following fields on the Employees > Payroll Interface tab in People Inc. are relevant to the integration process. (See screen 6 in the “Screen Fields Required For Integration” section.)
Payroll Insert?: If selected within People Inc then this Employee will be selected for Insertion into the Payroll Company. If the insertion is completed successfully then this indicator will be reset to False (blank).
Modify?: If selected within People Inc, the selected fields for this Employee will be updated into the corresponding employee fields within the Payroll Company. This indicator will remain selected, and the employee data updated every time an Update integration is performed, until de-selected within People Inc.
Payroll Company #: If multiple payroll company interfaces are required from one People Inc company then a user defined and allocated company number identifier should be entered against the employee in People Inc - otherwise leave this field blank. When an Update or Insertion interface is activated the user can select a corresponding Payroll Company number to enable selection of employees to be actioned against the current Payroll company logged on to.
Annual Leave Type
Defaults can be automatically assigned by the payroll system when the employee is inserted into payroll. These defaults apply when only the Annual Leave Type is selected on the Employee > Leave tab in MYOB IMS Payroll. This is done in the same manner as when an employee is set-up manually in the payroll system – the system will automatically set-up values for Annual Leave Fields dependent on the Annual Leave Type selected.
The following table shows the defaults allocated during an Insert when the Annual Leave Type is selected:
|
Annual Leave Type |
Full Time(set hours) |
Part Time(variable hours) |
Casual |
|
Annual Leave |
|||
|
Annual Leave Units |
Days |
Hours |
Hours |
|
Full Yrs Entitlement |
20 |
160 |
0 |
|
% of Gross |
8 |
8 |
8 |
|
Sick Leave |
|||
|
Sick Leave Units |
Days |
Days |
Hours |
|
Full Cycle Entitlement |
5 |
5 |
0 |
|
Max Entitlement |
20 |
20 |
0 |
|
Alternative Leave |
|||
|
Alternative Leave Units |
Days |
Hours |
Hours |
The annual leave units for casual employees is irrelevant, as leave is accrued and paid out as a dollar value only and is not converted into hourly or daily values.
If employees have leave values which are different to the defaults detailed above, then these can be set up for new employees in People Inc in the Payroll Interface screen (see screen 6 in the “Screen Fields Required For Integration” section), and will carry across to the payroll system when the employee is inserted. From that point on, any editing of the employee leave details must be done in IMS Payroll Partner.
Pre-Requisites
Each employee in MYOB IMS Payroll must have a unique Employee Number entered into the Emp# field on the Employee tab.
The same numbering structure must be used in People Inc to provide a unique matching key for employees in both systems. The Integration Insert facility will check that the employee number assigned in People Inc does not exist in payroll while the Update facility will require that the employee number does exist in payroll. It is important that once a number has been allocated in the payroll then this number is not changed.
The Employee Numbers of existing employees are listed in the Employee Listing report generated from the MYOB IMS Payroll Sundry Reports screen. For more information on the Payroll Emp# field please refer to the Payroll Partner on-line help facility.
Ensure that the latest version of the MYOB IMS Payroll application has been installed—contact the MYOB IMS Sales Department if you are unsure of the latest version.
Activation Pre-Requisites
-
To effect a successful integration, it is highly advised that there are no users in the People Inc company and no additional users in the Payroll Company excluding the user activating the integration.
-
The Payroll company to be integrated with People Inc must have a process status of “Closed”, i.e. ready to open a new pay period processing cycle.
-
If User Security is activated in MYOB IMS Payroll then the Vizual Integration option at Company > User Codes must be enabled for the user who is to perform the integration. In order to activate the “Vizual Integration” option the user must first have the Employee Maintenance and Payroll Processing options enabled.
-
It is strongly advised that a backup is performed prior to activating a Vizual Integration. Perform a backup at Tools menu > Backup.
Integration Process
Parameter Settings
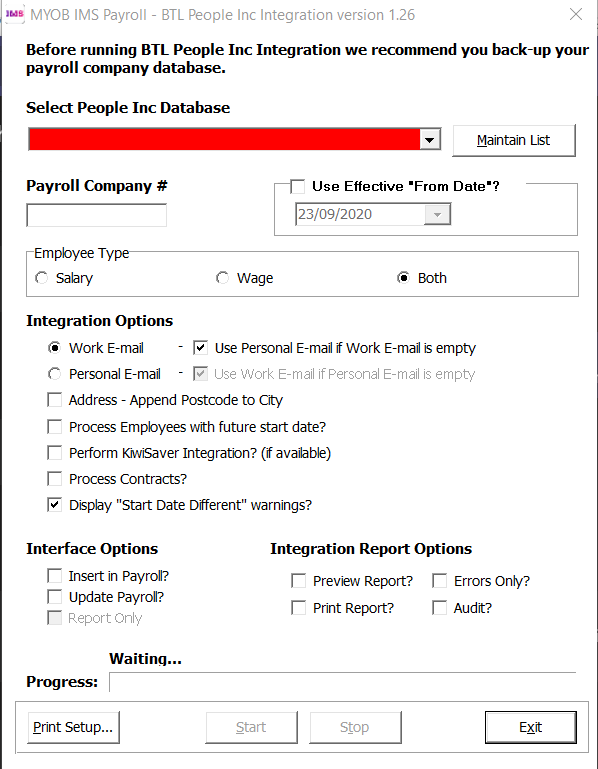
The People Inc Integration facility can be activated in MYOB IMS Payroll at Tools menu > Vizual Integration. Once activated, the following parameters will require reviewing and selection based as per your requirements.
Configuration Options
Select People Inc Database: Use the drop down menu to select a People Inc database to connect to. The listed databases are set up using the Maintain List screen—see “Setting up Database Connections” on page 6 for details on using this screen to add, delete or modify databases.
Payroll Company # – Required if one People Inc Database is to interface to two or more Payroll Companies.
This indicator can be utilised to enable identification of a particular payroll company which this employee will be processed in. If this is not a requirement then this field can be left blank otherwise enter a pre-allocated Payroll Company for employee selection.
Use Effective “From Date” ? - Use this to search for job / salary history on/prior to the date specified.
Employee Type – Use this to filter the employee list based on Salary/Wages or Both.
eMail Selection Options
Select which E-mail address is taken from the People Inc database. The selection is either the Work E-Mail or Personal E-mail. Furthermore, if the selected E-mail address isn't filled in the People Inc database then the other E-Mail address can be utilised for inserts or updates.
Address Options
Select ‘Append Postcode to City ‘ if you wish the contents of the People Inc - Post Code field to be appended to the City field when updating the Employees addresses.
Employee Selection Options
Select ‘Process Employees with future Start Date‘ if you wish for those employees with a Start Date in the future to be considered for integration.
KiwiSaver Options
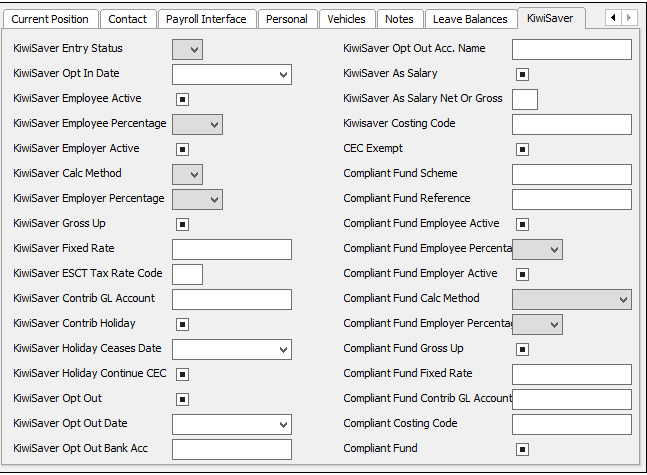
Select ‘Perform KiwiSaver Integration? (if available)‘ if you wish for KiwiSaver data to be considered for integration. It is imperative that if this option is selected then each employee with KiwiSaver data must have all the relevant KiwiSaver data setup correctly.
Interface Options
Insert in Payroll?
For each new employee within People Inc to be inserted in the payroll system, the indicator “Payroll Insert?” on the “Employees - Payroll Interface” screen must be selected. Once an employee has been successfully inserted then this indicator will be re-set to False (blank).
Update Payroll?
For each People Inc employee who already exists in the Payroll, the indicator “Modify?” on the “Employees - Payroll Interface” screen must be selected. This employee will be checked for a change of data every time the Update integration is performed. The People Inc Employee will be examined for data changes every integration process run until this indicator is manually switched off within People Inc.
Report Only:
Select if you only wish to generate a report of the pending integration instead of actually updating data.
Integration Report Options
Each Integration process will produce a report showing validation exceptions and employees successfully Inserted and/or Updated. This report may then be printed for reference in resolving any validation exceptions. One of the following options is required.
Preview Report?
Select if you wish to preview the report on screen. The report can then be printed from the preview if required.
Print Report?
If selected the report will automatically be printed whether the preview is selected or not
Errors Only?
If selected, the report will print Data Errors and System Status messages only.
Audit?
If selected, the report will print an audit of all changes.
Setting up Database Connections
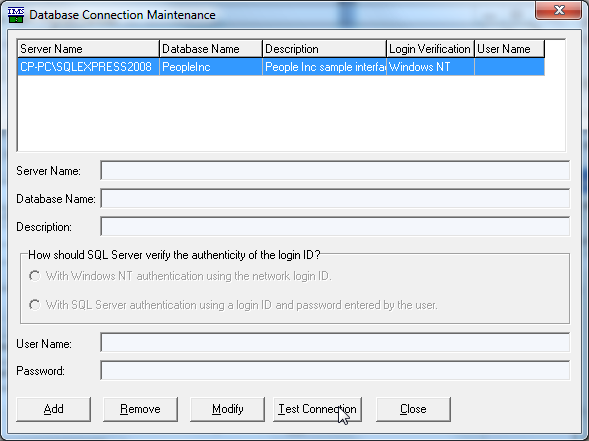
Before you can use the integration module you will need to set up a valid Database connection using the Database Connection Maintenance screen. To open this screen, click the Maintain List button on the People Inc Integration screen.
Adding a Database
Click the Add button on the Database Connection Maintenance screen.
In the Server Name field, enter in the name of the computer that is running SQL Server. This information can be retrieved from the Control Panel > System > Network Identification screen on the computer running SQL Server.
In the Database Name field enter the name of the People Inc Database that you wish to connect to.
Enter a description for the database connection in the Description field. This field is for your reference only and has no influence on the connection.
Select the login verification method. There are two options:
-
With standard Windows authentication using your user credentials
Use standard Windows Authentication when connecting to the server. This is the preferred option for security, where Microsoft Windows security validates the user and the authentication process takes place silently (i.e. no login prompt is necessary). To utilise this option you will need to be running a Windows compliant Server.
You may also need to configure the SQL Server security settings to allow you to connect to the database. This is beyond the scope of this document, as different settings will apply to different organisations. Your IT professional will be able to assist you with this. For further assistance, contact the IMS Support Desk.
-
With SQL Server authentication using a login and password entered by the user
Use SQL Server Authentication when connecting to the server. This option uses SQL Server security to validate the user and should be used where a Windows NT compliant server is not in use. The Username and optionally Password fields must be set up before logging on using this method of authentication.
You will need to create a user login in SQL Server that will allow you access to the selected database. This is beyond the scope of this document, as different settings will apply to different organisations. Your IT professional will be able to assist you with this. For further assistance, contact the IMS Support Desk.
Click OK to add the database connection to the list.
Removing a Database
Highlight the database connection that you wish to remove by clicking on the record in the grid.
Click on the Remove button. A window will be displayed asking you to confirm deletion. Click Yes and the database connection will be removed from the list.
Modifying a Database
Highlight the database connection that you wish to modify by clicking on the record in the grid.
Click on the Modify button. You will now be able to edit the data in the fields.
Click the Ok button to complete the modification.
Testing a Connection
Highlight the database connection that you wish to test by clicking on the record in the grid. Click the Test Connection button. If a connection can be established, the following window will be displayed:
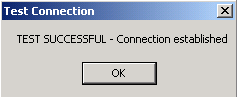
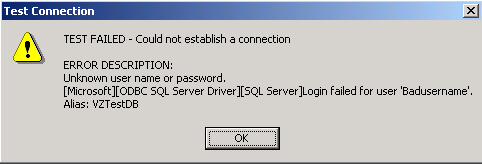
If a connection cannot be established, the following window will be displayed containing information on why the connection failed:
Validation
Prior to inserting and/or updating an employee in MYOB IMS Payroll, validation will be performed on certain fields as detailed on the appropriate forms. Standard validation will be performed on IRD Numbers, Bank Accounts etc.
During an Insert and/or Update process, if any field fails the validation routine then the employee will not be inserted / updated and an error report will be generated detailing why the integration failed for that particular employee. The integration will then process the next selected People Inc employee on record.
Once the errors have been corrected for the employee concerned the update / insert routine could then be re-run.
Auditing
If the appropriate sections of the Payroll Employee Information Auditing is activated within the Payroll Company Controls then an audit trail of an insertion or update will be generated. It is recommended that auditing be activated for all Standard, Payment and Leave options so a full audit of all integration fields are recorded. This audit would then be able to be reported on via the Payroll Sundry Reports - Employee Audit facility. (Integration audit information will be identified on the Audit Report with a source code of “VI”).
During an Update process only those fields selected for update which have changed will be audited.
Screen Fields Required For Integration
Fields used in the People Inc. interface are displayed below. Refer to the “Dataflow Diagram & Option Sheet” section for a cross reference to the relevant screen and associated fields.
Screen 1. Employees – Employment
Screen 2. Employees - Personal
Screen 3. Employees - Contact
Screen 4. Employees - Job History
Screen 5. Employees - Salary History
Screen 6. Employees - Payroll Interface
Screen 7. Employees – KiwiSaver