
Purchases to the Project Site with a Receipt: Process Activity
This activity will walk you through the process of purchasing materials for the project site with a receipt being recorded.
Story
Suppose that the ToadGreen Building Group company is building an Italian restaurant for the Italian Company, its customer. The construction project manager has analyzed the requirements and decided to create a project to track expenses and revenues for the performed work.
Further suppose that work on the project has started on February 15, 2025. The ToadGreen company purchases 400 pallets of 8-inch concrete blocks from the Concrete Supply Co. vendor. The construction project manager asks the vendor to deliver the purchased materials directly to the project site this week. On February 18, 2025, 250 pallets have been delivered to the project site. The vendor will deliver the rest of the purchased blocks at the beginning of March 2025.
Acting as ToadGreen's construction project manager, you will configure a project to handle the tracking and billing of the provided materials. Then you will process a purchase of materials with drop-shipping them directly to the project site.
Configuration Overview
In the U100 dataset, the following tasks have been performed to support this activity:
- On the Enable/Disable Features (CS100000) form, the
following features have been enabled:
- Projects and Construction, which provides support for construction projects
- Inventory and Order Management, which provides the sales order and purchase order functionality
- Inventory, which provides the stock item functionality
- On the Customers (AP303000) form, the ITACOM customer has been created.
- On the Project Templates (PM208000) form, the CONTM project template has been created.
- On the Stock Items (IN202500) form, the CONCRBK8 stock item has been defined.
- On the Vendors (AP303000) form, the CONCRESUP vendor has been created.
Process Overview
You will create a project based on the project template on the Projects (PM301000) form and configure settings for the drop-ship purchases for the project. Then you will create a drop-ship order for the project and process it. You will process a purchase receipt to record the partial receipt of the ordered items at the project site. Finally, you will review the commitment to the project budget.
System Preparation
Before you start creating a project and process a purchase, do the following:
- Launch the MYOB Acumatica website, and sign in as a construction project manager. You should sign in by using the ewatson username and the 123 password.
- In the info area, in the upper-right corner of the top pane of the MYOB Acumatica screen, make sure that the business date in your system is set to 1/30/2025. If a different date is displayed, click the Business Date menu button, and select 1/30/2025 on the calendar. For simplicity, in this activity, you will create and process all documents in the system on this business date.
- On the General tab (General Settings section) of the Projects Preferences (PM101000) form, select the Internal Cost Commitment Tracking check box to expose commitments and committed values in the project budget, and save your changes to the project accounting preferences.
Step 1: Creating a Project Based on the Project Template
To create a project based on a template, do the following:
- On the Projects (PM301000) form, add a new record.
- In the Summary area, specify the following settings:
- Project ID: ITALIAN3T
- Customer: ITACOM
- Template: CONTM
When you select the project template, the system fills in the relevant elements of the project with the settings specified for the template, including tasks and revenue budget lines.
- In the Description box of the Summary area, enter Italian restaurant (Taylor Street).
- In the Project Properties section on the
Summary tab, specify the following settings:
- Cost Budget Level: Task, Item, and Cost Code
- Allow Adding New Items on the Fly: Selected
- On the
Addresses tab, in the
Project Address section, specify the following
settings:
- Address Line 1: 3505 Taylor Street
- City: New York
- Country: US
- State: NY
- Postal Code: 10011
- Save your changes to the project.
- On the Tasks tab, make sure that 16 tasks have been added, and on the table toolbar, click Activate Tasks to change the status of the project tasks to Active.
- On the Defaults tab, specify the following settings:
- Use Expense Account From: Posting Class or Item
- Drop-Ship Receipt Processing: Generate
Receipt
With this setting, items of any type added to a purchase order of the Project Drop-Ship type are processed with a purchase receipt.
- Record Drop-Ship Expenses: On Receipt
Release
With this setting, the expenses are recorded to the project on release of the purchase receipt created for the drop-ship purchase order.
- On the form toolbar, click Activate. The system assigns the project the Active status.
Step 2: Creating a Project Drop-Ship Order
Create and process a drop-ship order for the project as follows:
- Set the business date to 2/15/2025.
- While still reviewing the ITALIAN3T project on the Projects (PM301000) form, on the table toolbar of the Commitments tab, click Create Drop-Ship. The system opens the Purchase Orders (PO301000) form, with the Project Drop-Ship selected in the Type box and ITALIAN3T project specified in the Project box in the Summary area.
- In the Summary area, specify the following settings:
- Vendor: CONCRESUP
- Date: 2/15/2025 (populated automatically)
- Description: Purchase of concrete blocks with delivery to project site
- On the Details tab, add a row with the following
settings:
- Inventory ID: CONCRBK8
- UOM: PIECE (specified automatically)
- Order Qty.: 400
- Unit Cost: 180
- Project Task: 04
- Cost Code: 04-220
The system will warn you that the line with the specified project budget key does not exist in the project budget.
- Save the drop-ship order for the project. On the Shipping tab, review the shipping settings for the purchase order and notice that the Shipping Destination Type is set to Project Site.
- On the More menu (under Printing and Emailing), click Print Purchase Order. In the prepared printable document, review the Ship To section, and make sure that the shipping address has been copied from the project settings.
- Close the browser tab with the report and return to the drop-ship order for the project on the Purchase Orders form.
- On the form toolbar, click Remove Hold. The system assigns the purchase order the Open status. When the Open status is assigned to the purchase order, the system creates the commitments for the project.
- On the Projects form, open the ITALIAN3T project.
- On the Cost Budget tab, review the cost budget line with
the 04 project task, the CONCRBK8 inventory item, and the
04-220 cost code. The system has created this cost budget line based
on the commitment.
Notice that the original committed and revised committed values of the cost budget line have been updated by the purchase order total (72,000.00). The actual quantity and actual amount in the line are zero because the expenses have not yet been recorded to the project.
Step 3: Receiving the Items
To record the receipt of the items at the project site, perform the following instructions:
- On the Commitments tab, click the Order Nbr. link of the only row to open the project drop-ship order that you have created earlier on the Purchase Orders (PO301000) form.
- On the form toolbar, click Enter PO Receipt. The system creates a purchase receipt and opens it on the Purchase Receipts (PO302000) form. Save the purchase receipt.
- In the Date box, specify 2/18/2025.
- In the only line on the Details tab, specify 250 as Receipt Qty..
- Save the purchase receipt.
- On the form toolbar, click Release.
- On the Projects form, open the
ITALIAN3T
project, and review the Cost Budget tab, as shown in the
following screenshot. In the line with the 04 project task and the
04-220 cost code, the Actual Amount has been
updated and is now 45,000. The Actual Quantity is
250.
Figure 1. Expenses recorded to project budget 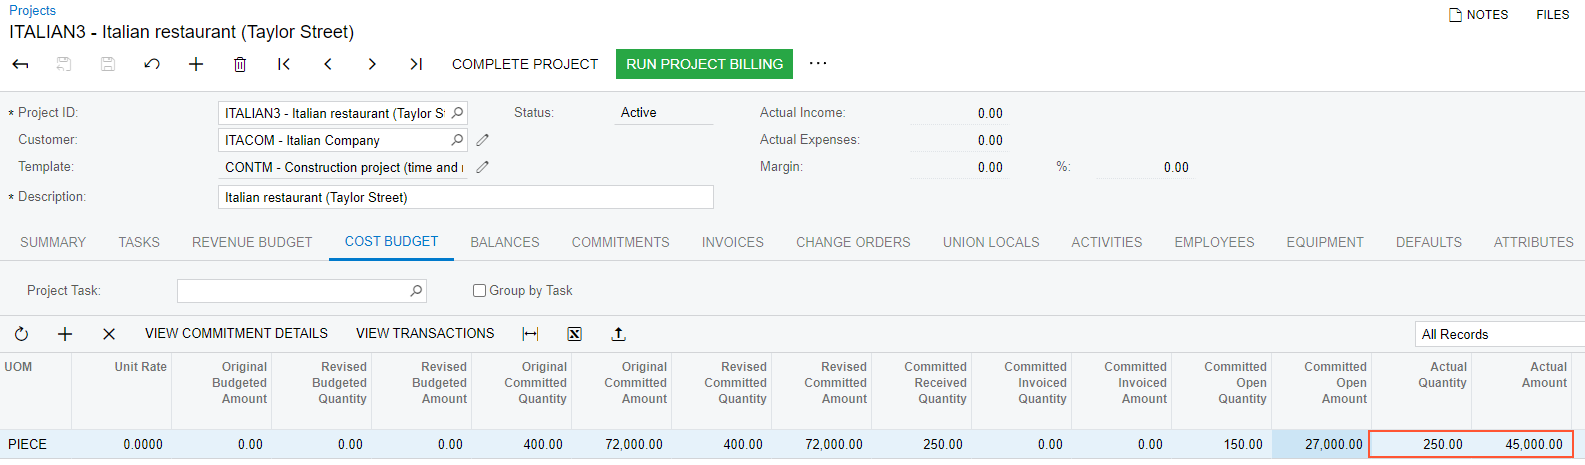
You have finished processing a drop-ship purchase order for a project and recorded the receipt of items to the project site.