
Vendor Prices: To Upload a Price List and Explore Price Selection
In this activity, you will learn how to upload vendor price lists with regular prices and promotional prices and analyze how the system suggests vendor prices in bills and purchase orders.
Story
Suppose that, to make work with vendor documents easier, the SweetLife Fruits & Jams company decided to create a catalog of vendor prices for non-stock items. The system should be able to automatically suggest the vendor price of a specific non-stock item when a user enters this item in a line of a purchase order. SweetLife ordered advertising services from the Blueline Advertisement agency (BLUELINE) before and wants to keep these prices in the system.
Also, the agency offers prices that depend on the number of purchased hours of consulting services:
- $110 per hour for 0 to 4 hours of consulting services
- $100 per hour for 5 to 9 hours of consulting services
- $90 per hour for 10 or more hours of consulting services
On January 30, 2025, the marketing manager of SweetLife decided to purchase consulting services from Blueline Advertisement agency and you, acting as SweetLife's accountant, need to create a purchase order for this agency in the system.
Configuration Overview
In the U100 dataset, the following tasks have been performed to support this activity:
- On the Enable/Disable Features (CS100000) form, the Volume Pricing feature has been enabled.
- On the Non-Stock Items (IN202000) form, the CONSULT, CAMPAIGN, and ADVERT non-stock items have been created.
- On the Vendors (AP303000) form, the BLUELINE vendor has been created.
Process Overview
You will create a list of regular prices on the Vendor Price Worksheets (AP202010) form. You will then configure the price retention settings on the Accounts Payable Preferences (AP101000) form, and on the Vendor Prices (AP202000) form, you will analyze how the system keeps a history of vendor prices depending on the specified settings.
You will create a list of vendor prices broken down by item quantity on the Vendor Price Worksheets form and review how the system suggests these prices when you create a purchase order for the vendor on the Purchase Orders (PO301000) form. You will configure the standard cost for an item on the Non-Stock Items (IN202000) form, and then analyze how the system suggests the last purchase price and standard cost on the Purchase Orders form.
Finally, you will add a promotional price for this vendor on the Vendor Prices form, create a purchase order for this vendor on the Purchase Orders form, and analyze how the system suggests the vendor prices.
System Preparation
- Launch the MYOB Acumatica website with the U100 dataset preloaded, and sign in to the system as an accountant by using the johnson username and the 123 password.
- In the info area, in the upper-right corner of the top pane of the MYOB Acumatica screen, make sure that the business date in your system is set to 1/30/2025. If a different date is displayed, click the Business Date menu button and select 1/30/2025. For simplicity, in this lesson, you will create and process all documents in the system on this business date.
- On the Company and Branch Selection menu, also on the top pane of the MYOB Acumatica screen, make sure that the SweetLife Head Office and Wholesale Center branch is selected. If it is not selected, click the Company and Branch Selection menu button to view the list of branches that you have access to, and then click SweetLife Head Office and Wholesale Center.
Step 1: Enabling the Needed Features
- Open the Enable/Disable Features (CS100000) form.
- On the form toolbar, click Modify.
- Under the Advanced Financials group of features, select the Vendor Discounts check box.
- On the form toolbar, click Enable.
Step 2: Uploading a List of Regular Prices for the Vendor
To upload a list of regular vendor prices, do the following:
- Open the Vendor Price Worksheets (AP202010) form.
- Click Add New Record on the form toolbar, and specify the
following settings in the Summary area:
- Effective Date: 1/1/2025
- Description: Regular prices of Blueline Advertisement, January
- On the table toolbar, click Load Records from File.
- In the File Upload dialog box, which opens, click Choose File.
- In the window that opens, find the PricesAndDiscounts_VendorPrices_BLUELINE_2025_01_01.xlsx file and select it for upload.
- In the File Upload dialog box, click Upload.
- In the Common Settings dialog box, which opens while you are uploading the worksheet, leave the default settings and click OK.
- In the Columns dialog box, which opens next, leave the default column mapping and click OK.
- Make sure that the worksheet contains five lines and save the worksheet.
- On the form toolbar, click Remove Hold, and then click Release to release the worksheet and make the prices effective in the system. The prices from the worksheet will be suggested in documents starting on 1/1/2025.
Step 3: Analyzing How the System Keeps the History of Prices
To analyze how the system keeps the history of vendor prices, do the following:
- Open the Accounts Payable Preferences (AP101000) form.
- On the Pricing tab, make sure that Last Price is
selected in the Retention Type box.
This is the default setting, which means that the system keeps both the new price defined in the worksheet and the previous regular price.
- Open the Vendor Price Worksheets (AP202010) form.
- On the form toolbar, click Add New Record, and specify
the following settings for a worksheet that is effective starting on 6/1/2025:
- Effective Date: 6/1/2025
- Description: Regular prices of Blueline Advertisement, June
- On the table toolbar, click Load Records from File.
- In the File Upload dialog box, which opens, click Choose file.
- In the window that opens, find the PricesAndDiscounts_VendorPrices_BLUELINE_2025_06_01.xlsx file and select it for upload.
- In the File Upload dialog box, click Upload.
- In the Common Settings dialog box, which opens while you are uploading the worksheet, leave the default settings and click OK.
- In the Columns dialog box, which opens next, leave the default column mapping and click OK.
- Make sure that the worksheet contains five lines and save the worksheet.
- On the form toolbar, click Remove Hold, and then click Release on the form toolbar to release the worksheet and make the prices effective in the system.
- Open the Vendor Prices (AP202000) form.
- Clear the Effective As Of box.
- In the table, review the prices that are now defined in the system for the
non-stock items.
The prices that you uploaded in Step 1 expire on 5/31/2025, because you have uploaded new prices effective from 6/1/2025.
- Open the Vendor Price Worksheets form again and, on the form toolbar,
click Add New Record and specify the following settings
for a worksheet effective starting on 9/1/2025:
- Effective Date: 9/1/2025
- Description: Regular prices of Blueline Advertisement, September
- On the table toolbar, click Load Records from File.
- In the File Upload dialog box, which opens, click Choose file.
- In the window that opens, find the PricesAndDiscounts_VendorPrices_BLUELINE_2025_09_01.xlsx file and select it for upload.
- In the File Upload dialog box, click Upload.
- In the Common Settings dialog box, which opens while you are uploading the worksheet, leave the default settings and click OK.
- In the Columns dialog box, which opens next, leave the default column mapping and click OK.
- Make sure that the worksheet contains five lines and save the worksheet.
- On the form toolbar, click Remove Hold, and then click Release to release the worksheet and make the prices effective in the system.
- Open the Vendor Prices form.
- In the Vendor box of the Summary area, select BLUELINE.
- In the Inventory ID box, select ADVERT.
- Clear the Effective As Of box and, in the table, review
how the system has updated the prices.
The system has kept two prices—the most recent price ($45) effective from 9/1/2025 and the previous price ($30) that expired on 8/31/2025.
The system sets the expiration date automatically if you release a new price from a worksheet. If you add a new price directly on the Vendor Prices form, you have to specify the expiration date for the previous price manually.
Step 4: Creating a List of Vendor Prices Broken Down by Item Quantity
To create a list of vendor prices broken down by item quantity, do the following:
- Open the Vendor Price Worksheets (AP202010) form.
- On the form toolbar, click Add New Record, and specify
the following settings in the Summary area:
- Effective Date: 1/1/2025
- Description: Volume-based prices (consulting)
- On the table toolbar, click Add Row, and specify the
following settings for 0 to 4 hours of consulting services:
- Vendor: BLUELINE
- Inventory ID: CONSULT
- UOM: HOUR
- Break Qty: 0.00
- Pending Price: 110.00
- On the table toolbar, click Add Row, and specify the
following settings for 5 to 9 hours of consulting services:
- Vendor: BLUELINE
- Inventory ID: CONSULT
- UOM: HOUR
- Break Qty: 5.00
- Pending Price: 100.00
- On the table toolbar, click Add Row, and specify the
following settings for 10 or more hours of consulting services:
- Vendor: BLUELINE
- Inventory ID: CONSULT
- UOM: HOUR
- Break Qty: 10.00
- Pending Price: 90.00
- On the form toolbar, click Remove Hold, and then click
Release to release the worksheet (see the following
screenshot).
Figure 1. Volume-based vendor prices 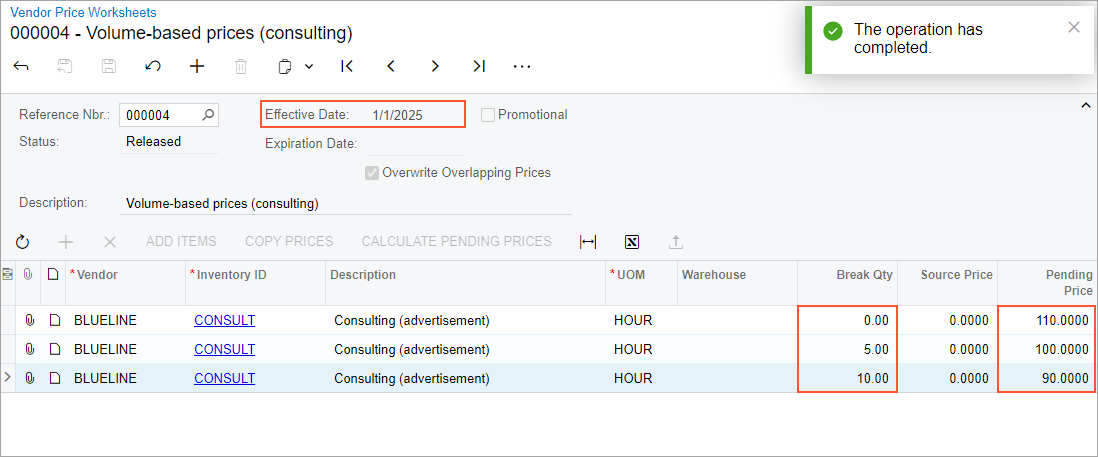
- Open the Purchase Orders (PO301000) form.
- On the form toolbar, click Add New Record, and specify
the following settings in the Summary area:
- Type: Normal
- Vendor: BLUELINE
- Date: 1/30/2025
- Description: Consulting services
- On the Details tab, click Add Row
on the table toolbar, and specify the following settings for 1 hour of
consulting services:
- Branch: HEADOFFICE
- Inventory ID: CONSULT
- Order Qty.: 1
- Click Add Row on the table toolbar, and specify the
following settings for 5 hours of consulting services:
- Branch: HEADOFFICE
- Inventory ID: CONSULT
- Order Qty.: 5
- Click Add Row on the table toolbar, and specify the
following settings for 12 hours of consulting services:
- Branch: HEADOFFICE
- Inventory ID: CONSULT
- Order Qty.: 12
Depending on the quantity, the system suggests the different unit costs that you configured for these quantities (see the following screenshot).Figure 2. Purchase order with volume-based vendor prices 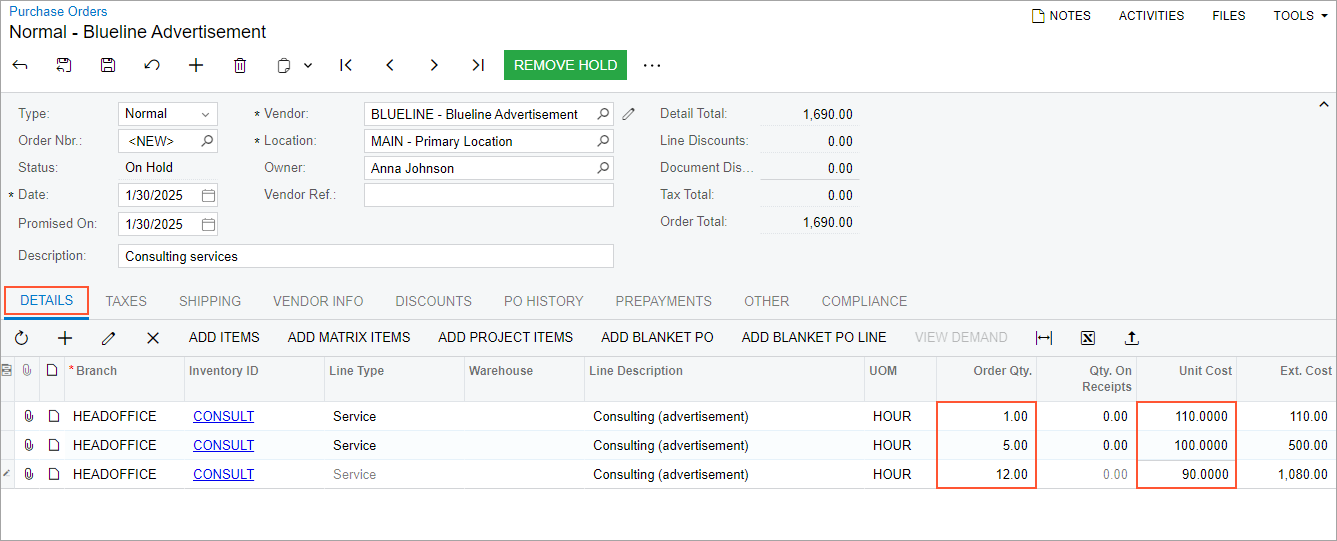
You do not need to save or process this purchase order. You created it solely to test how the vendor prices are selected.
Step 5: Analyzing How the System Suggests the Last Purchase Price and Standard Cost
To analyze how the system suggests the last purchase price and standard cost, do the following:
- Open the Non-Stock Items (IN202000) form.
- In the Inventory ID box, select CAMPAIGN.
- On the Price/Cost tab, specify 390 in the Pending Cost box in the Standard Cost section and 1/20/2025 in the Pending Cost Date box.
- On the More menu (under Other), click Update Cost.
- Open the Purchase Orders (PO301000) form.
- On the form toolbar, click Add New Record, and specify
the following settings in the Summary area:
- Type: Normal
- Vendor: BLUELINE
- Date: 1/30/2025
- Description: Advertising campaign
- On the Details tab, click Add Row
on the table toolbar, and specify the following settings in the added row:
- Branch: HEADOFFICE
- Inventory ID: CAMPAIGN
- Order Qty.: 1
In the Unit Cost column, the system has suggested the $390 standard cost because there is no regular or promotional price effective for this vendor on the specified date.
- In the Unit Cost column, change the value to 350 and save the purchase order.
- On the form toolbar, click Remove Hold, and then on the More menu (under Processing), click Enter AP Bill to create an AP bill for the order.
- On the Bills and Adjustments (AP301000) form, which opens, click Remove Hold, and then on the form toolbar, click Release to release the bill.
- Open the Non-Stock Items form.
- In the Inventory ID box, select CAMPAIGN.
- On the Vendors tab, review the information displayed on
the tab. The last purchase price ($350) has been saved in the Last
Vendor Price column for the BLUELINE vendor (see the
following screenshot).
Figure 3. Last vendor price on the Non-Stock Items form 
- Open the Bills and Adjustments form.
- On the form toolbar, click Add New Record, and specify
the following settings in the Summary area:
- Type: Bill
- Vendor: BLUELINE
- Date: 1/30/2025
- Description: Advertising campaign
- On the Details tab, click Add Row
on the table toolbar, and specify the following settings in the added row:
- Branch: HEADOFFICE
- Inventory ID: CAMPAIGN
- Quantity: 1
In the Unit Cost column, the system has suggested the last purchase price, which is now $350, because there is no regular or promotional price effective for this vendor on the specified date.Figure 4. The last vendor price on the Bills and Adjustments form 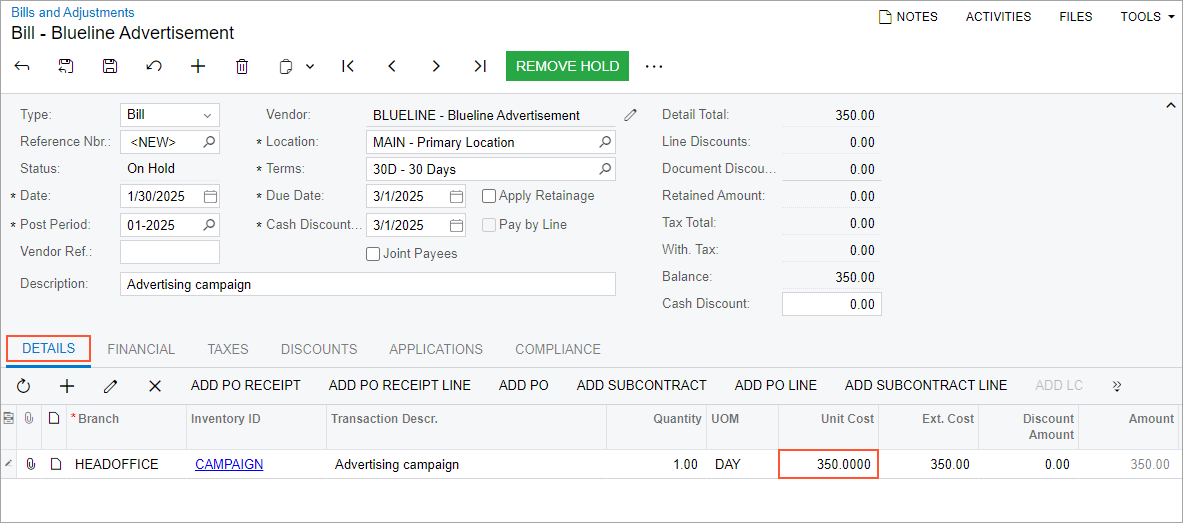
You do not need to save or process this bill. You created it solely to test how the purchase price is suggested.
Step 6: Adding a Promotional Price and Creating a Purchase Order
To add a promotional price for the BLUELINE vendor and create a purchase order, do the following:
- Add a promotional price of $95/hour for the consulting services as follows:
- Open the Vendor Prices (AP202000) form.
- On the table toolbar, click Add Row, and specify
the following settings in the added row:
- Vendor: BLUELINE
- Inventory ID: CONSULT
- UOM: HOUR
- Promotional: Selected
- Price: 95.00
- Effective Date: 1/1/2025
- Expiration Date: 3/31/2025
- On the form toolbar, click Save to save the price.
- Open the Purchase Orders (PO301000) form.
- On the form toolbar, click Add New Record, and specify
the following parameters in the Summary area:
- Type: Normal
- Vendor: BLUELINE
- Date: 1/30/2025
- Description: Consulting services
- On the Details tab, click Add Row
on the table toolbar, and specify the following settings in the added row:
- Branch: HEADOFFICE
- Inventory ID: CONSULT
- UOM: HOUR
- Order Qty.: 2
- On the form toolbar, click Save to save the purchase
order.
Because the system contains a vendor price for this non-stock item for the BLUELINE vendor, the system has copied this price ($95) to the Unit Cost column. This is a promotional price for this vendor that you have set up in this step, it is effective from 1/1/2025 to 3/31/2025 and overrides regular vendor price defined in the system.
- In the Date box in the Summary area, change the date to 4/30/2025.
- In the Warning message that opens, click Yes.
- Review the value in the Unit Cost column.
The unit cost of this item has changed to $110, because it is the regular vendor price for 0 to 4 hours of consulting services, which you set up in Step 3, as shown in the following screenshot.
Figure 5. Updated unit cost in the purchase order 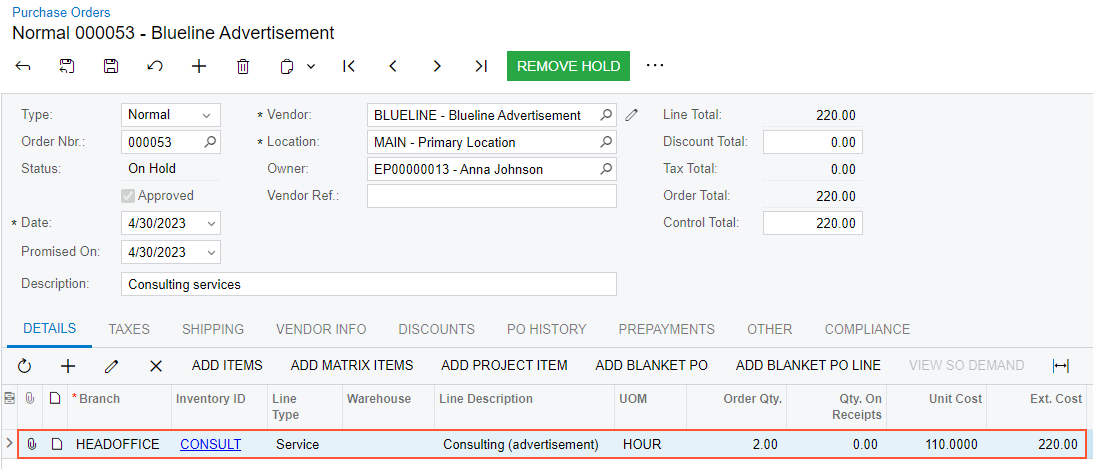
You do not need to save or process this purchase order. You created it solely to test how the unit costs are suggested.