Customer Synchronization: To Perform Bidirectional Synchronization
The following activity will walk you through the process of setting up the bidirectional synchronization of customers and performing the synchronization of customers between MYOB Advanced and the Shopify store.
Story
Suppose that the SweetLife Fruits & Jams company has multiple corporate customers from the United States and Canada in the system. The company management wants customer records for US customers to be exported from MYOB Advanced to the Shopify store. At the same time, new customers that place orders in the Shopify store should be imported to MYOB Advanced.
Because an email address is a key field for a customer in Shopify, customers that do not have it specified in MYOB Advanced will not be saved in the Shopify store during the export.
Acting as an implementation consultant helping SweetLife to set up the integration of MYOB Advanced with the SweetLife store, you need to configure the bidirectional synchronization of customers, and configure the filtering conditions to export only records for US customers that have an email specified.
Configuration Overview
In the U100 dataset, the following tasks have been performed for the purposes of this activity:
- On the Customer Classes (AR201000) form, the COMMERCEBB and ECCUSTOMER customer classes have been configured. The COMMERCEBB customer class is assigned to local (US) customers that need to be exported to the external system.
- On the Customers (AR303000) form, the following customer
records have been created and assigned the COMMERCEBB customer class:
- FRUITICO: On the General tab, notice that no details have been specified in the boxes of the Primary Contact section. In the Additional Account Info section, the account's email address and phone number have been specified.
- JAMIFIQUE: On the General tab, notice that in the Primary Contact section, the name of the contact (Colleen Plunkett) has been filled in. In the Additional Account Info section, the account's email address and phone number have been specified.
- On the Numbering Sequences (CS201010) form, the ECCUSTOMER numbering sequence has been defined.
Process Overview
In this activity, you will perform the following steps:
- On the Shopify Stores (BC201010) form, review the settings of the Customer entity.
- On the Entities (BC202000) form, configure the filtering condition for the export of customers from MYOB Advanced to the Shopify store.
- On the Customers (AR303000) form, review some of the customers that need to be exported.
- On the Prepare Data (BC501000) form, start the data preparation process for the Customer entity to prepare out-of-sync data for export.
- On the Process Data (BC501500) form, start data processing for the Customer entity to save the synchronized customer data in the Shopify store.
- On the Sync History (BC301000) form, review the synchronization status of the processed synchronization records.
- In the Shopify store, review the customers that have been imported from MYOB Advanced.
System Preparation
Before you complete the instructions in this activity, do the following:
- Make sure that the following prerequisites have been met:
- The Shopify store has been created and configured, as described in Initial Configuration: To Set Up a Shopify Store.
- The connection to the Shopify store has been established and the initial configuration has been performed, as described in Initial Configuration: To Configure the Store Connection.
- Launch the MYOB Advanced website with the U100 data preloaded, and sign in by using the
following credentials:
- Username: gibbs
- Password: 123
- Sign in to the admin area of the Shopify store as the store administrator in the same browser.
Step 1: Reviewing the Synchronization Settings of the Customer Entity
To review the synchronization settings of the Customer entity, do the following:
- Open the Shopify Stores (BC201010) form.
- In the Store Name box, select SweetStore - SP.
- On the Entity Settings tab, in the row with the
Customer entity, make sure that the following settings have been
specified:
- Active Selected
- Sync Direction: Bidirectional
- Primary System: External System
- On the Customer Settings tab, make sure that the
following settings have been specified:
- Customer Class:
ECCUSTOMER
When a new customer is imported from the Shopify store to MYOB Advanced, its default settings will be defined based on the customer class selected in this box.
- Customer Auto-Numbering:
ECCUSTOMER
Each new customer imported from the Shopify store will be assigned an identifier based on the numbering sequence selected in this box.
- Customer Class:
ECCUSTOMER
- If you have changed any of the settings, click Save on the form toolbar to save your changes.
Step 2 : Configuring the Filtering Condition
To configure the export of only customer records of the COMMERCEBB customer class, do the following:
- Open the Entities (BC2020PL) form.
- In the Store Name box of the Selection area, select SweetStore - SP.
- In the Entity column of the table, click the
Customer link.
The system opens the Entities (BC202000) form with the SweetStore - SP store and the Customer entity selected in the Summary area.
- To create a first filtering condition, on the Export
Filtering tab, click Add Row on the table
toolbar, and specify the following settings in the row:
- Active: Selected
- Field Name: Customer Class
- Condition: Equals
- Value: COMMERCEBB
- To create a second filtering condition, and another row and specify the
following settings in the row:
- Active: Selected
- Field Name: Email
- Condition: Is Not Empty
- On the form toolbar, click Save to save your
changes.
Now when you prepare the Customer entity for synchronization and process the prepared customer data, only the customers that have the COMMERCEBB customer class and an email address specified will be exported to the SweetStore - SP store.
Step 3 : Preparing the Customer Data for Synchronization
To prepare the customer data for synchronization, do the following:
- Open the Prepare Data (BC501000) form.
- In the Summary area, specify the following settings:
- Store: SweetStore - SP
- Prepare Mode: Incremental
- In the table, select the Selected check box in the row of the Customer entity.
- On the form toolbar, click Prepare.
- In the Processing dialog box,
which opens, review the results of the processing, and click
Close to close the dialog box and return to the Prepare Data form.
Notice that the Prepared Records column shows the number of synchronization records that have been prepared and are ready to be processed.
Step 4 : Processing the Prepared Customer Data
To process the customer data you have prepared for synchronization, do the following:
- While you are still viewing the Prepare Data (BC501000) form,
click the link in the Ready to Process column of the row
with the Customer entity.
The Process Data (BC501500) form opens with the SweetStore - SP store and the Customer entity selected in the Summary area. The table displays all synchronization records of the Customer entity that you prepared in the previous step.
- On the form toolbar, click Process All to process all synchronization records displayed in the table.
- In the Processing dialog box, which opens, click Close to close the dialog box.
Step 5 : Reviewing the Synchronization Status
To review the synchronization status of the synchronization records that you processed in Step 4, do the following:
- Open the Sync History (BC301000) form.
- In the Summary area of the form, specify the following settings:
- Store: SweetStore - SP
- Entity: Customer
- Go to the Processed tab.
The tab shows the items that have been successfully synchronized with the SweetStore - SP store (see the following screenshot). For each customer, the system displays a Shopify identifier in the External ID column. In the table, the Last Operation column is set to Inserted Externally and the time stamp in the Last Attempt column now shows the date and time when you ran data processing on the Process Data (BC501500) form.
Figure 1. Processed synchronization records for the Customer entity 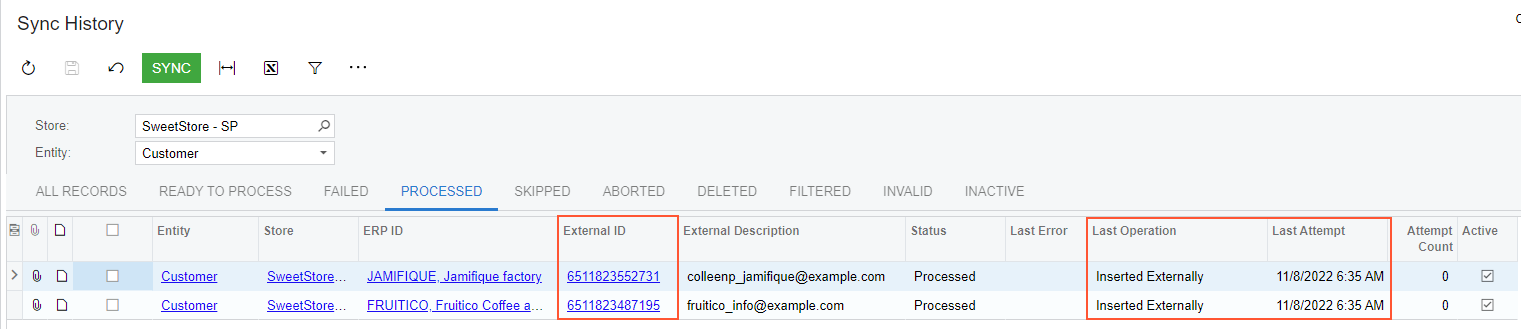
Step 6 : Viewing the Exported Customer Records
To view the FRUITICO and JAMIFIQUE customers in the Shopify store, do the following:
- While you are still viewing the Sync History (BC301000) form,
locate the row with FRUITICO - Coffee and Cakes in the ERP
ID column, and click the link in the External
ID column of that row.
The customer page of the admin area of the Shopify store opens.
- On the customer page, which opens, click right of Customer.
In the Edit customer dialog box, which opens, notice that the First Name and Last Name boxes have been filled in with the information from the Account Name box of the Account Info section on the Customers (AR303000) form because the Name box of the Primary Contact section is empty for this customer.
- Click Cancel to close the Edit
customer dialog box.
In the Default address subsection of the Customer section, notice that no address details are specified. Because the Customer Location entity was not activated on the Entity Settings tab of the Shopify Stores (BC201010) form, the location information has not been imported to the Shopify store for any of the customers.
- In the left menu, click Customers.
- Click the row of the Colleen Plunkett customer.
- On the customer page, which opens, click right of Customer.
In the Edit customer dialog box, which opens, notice that the First Name and Last Name boxes have been filled in with the information saved for the JAMIFIQUE customer from the Name box of the Account Info section on the Customers (AR303000) form.