
Customer Synchronization: To Synchronize Customers with Multiple Locations
The following activity will walk you through the process of setting up the synchronization of customer locations and performing the synchronization of individual customers with locations between MYOB Acumatica and the Shopify store.
Story
Suppose that SweetLife Fruits & Jams works with individual customers and small businesses that order items to be delivered to multiple locations. The company keeps track of customer addresses in the Shopify store and wants these addresses to be in sync with customer locations in MYOB Acumatica.
SweetLife's Shopify subscription does not include business-to-business features, so individual and business customers should be synchronized together.
Acting as an implementation consultant helping SweetLife to set up the integration of MYOB Acumatica with the Shopify store, you need to configure the synchronization of customers along with their locations between the two systems. You will then test the import of customers with multiple locations, then update location details, and test the export of the updated data.
Configuration Overview
In the U100 dataset, the following tasks have been performed to support this activity:
- On the Enable/Disable Features (CS100000) form, the Business Account Locations feature has been enabled.
- On the Customer Classes (AR201000) form, the ECCUSTOMER customer class has been configured.
- On the Numbering Sequences (CS201010) form, the ECCUSTOMER and ECLOCATION numbering sequences have been defined.
Process Overview
In this activity, you will do the following:
- On the Shopify Stores (BC201010) form, update the settings of the Customer and Customer Locations entities.
- In the admin area of the Shopify store, create a new customer with two addresses.
- On the Prepare Data (BC501000) form, prepare the customer and customer address data for synchronization.
- On the Process Data (BC501500) form, process the customer and customer address data prepared for synchronization.
- On the Customers (AR303000) form, review the imported customer data.
- On the Customer Locations (AR303020) form, review the imported customer address data and update one of the customer locations.
- By using the Sync History (BC301000) form, synchronize the updated customer location with the Shopify store.
- In the admin area of the Shopify store, review the updated customer address.
System Preparation
Before you perform the instructions in this activity, do the following:
- Make sure that the following prerequisites have been met:
- The Shopify store has been created and configured, as described in Initial Configuration: To Set Up a Shopify Store.
- The connection to the Shopify store has been established and the initial configuration has been performed, as described in Initial Configuration: To Configure the Store Connection.
- Launch the MYOB Acumatica website with the U100 dataset preloaded, and sign in with the
following credentials:
- Username: gibbs
- Password: 123
- Sign in to the admin area of the Shopify store as the store administrator in the same browser.
Step 1: Configuring the Synchronization Settings of the Customer and Customer Location Entities
To review the synchronization settings of the Customer and Customer Locations entities, do the following:
- On the Shopify Stores (BC201010) form, select the SweetStore - SP store.
- On the Entities tab, do the following:
- Make sure that the Active check box is selected in the rows of the Customer and Customer Location entities.
- In the row of the Customer entity, make sure that Sync
Direction is set to Bidirectional.Tip:Notice that all other settings of the Customer Location entity (including the synchronization direction) are the same as those of the Customer entity and cannot be edited.
- On the Customers tab, make sure that the
following settings have been specified:
- Customer Class: ECCUSTOMER
When a new customer is imported from the Shopify store to MYOB Acumatica, its default settings are defined based on the customer class selected in this box.
- Customer Numbering Sequence:
ECCUSTOMER
Each new customer imported from the Shopify store will be assigned an identifier based on the numbering sequence selected in this box.
- Location Numbering Sequence:
ECLOCATION
Each new customer location imported from the Shopify store will be assigned an identifier based on the numbering sequence selected in this box.
- Customer Class: ECCUSTOMER
- On the form toolbar, click Save to save your changes.
Step 2: Creating a Customer in the Shopify Store
To create a customer and a first address, in the admin area of the Shopify store, do the following:
- In the left menu of the Shopify admin area, click Customers.
- On the Customers page that opens, click Add customer in the upper right.
- On the New customer page that opens, specify the
following details in the Customer overview section:
- First name: Isabelle
- Last name: Bober
- Email: hoppy_info@example.com
- In the Default address section, click Add address.
- In the Add default address dialog box, which opens,
specify the following details:
- Country/region: United States (inserted by default)
- First name: Isabelle (inserted by default based on the information specified in the customer overview section)
- Last name: Bober (inserted by default based on the information specified in the customer overview section)
- Company: Hoppy Place Coffee and Cakes
- Address: 3690 Taylor Street
- City: New York
- State: New York
- ZIP code: 10007
- Click Save to save the address.
The system closes the dialog box and adds the primary address for the customer.
- At the top of the page, in the Unsaved changes bar, click
Save to save the customer record.
The customer page opens for Isabel Bober. Notice that in the Customer section, the email address is displayed, and the Default Address section shows the address lines that you entered in this step.
Step 3: Adding an Address for the Customer
To add a second address for the customer you created in the previous step, while you are still viewing the Customers page for Isabelle Bober, do the following:
- In the Customer section, in the upper right, click the More button and then click Manage addresses.
- In the Manage addresses dialog box, which opens, click Add new address.
- The Add new address dialog box, which opens, in the Country/region box, select United States. The State and ZIP code boxes appear in the dialog box.
- Fill in the boxes as follows:
- First name: William
- Last name: Duncan
- Company: Hoppy Wellby
- Address: 2671 Simons Hollow Road
- City: New York
- State: New York
- ZIP code: 10001
- Click Save to save the address.
The dialog box closes and you return to the customer page for Isabel Bober.
- In the Customer section, in the upper right, click the
More button and then click Manage addresses.
In the Manage addresses dialog box, which opens, notice that the second address has been added.
- Close the Manage addresses dialog box.
Step 4: Preparing the Customer and Customer Location Data for Synchronization
To prepare the customer and customer location data for synchronization, in MYOB Acumatica, do the following:
- On the Prepare Data (BC501000) form, specify the following
settings in the Summary area:
- Store: SweetStore - SP
- Prepare Mode: Incremental
This setting controls which data will be loaded. Incremental indicates that only the customer records that match the filtering conditions and have been modified since the previous processing of the data have been prepared for synchronization.
- In the table, select the check box in the unlabeled column in the row of the Customer entity.
- On the form toolbar, click Prepare.Tip:Because customer locations are synchronized along with customers during the synchronization of the Customer entity, the Customer Location entity is not listed in the table and cannot be prepared separately.
- In the Processing dialog box,
which opens, review the results of the processing, and click
Close to close the dialog box and return to the Prepare Data form.
Notice that the Prepared Records column shows the number of synchronization records that have been prepared and are ready to be processed.
Step 5: Processing the Prepared Customer and Customer Location Data
To process the customer and customer location data you have prepared for synchronization, do the following:
- While you are still viewing the Prepare Data (BC501000) form,
click the link in the Ready to Process column of the row
with the Customer entity.
The Process Data (BC501500) form opens with the SweetStore - SP store and the Customer entity selected in the Summary area. The table displays all synchronization records of the Customer entity that you prepared.
- In the table, select the unlabeled check box in the only row that has a number
in the External ID column but does not have any value in
the ERP ID column.
The empty ERP ID column indicates that the record has been created in the Shopify store but has not yet been synchronized with MYOB Acumatica.
- On the form toolbar, click Process to process the selected synchronization record.
- In the Processing dialog box, which opens, click Close to close the dialog box.
Step 6: Reviewing the Imported Customer and Customer Locations
Perform the following instructions to review the customer and customer locations that have been imported to MYOB Acumatica:
- Open the Customers (AR3030PL) form.
- In the list of customers, in the Customer Name column, locate the Isabelle Bober customer, and click the link for this customer in the Customer ID column.
- On the Customers (AR303000) form, which opens for Isabelle Bober, on the General tab, notice that the system has inserted the customer identifier from Shopify in the Ext. Ref. Nbr. box (Additional Account Info section).
- Open the Locations tab and review the locations that the
system created when the customer record was synchronized.
Notice that the table displays the following locations, as shown in the screenshot below:
- The location with the MAIN identifier, which was created for the customer first in the Shopify store. This location is also marked as the default (that is, the Default check box is selected for this location).
- The location with the identifier that the system assigned to it based on the numbering sequence selected for locations in the store settings on the Shopify Stores (BC201010) form.
Figure 1. Customer locations imported from the store 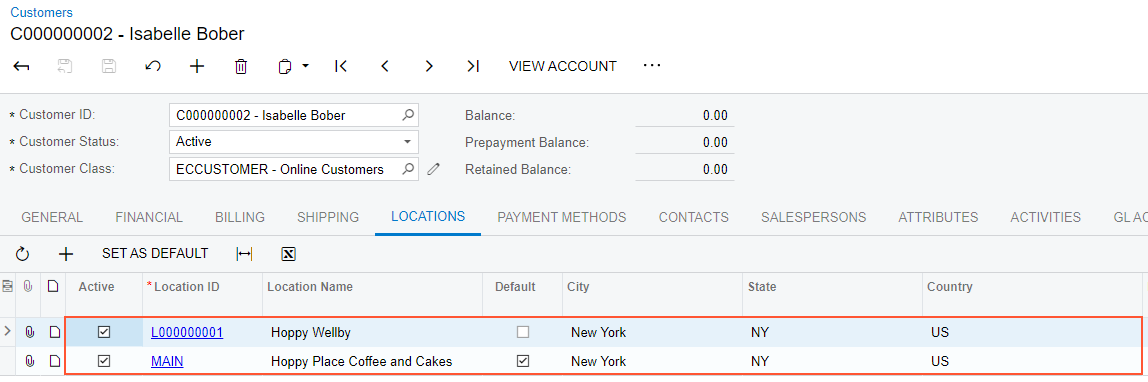
- Click the MAIN link in the Location ID column.
- On the Customer Locations (AR303020) form, which the system has
opened in a pop-up window, on the General tab, review the
location details that have been imported from the Shopify store. Notice the following:
- The Company value from the address in Shopify has been imported as the Location Name of the
Location Info section and the
Account Name box of the Additional
Location Info section.
The address lines, city, state, country, and postal code have been imported to the appropriate boxes of the Location Address section.
The first and last name of the address in Shopify have been imported to the Attention box of the Additional Location Info section.
The location identifier from Shopify along with the store name have been imported to the External ID box of the Other Settings section.
- The Company value from the address in Shopify has been imported as the Location Name of the
Location Info section and the
Account Name box of the Additional
Location Info section.
Step 7: Updating the Customer Location
Suppose that you need to update the contact and address details of the MAIN customer location for Isabelle Bober. Do the following:
- While you are still viewing the Customer Locations (AR303020) form with the MAIN location of the Isabelle Bober customer, on the General tab, in the Additional Location Info section, type Gail Anderson in the Attention box.
- In the Location Address section, change Address Line 1 to 3650 Taylor Street.
- On the form toolbar, click Save & Close to save your changes and close the pop-up window with the Customer Locations form.
Step 8: Synchronizing the Updated Location with the Shopify Store
To synchronize the updated customer location with the Shopify store in order to update the address in the store, do the following:
- On the Sync History (BC301000) form, in the Summary area,
specify the following settings:
- Store: SweetStore - SP
- Entity: Customer Location
- On the Processed tab, select the unlabeled check box in
the row of the MAIN, Hoppy Place Coffee and Cakes location, and on the
form toolbar, click Sync.Tip:When you change a location of a customer, the ecommerce connector recognizes the customer record as having been modified as well. So in this step, you could have selected the synchronization record for the Isabelle Bober customer and clicked Sync, and the updated customer location would have been synchronized as part of the customer synchronization process. Alternatively, you could have prepared the Customer entity for synchronization on the Prepare Data (BC501000) form and then processed the prepared synchronization records on the Process Data (BC501500) form.
Step 9: Reviewing the Updated Customer Address in the Shopify Store
To review the updated customer address in the Shopify store, do the following:
- While you are still viewing the Sync History (BC301000) form,
in the row of the MAIN, Hoppy Place Coffee and Cakes customer location,
click the link in the External ID column.
The customer page of the admin area of the Shopify store opens for Isabelle Bober.
- In the Customer section, under Default
Address, review the updated details of the customer
address.
Notice that the first name, last name, and the address line have been updated to reflect the changes that you made to the customer location. The name is now Gail Anderson, and the address has been changed to 3650 Taylor Street.