Redirection to Webpages: To Add Redirection Links to a Grid by Using an Action
The following activity will walk you through the process of adding redirection links to the grid of a form by using an action.
Story
Suppose that you want to improve the navigation between the rows of the grid on the Open Payment Summary (RS401000) form and the repair work orders and sales orders listed in these lines. You have decided to do this by adding redirection links to this inquiry, which will give users the ability to navigate to the form that has detailed information about the repair work order or the sales order. You need to replace the text numbers in the Order Nbr. column with links that a user can click to open the data entry form for the order whose number the user has clicked; the user can then view the settings and make any needed modifications.
Two types of orders are displayed on the Open Payment Summary (RS401000) form: work orders and sales orders. Thus, when a user clicks an order number in the Order Nbr. column of the grid, the form corresponding to the order number should be opened:
- If a work order is selected, the Repair Work Orders (RS301000) form should be opened.
- If a sales order is selected, the Sales Orders (SO301000) form should be opened.
You cannot implement the described behavior by using only ASPX elements and attributes. To implement this logic, you will declare an action, and inside the action method, you will implement a redirection link to the corresponding form.
Process Overview
- Defining an action in the graph of the form, and defining an action method with the logic to open the corresponding data entry form based on the order type
- On the Open Payment Summary (RS401000) form, testing the redirection links to make sure they open the appropriate data entry form: Sales Orders (SO301000) or Repair Work Orders (RS301000)
System Preparation
Make sure that you have completed the steps described in the following prerequisite activities:
- Test Instance for Customization: To Deploy an Instance with a Custom Form that Implements a Workflow
- Inquiry Forms: To Set Up an Inquiry Form
- Filtering Parameters: To Add a Filter for an Inquiry Form
- Data View Delegates: To Add a Filtering Query Dynamically
- Data Aggregation: To Retrieve Aggregated Data
- Use of PXProjection: To Display Multiple DAC Data on a Tab
Step 1: Adding a Link by Using an Action
In this step, you will implement an action that redirects the user to the Repair Work Orders (RS301000) or Sales Orders (SO301000) form, depending on the order type of the selected line. To add a redirection link by using an action, do the following:
- In the
RSSVPaymentPlanInqgraph, define theViewOrderaction as follows.public PXAction<RSSVWorkOrderToPay> ViewOrder = null!; [PXButton(DisplayOnMainToolbar = false)] [PXUIField] protected virtual void viewOrder() { RSSVWorkOrderToPay order = DetailsView.Current; // if this is a repair work order if (order.OrderType == OrderTypeConstants.WorkOrder) { // create a new instance of the graph var graph = PXGraph.CreateInstance<RSSVWorkOrderEntry>(); // set the current property of the graph graph.WorkOrders.Current = graph.WorkOrders. Search<RSSVWorkOrder.orderNbr>(order.OrderNbr); // if the order is found by its ID, // throw an exception to open the order in a new tab if (graph.WorkOrders.Current != null) { throw new PXRedirectRequiredException(graph, true, "Repair Work Order Details"); } } // if this is a sales order else { // create a new instance of the graph var graph = PXGraph.CreateInstance<SOOrderEntry>(); // set the current property of the graph graph.Document.Current = graph.Document. Search<SOOrder.orderNbr>(order.OrderNbr); // if the order is found by its ID, // throw an exception to open the order in a new tab if (graph.Document.Current != null) { throw new PXRedirectRequiredException(graph, true, "Sales Order Details"); } } }In the action method, depending on the type of the order, you have created a new instance of the
RSSVWorkOrderEntryorSOOrderEntrygraph. In the graph, you have set theCurrentproperty of the primary view’s PXCache to the order if the system has found it by the specified ID.If the current data record is set for the PXCache object, you throw the PXRedirectRequiredException to open the form with the current data record displayed.
Tip:To learn the primary view name, you can use the Element Inspector to explore the Summary area of the entry form. - Build the project.
- In the RS401000.aspx file, do the following:
- For the PXGrid element, set the
SyncPosition property to
True. - In the grid column for the
OrderNbrdata field, specify the action name in theLinkCommandproperty as follows.<px:PXGridColumn DataField="OrderNbr" LinkCommand="ViewOrder" />
- For the PXGrid element, set the
SyncPosition property to
- Publish the customization project.
[PXPrimaryGraph(typeof(RSSVWorkOrderEntry))] attribute to the
RSSVWorkOrder DAC to define a graph to be created by default
for the RSSVWorkOrder DAC. You would have then made changes in the
ASPX file that are similar to those described in Redirection to Webpages: To Add Redirection Links to the Grid by Using the PXSelector Attribute.Step 2: Testing the Redirection Links
To test the redirection links that you have implemented, do the following:
- In MYOB Acumatica, open the Open Payment Summary (RS401000) form.
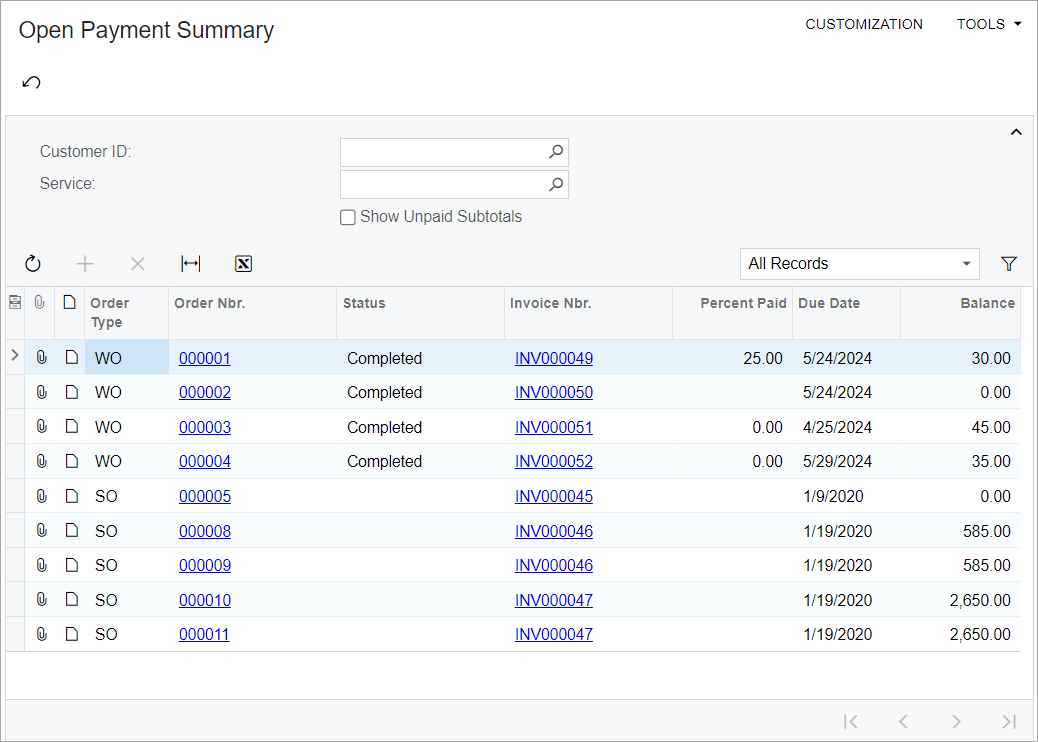
The form should look similar to the one shown in the following screenshot. Notice the links in the Order Nbr. column.
Figure 1. The links in the Order Nbr. column 
- In the Order Nbr. column of the table,
click any sales order number—that is, the number of any order with an
Order Type of SO.
In a new tab, the Sales Orders (SO301000) form opens with the selected sales order.
- On the Open Payment Summary form, in the Order
Nbr. column, click any repair work order number—that is,
any order with an Order Type of WO.
In a new tab, the Repair Work Orders (RS301000) form opens with the selected repair work order.
