Use of PXProjection: To Display Multiple DAC Data on a Tab
This activity will walk you through deriving a set of data from multiple DACs by using the PXProjection attribute, and displaying that data on a single tab.
Story
Suppose that in the PhoneRepairShop customization project, you want to display information about the invoice related to a repair work order and the most recent payment that was made for it. You need to add a tab to the Repair Work Orders (RS301000) form that will display this information.
The tab will have the following elements:
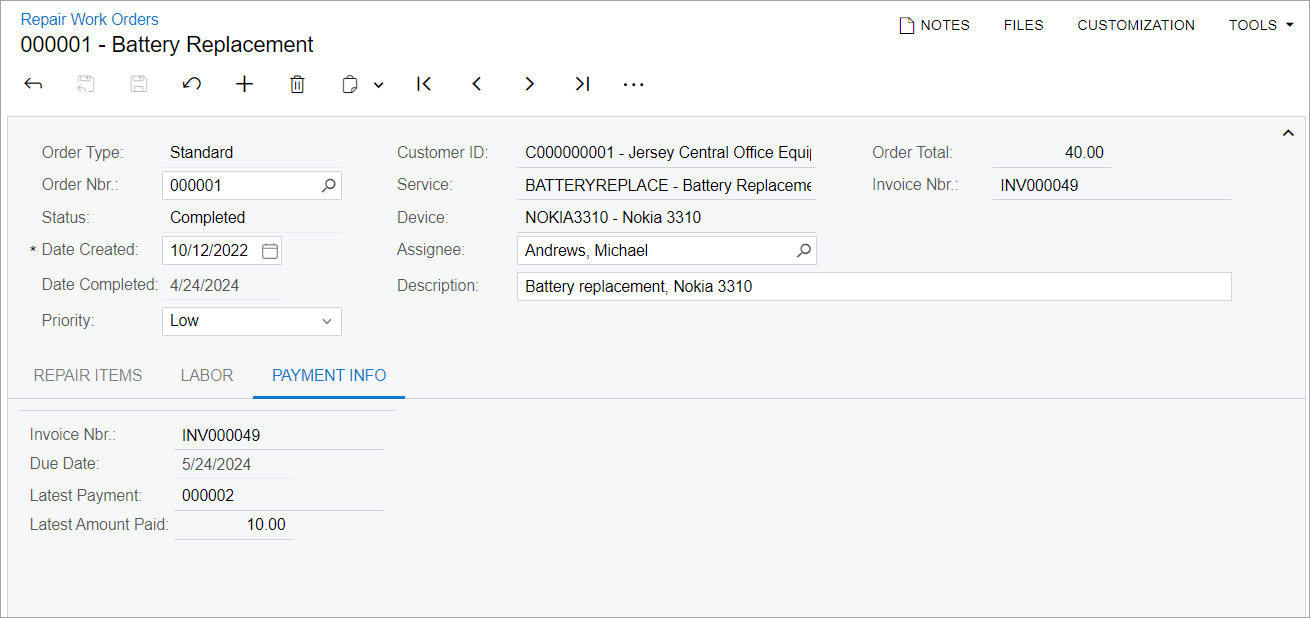
- Invoice Nbr.: The number of the invoice that has been created for the repair work order
- Due Date: The due date for the invoice
- Latest Payment: The number of the most recent payment applied to the invoice
- Latest Amount Paid: The amount paid in the payment that was applied to the invoice most recently
This set of data is derived from different DACs. To display the UI elements on a single tab, you’ll use the PXProjection attribute.
Process Overview
- Defining the DAC for the new tab by using the PXProjection attribute
- Defining the data view for the new tab
- Adding the new tab to the form
- Testing the new tab
System Preparation
Make sure that you’ve configured your instance as described in Test Instance for Customization: To Deploy an Instance with a Custom Form that Implements a Workflow. Make sure that the Repair Work Orders (RS301000) form has been defined and the following elements exist:
RSSVWorkOrderEntrygraphRSSVWorkOrderDAC- RS301000.ts file
- RS301000.html file
To be able to create and pay invoices, you need to configure the deployed instance as follows:
- On the Enable/Disable Features (CS100000) form, enable the Advanced SO Invoices feature.
- On the Item Classes (IN201000) form, select the STOCKITEM class. On the General tab (General Settings section), select the Allow Negative Quantity check box. On the form toolbar, click Save.
- On the Accounts Receivable Preferences (AR101000) form, on the General tab (Data Entry Settings section), clear the Validate Document Totals on Entry and Require Payment Reference on Entry boxes to simplify the process of releasing an invoice. On the form toolbar, click Save.
Step 1: Learning the DAC Names for the Fluent BQL Query
To retrieve the needed set of data, you’ll find out which DACs you need to use in a fluent BQL query of the PXProjection attribute. To learn the names of the required DACs, do the following:
- On the Invoices (SO303000) form, use the
Element Inspector on the Summary area of the form to learn the DAC name for the
invoice, and on the Applications tab to learn the DAC
name for payments that have been applied to the invoice. Notice that these are
the
ARInvoiceandARAdjust2DACs, respectively. - Learn the key fields of the
ARInvoiceDAC, which you’ll need to know to select records in a fluent BQL query. The key fields you need to select an invoice areARInvoice.refNbrandARInvoice.docType. - Analyze the code of the
ARAdjust2DAC. It is an alias of theARAdjustDAC, so you can use theARAdjustDAC. - Analyze the code of the
ARInvoiceandARAdjustDACs and the fields defined in them. You’ll need the following fields:- For the invoice number,
ARInvoice.refNbr - For the invoice due date,
ARINvoice.dueDate - For the payment number,
ARAdjust.adjgRefNbr - For the payment amount,
ARAdjust.curyAdjdAmt
- For the invoice number,
Step 2: Defining the DAC for the Tab
To define the DAC for the tab, do the following:
- In the Helper/Messages.cs file, add the
RSSVWorkOrderPaymentstring to the Messages class, as shown in the following code. This message will be used in the PXCacheName attribute for the new DAC.public const string RSSVWorkOrderPayment = "Invoice and Payment of the Repair Work Order"; - In the DAC folder of the
PhoneRepairShop_Codeproject, create the RSSVWorkOrderPayment.cs file. - Add the following using
directives.
using PX.Data;
using PX.Data.BQL.Fluent;
using PX.Objects.AR;
- Add the
RSSVWorkOrderPaymentDAC, as shown in the following code.namespace PhoneRepairShop { [PXCacheName(Messages.RSSVWorkOrderPayment)] [PXProjection(typeof( SelectFrom<ARInvoice>. InnerJoin<ARAdjust>.On< ARAdjust.adjdRefNbr.IsEqual<ARInvoice.refNbr>. And<ARAdjust.adjdDocType.IsEqual<ARInvoice.docType>>>. AggregateTo< Max<ARAdjust.adjgDocDate>, GroupBy<ARAdjust.adjdRefNbr>, GroupBy<ARAdjust.adjdDocType>>))] public class RSSVWorkOrderPayment : PXBqlTable, IBqlTable { } }In the query of the
PXProjectionattribute, you’ve selected an invoice and all payments applied to the invoice. To sort the payments by the date, you’ve used theAggregateToclause. Inside the clause, you’ve grouped all payments by their invoice number and document type (which are the same because all payments selected are applied to the same invoice) and selected the payment with the latest document date. - Add to the
RSSVWorkOrderPaymentDAC the fields you learned in Instruction 1, as the following code shows.#region InvoiceNbr [PXDBString(15, IsUnicode = true, IsKey = true, InputMask = "", BqlField = typeof(ARInvoice.refNbr))] [PXUIField(DisplayName = "Invoice Nbr.", Enabled = false)] public virtual string? InvoiceNbr { get; set; } public abstract class invoiceNbr : PX.Data.BQL.BqlString.Field<invoiceNbr> { } #endregion #region DueDate [PXDBDate(BqlField = typeof(PX.Objects.AR.ARInvoice.dueDate))] [PXUIField(DisplayName = "Due Date", Enabled = false)] public virtual DateTime? DueDate { get; set; } public abstract class dueDate : PX.Data.BQL.BqlDateTime.Field<dueDate> { } #endregion #region AdjgRefNbr [PXDBString(BqlField = typeof(ARAdjust.adjgRefNbr))] [PXUIField(DisplayName = "Latest Payment", Enabled = false)] public virtual string? AdjgRefNbr { get; set; } public abstract class adjgRefNbr : PX.Data.BQL.BqlString.Field<adjgRefNbr> { } #endregion #region CuryAdjdAmt [PXDBDecimal(BqlField = typeof(ARAdjust.curyAdjdAmt))] [PXUIField(DisplayName = "Latest Amount Paid", Enabled = false)] public virtual Decimal? CuryAdjdAmt { get; set; } public abstract class curyAdjdAmt : PX.Data.BQL.BqlDecimal.Field<curyAdjdAmt> { } #endregionNote that each field has the PXDB<type> attribute with the
BqlFieldparameter specified to set up the projection.Although the
RSSVWorkOrderPaymentDAC has a master-detail relationship with theRSSVWorkOrderDAC, you don’t need to add any PXDBDefault and PXParent attributes to the fields because all field values are determined by the query in the PXProjection attribute. - Build the project.
Step 3: Defining the Data View for the Tab
To define the data view for the tab, do the following:
- In the
RSSVWorkOrderEntryclass, add the following member to theViewsregion of the class.public SelectFrom<RSSVWorkOrderPayment>. Where<RSSVWorkOrderPayment.invoiceNbr. IsEqual<RSSVWorkOrder.invoiceNbr.FromCurrent>> .View Payments = null!;In the view, you select data from the
RSSVWorkOrderPaymentDAC with same invoice number (stored in theRSSVWorkOrderDAC) as in the Summary area of the form. - Build the project.
Step 4: Adding a New Tab (Self-Guided Exercise)
To add the new tab, do the following:
- In the RS301000.ts file, define the
Paymentsproperty for theRSSVWorkOrderPaymentview class and then define this view class (see the code below).@viewInfo({ containerName: "Payment Info" }) Payments = createSingle(RSSVWorkOrderPayment); - In the
RSSVWorkOrderPaymentview class, specify properties for all fields of theRSSVWorkOrderPaymentDAC, as shown in the code below.export class RSSVWorkOrderPayment extends PXView { InvoiceNbr: PXFieldState; DueDate: PXFieldState; AdjgRefNbr: PXFieldState; CuryAdjdAmt: PXFieldState; } - In the RS301000.html file, add qp-tab in the qp-tabbar container.
- In the qp-tab tag, add the qp-template tag with a single qp-fieldset tag inside it. Use the 7-10-7 template.
- Bind qp-fieldset to the
Paymentsview property in the TypeScript class. - In the qp-fieldset container, include the
field tags for the fields you’ve added in the view class.
		<qp-tab id="tab-PaymentInfo" caption="Payment Info">
			<qp-template
				id="form-PaymentInfo"
				name="7-10-7"
			>
				<qp-fieldset id="fsColumnA-PaymentInfo" slot="A" view.bind="Payments">
					<field name="InvoiceNbr"></field>
					<field name="DueDate"></field>
					<field name="AdjgRefNbr"></field>
					<field name="CuryAdjdAmt"></field>
				</qp-fieldset>
			</qp-template>
        </qp-tab>
- Publish the customization project.
For details on how to define a tab, see the T210 Customized Forms and Master-Details Relationships course.
Step 5: Testing the New Tab
To test the Payment Info tab of the Repair Work Orders (RS301000) form, do the following:
- Open any repair work order with Paid or Completed status.
- Open the Payment Info tab, which looks as follows.
Figure 1. The Payment Info tab