
To Add a Form To Mobile Site Map
Suppose that you need to add to the MYOB mobile app a screen that corresponds to an MYOB Acumatica form. The form ID is XXX. The desired mobile screen has to contain the Date and Description fields and the Insert and Delete actions of the original XXX form of MYOB Acumatica. Further suppose that you need to add the screen to a workspace.
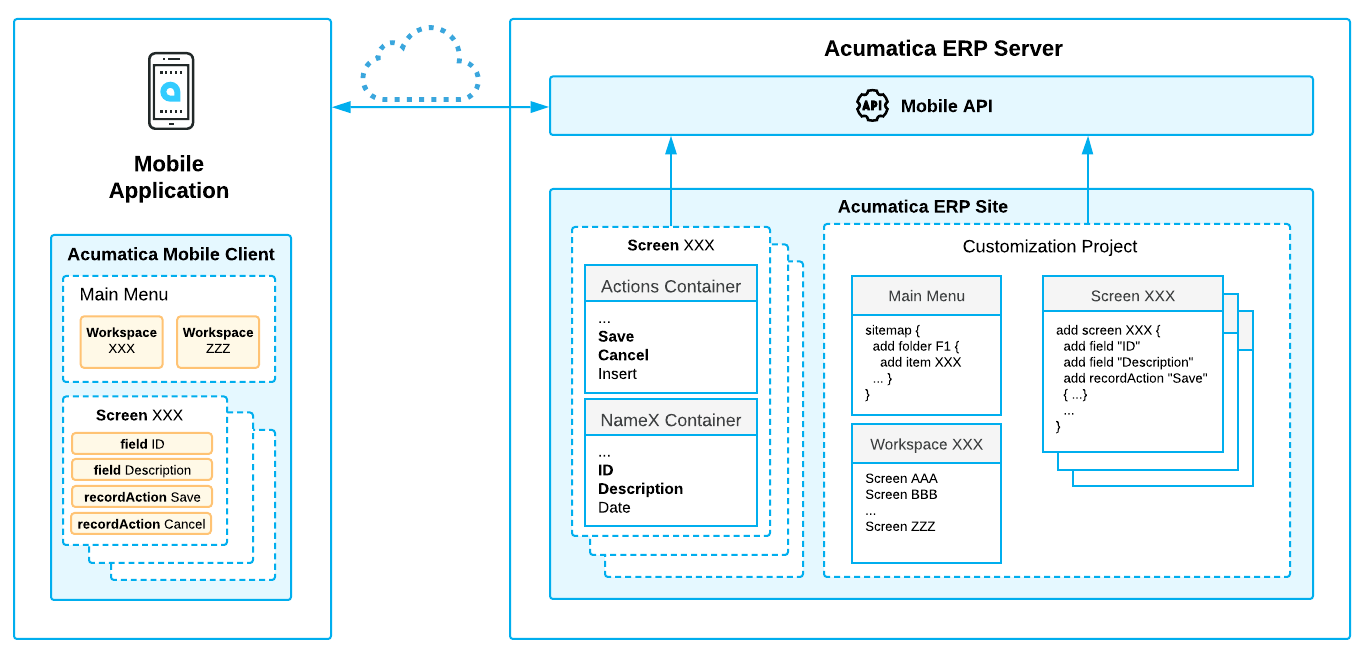
The diagram above shows how the MYOB Acumatica Mobile Framework uses the MSDL code to configure the XXX screen in the mobile app. (See Configuring the Mobile Site Map for details.) You declare the desired screen, workspace, containers, fields, actions, and other objects by using Mobile Site Map Definition Language (MSDL) in the Customization Project Editor. The objects you want to be displayed on the mobile app screen must be present on the original MYOB Acumatica form (see Getting the WSDL Schema).
After you publish your customization project, the screen you have defined by using MSDL appears in the mobile app.
To Add a Screen to the Mobile Site Map
To add a screen to the mobile site map, perform the following steps:
- Get the WSDL schema for the original XXX screen of Acumatica ERP, as described in Getting the WSDL Schema.
- Open the Customization Projects (SM204505) form, and in the Project Name column, click the link of the customization project. The Customization Project Editor opens.
- Open the Mobile Application page.
- On the More menu of the page, click Add New
Screen.
The Add New Screen dialog box opens.
- In the dialog box, enter the form ID of the MYOB Acumatica form (and thus of the corresponding screen in the mobile app) that you
want to add to the mobile app, and click OK.
The Add: <screen_name> page opens. The row with the Add New Screen item and its details appears in the list of modified screens on the Mobile Application page of the Customization Project Editor.
- Notice that the initial code of the screen includes only one
addinstruction.
(See add for details about the instruction.)add screen <screen_ID> { # you can add commands here # ObjectAttribute = Value } - Implement the code of the new screen in the Commands
area of the Add page. For details, see Screens.
While implementing the code, use the WSDL schema to understand which actions and fields are available for the form you are adding. For details, see Getting the WSDL Schema.
- Save your changes.
Your commands are applied to the site map. If any errors have occurred, you can see them in the Errors area of the page. If your changes have been applied successfully, you can see the updated site map in the Result Preview area of the form.
- On the Update: SITEMAP page, add the screen to the mobile site map, as
illustrated in the following code.
add item <screen_ID> { visible = True displayName = "screen_title" } - Add a screen to a mobile workspace on the Mobile Workspaces (AU220012) form.
- Save your changes, and publish your customization project.