
To Configure Microsoft Entra ID for Integration with Your MYOB Acumatica Instance
To configure Microsoft Entra ID for integration with your MYOB Acumatica instance, you perform the following actions in Microsoft Azure, each of which is described in a section of this topic:
- Registering your MYOB Acumatica instance, and copying the registration parameters for further use on the Security Preferences form (SM.20.10.60)
- Obtaining the client secret, and copying it, too, for further use on the Security Preferences form
- Configuring API permissions
- Specifying your MYOB Acumatica instance ID URI
- Specifying your MYOB Acumatica instance redirect URI
- The procedure below is designed for the most common usage scenarios. If you are implementing a more complicated scenario and you encounter difficulties, contact MYOB Acumatica technical support.
- The vendor of the third-party software may change the user interface and settings. Therefore, the screen elements and setting names that you see may differ from the ones described in the procedure.
- The procedure will be updated to describe new common scenarios and changes in the user interface and settings.
Before You Begin
- Be aware that you can't use both two-factor authentication (2FA) with MYOB ID and Microsoft Entra ID for single sign-on (SSO) at the same time. If you enable SSO, it replaces 2FA with MYOB ID.
- Ensure that your company has an Microsoft Entra ID instance configured. For more information, see Microsoft Entra ID on the Microsoft Azure Portal.
- Make sure that your company has a Microsoft Azure subscription to register your MYOB Acumatica instance in Microsoft Entra ID.
Step 1: To Register Your Application
To register your application on Microsoft Azure, perform the following instructions:
- Sign in to the Microsoft Azure portal.
- On the left menu, click the Microsoft Entra ID icon. If you have one Microsoft Entra ID instance, it will be opened automatically. If you have multiple instances, click the Microsoft Entra ID instance where you want to register the application.
- In the Overview, copy the following parameter values for further
use on the Security Preferences form (SM.20.10.60)
(see the following screenshot):
- Tenant ID: The tenant identifier of your Azure instance
- Primary domain: The domain name in Microsoft Entra ID
Figure 1. Microsoft Azure: Example of the tenant ID and path to the Microsoft Entra ID instance 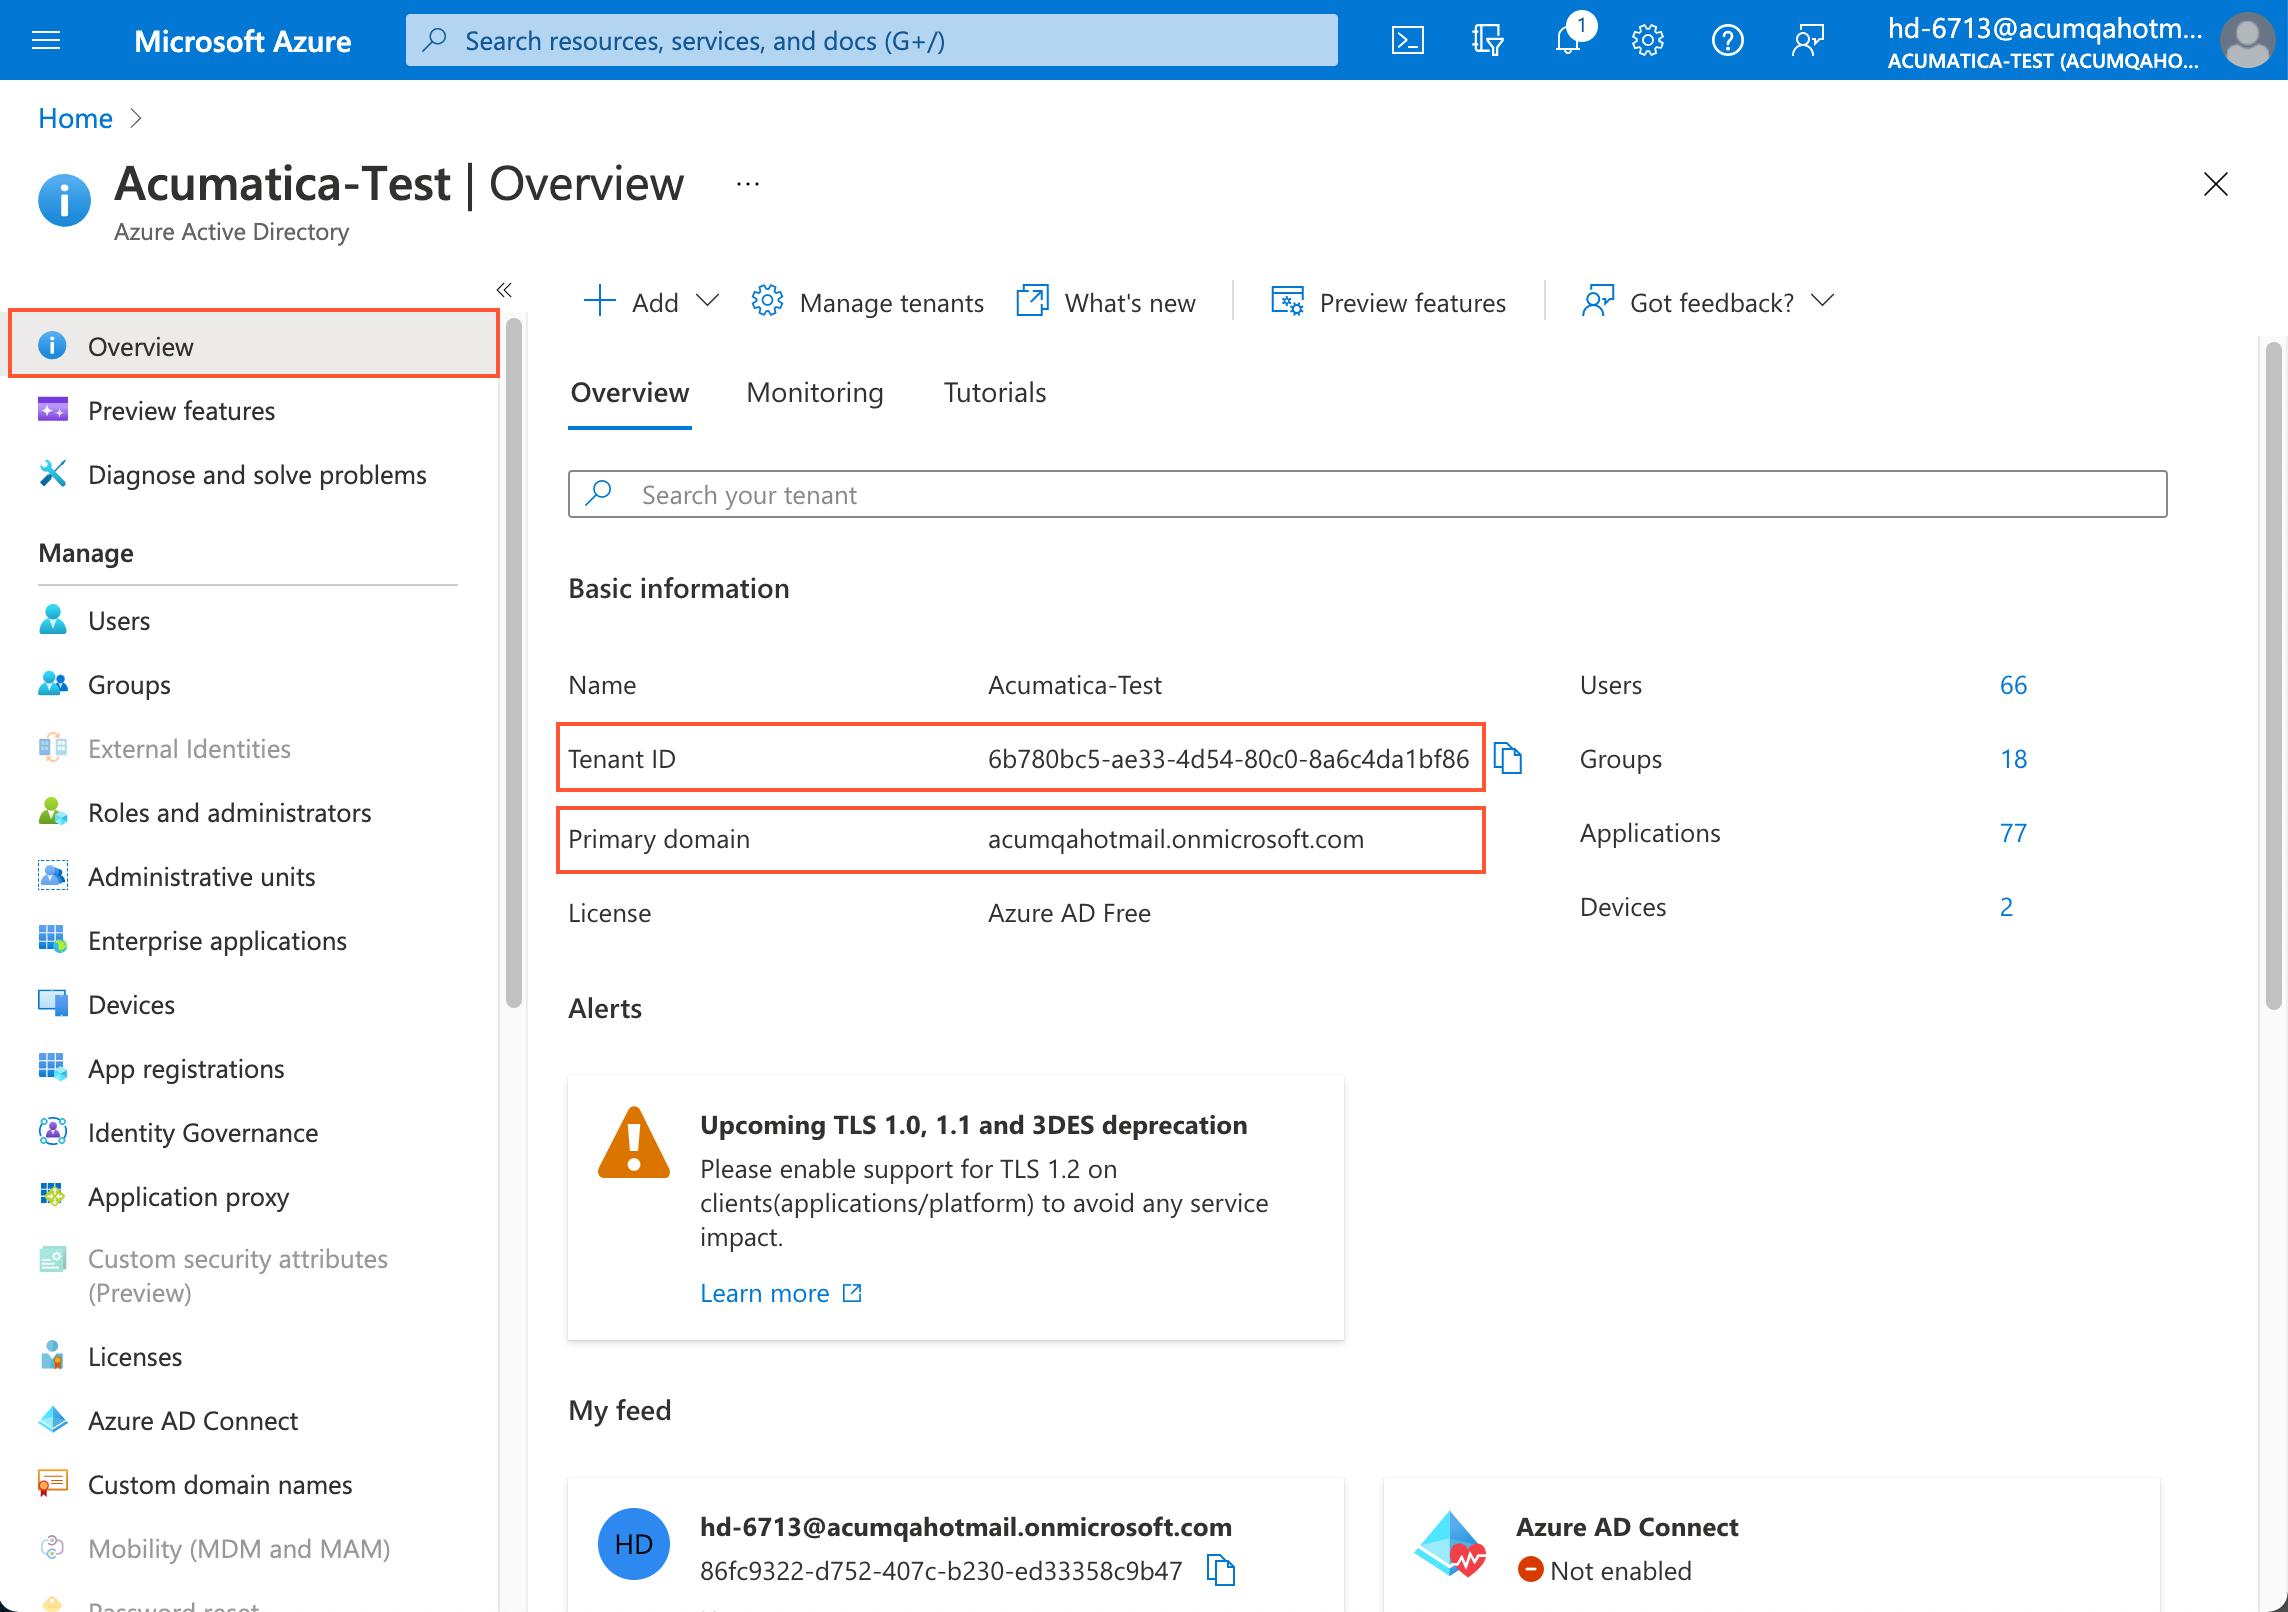
- In the left pane, expand the Manage node and click App
registrations. You will see a list of applications or an empty list (as
shown in the following screenshot), depending on whether any applications have been
registered previously.
Figure 2. Microsoft Azure: No registered applications in Microsoft Entra ID 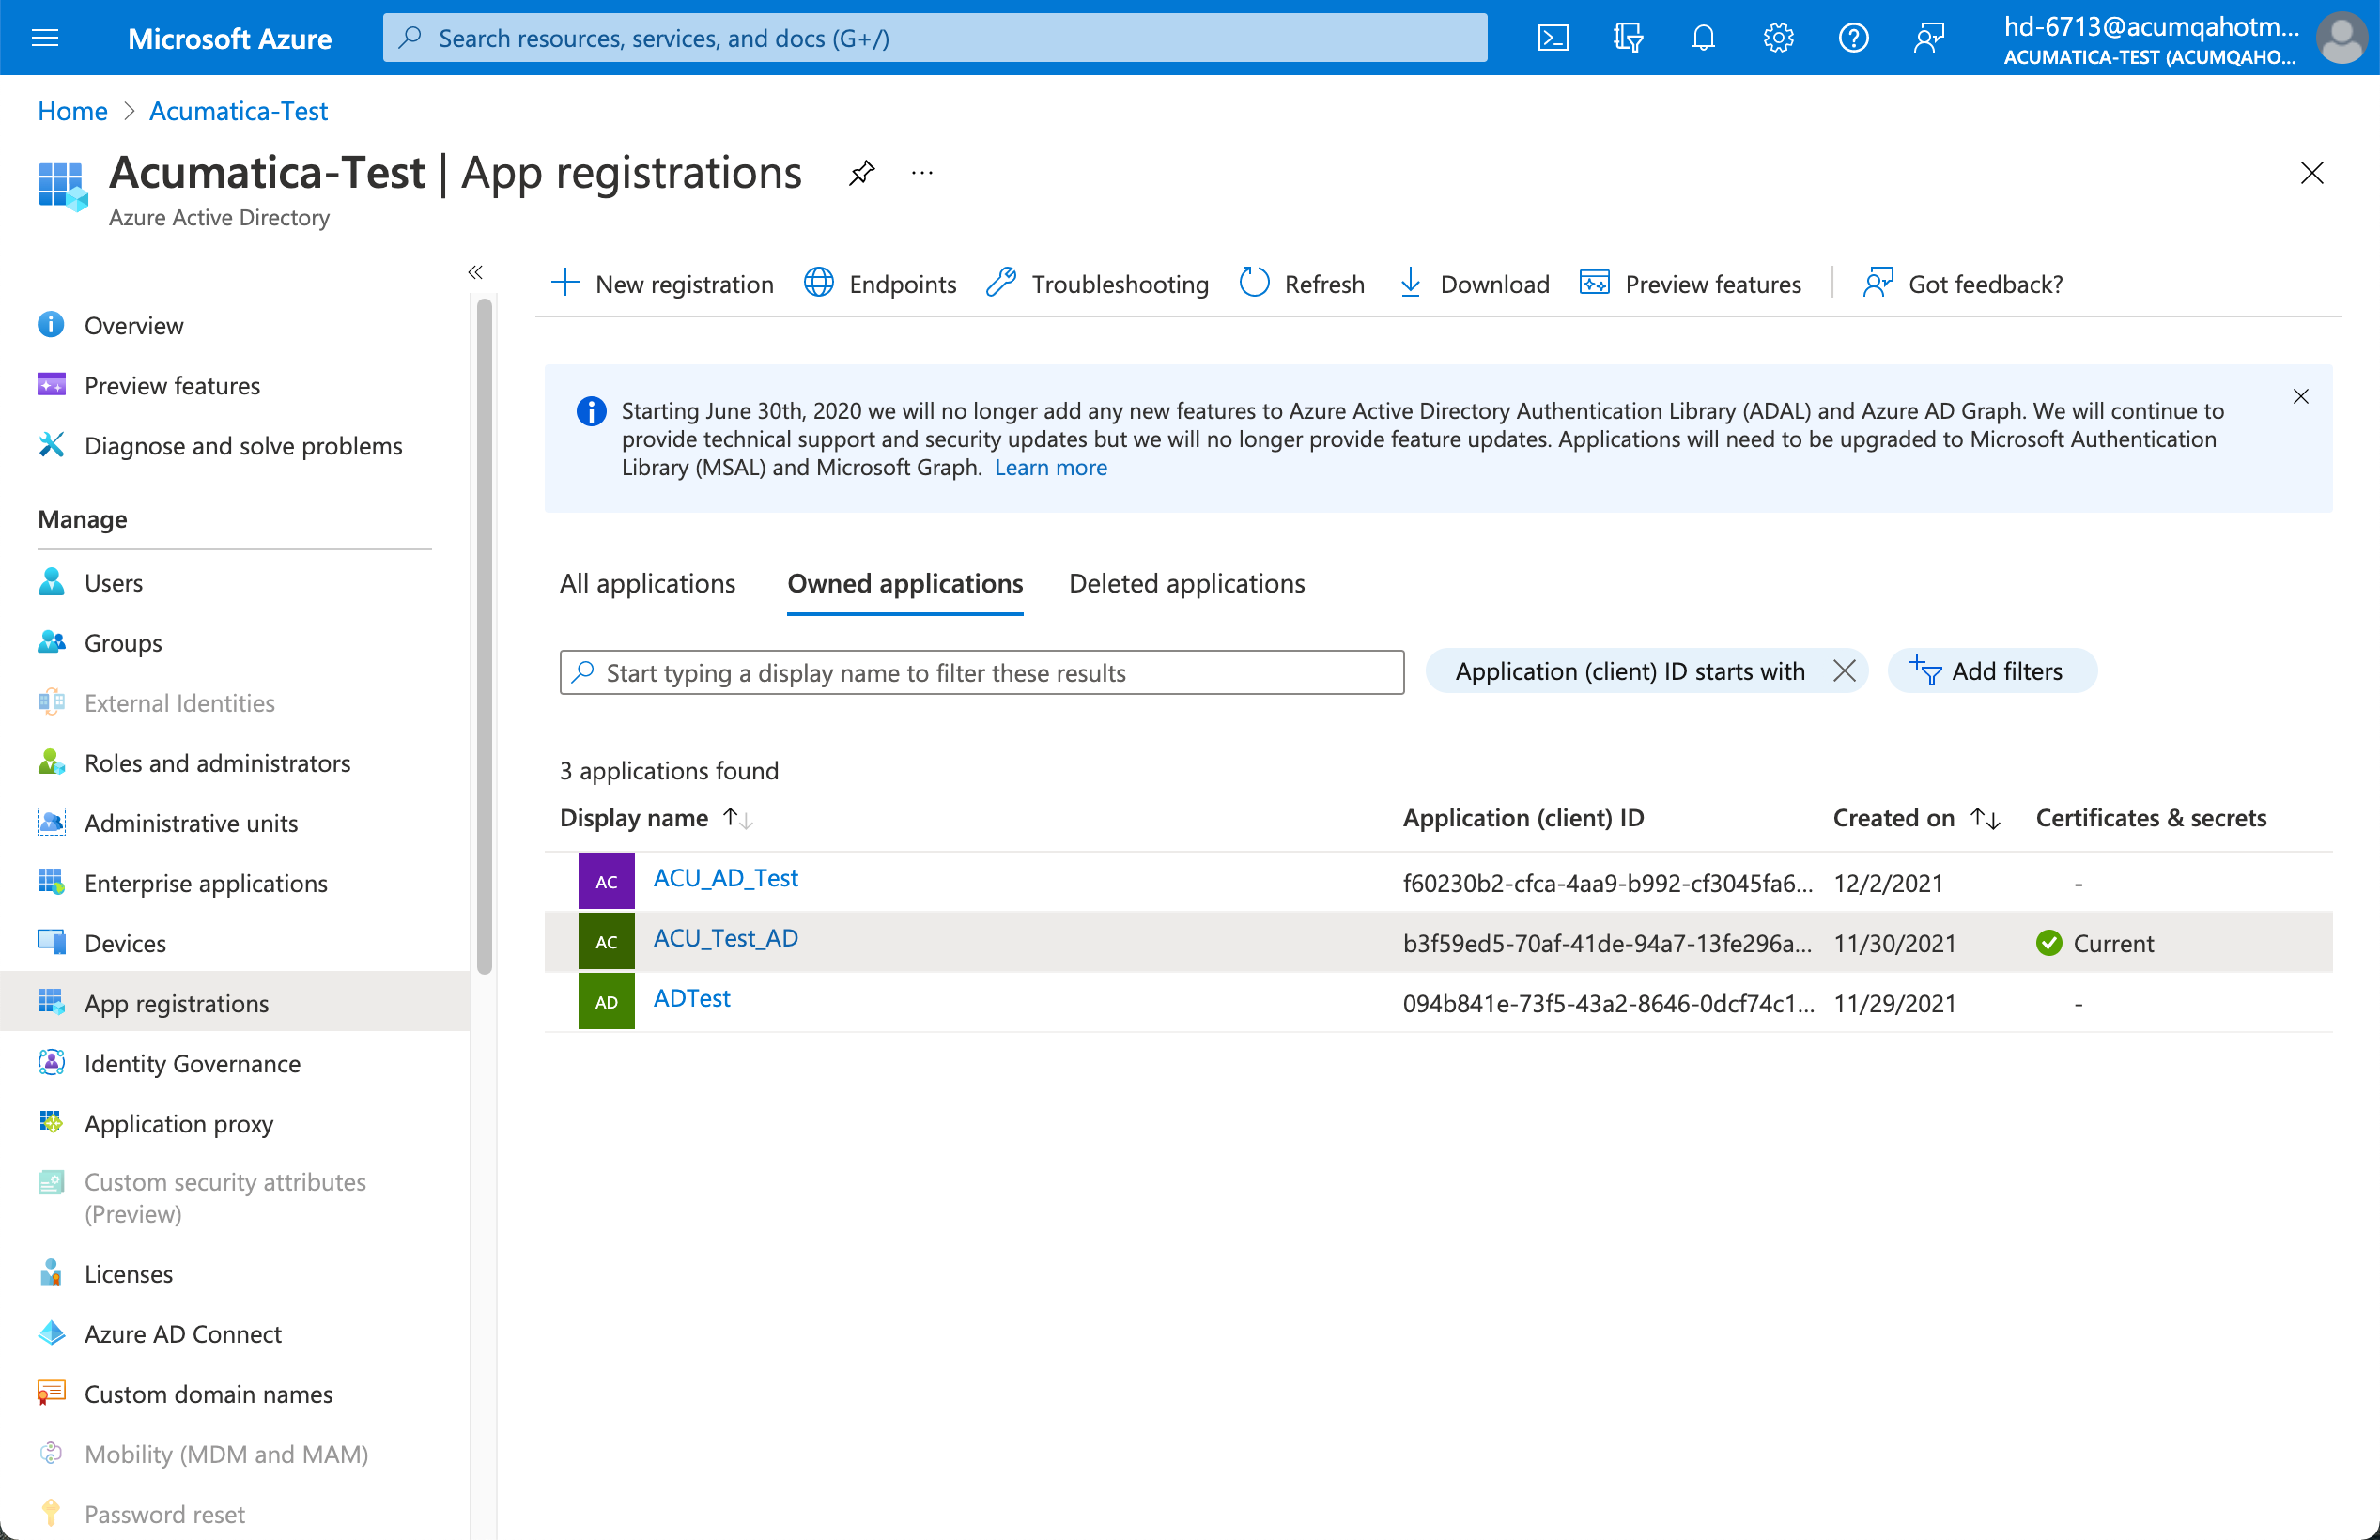
- On the pane toolbar, click New registration.
- In the Register an application pane (which is shown in the
following screenshot), do the following:
- In the Name box, type a name for your MYOB Acumatica instance. This name will be displayed in the application list.
- In the Supported account types section, select the Accounts in this organizational directory only (<Your_Entra_ID_Instance_Name> only - Single tenant) option button.
- In the Redirect URI section, select Web in the first box.
- Click Register.
Figure 3. Microsoft Azure: Registration of an application 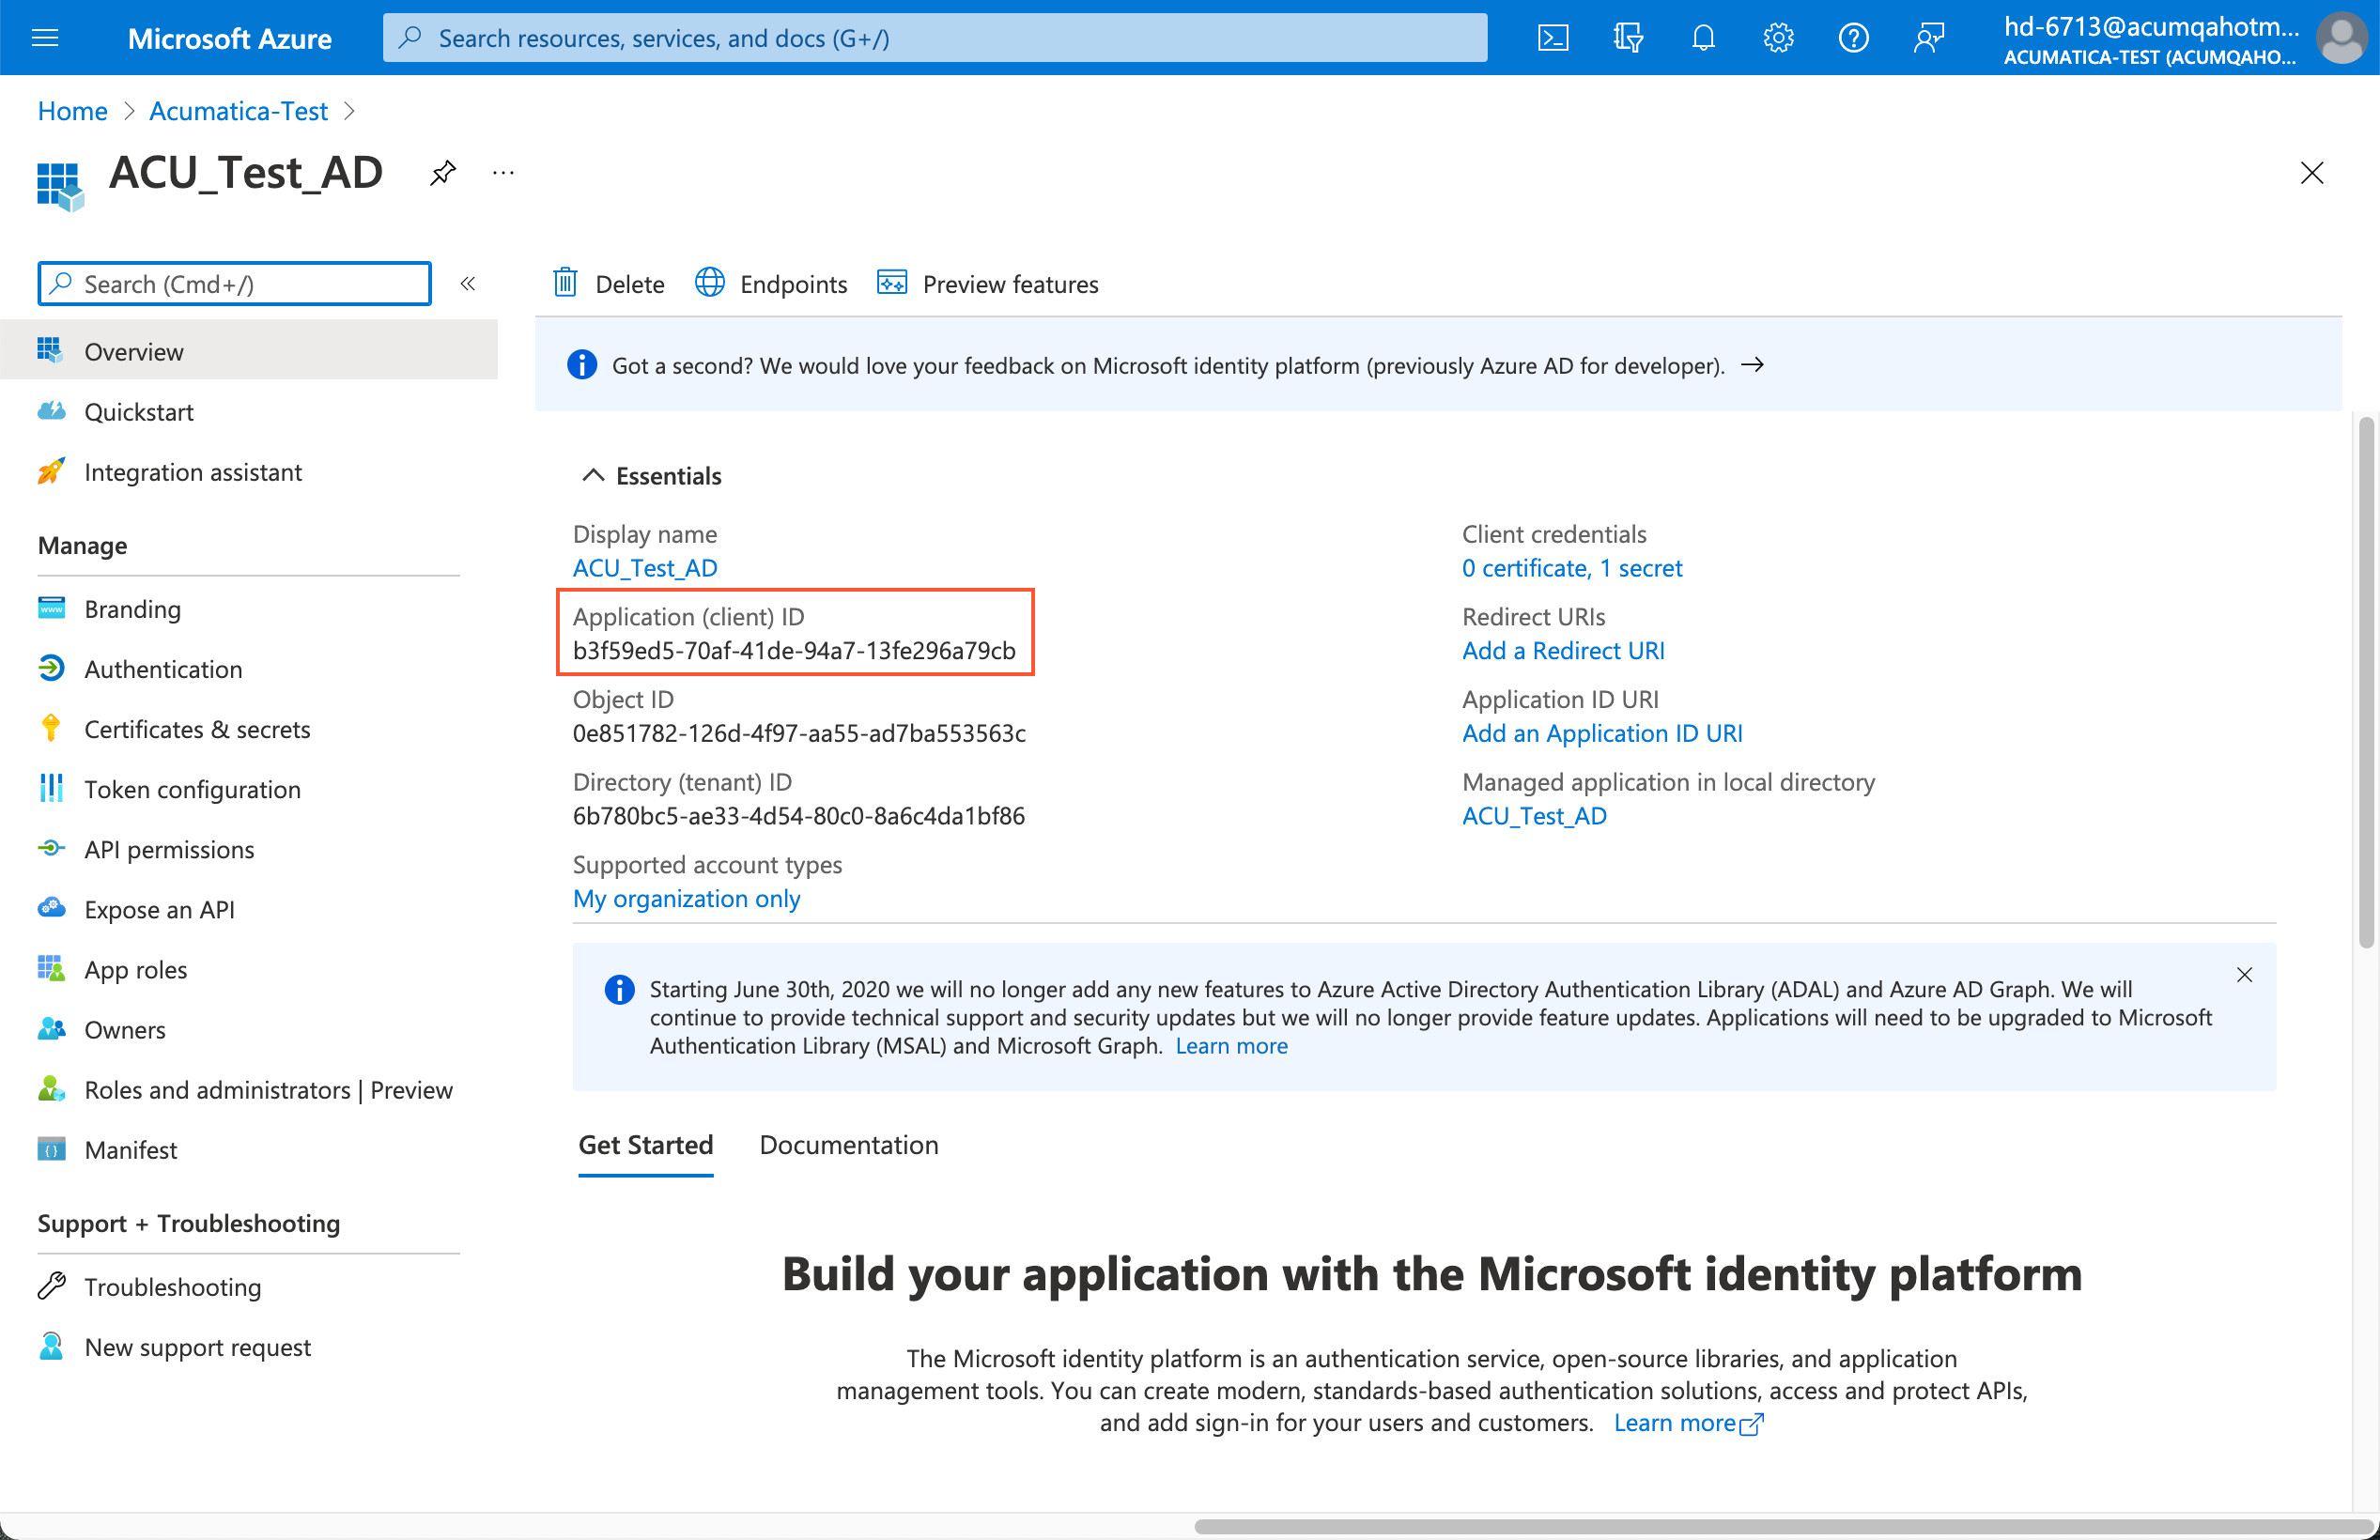
Now your MYOB Acumatica instance is registered with Microsoft Entra ID, and an Application (Client) ID value is generated (see the following screenshot).
Figure 4. Microsoft Azure: Application registered with Microsoft Entra ID 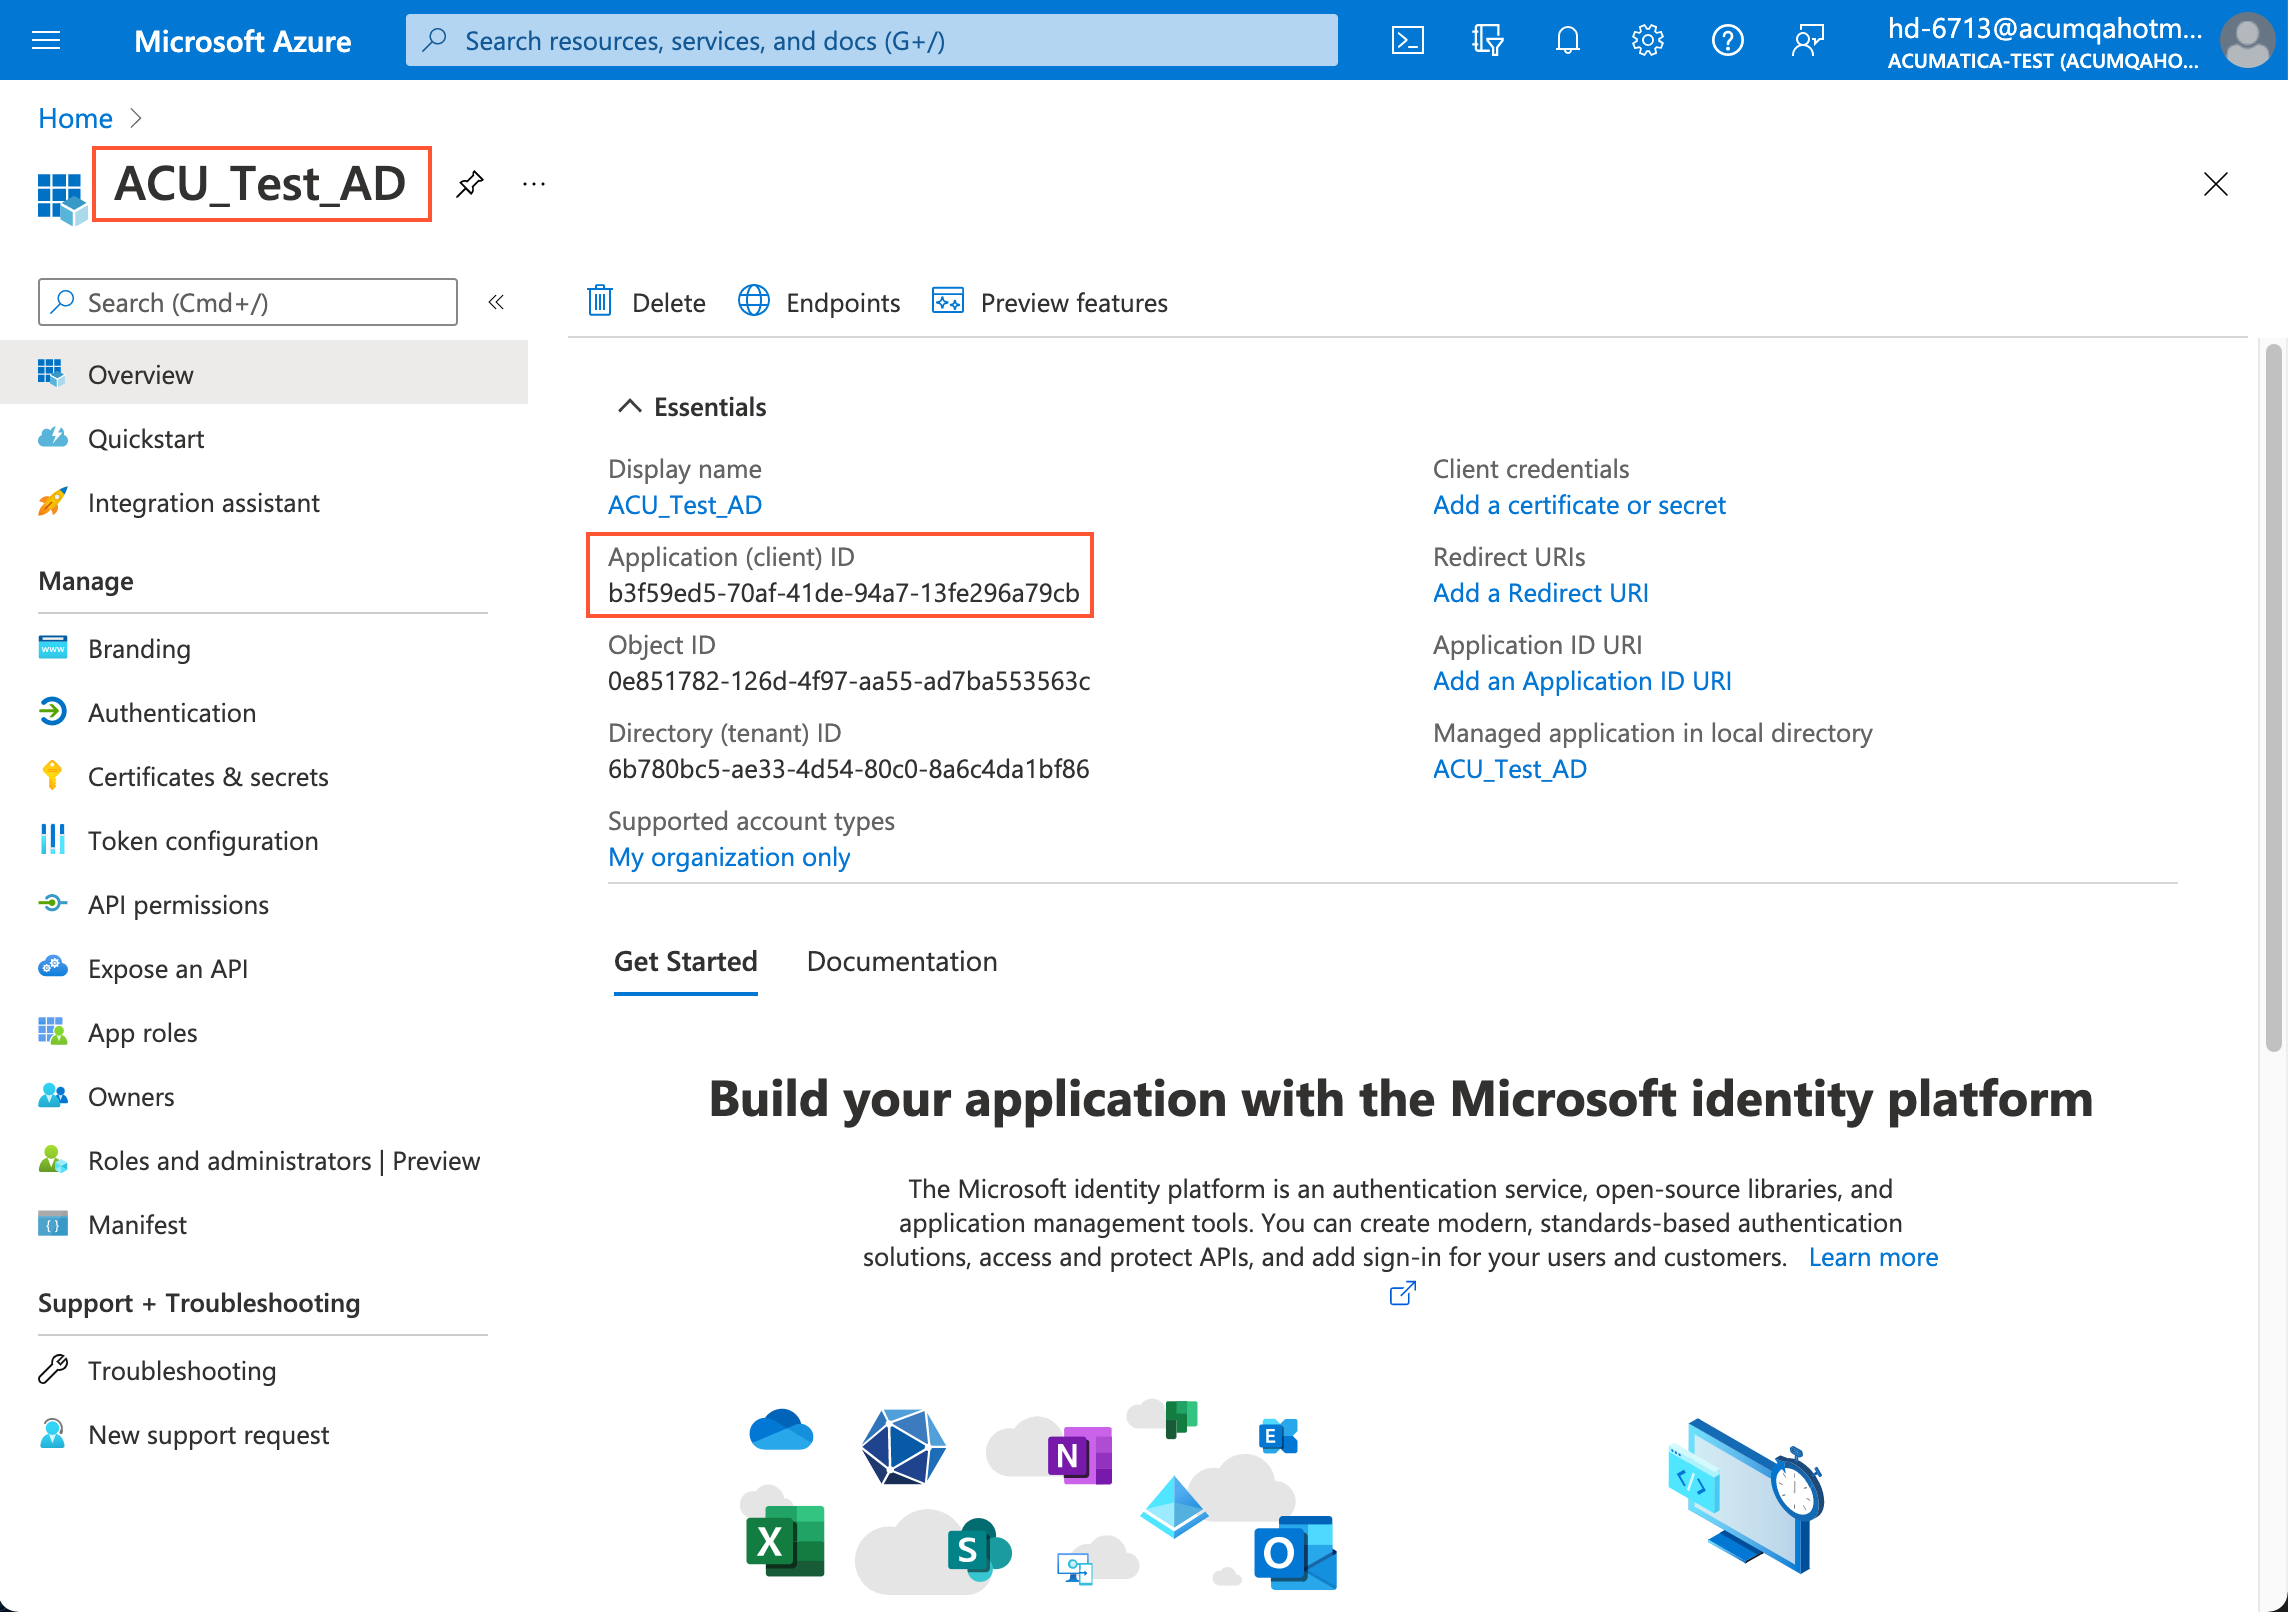
- Copy the value in the Application (Client) ID column.
Step 2: To Obtain the Client Secret
To obtain the client secret for further use on the Security Preferences form (SM.20.10.60), perform the following instructions:
- In the left pane, click App registrations, and select the needed application.
- In the left pane, expand the Manage node, and click Certificates & secrets.
- On the Client secrets tab , click New client
secret in the bottom part of the screen (see the following screenshot).
Figure 5. Microsoft Azure: New client secret 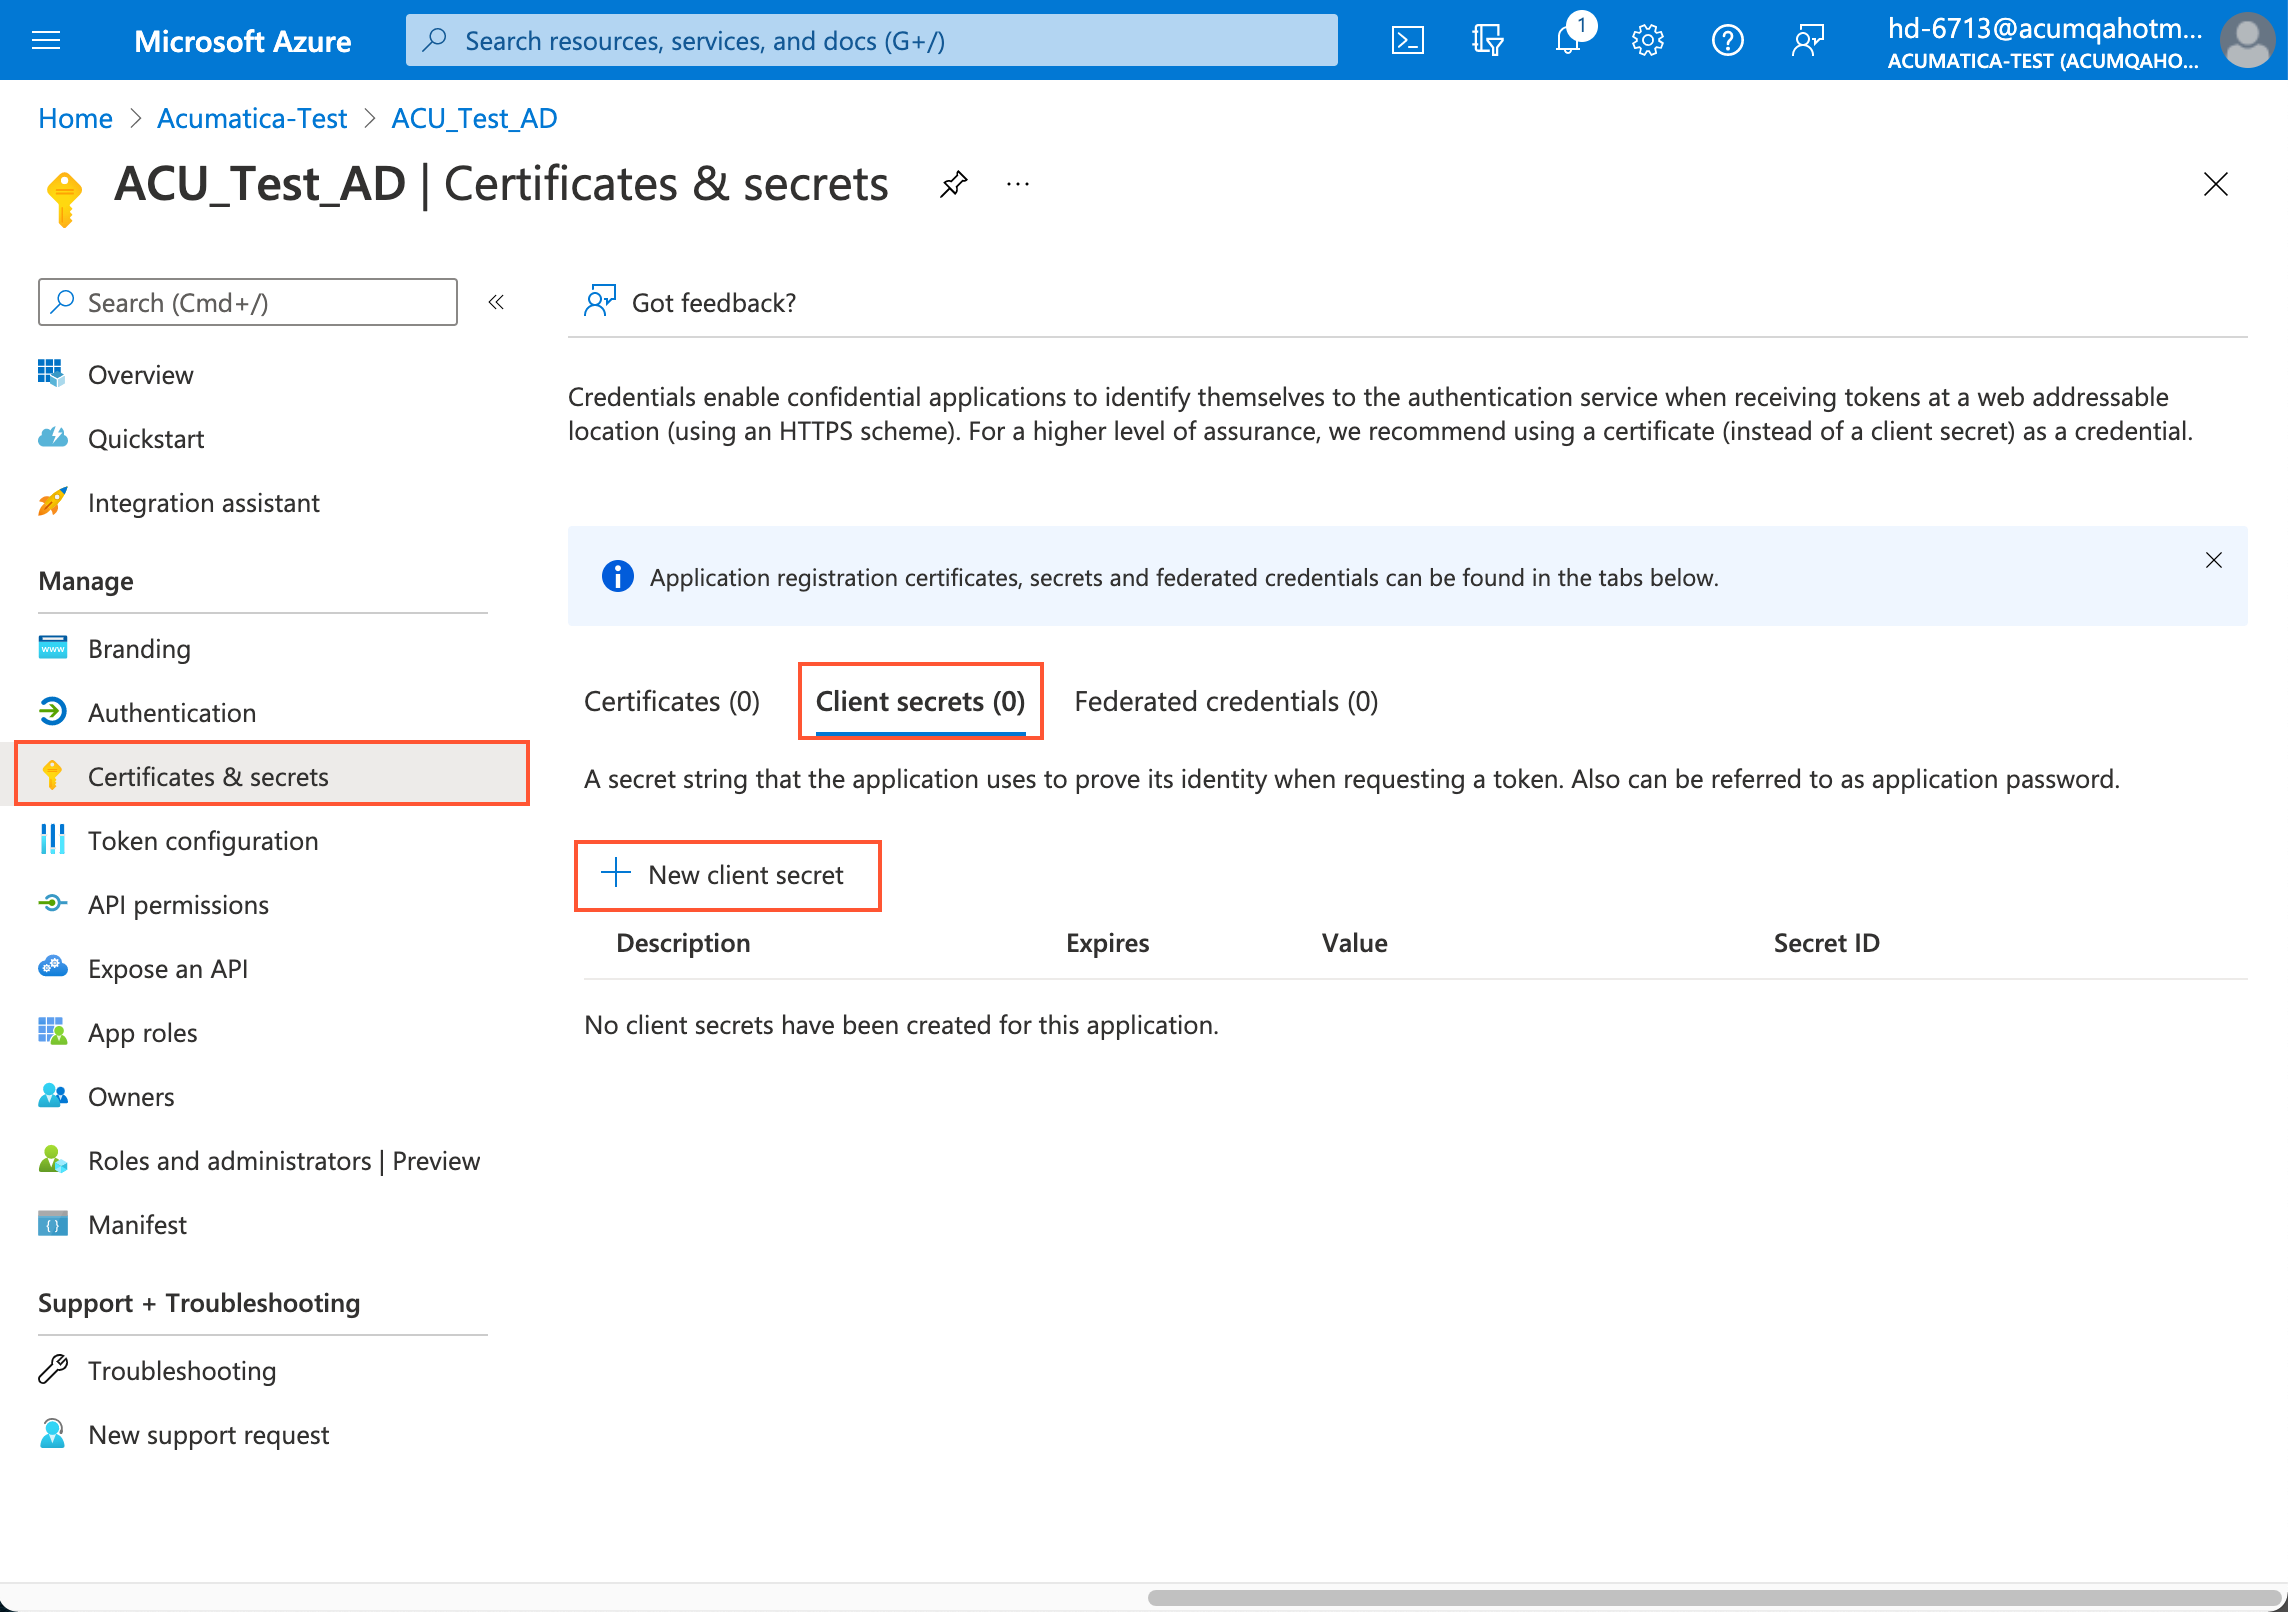
- In the Description box of the Add a client secret pane, type a description of the client secret.
- In the Expires box, select the secret’s duration (see the
following screenshot).
Figure 6. Microsoft Azure: Client secret generation 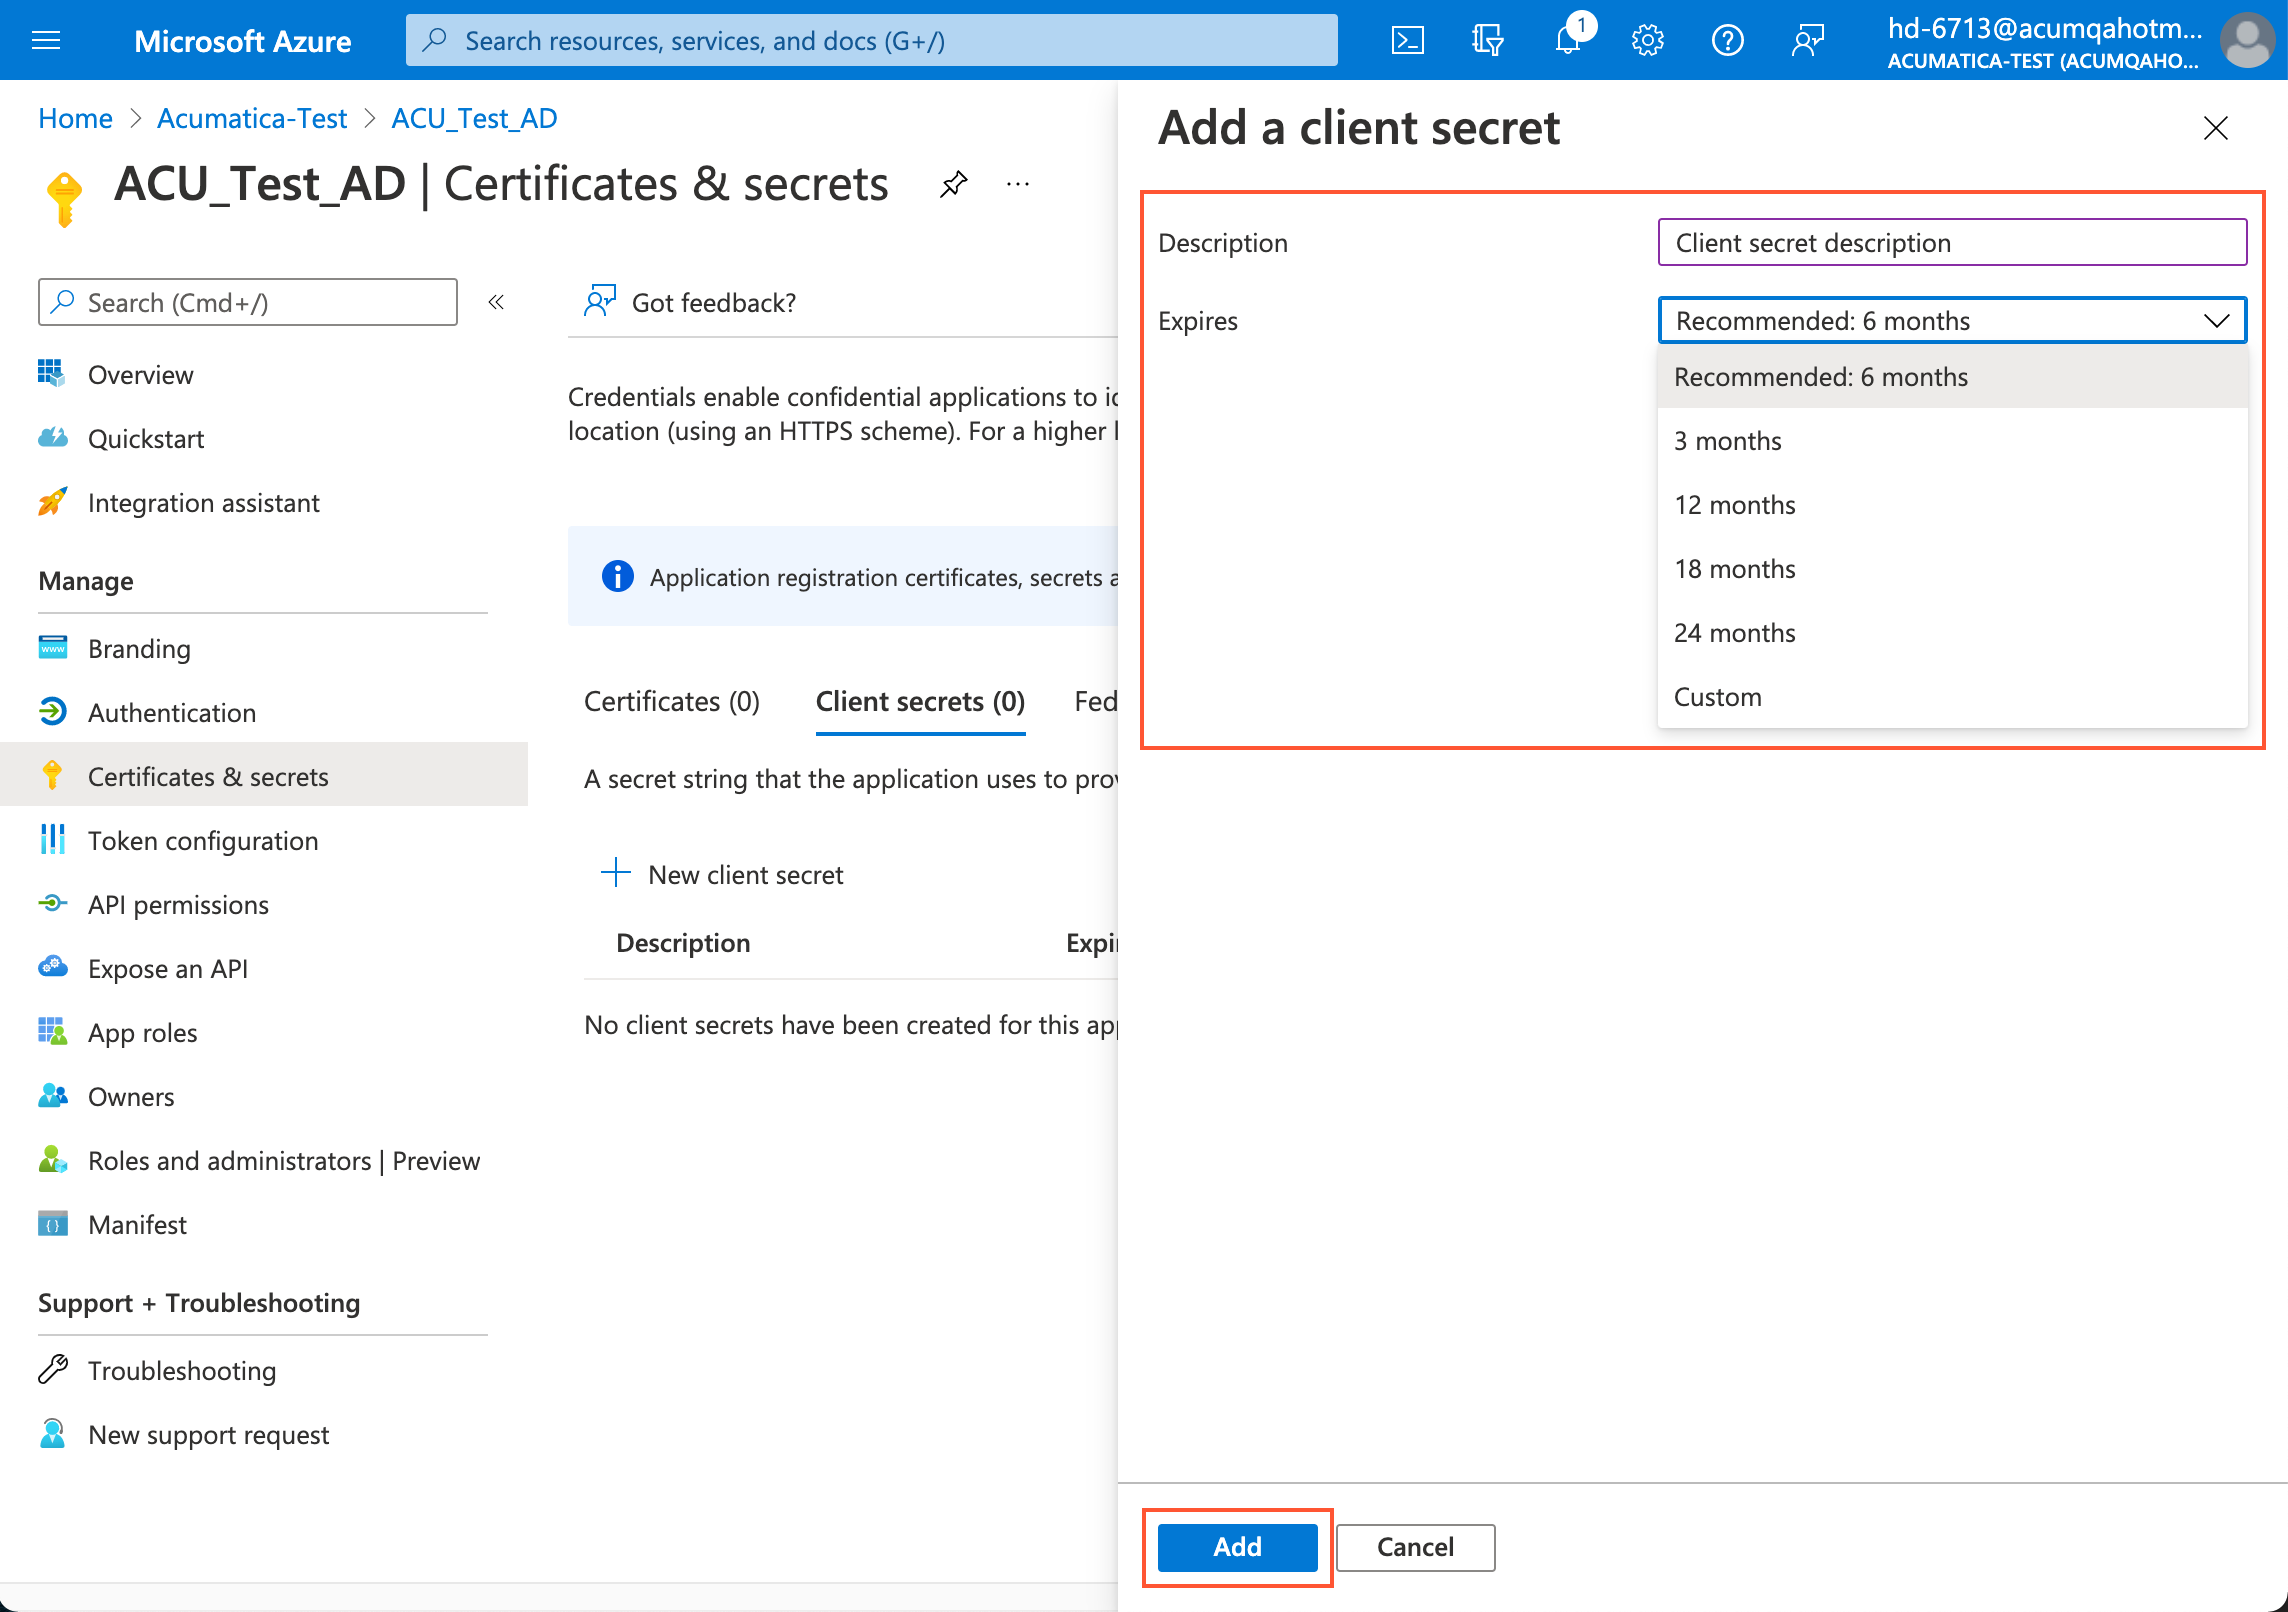
- Click Add.
- Copy the value of the client secret, which appears in the Value
column of the Client secrets pane (see the screenshot below), to
use it as a client secret in MYOB Acumatica.Important:You must copy the client secret value right after clicking Add and before you leave the page. If you leave the page and return to it, the value will be hidden and will not be shown anymore.
Figure 7. Microsoft Azure: Client secret 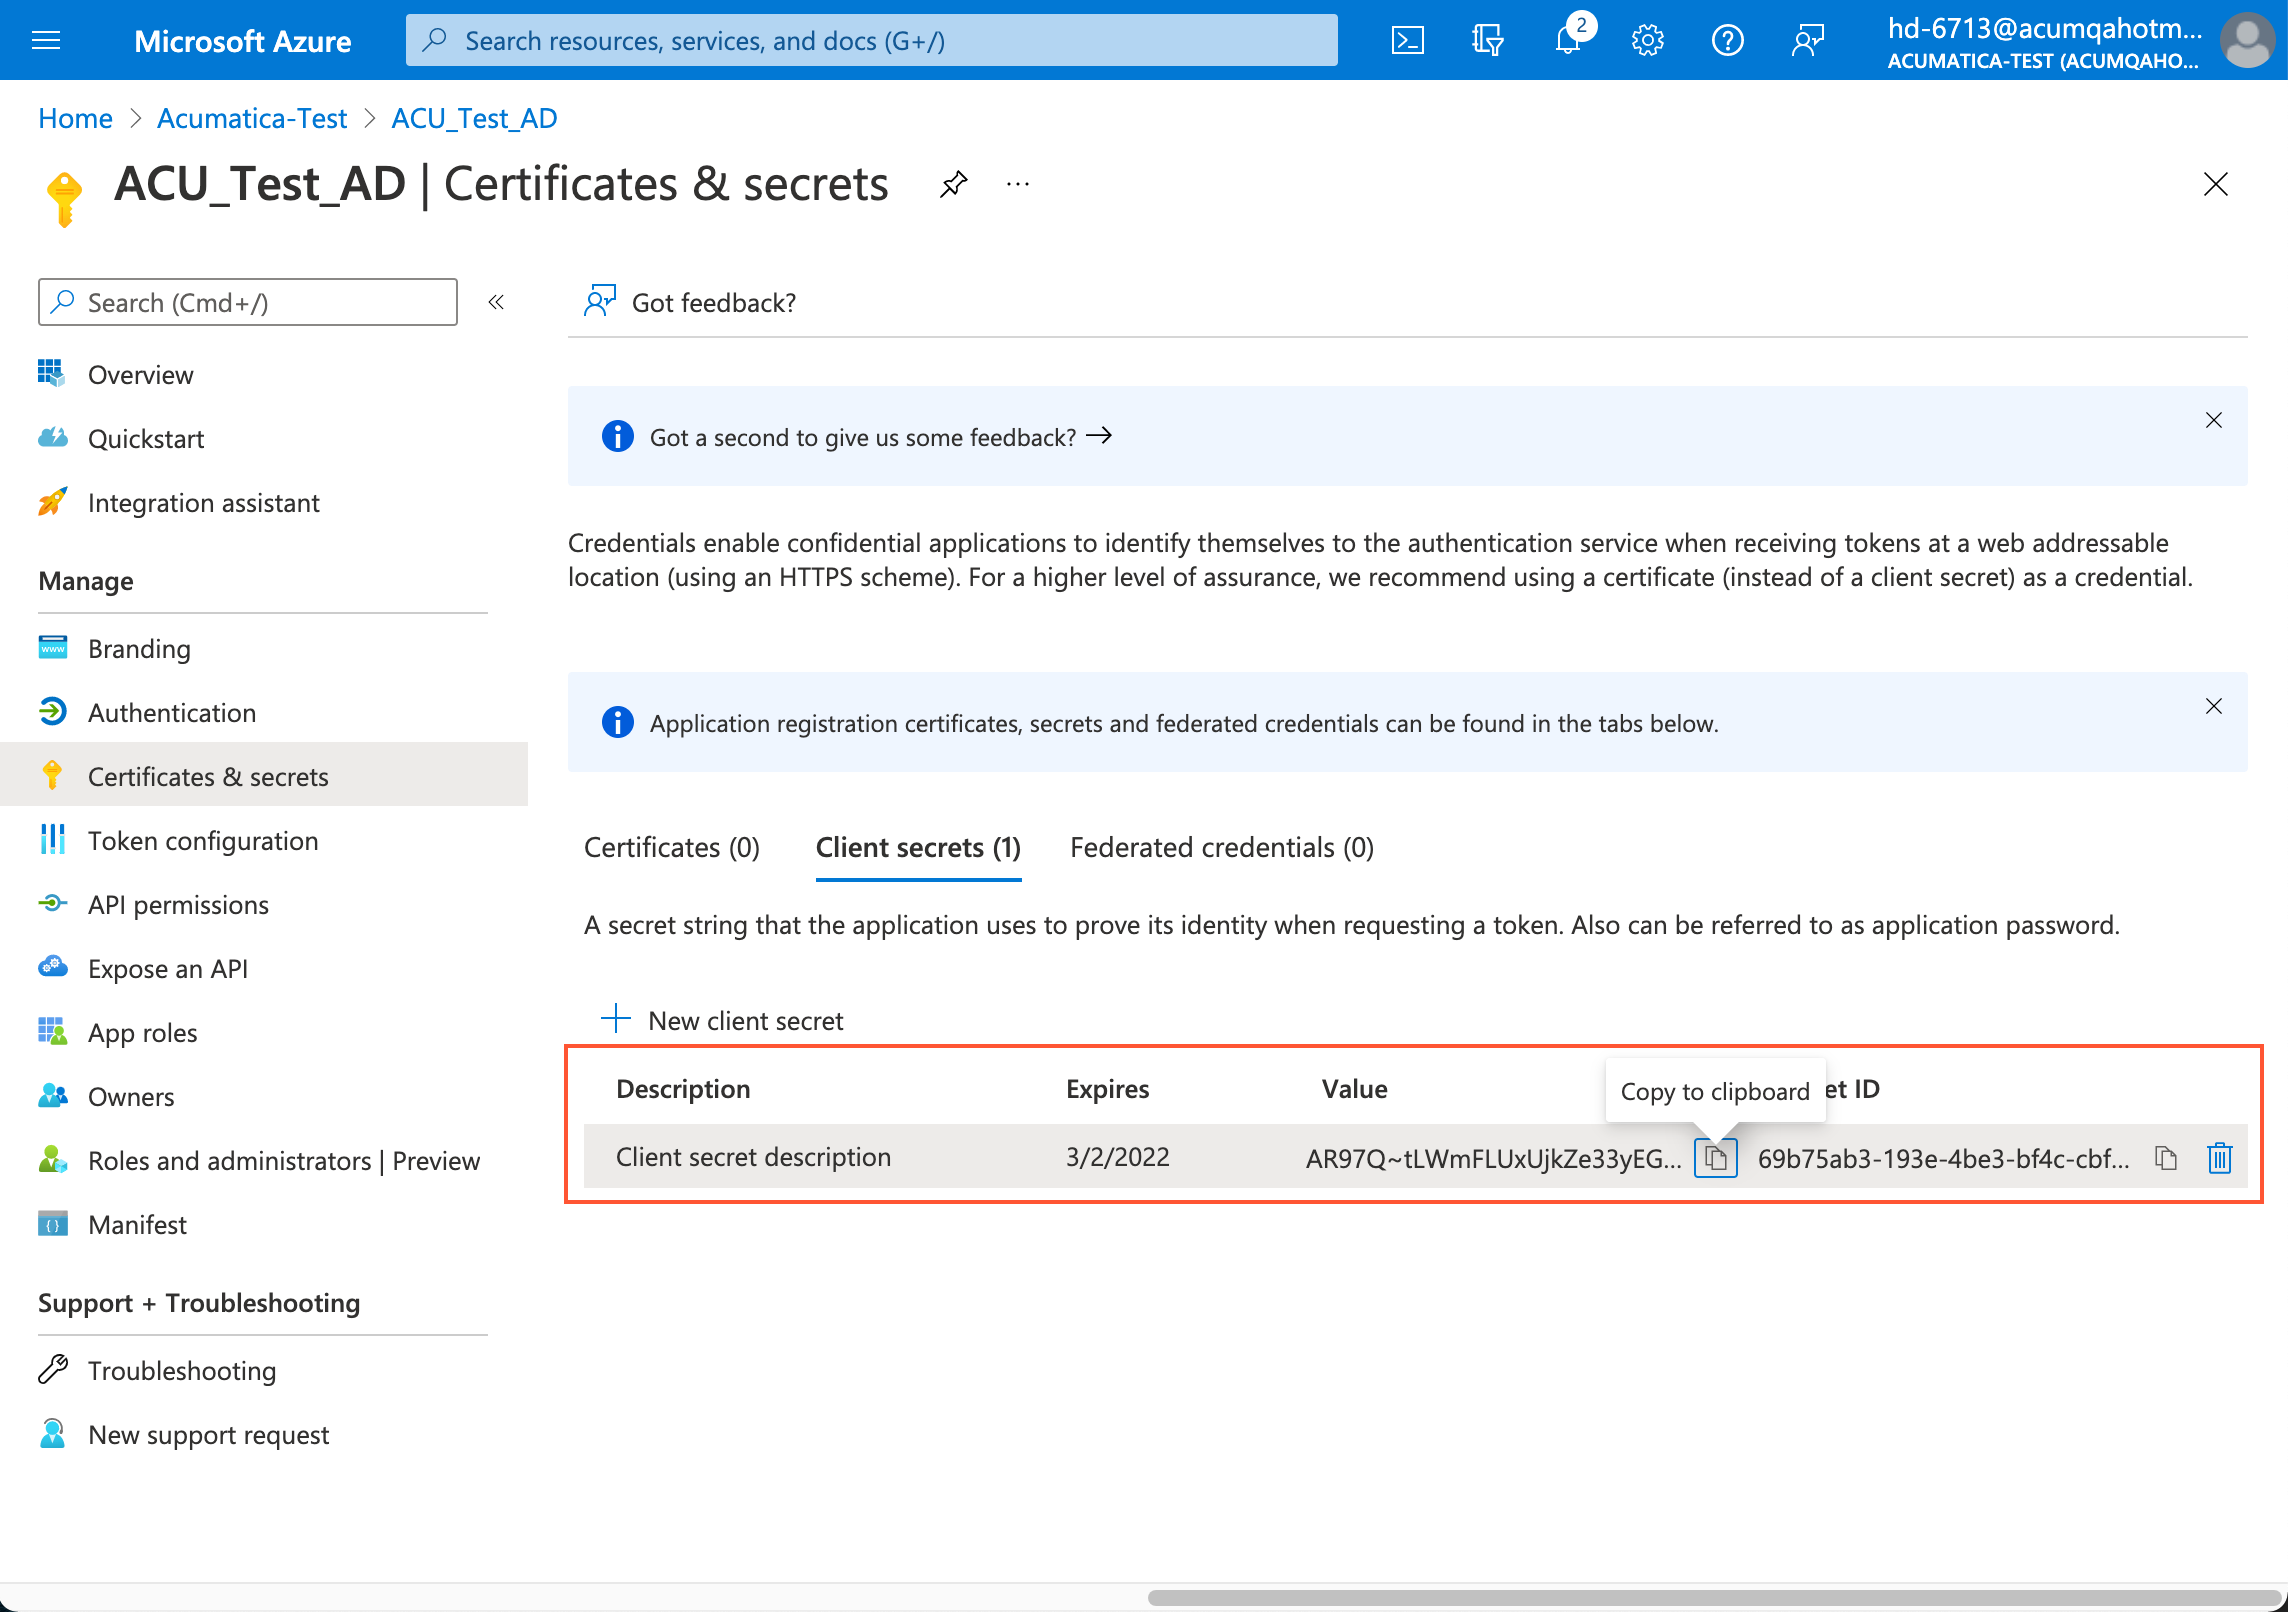
You have obtained the client secret for further use on the Security Preferences form (SM.20.10.60).
Step 3: To Specify API Permissions
To specify API permissions, perform the following instructions:
- In the left pane, expand the Manage node, and click API permissions.
- In the API permissions pane, click Add a
permission (see the following screenshot).
Figure 8. Microsoft Azure: New API permissions 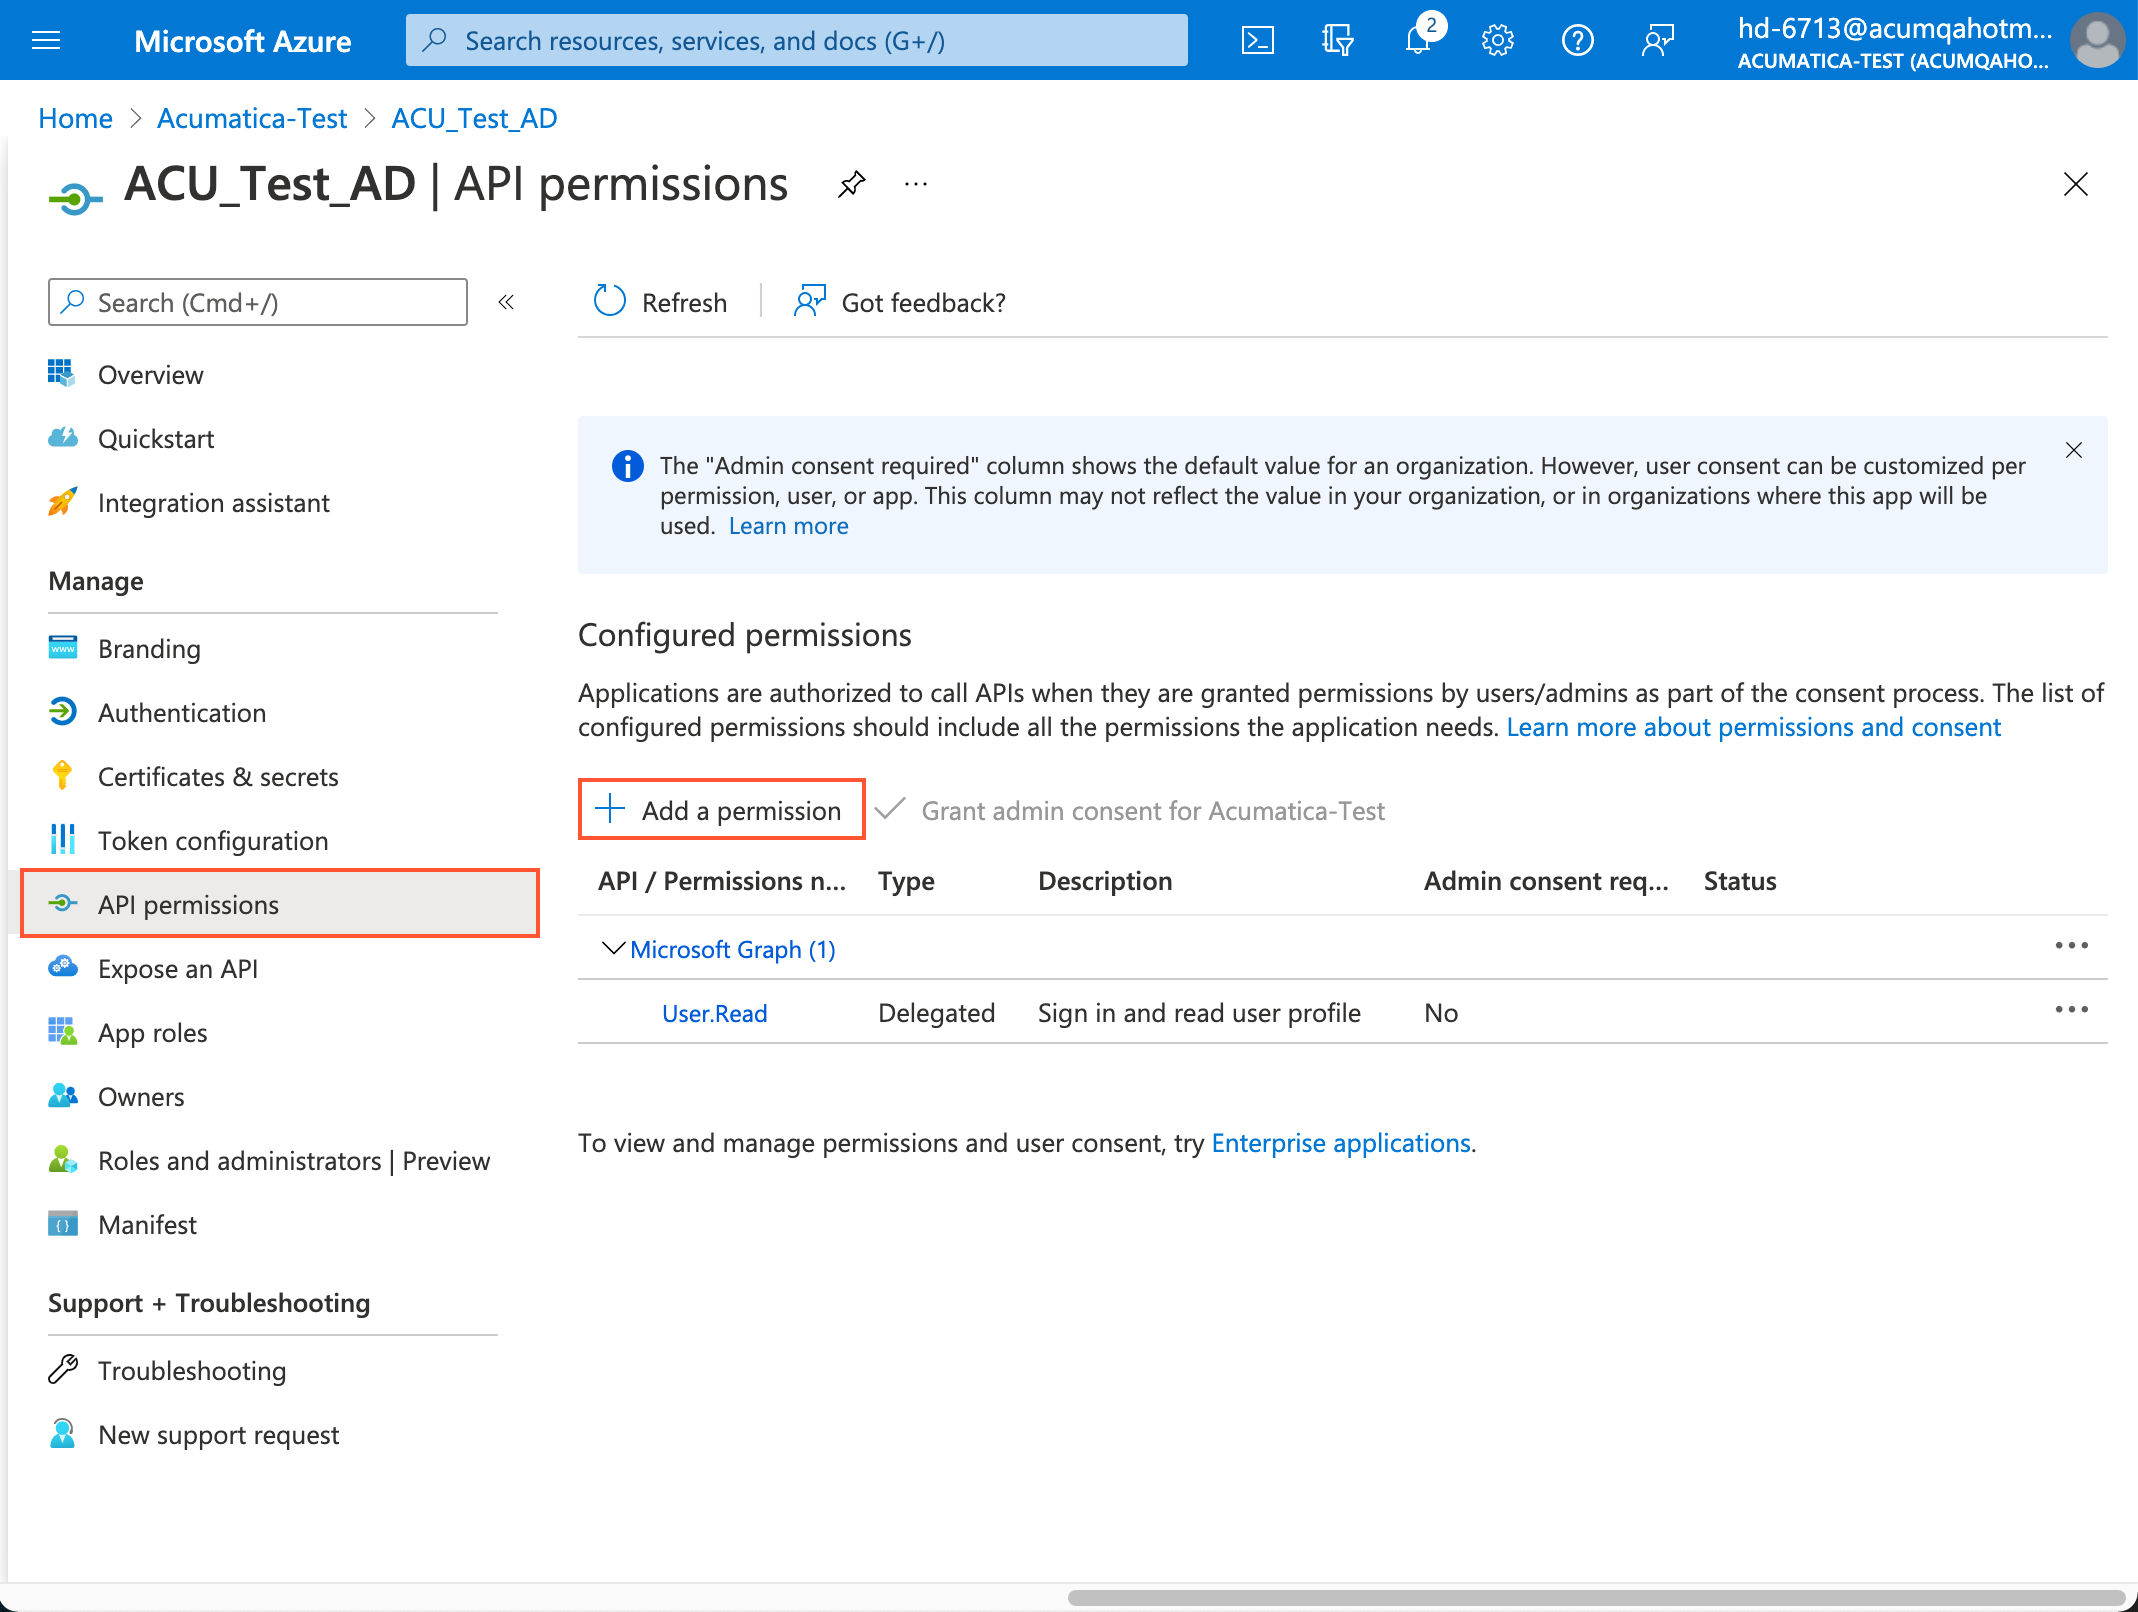
- In the API permissions pane, select the Microsoft
Graph API, as shown in the following screenshot.
Figure 9. Microsoft Azure: API selected 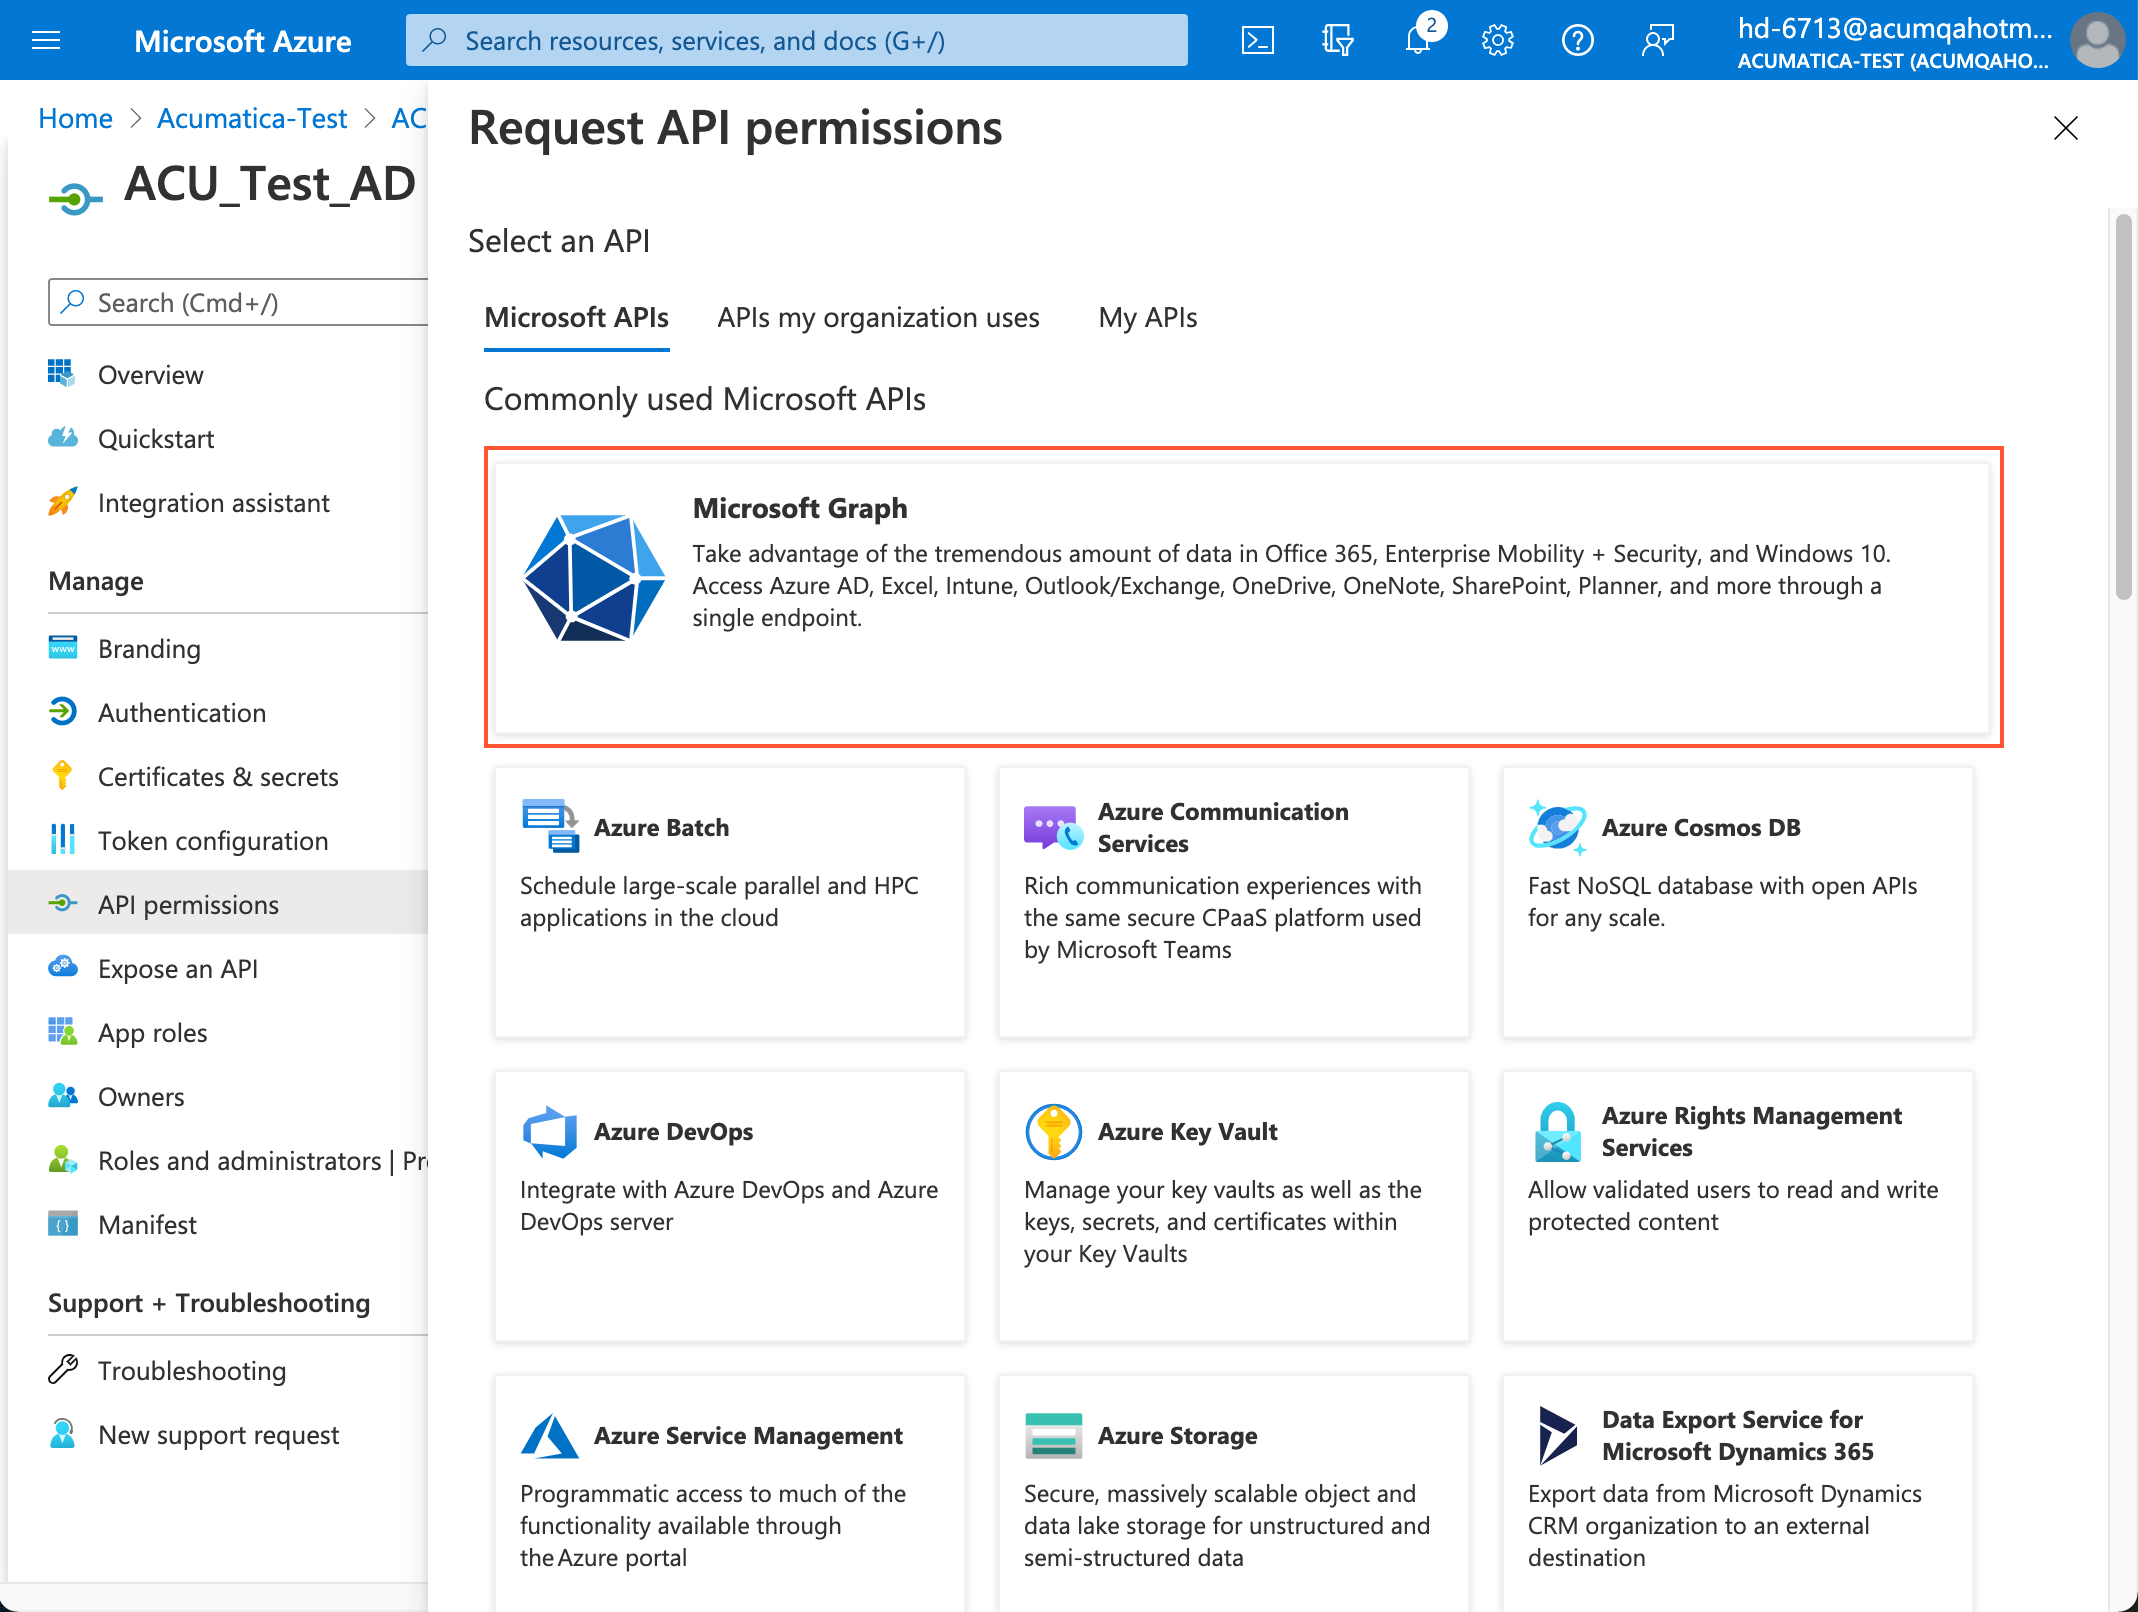
- In the Request API permissions pane, click Application
permissions, as shown in the following screenshot.
Figure 10. Microsoft Azure: API permissions selected 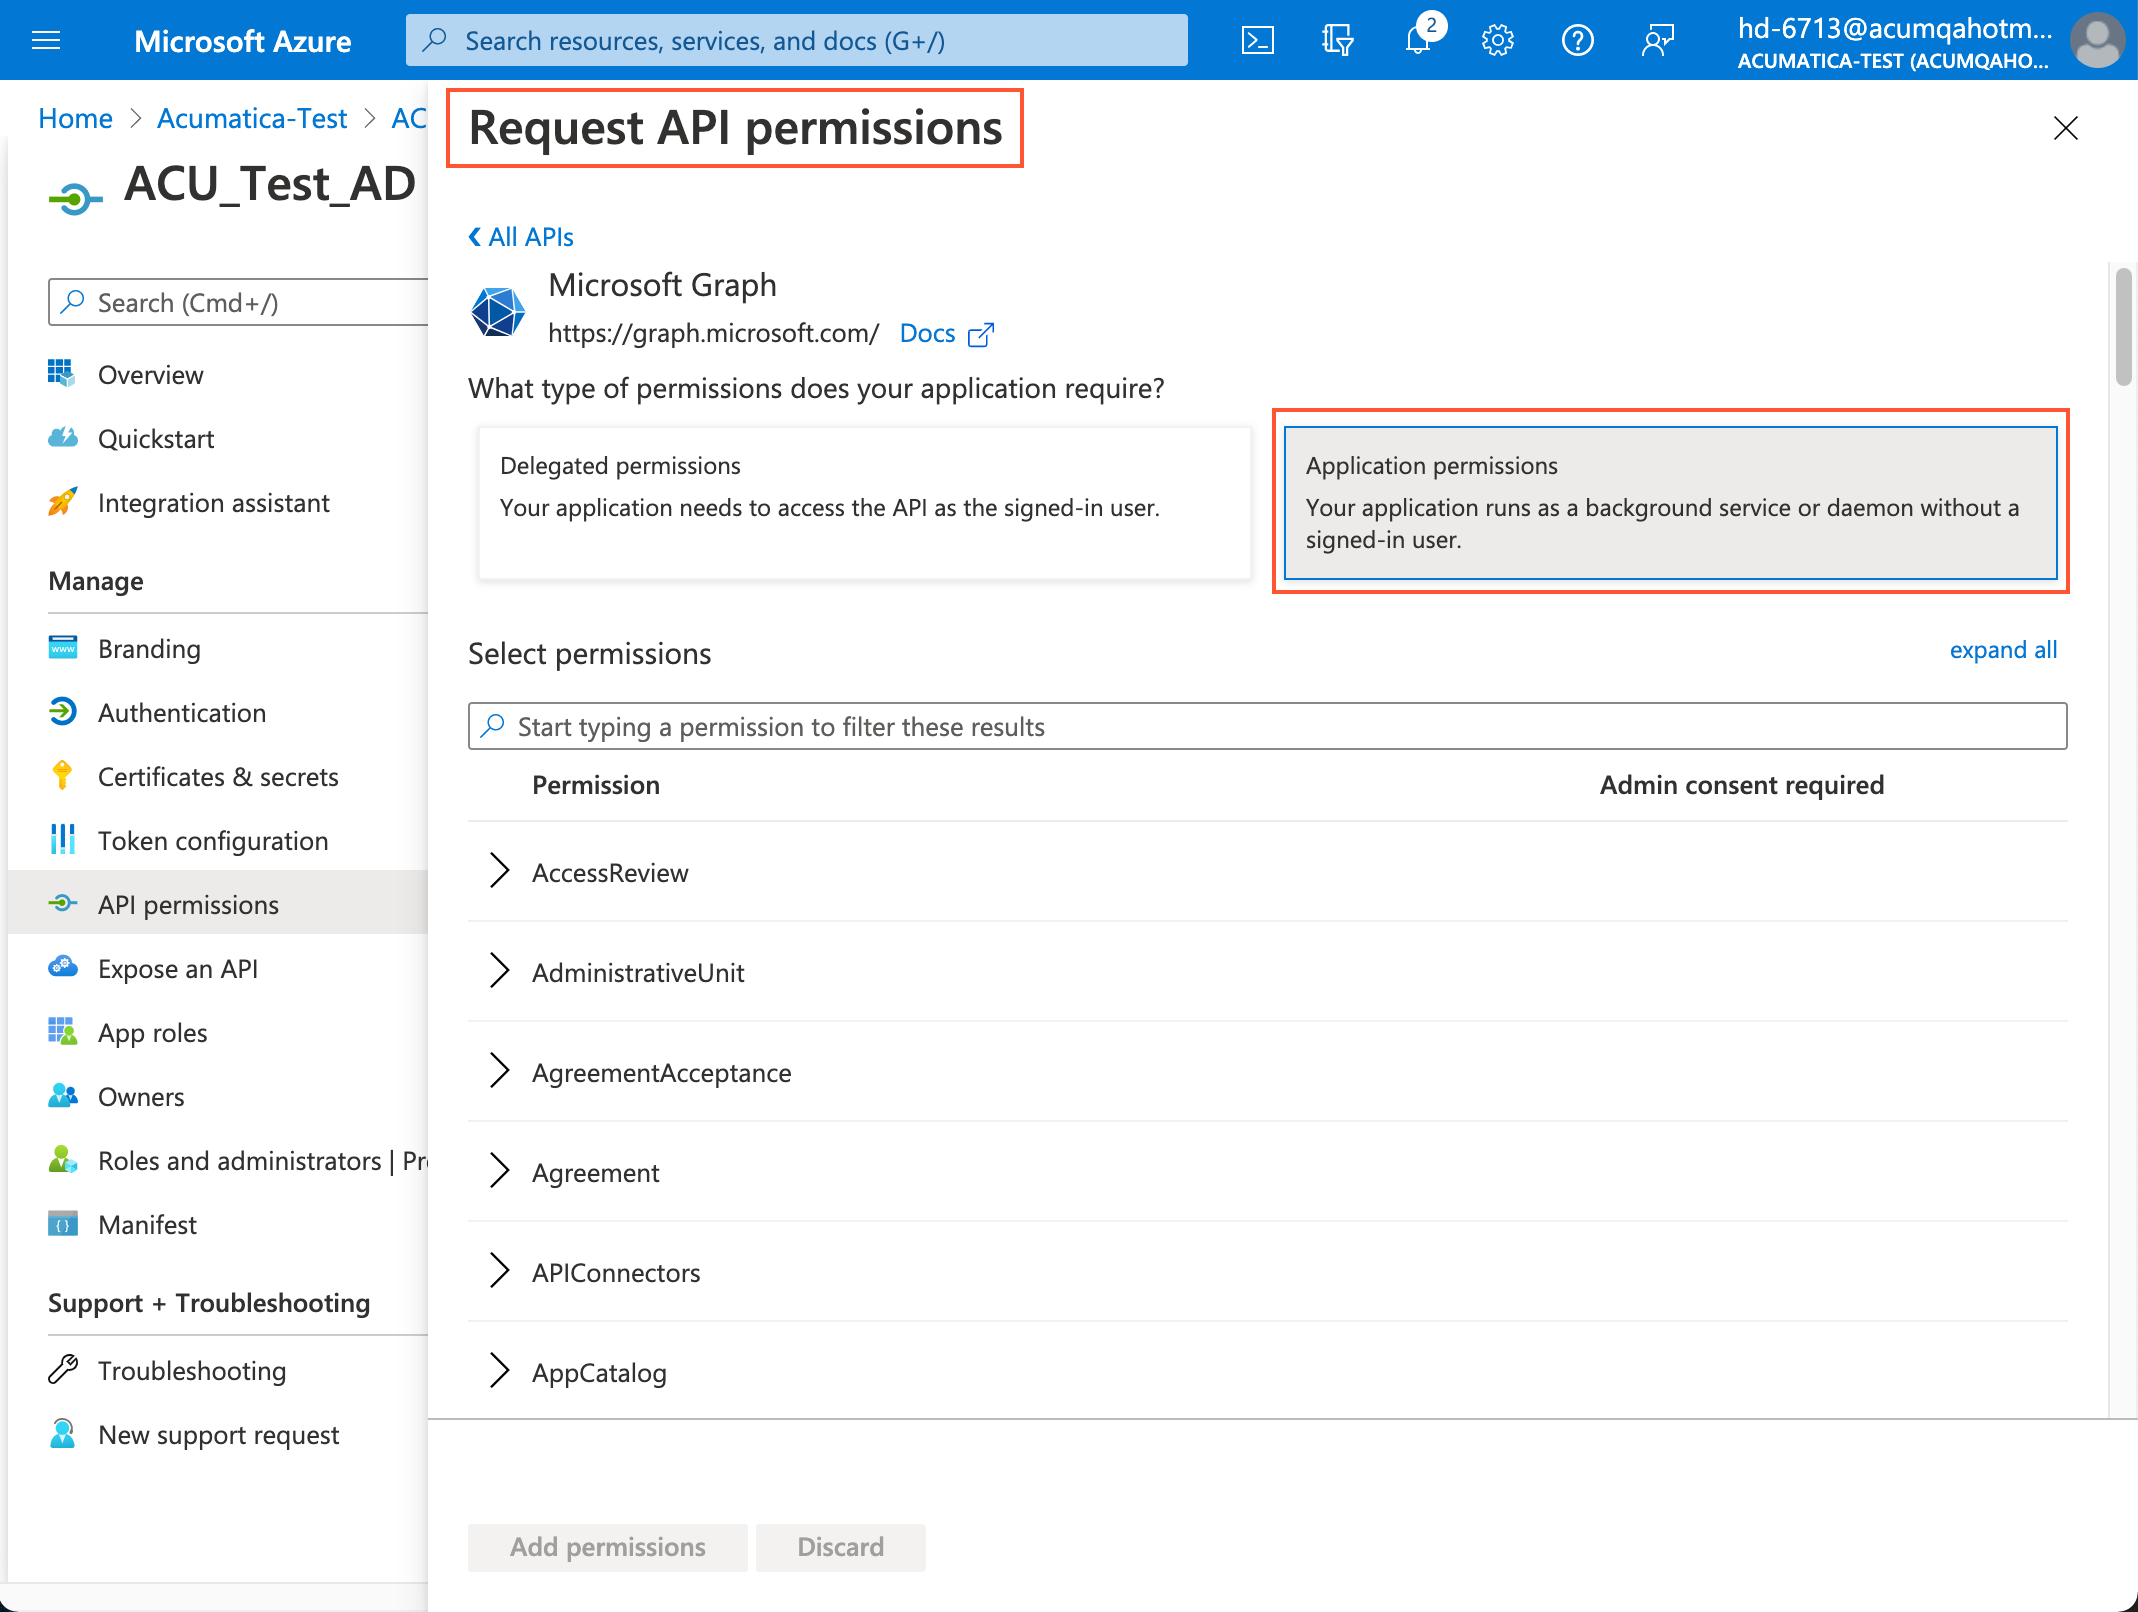
- In the Domain group, select the Domain.Read.All check box to add this permission.
- Click Add permissions, as shown in the following screenshot.
Figure 11. Microsoft Azure: API permission added 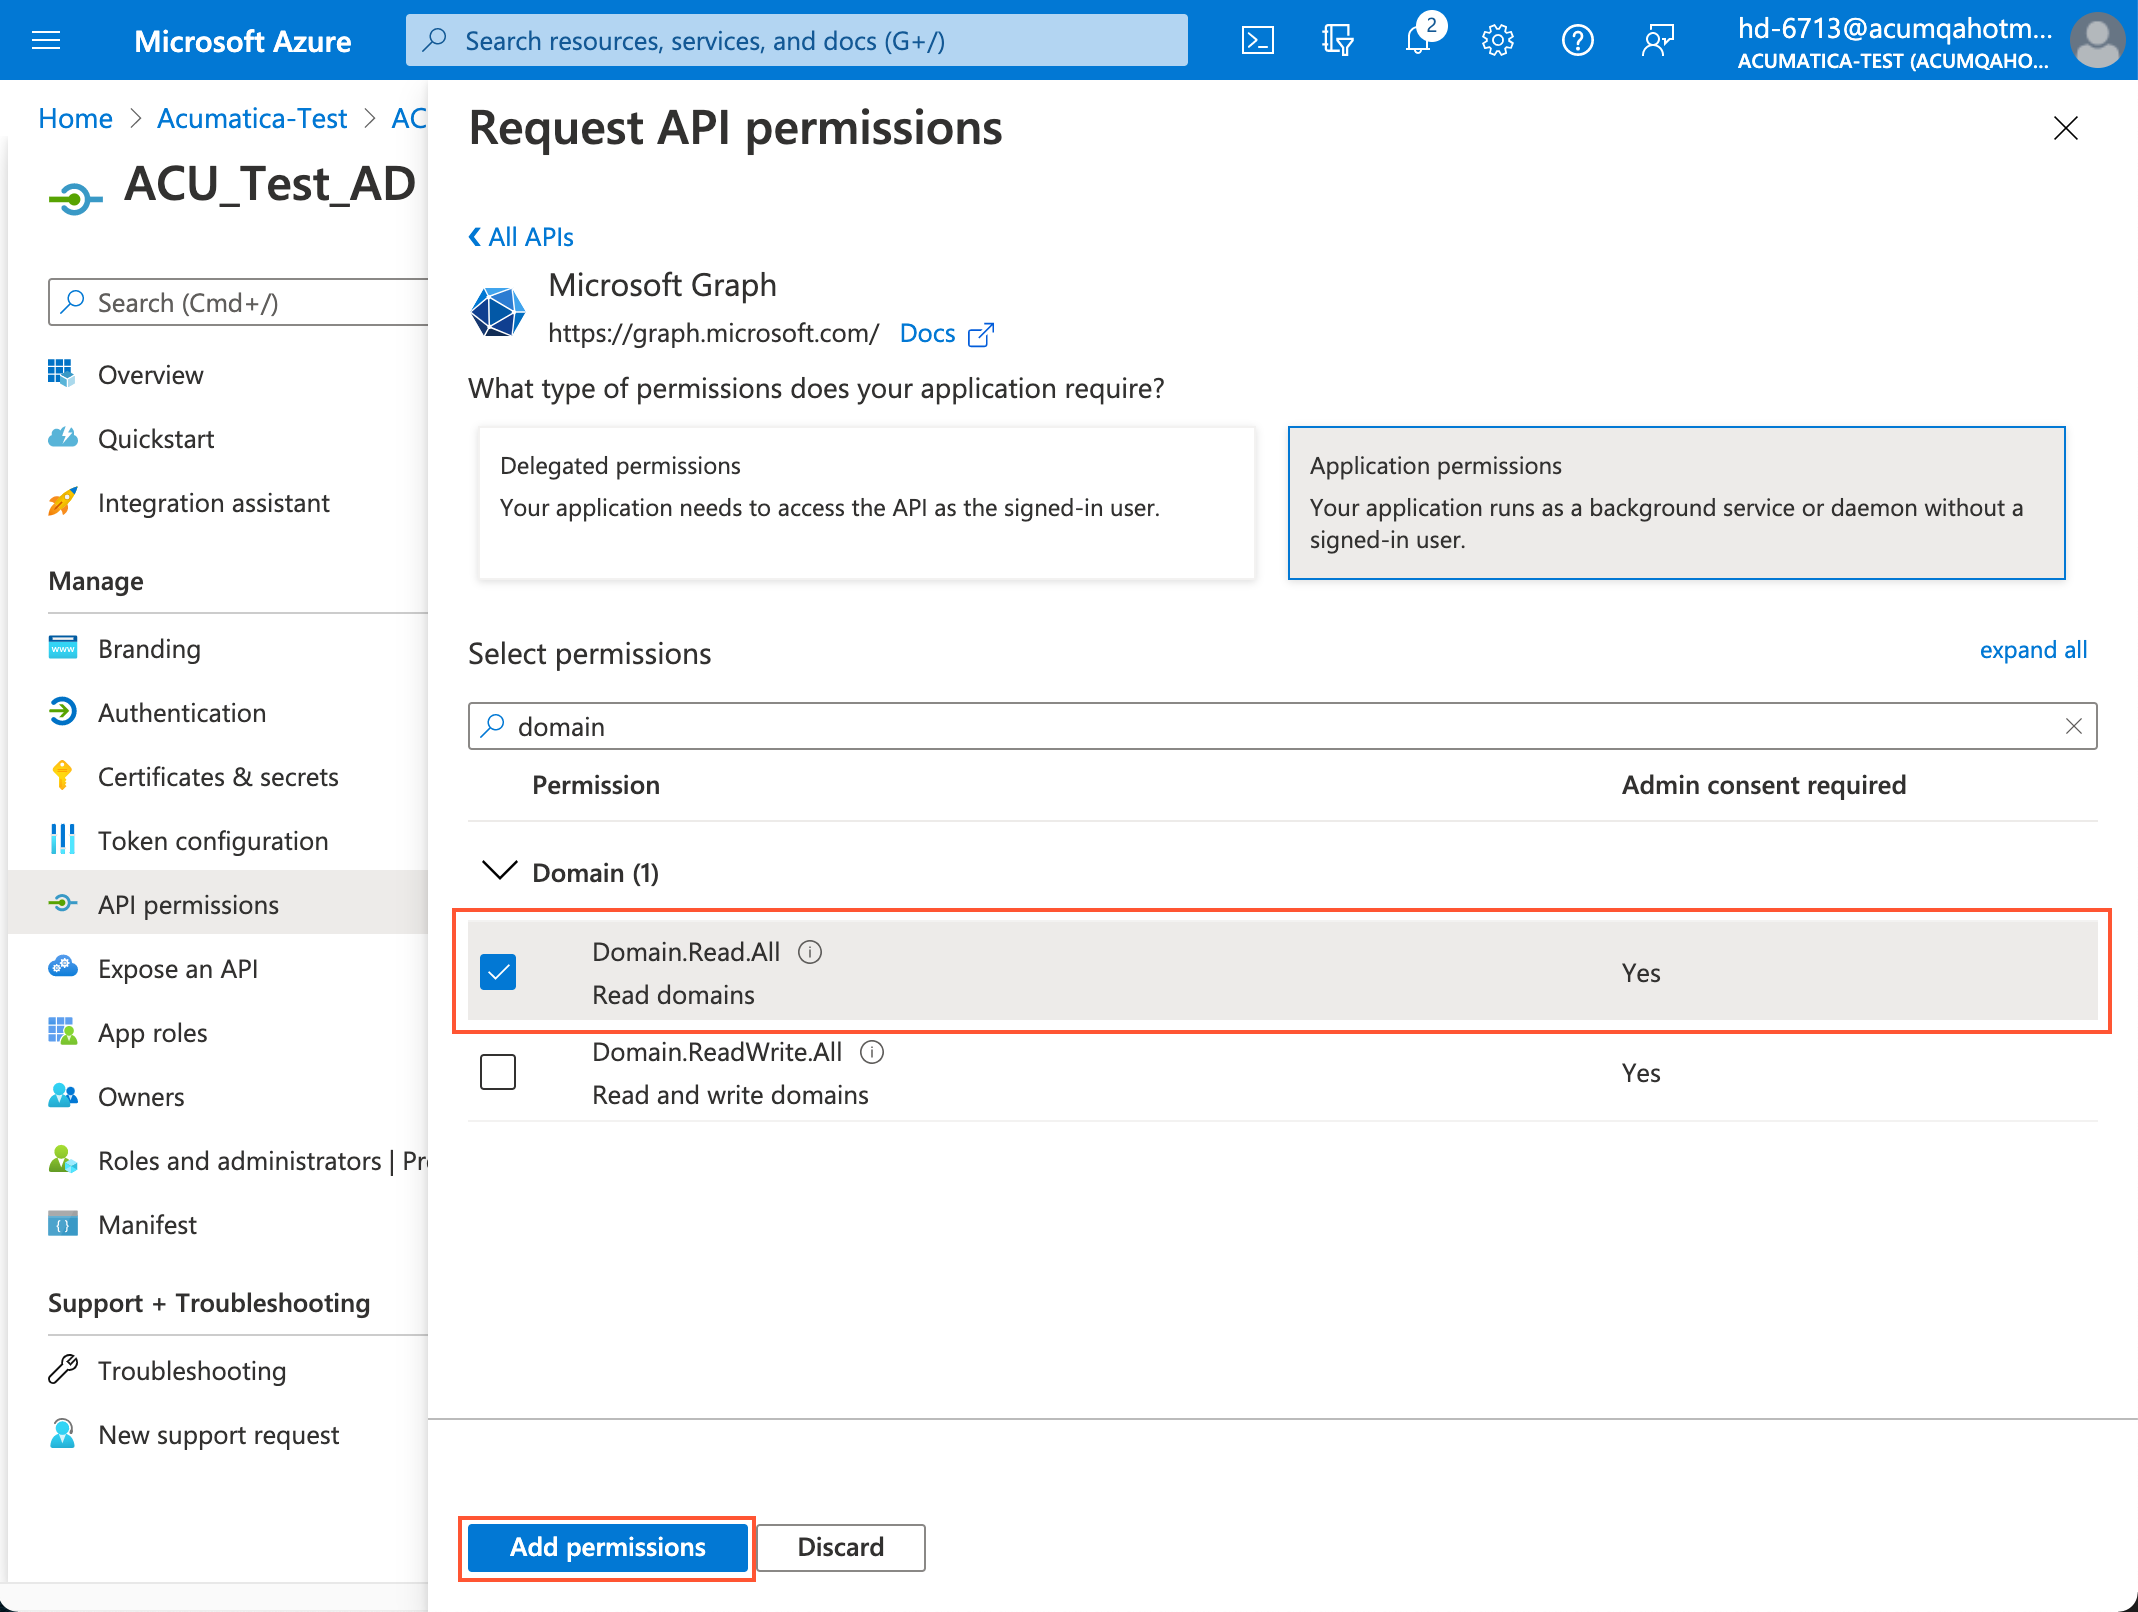
- Repeat Instructions 2 through 6 to add the following permissions:
- User.Read.All
- GroupMember.Read.All
Tip:If you use the hidden members in Active Directory and would like these members to have access to MYOB Acumatica, add the Member.Read.Hidden permission as well. - Click Grant admin consent for <Azure_Instance_Name>.
Tip:You should have administrative access rights to grant consent. If you do not, ask the instance administrator to grant this consent.
- Confirm your action by clicking Yes. Notice that the status of
the permissions has been changed to Granted for <Azure_Instance_Name> (see the
Status column in the following screenshot).
Figure 12. Microsoft Azure: API permission granted 
You have configured API permissions.
Step 4: To Specify Your Application ID URI
To specify the application ID URI of your MYOB Acumatica instance, you perform the following instructions:
- Switch to your Microsoft Entra ID instance by clicking its name in the navigation bar in upper left corner of the screen.
- In the left pane, expand the Manage node, and click App registrations.
- In the App registrations list, click the application name that you have registered.
- In the left pane, click Overview (see the following screenshot).
- In the right pane, click
Add an Application ID URI.
Figure 13. Microsoft Azure: Addition of an application ID URI 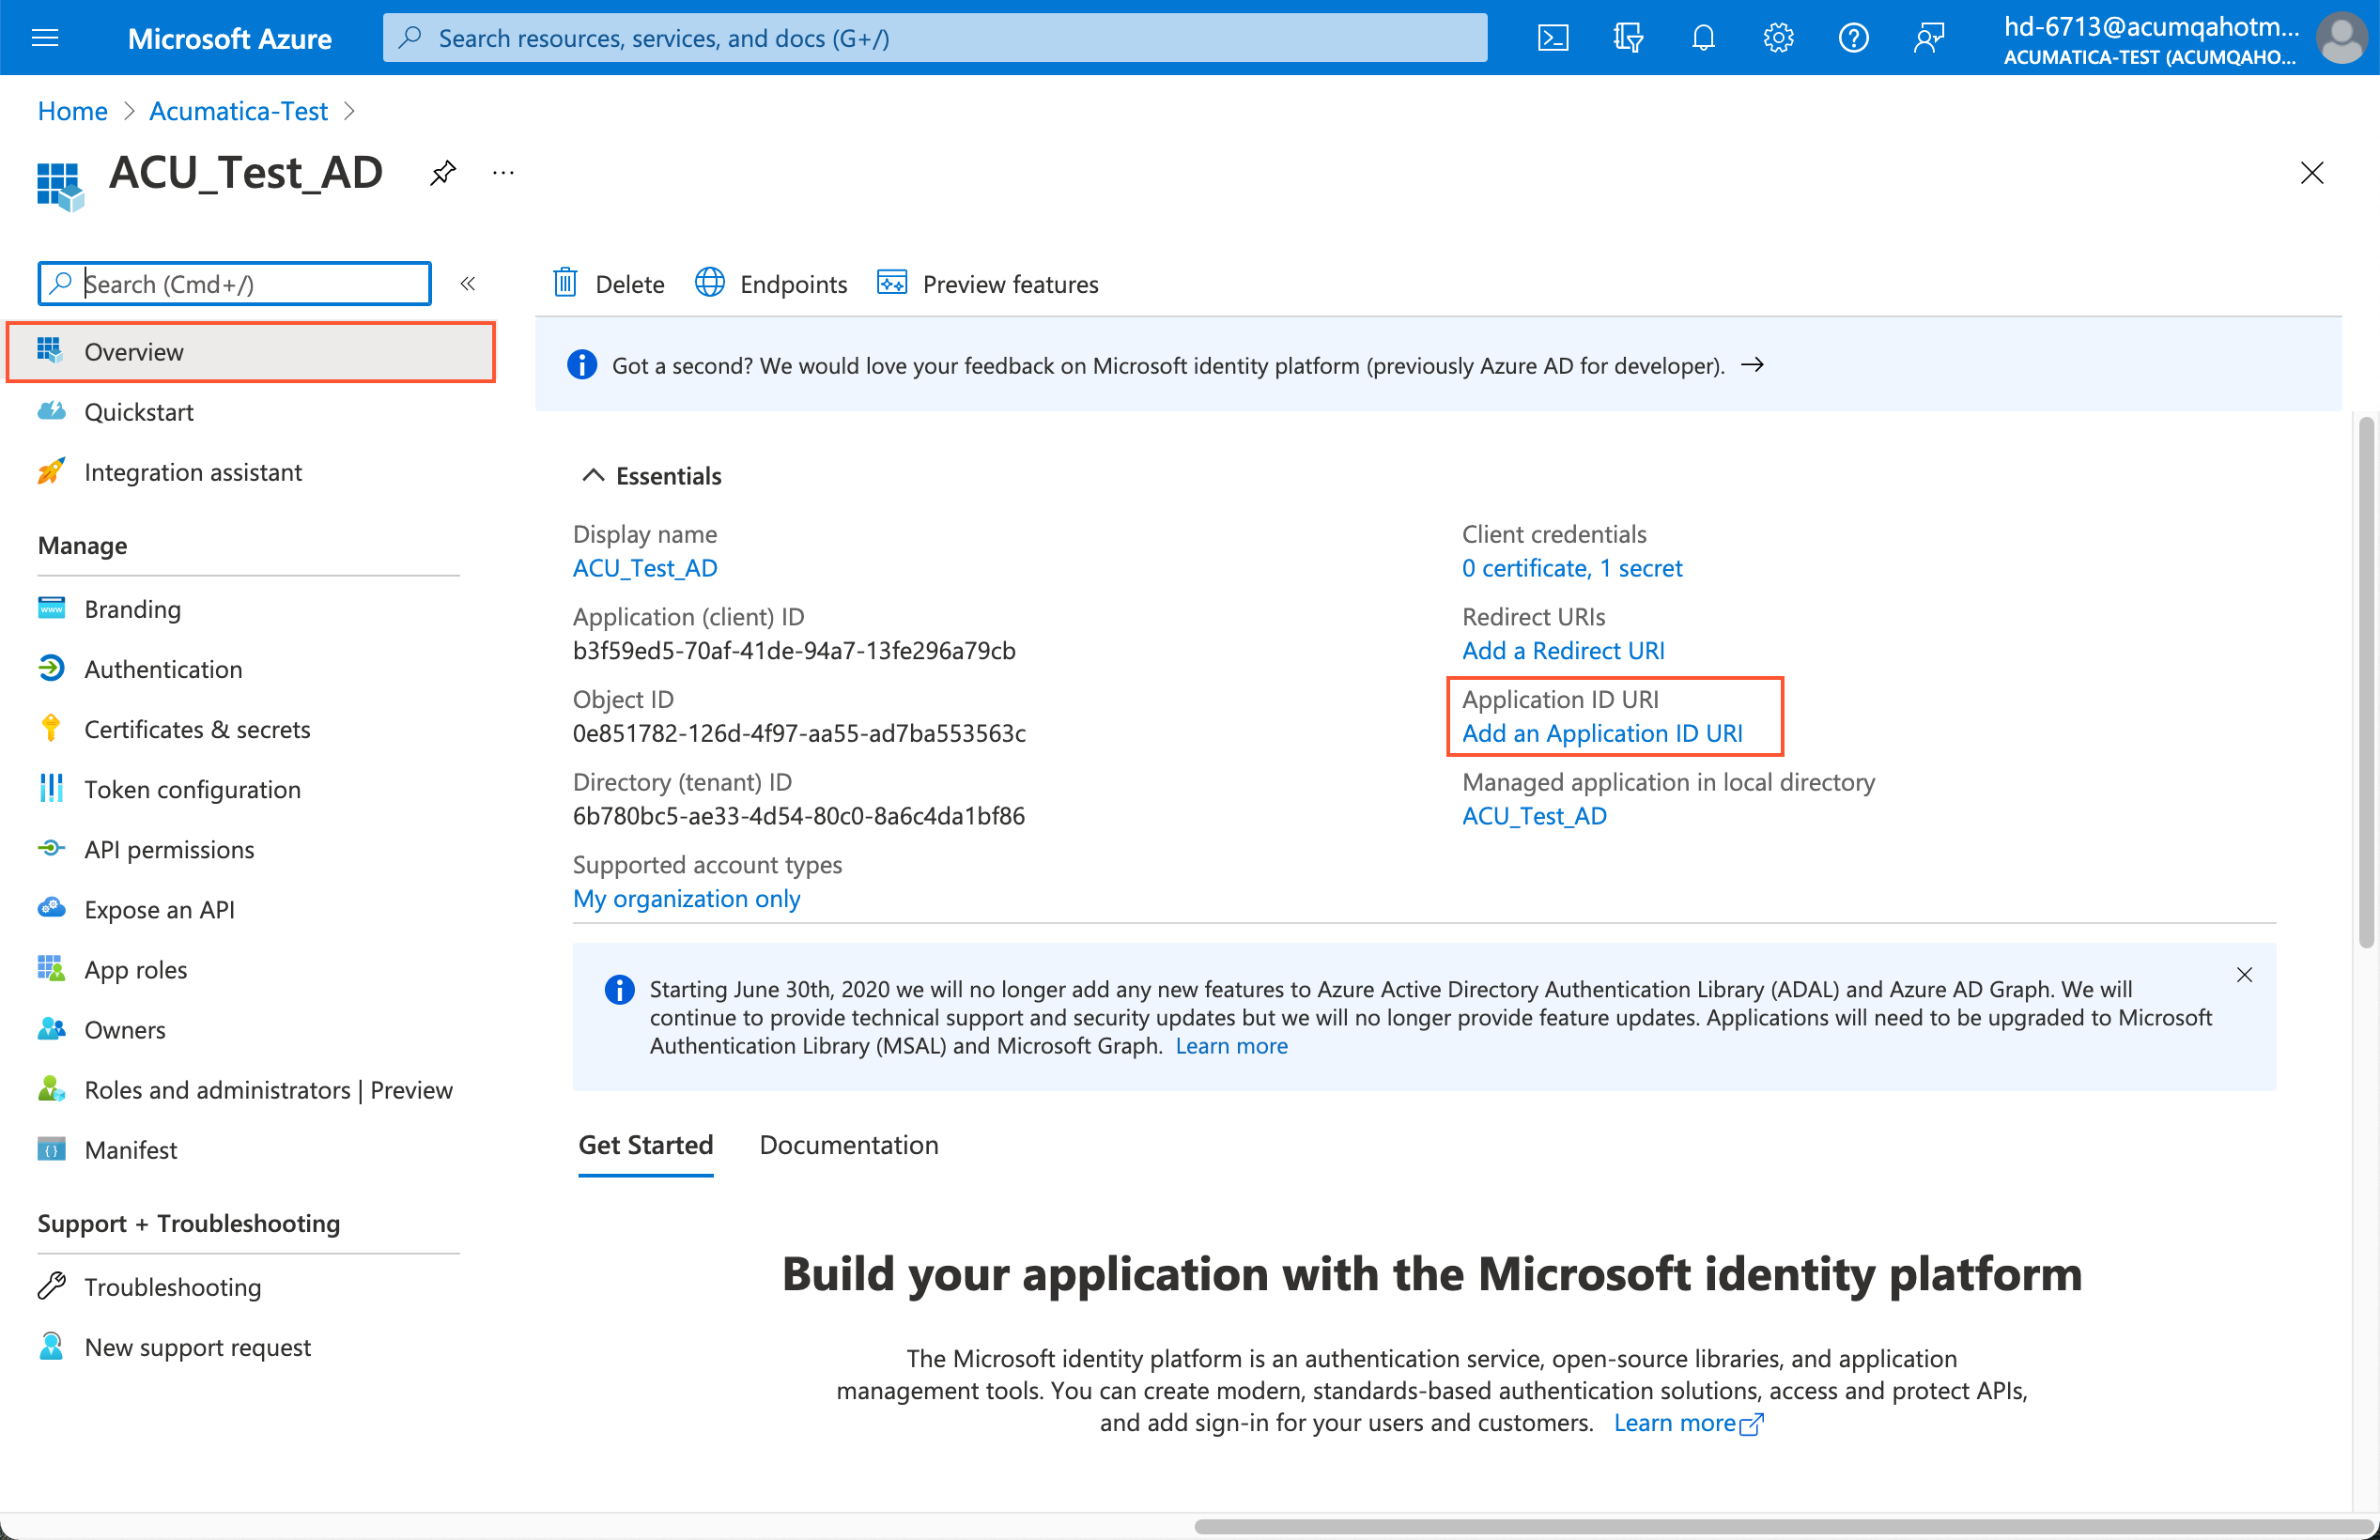
- In the Expose an API pane, which opens, click Add next to
Application ID URI (see the following screenshot).
Figure 14. Microsoft Azure: Setting an application ID URI 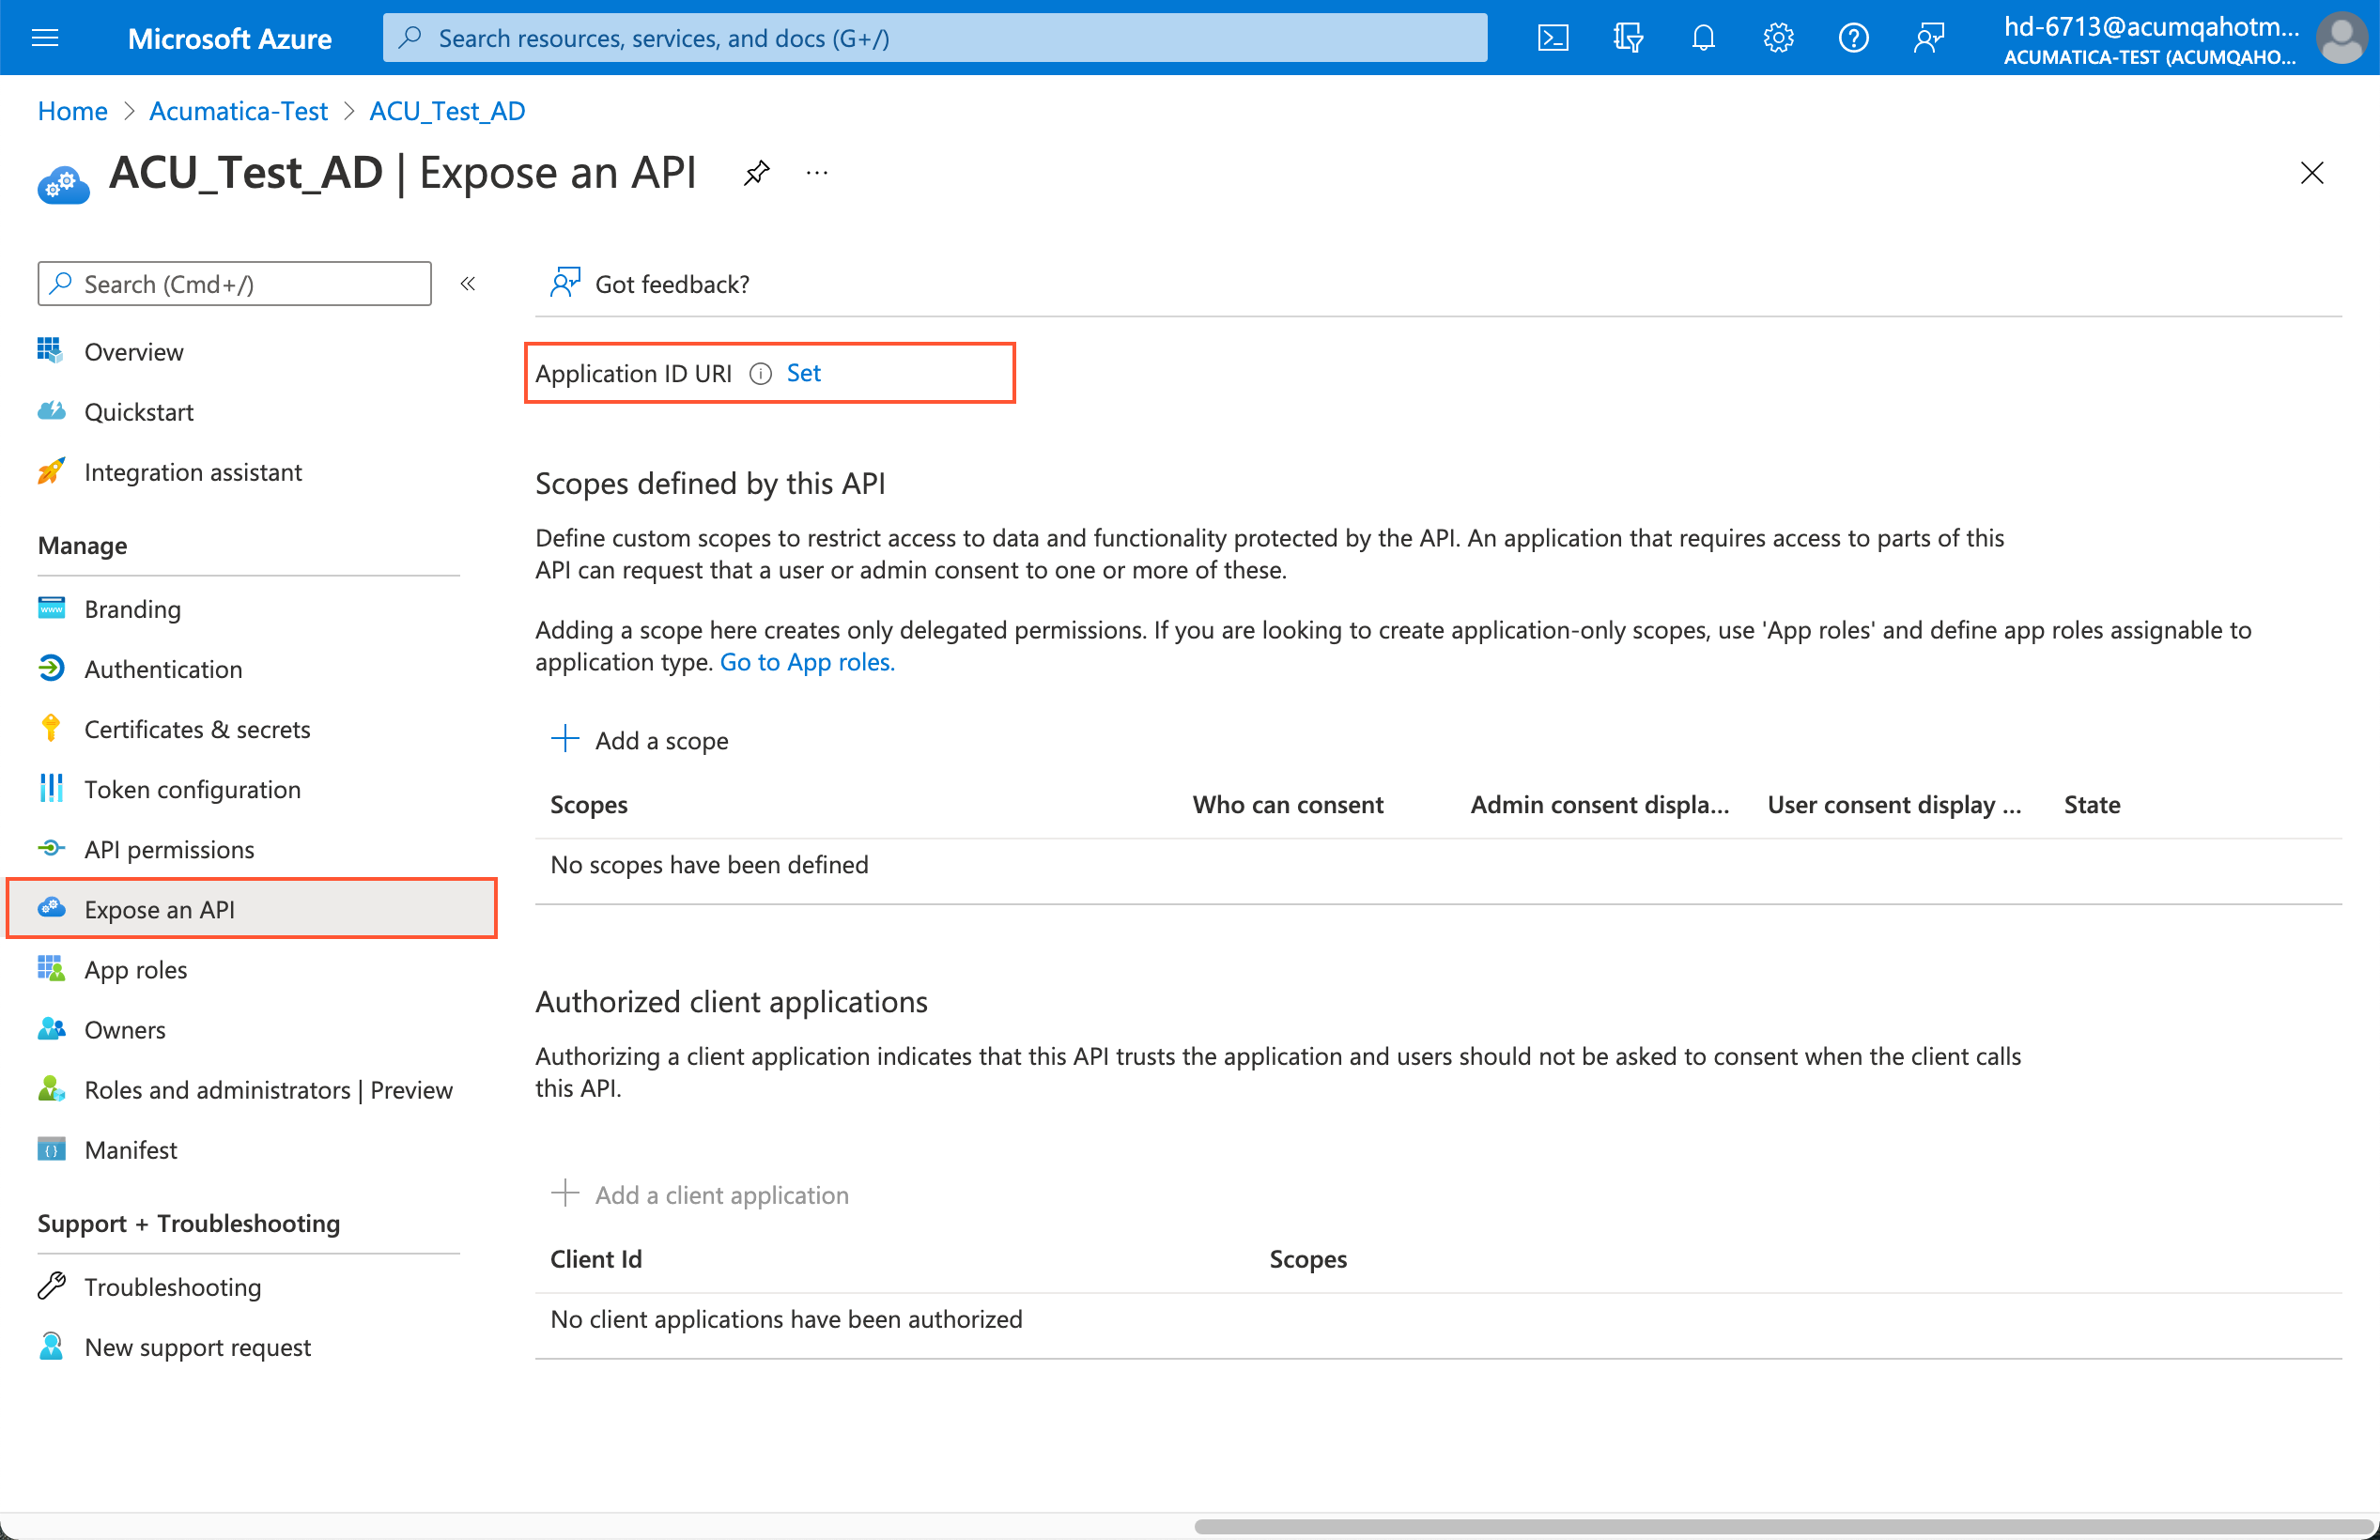
- In the Edit application ID URI dialog box, confirm the suggested
URI of your MYOB Acumatica URI.
We suggest accepting the system-generated value in the api://<Application_Client_ID> format.
Attention:For single-tenant applications, Microsoft Entra ID validates that the domain in the URI is in the verified domain list in the Entra ID tenant. If the specified domain is not verified, you should use the default scheme (api://<Application_Client_ID>) suggested by Microsoft Entra ID. - Click Save.
You have specified your MYOB Acumatica instance ID URI.
Step 5: To Specify the Redirect URI of Your Application
After Microsoft Entra ID successfully authenticates users, it uses the redirect URI as the destination when it returns authentication responses (tokens). To specify the redirect URI, you perform the following instructions:
- In the left pane, click Overview (see the following screenshot).
- In the right pane, click Add a Redirect URI.
Figure 15. Microsoft Azure: Addition of a redirect URI 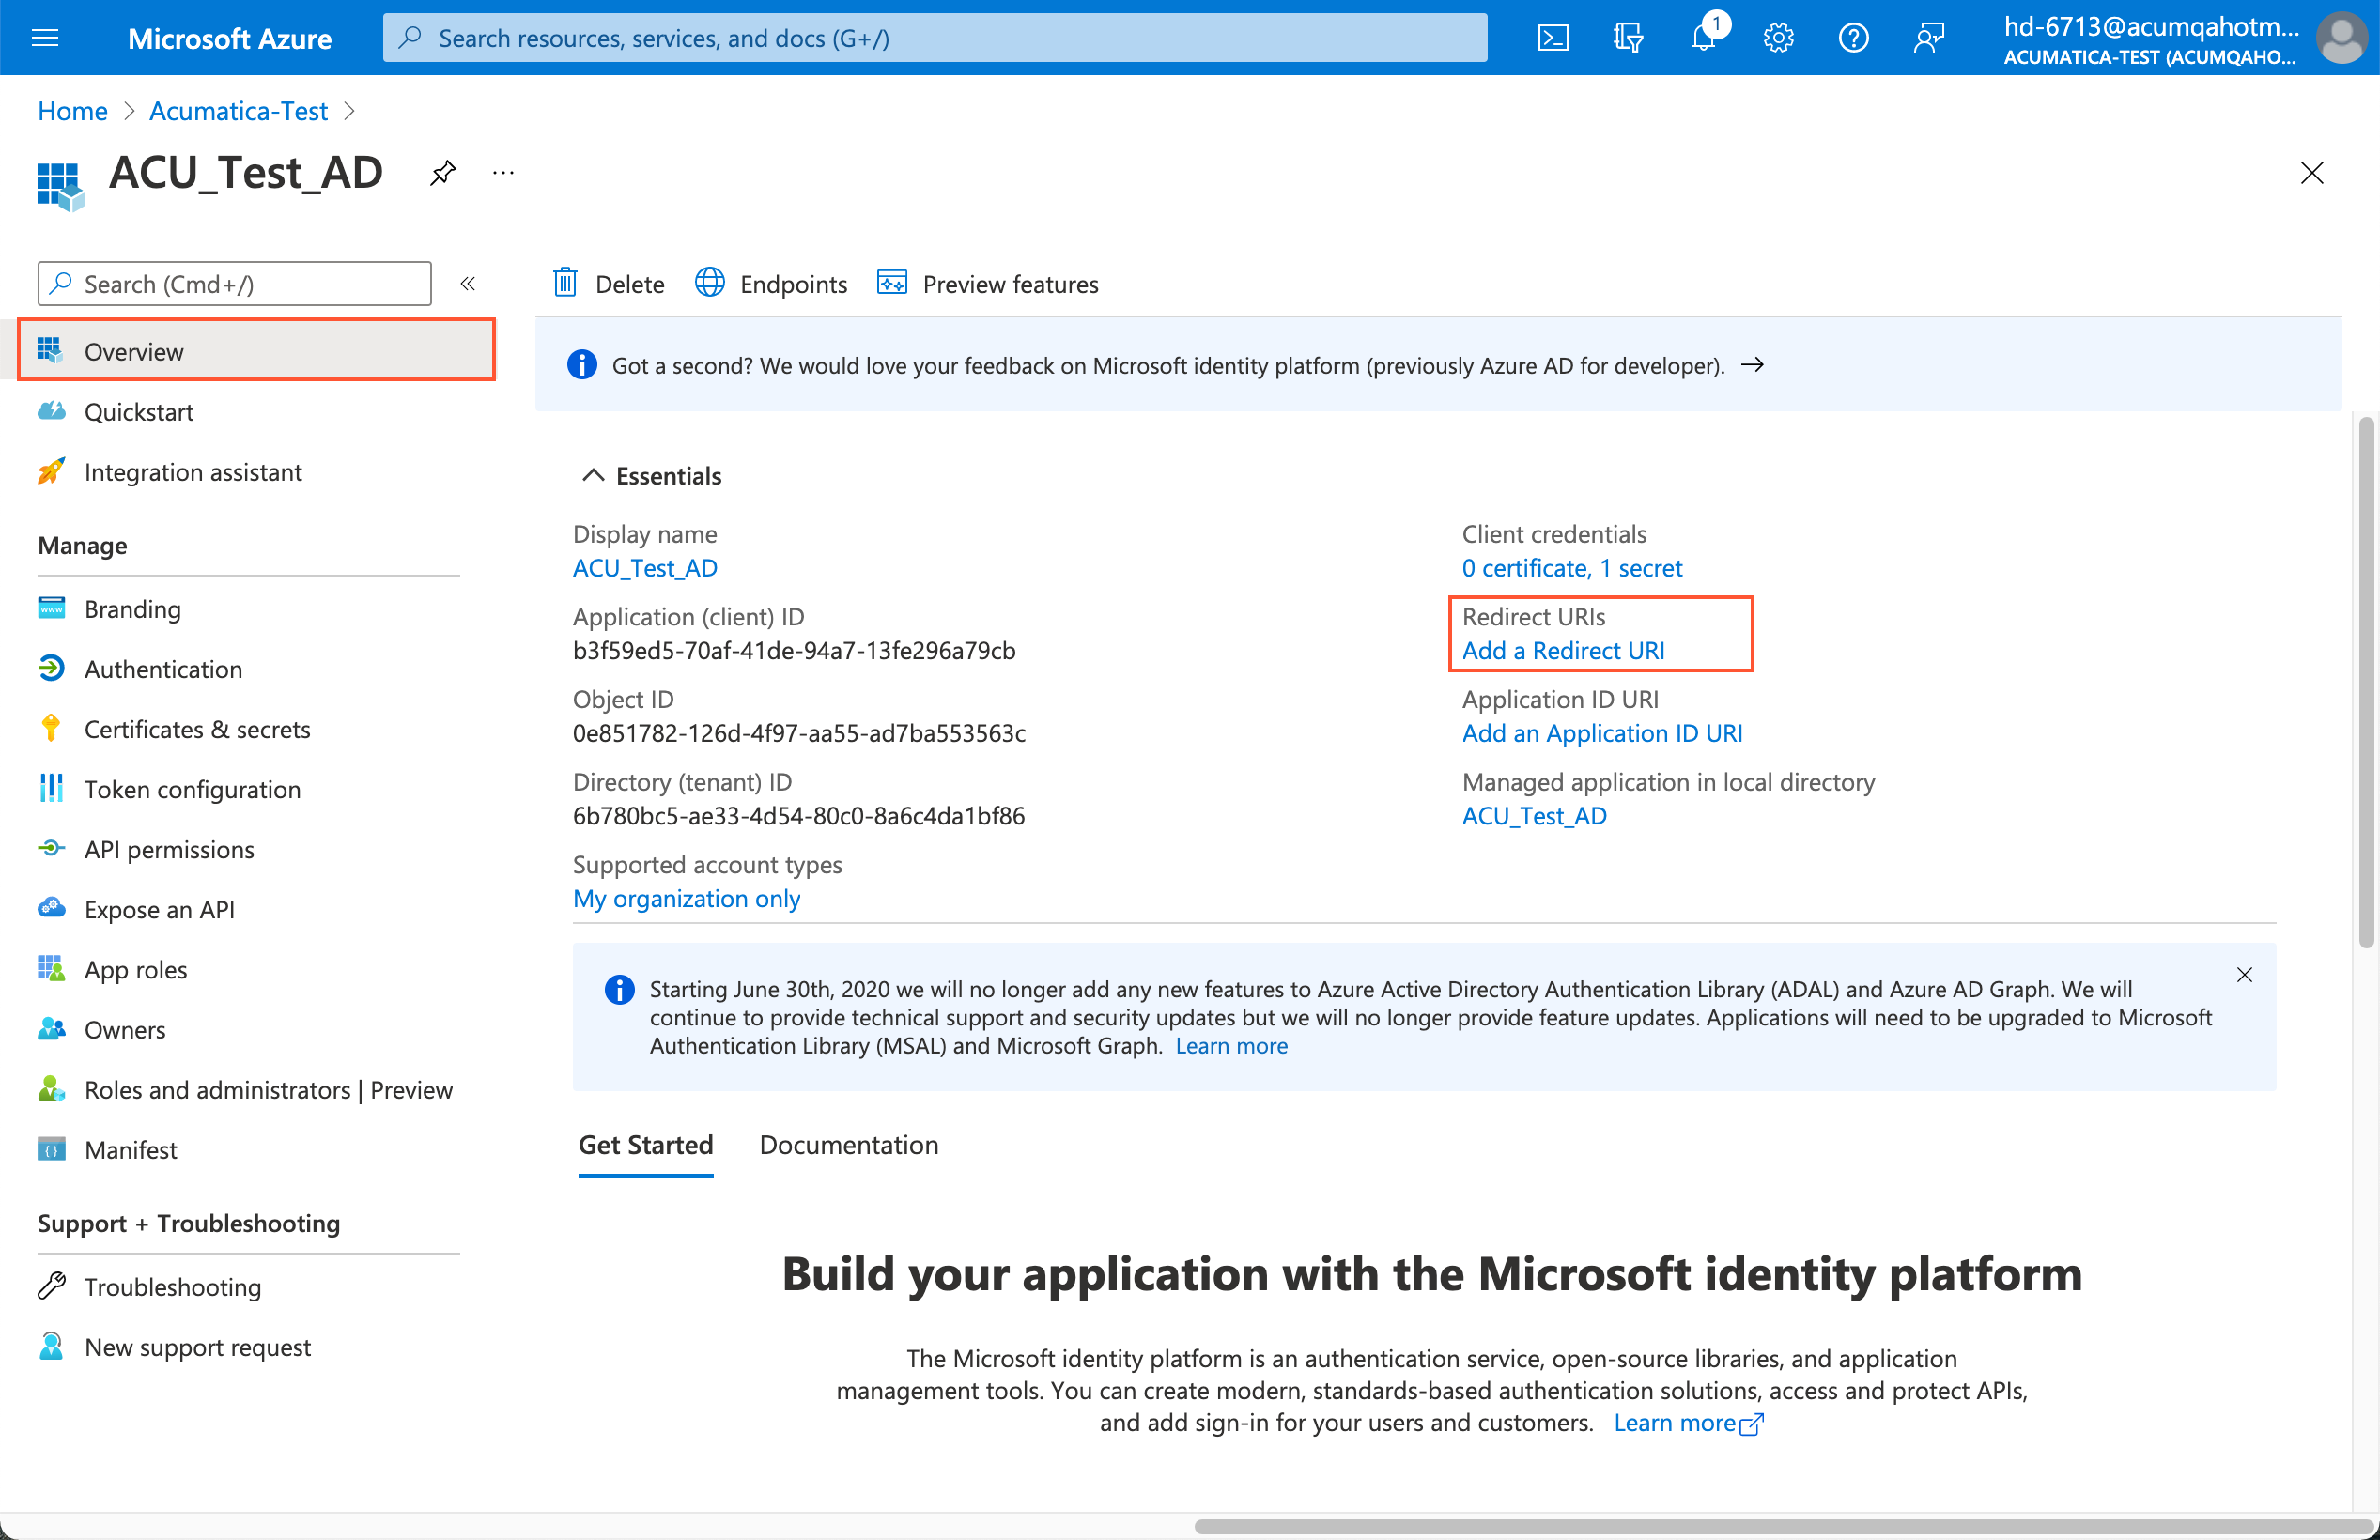
- In the Authentication pane, click Add a platform in the Platform configurations section.
- In the Configure platforms pane, click Web
(see the following screenshot).
Figure 16. Microsoft Azure: Selection of the web platform 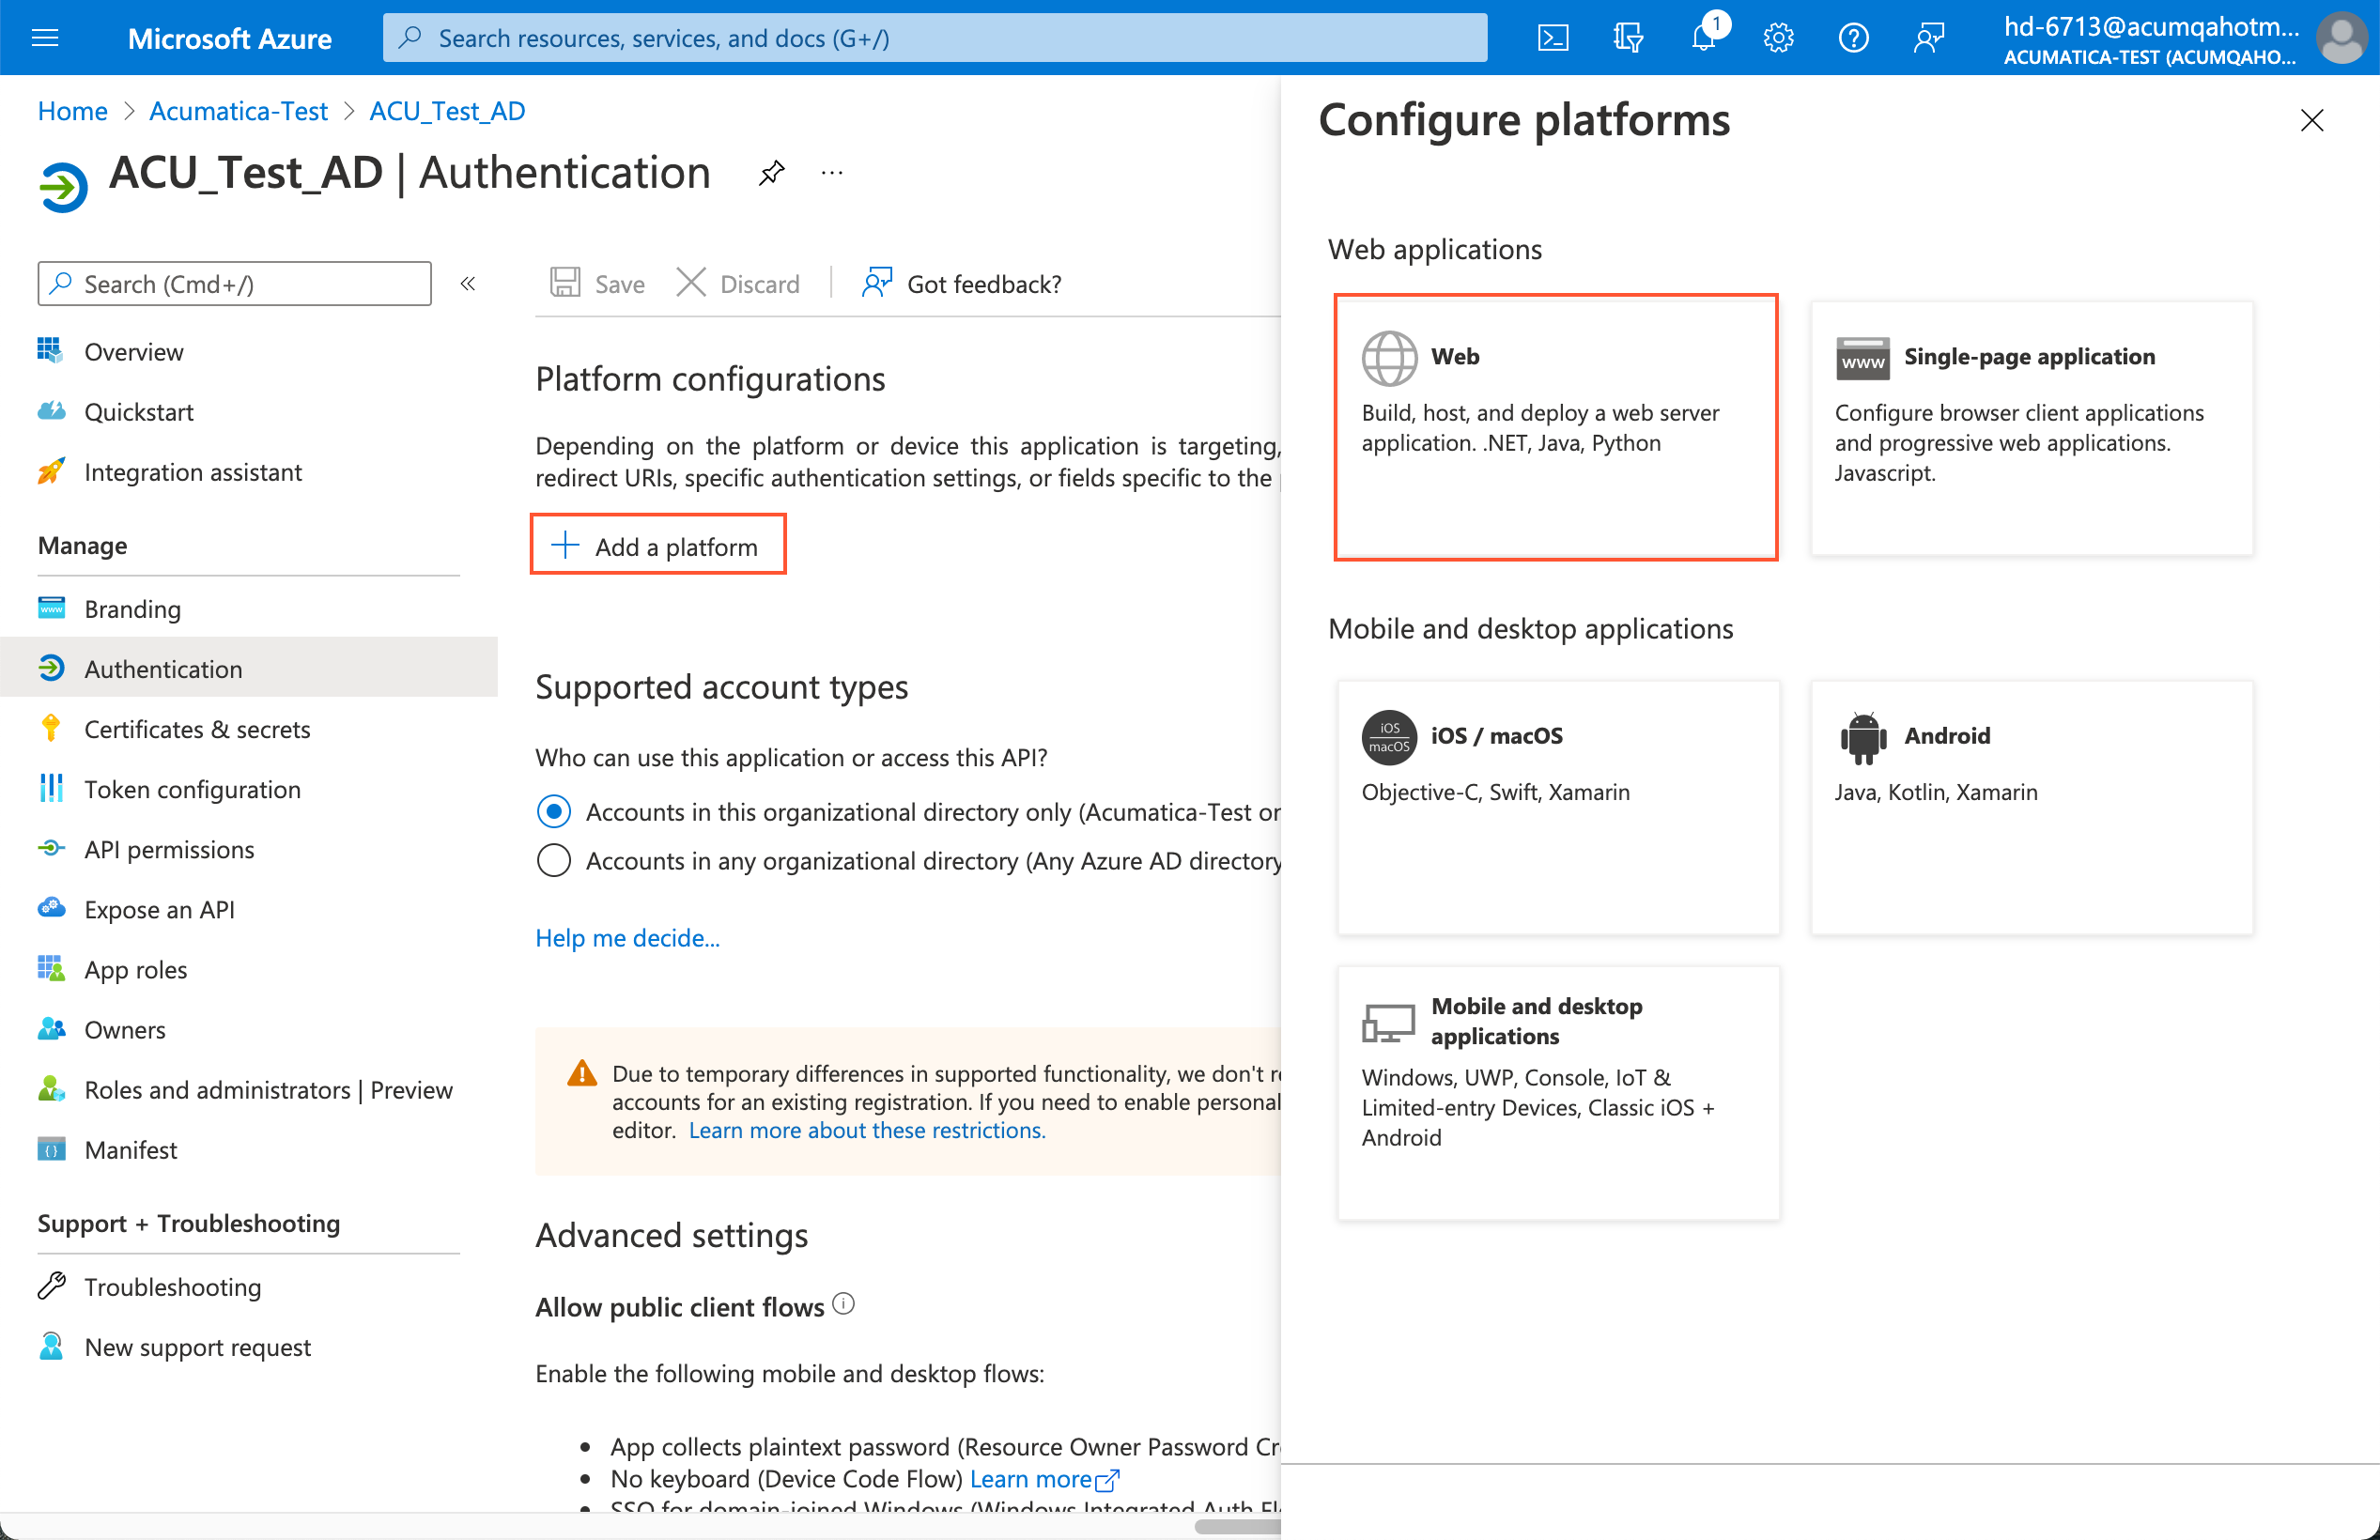
- In the Configure Web pane, under the Redirect
URIs section, type the URI of your MYOB Acumatica instance—that is,
Full_Acumatica_Instance_URL. For example, it could be https://myobsupport-sso-demo.myobadvanced.com or http://localhost/MYOBAcumatica192000078.Figure 17. Microsoft Azure: Redirect URI configuration 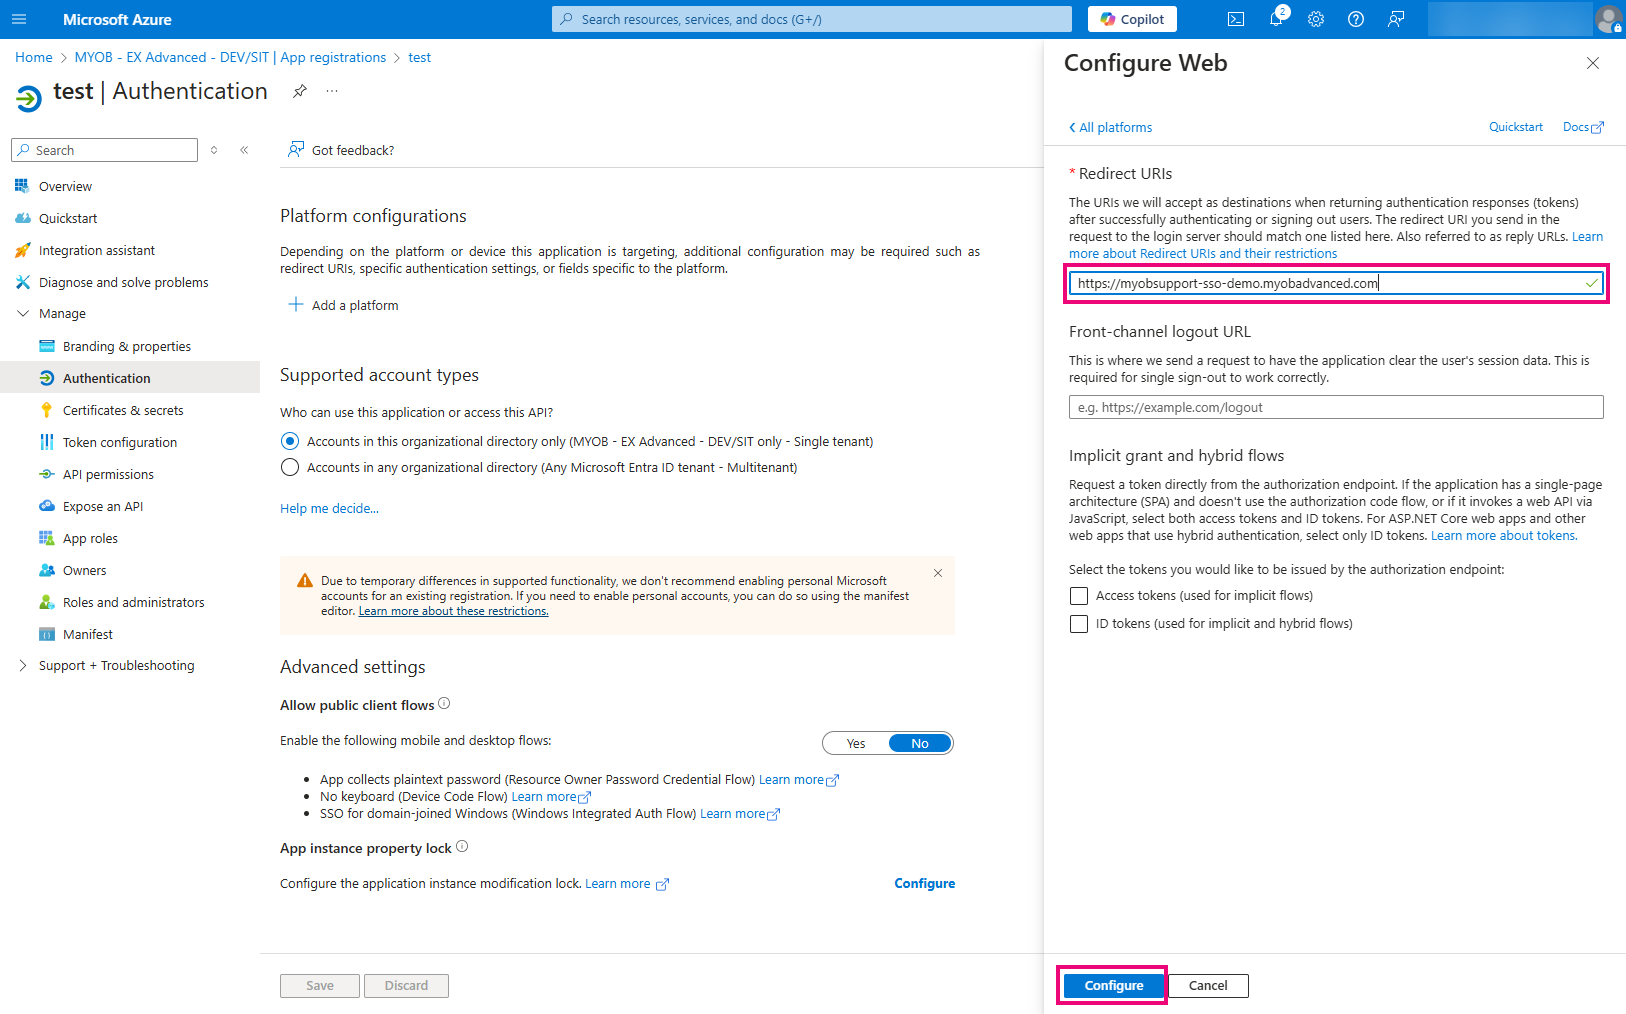
- Click Configure, as shown in the previous screenshot.
You have specified the redirect URI of your MYOB Acumatica instance. The configuration of your Azure instance for integration with your MYOB Acumatica instance is complete.
Now you can enable integration with Microsoft Entra ID for your MYOB Acumatica instance, as described in To Enable Microsoft Entra ID in MYOB Acumatica.