
Sales Prices: To Explore Warehouse-Specific Prices
In this activity, you will learn how to define sales prices for a particular warehouse.
Story
Suppose that the sales manager of the SweetLife company decided that on January 30, 2025, the company will start selling one of its products (a 96-ounce jar of lemon jam, defined in the system as LEMJAM96) from the Wholesale warehouse (WHOLESALE) at special prices.
Acting as SweetLife's accountant, you need to define the sales price of the LEMJAM96 stock item for this particular warehouse effective on the specified date. You also need to record the sale of 10 jars of lemon jam, 5 of which are sold from the Wholesale warehouse.
Configuration Overview
In the U100 dataset, the following tasks have been performed to support this activity:
- On the Warehouses (IN204000) form, the WHOLESALE and RETAIL warehouses have been created.
- On the Stock Items (IN202500) form, the LEMJAM96 stock item has been created.
- On the Units of Measure (CS203500) form, the PIECE unit of measure has been created.
- On the Customer Price Classes (AR208000) form, the LOCAL customer price class has been created.
- On the Customers (AR303000) form, the GOODFOOD customer has been created and assigned to the LOCAL customer price class.
Process Overview
On the Sales Prices (AR202000) form, you will first view sales prices defined for a particular warehouse. By using the same form, you will define a sales price of a particular item from a particular warehouse (that is, a warehouse-specific sales price).
To test this configuration, you will then create a sales order on the Sales Orders (SO301000) form, add lines to it (at least one for the item being sold from the particular warehouse for which you have added the sales price, and at least one for the item at another warehouse), and review the sales prices the system inserts for these lines.
System Preparation
To prepare the system, do the following:
- Launch the MYOB Acumatica website with the U100 dataset preloaded, and sign in to the system as an accountant by using the johnson username and the 123 password.
- In the info area, in the upper-right corner of the top pane of the MYOB Acumatica screen, make sure that the business date in your system is set to 1/30/2025. If a different date is displayed, click the Business Date menu button and select 1/30/2025. For simplicity, in this lesson, you will create and process all documents in the system on this business date.
- On the Company and Branch Selection menu, also on the top pane of the MYOB Acumatica screen, make sure that the SweetLife Head Office and Wholesale Center branch is selected. If it is not selected, click the Company and Branch Selection menu button to view the list of branches that you have access to, and then click SweetLife Head Office and Wholesale Center.
Step 1: Viewing Sales Prices for a Particular Warehouse
To view the sales prices that have been defined for the WHOLESALE warehouse, do the following:
- Open the Sales Prices (AR202000) form.
- In the Warehouse box of the Selection area, select
WHOLESALE.
Notice that the table shows no records because no sales prices that are specific to this warehouse have been defined in the system.
Step 2: Defining a Sales Price of a Particular Item at the Wholesale Warehouse
To create a sales price for the LEMJAM96 stock item at the Wholesale warehouse, do the following:
- On the Sales Prices (AR202000) form, click
Add Row on the table toolbar, and specify the
following settings in the added row:
- Price Type: Base
- Inventory ID: LEMJAM96
- UOM: PIECE
- Warehouse: WHOLESALE
- Price: 43
- Effective Date: 1/30/2025
- On the form toolbar, click Save.
- In the Selection area, select LEMJAM96 in the Inventory ID box, and clear the value in the Warehouse box. Review the prices that are defined in the system for the LEMJAM96 item.
Now in the Price column, two prices are shown: the LEMJAM96 price (for which the warehouse is not specified) of $49.49, and the LEMJAM96 price (for which the WHOLESALE warehouse is specified) of $43.00.
Step 3: Creating a Sales Order
To make sure the system is inserting a different price for the item when it is sold from the WHOLESALE warehouse than when it is sold from another warehouse, you will create a sales order with two lines from different warehouses. Do the following:
- Open the Sales Orders (SO301000) form.
- On the form toolbar, click Add New Record, and specify
the following settings in the Summary area:
- Order Type: SO
- Customer: GOODFOOD
- Date: 1/30/2025
- Description: Lemon jam 96 oz.
- On the table toolbar of the Details tab, click
Add Row, and specify the following settings for the
first order line:
- Branch: HEADOFFICE
- Inventory ID: LEMJAM96
- Warehouse: WHOLESALE
- UOM: PIECE
- Quantity: 5
Notice the value in the Unit Price column. Because you specified the WHOLESALE warehouse, the system has inserted the unit price ($43) that you have specified for this warehouse in Step 2, as shown in the following screenshot.
Figure 1. Unit price updated based on the warehouse-specific price of the LEMJAM96 stock item 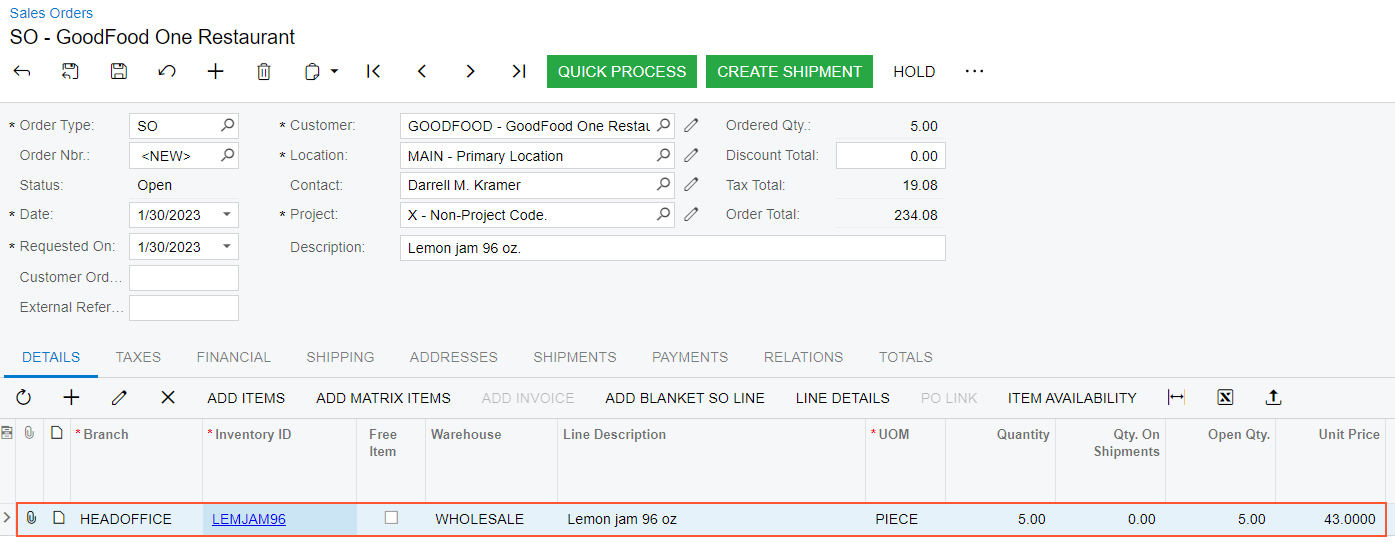
- On the table toolbar of the Details tab, click
Add Row, and specify the following settings for the
second order line:
- Branch: HEADOFFICE
- Inventory ID: LEMJAM96
- Warehouse: RETAIL
- UOM: PIECE
- Quantity: 5
Notice the value in the Unit Price column, which is shown in the following screenshot. Because no sales price has been specified for this stock item that is specific to the RETAIL warehouse, the system has inserted the base price for this stock item ($49.49).
Figure 2. Base price and warehouse-specific price of the LEMJAM96 stock item 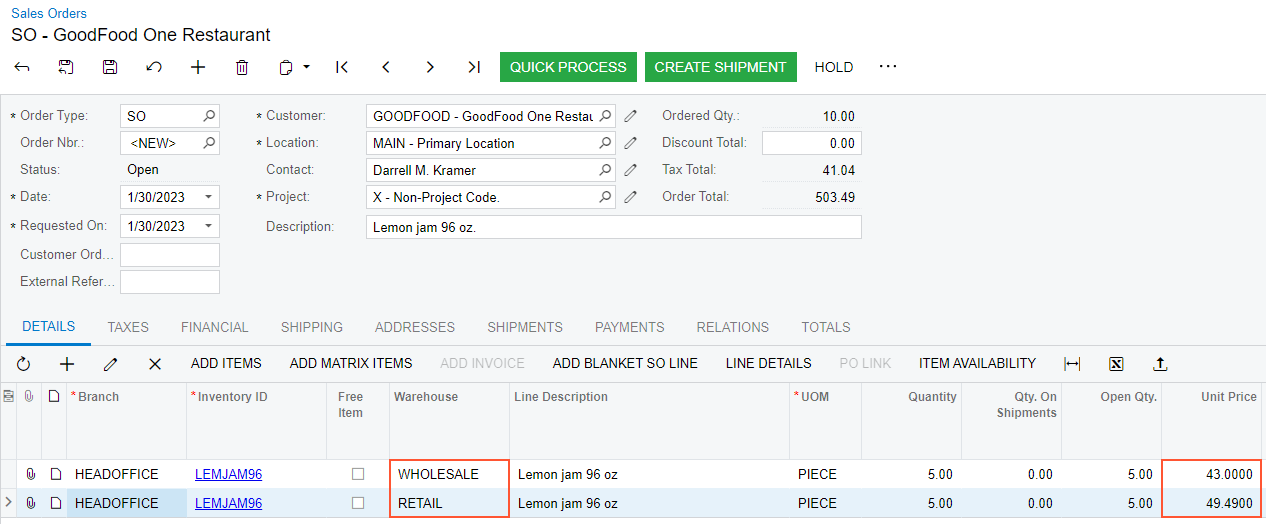
- On the form toolbar, click Save to save the sales order.