Consolidated Financial Statement: Creating a Customized Report
The following activity will walk you through the process of creating a consolidated financial statement for the SweetLife Fruits & Jams and SweetLife Canada companies.
Story
Suppose that the account balances of the SweetLife Canada company have been translated from Canadian dollars (the company's base currency) into U.S. dollars (the base currency of the parent company).
Acting as Kimberly Gibbs, an employee who has access to both companies, you need to create an analytical report based on the Profit & Loss report. The created report will include the financial data of both SweetLife companies—SweetLife U.S. and SweetLife Canada.
Configuration Overview
In the U100 dataset, the following configuration task has been performed to prepare the system for this activity to be performed:
On the Enable/Disable Features (CS100000) form, the Multibranch Support, Multicompany Support, Customer and Vendor Visibility Restriction, Multicurrency Accounting, and Multiple Base Currencies features have been enabled.
Process Overview
In this activity, you will first create a copy of the predefined Profit & Loss (GL635000) report by copying its row set, column set, and report definition. Then you will create a unit set so that you can filter the displayed data by company and to review the consolidated data for the entire SweetLife company.
System Preparation
To prepare the system, do the following:
- Launch the MYOB Acumatica website, and sign in to a company with the U100 dataset preloaded. You should sign in as Kimberly Gibbs by using the gibbs username and the 123 password.
- On the Company and Branch Selection menu, on the top pane of the MYOB Acumatica screen, select the SweetLife Canada branch.
- In the company to which you are signed in, be sure that you have configured the SweetLife Canada company, as described in Multiple Base Currencies: Implementation Activity, which is a prerequisite activity.
- Make sure that you have prepared and released a translation of SweetLife Canada balances into USD, as described in Consolidated Financial Statement: Performing a Translation, which is a prerequisite activity.
Step 1: Copying the Row Set of the Report
To copy the row set of the predefined Profit & Loss (GL635000) report, do the following:
- On the Row Sets (CS206010) form, open the row set with the DPL code.
- On the form toolbar, click Copy Row Set.
- In the New Row Set Code dialog box, which is opened, type CONSDPL in the New Code box, and click Copy. The system closes the dialog box and returns you to the form.
- In the Description box of the Summary area, type SweetLife Consolidated P&L.
- On the form toolbar, click Save.
Step 2: Copying the Column Set of the Report
To copy the column set of the predefined Profit & Loss (GL635000) report, do the following:
- On the Column Sets (CS206020) form, open the column set with the DPLP code.
- On the form toolbar, click Copy Column Set.
- In the New Column Set Code dialog box, which is opened, type CONSDPLP in the New Code box, and click Copy. The system closes the dialog box and returns you to the form.
- In the Description box of the Summary area, type SweetLife Consolidated P&L.
- On the form toolbar, click Save.
Step 3: Copying the Report Definition of the Report
To copy the report definition of the predefined Profit & Loss (GL635000) report, do the following:
- On the Report Definitions (CS206000) form, open the report definition with the DPLP code.
- On the form toolbar, click Copy Report.
- In the New Report Code dialog box, which is opened, specify DPLPCONS in the New Code box, and click Copy. The system closes the dialog box and returns you to the form; you are now working with the copied version of the report with the DPLPCONS code.
- In the Report Definition section, change the settings of
the report to the following:
- Description: SweetLife Consolidated Profit & Loss
- Row Set: CONSDPL
- Column Set: CONSDPLP
- In the Site Map section, specify the following settings
to add your report to the site map:
- Make Visible on the UI: Selected
- Title: SweetLife Consolidated Profit & Loss
- Workspace: Finance
- Category: Financial Statements
- In the Default Data Source section, clear the Request check box right of the Ledger box.
- On the form toolbar, click Save.
You have created an ARM report as a copy of the existing Profit & Loss report. Next, you will add a unit set to the new SweetLife Consolidated Profit & Loss report to be able to switch between the consolidated financial information of SweetLife company and the consolidated financial information of both SweetLife Fruits & Jams and SweetLife Canada.
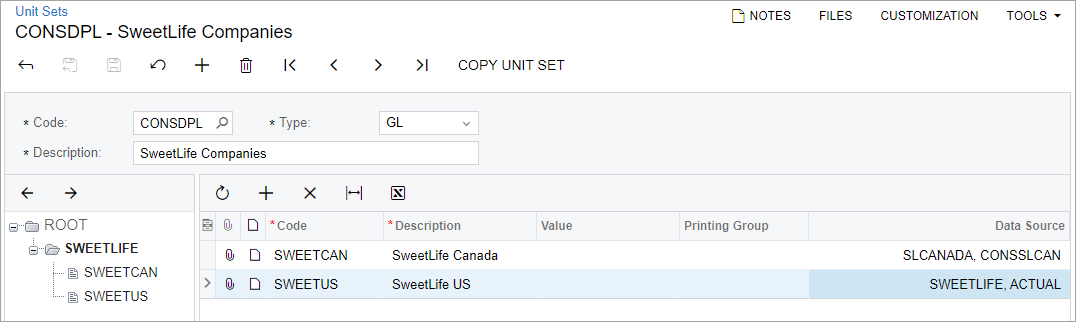
Step 4: Configuring the Unit Set
To configure a unit set that will give users the ability to filter data in the report by company, do the following:
- Open the Unit Sets (CS206030) form.
- On the form toolbar, click Add New Record, and in the
Summary area, specify the following settings:
- Code: CONSDPL
- Description: SweetLife Companies
- In the left pane, select the ROOT node of the unit set, which is the topmost system node.
- In the table on the right, click Add Row on the table
toolbar, and specify the following settings in the added row:
- Code: SWEETLIFE
- Description: SweetLife Consolidated
- Value: =@SWEETUS + @SWEETCAN
When you run the report, the topmost unit of the left pane below ROOT is applied to the report by default.
Note: You can use the arrow buttons in the toolbar of the left pane to change the position of a unit in the hierarchy.You will use the SWEETLIFE unit to show the consolidated account balances of the SweetLife and SweetLife Canada companies. You will present the data for the SweetLife U.S. and SweetLife Canada companies as child units of SWEETLIFE.
- On the form toolbar, click Save to save your changes to the unit set. The SWEETLIFE unit appears in the left pane.
- In the left pane, select the SWEETLIFE unit.
- In the table in the right pane, add two rows with the settings shown in the
following table.
Code Description Data Source SWEETCAN SweetLife Canada - Company: SLCANADA
- Ledger: CONSSLCAN
SWEETUS SweetLife U.S. - Company: SWEETLIFE
- Ledger: ACTUAL
- On the form toolbar, click Save to save your changes.
You have created and configured the unit set shown in the following screenshot.
Step 5: Applying the Unit Set to the Report
To apply the unit set that you have created in the previous step, do the following:
- Open the Report Definitions (CS206000) form.
- In the Code box of the Summary area, select DPLPCONS.
- In the Unit Set box, select CONSDPL to apply the unit set.
- In the Start Unit box, select SWEETLIFE - SweetLife Consolidated.
- On the form toolbar, click Save to save your changes to
the report, and then click Preview.
On the Report Parameters tab of the pop-up window that opens, notice that you need to specify the Financial Period parameter to run the report.
Step 6: Running the SweetLife Consolidated Profit & Loss Report
To run the SweetLife Consolidated Profit & Loss report, do the following:
- On the Main menu, click Finance, and open the SweetLife Consolidated Profit & Loss report under the Financial Statements category.
- On the Report Parameters tab, select 01-2023 in the Financial Period box, and click
Run Report.
The SweetLife Consolidated Profit & Loss report opens with the financial data displayed for the entire SweetLife company.
- On the form toolbar, click the Groups button to open the left pane with the
report units. Notice that the SweetLife Consolidated unit is selected by
default, as shown in the following screenshot.
Figure 2. The consolidated financial statement of SweetLife 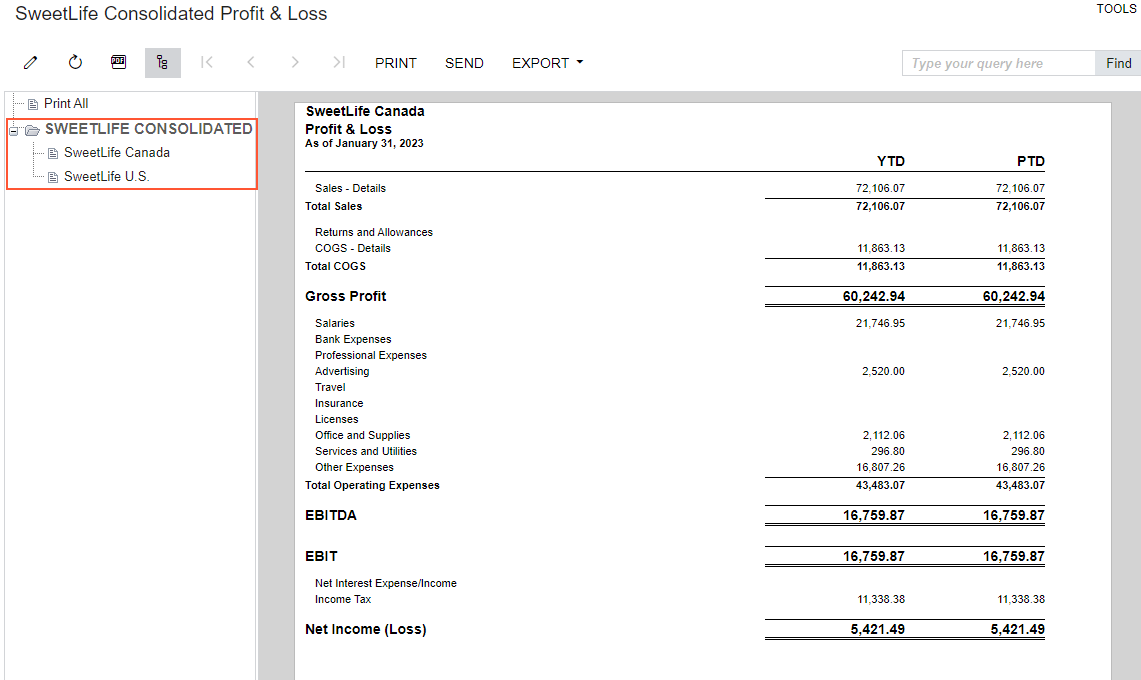
- In the left pane, select SweetLife Canada, and review the report data related to the selected company.
- In the left pane, select SweetLife U.S., and review the report data related to the selected company.