
Budget vs. Actual ARM Report: Process Activity
The following activity will walk you through the process of preparing and running an ARM report that compares budgeted and actual amounts.
Story
Suppose that the management of the SweetLife Fruits & Jams company wants to compare the budget for 2026 with the actual figures for this financial year.
Acting as a system administrator, you need to prepare and run the Budget vs. Actual ARM report.
Configuration Overview
In the U100 dataset, the following tasks have been performed for the purposes of this activity:
- On the Companies (CS101500) form, the SWEETLIFE company has been defined.
- On the Branches (CS102000) form, the HEADOFFICE branch of the SWEETLIFE company has been created.
- On the Ledgers (GL201500) form, a ledger with the ACTUAL name and the Actual type has been defined.
- On the Report Definitions (CS206000) form, the DPL report has been created.
- On the Column Sets (CS206020) form, the DPLP column set has been configured.
Process Overview
In this activity, you will prepare the actual data for SweetLife by uploading an Excel file on the Journal Transactions (GL301000) form. On the Column Sets (CS206020) form, you will copy the column set of an existing ARM report and update its settings. On the Report Definitions (CS206000) form, you will copy the report definition of an existing report, update the report, and publish it. Finally, you will run the SweetLife: Actual vs. Budget (RM000001) report and review it.
System Preparation
Before you begin performing the steps of this activity, do the following:
- Launch the MYOB Acumatica website with the U100 dataset preloaded, and sign in as a system administrator Kimberly Gibbs by using the gibbs username and the 123 password.
- On the Company and Branch Selection menu on the top pane of the MYOB Acumatica screen, make sure that the SweetLife Head Office and Wholesale Center branch is selected. If it is not selected, click the Company and Branch Selection menu button to view the list of branches that you have access to, and then click SweetLife Head Office and Wholesale Center.
Step 1: Preparing the Actual Data of SweetLife for 2026
To prepare the actual data of SweetLife for 2026, you need to open the remaining closed financial periods, and then create and release a list of transactions. Do the following:
- Open the Manage Financial Periods (GL503000) form.
- In the Selection area, specify the following settings:
- Company: SWEETLIFE
- Action: Open
- To Year: 2026
- In the table, select the check boxes next to 11-2026 and 12-2026.
- On the form toolbar, click Process.
- On the Journal Transactions (GL301000) form, add a new record.
- In the Summary area, specify the following settings:
- Branch: HEADOFFICE
- Ledger: ACTUAL
- Transaction Date: 12/31/2026
- Post Period: 12-2026
- Description: Transactions for 2026
- On the Details tab, click Load Records from File on the table toolbar.
- In Step 1 of the Import Data wizard that opens, click Upload File, and select the HEADOFFICE_2026_Transactions.xlsx file.
- In Step 2 of the wizard, leave the default settings, and click Next.
- In Step 3 of the wizard, leave all the default settings and click Finish.
- On the form toolbar of the Journal Transactions form, click Remove Hold.
- On the form toolbar, click Release.
Step 2: Copying and Updating the Column Set
To copy a column set of an existing ARM report and update its settings, do the following:
- Open the Column Sets (CS2060P2) form.
- In the Code
column, click
DPLP.
This is the report definition code of the Profit and Loss report, whose column set you are going to copy.
- On the form toolbar of the Column Sets (CS206020) form, which is opened, click Copy Column Set.
- In the Copy Column Set dialog box, which appears, enter MYPL in the New Code box.
- In the Description box, enter P&L Actual vs. Budget and click Save.
- On the form toolbar, click Save to save your changes.
- In the left pane, click YTD in column B.
- In the right pane, replace the ='YTD' value with ='Actual'.
- In the left pane, click PTD in column C.
- In the right pane, replace the ='PTD' value with ='Budget'.
- On the form toolbar, click Save.
- In the left pane, click Ending Balance in column B. In
the Data Source section on the
Data tab, specify the following settings:
- Ledger: ACTUAL
- Amount Type: Ending Balance
- On the form toolbar, click Save.
- In the left pane, click Turnover in column C. In the
Data Source section on the
Data tab, specify the following settings:
- Ledger: BUDGET
- Amount Type: Ending Balance
- On the form toolbar, click Save to save your changes. The
following screenshot illustrates the changes to the column set.
Figure 1. Changes to the column set 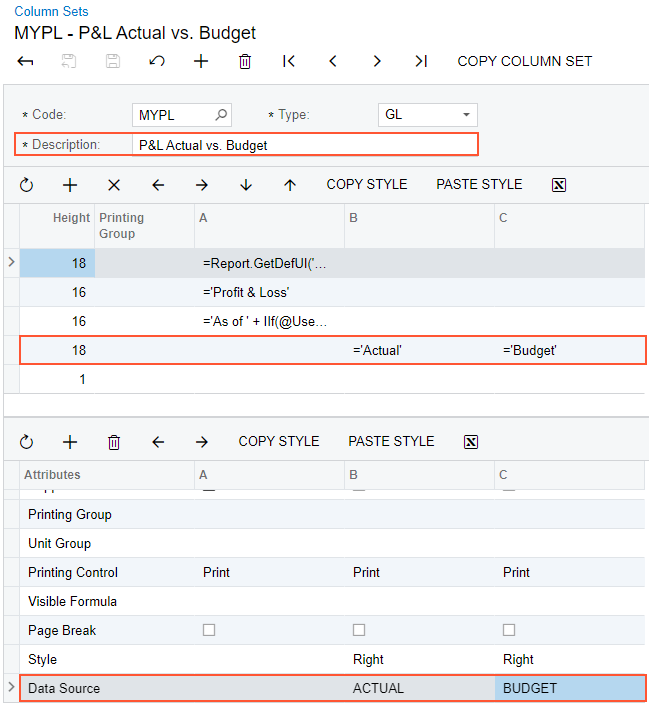
Step 3: Copying and Updating the Report Definition
To copy an existing report definition and update its settings, do the following:
- Open the Report Definitions (CS206000) form.
- In the Code box, select DPL.
- On the form toolbar, click Copy Report.
- In the Copy Report dialog box, which opens, specify MYPL in the New Code box, and click Save. This closes the dialog box; you are now working with the copied version of the report with the MYPL code.
- On the form toolbar, click Save to save the changes.
- In the Report Definition section, specify the following
settings:
- Description: P&L Actual vs. Budget
- Column Set: MYPL - P&L Actual vs. Budget
- In the Default Data Source Settings section, specify the
following settings:
- Company: SWEETLIFE
- Request (right of the Company box): Cleared
- Request (right of the Ledger box): Cleared
- Start Branch: HEADOFFICE
- Request (right of the Start Branch box): Selected
- Request (right of the Start Period box): Selected
- In the Site Map section, specify the following settings
to add your report to the site map:
- Title: P&L: Actual vs. Budget
- Workspace: Finance (copied from the predefined report)
- Category: Financial Statements (copied from the predefined report)
- On the form toolbar, click Save to save your changes. The
following screenshot illustrates the changes to the report definition.
Figure 2. Changes to the report definition 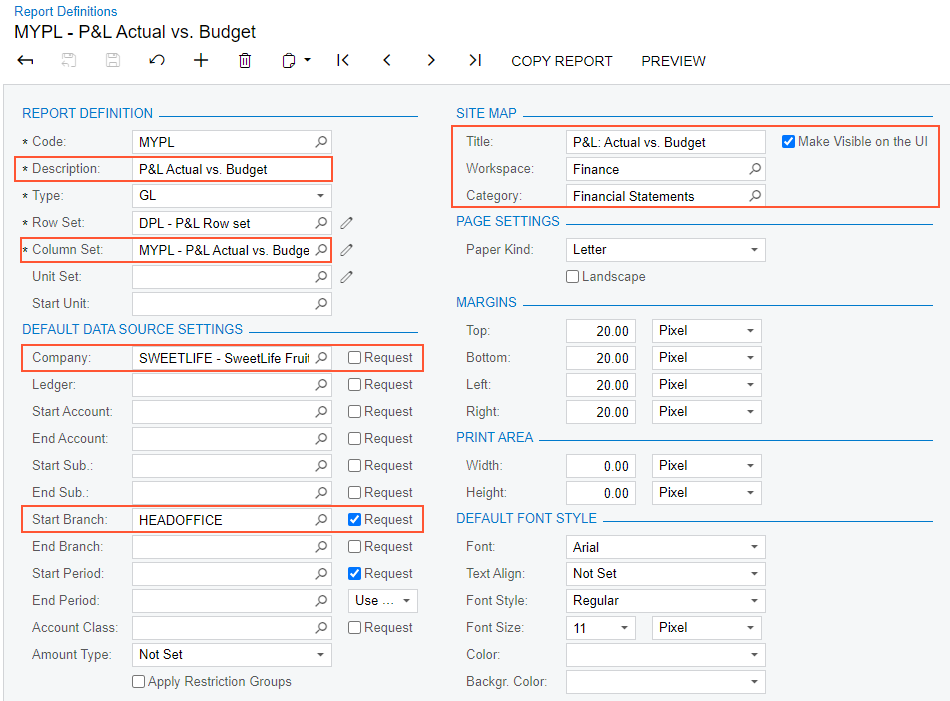
Step 4: Publishing the ARM Report
To publish the ARM report, do the following:
- While you are still viewing the report definition on the Report Definitions (CS206000) form, on the form toolbar, click Publish to the UI.
- In the Publish to the UI dialog box, which opens, specify
the following settings:
- Site Map Title: P&L: Actual vs. Budget (inserted automatically)
- Workspace: Finance (inserted automatically)
- Category: Financial Statements (inserted automatically)
- Screen ID: RM.00.00.01 (inserted automatically)
- Set to Granted for All Roles: Selected
- Click Publish.
- Refresh the page.
Step 5: Running the ARM Report
To run the P&L: Actual vs. Budget report, do the following:
- In the MYOB Acumatica main menu, click the Finance workspace menu item to open the Finance workspace. Under the Financial Statements category, click P&L: Actual vs. Budget to open the report form of the report that you have created.
- On the Report Parameters tab, specify the following
parameters:
- Start Branch: HEADOFFICE
- Financial Period: 12-2026
- On the form toolbar, click Run Report.
- In the report that is displayed, review the amounts in the
Actual and Budget columns of
the Profit & Loss report generated for the SweetLife Fruits &
Jams company, as illustrated in the following screenshot.
Figure 3. The Actual vs. Budget report 