
Drawing Logs: Process Activity
This activity will walk you through the process of working with a drawing log.
Story
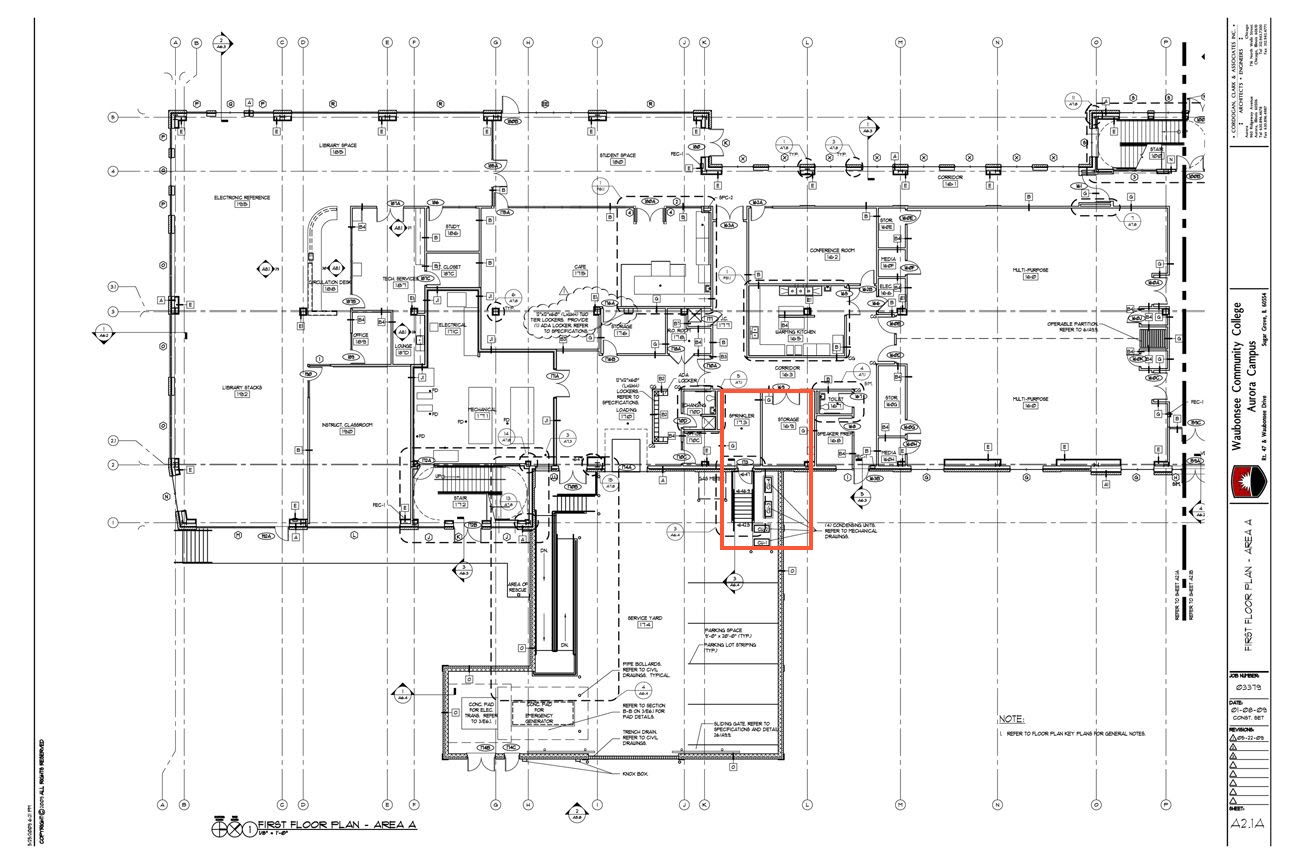
Suppose that the ToadGreen architect has prepared a floor plan blueprint for the Beach Hotel and Condominiums, the project that the ToadGreen company is working on. Then the architect has submitted a request for information about the plan of the first floor to make sure that the current location of the storage room (next to the service elevator) is correct. Based on the submitted request for information, a new revision of the blueprint should be created and linked to the original drawing, and the original blueprint must be marked as obsolete.
Acting as the architect, you will process all required documents in the system with the assumption that these changes will not affect the schedule, cost, and design.
Configuration Overview
In the U100 dataset, the following tasks have been performed to support this activity:
- The Construction and Construction Project Management features have been enabled in the Projects group of features on the Enable/Disable Features (CS100000) form.
- On the Project Management Classes (PJ201000) form, the DOCRFI class has been defined with the Request for Information check box selected in the Use For section of the Summary area.
- On the Projects (PM301000) form, the HOTEL project has been created with multiple project tasks.
- On the Employees (EP203000) form, the EP00000033 – Ellen Watson and EP00000013 – Anna Johnson employee records have been created.
Process Overview
You will create a drawing log with the initial floor plan on the Drawing Log (PJ303000) form. You will then create a request for information on the Request for Information (PJ301000) form and send an email to the person responsible for receiving the needed information. After that, based on the answer to the request for information that you have received, you will create a new drawing log on the Drawing Log (PJ303000) form.
System Preparation
To prepare to perform the instructions of this activity, do the following:
- As a prerequisite to this activity, prepare the system for using drawing logs by completing the Drawing Logs: Implementation Activity.
- Launch the MYOB Acumatica website, and sign in to a company with the U100 dataset preloaded. You should sign in as an architect by using the rsmith username and the 123 password.
- In the info area, in the upper-right corner of the top pane of the MYOB Acumatica screen, make sure that the business date in your system is set to 3/15/2025. If a different date is displayed, click the Business Date menu button, and select 3/15/2025 on the calendar. For simplicity, in this activity, you will create and process all documents in the system on this business date.
- Download the Floor_Plan_Revision_1.jpg and Floor_Plan_Revision_2.jpg files to your device.
Step 1: Creating a Drawing Log
To create a drawing log, do the following:
- Open the Drawing Logs (PJ403000) form.
- On the form toolbar, click Add New Record. The system creates a new drawing log and opens it on the Drawing Log (PJ303000) form.
- In the Summary area of the Drawing Log form, specify the
following settings:
- Drawing Number: 1
- Description: Floor plan blueprint
- Title: Floor plan
- Project: HOTEL
- Discipline: Architectural
- Owner: Ellen Watson
- Click Save on the form toolbar.
In the Summary area, note that the status of the drawing log is Active and that the Latest Revision check box is selected for the drawing log to mark it as up to date.
- On the table toolbar of the Drawings tab, click Files.
- In the Files dialog box, which opens, click Browse, select the Floor_Plan_Revision_1.jpg file, click Upload, and close the dialog box. Notice that the line with the uploaded drawing has appeared in the table.
Step 2: Linking a Request for Information to the Drawing Log
To create a request for information, do the following.
- While you are still viewing the drawing log that you have created on the Drawing Log (PJ303000) form, click Create RFI on the More menu.
- On the Request for Information
(PJ301000) form, which opens with the new request for information, specify the
following settings in the Summary area:
- Summary: Storage room should be next to service elevator
- Class ID: DOCRFI
- Owner: Ellen Watson
- Project: HOTEL (inserted automatically)
- Contact: Anna Johnson
- On the Details tab, enter the following text:
- Question pane: Is the storage room next to the service elevator?
- Answer pane: No. The blueprint should be updated.
- On the Additional Info tab, leave the Schedule Impact, Cost Impact, and Design Change check boxes cleared.
- On the Drawings tab, make sure that the row with the Floor plan drawing log that you have prepared is shown.
- On the form toolbar, click Save to save the request for information.
- On the More menu, click Email.
The system opens the Email Activity (CR306015) form with the Anna Johnson contact specified in the To box. On the form title bar, notice Files (1), which indicates that the system has attached the file from the request for information to the created email.
- On the form toolbar, click Send to send the email, close the form, and return to the Request for Information form with the request for information that you have created earlier.
Step 3: Creating a Revision
To create a new revision of the drawing log with the updated floor plan, do the following:
- Open the Drawing Logs (PJ403000) form, and in the table, click the link in the Drawing Log ID column of the row with the Floor plan drawing log that you have created earlier in this activity.
- On the form toolbar of the Drawing Log (PJ303000) form, which opens with the drawing log, click Create Revision.
- In the Revision box of the Summary area, enter the number of the revision: 1.
- In the Description box, change the text to Revised floor plan blueprint.
- Save the drawing log. Notice that in the Summary area, the Original Drawing box shows a link to the initial drawing document.
- On the table toolbar of the Drawings tab, click Files.
- In the Files dialog box, which opens, click
Browse, select the Floor Plan Revision
2.jpg file, click Upload, and close the
dialog box. Notice that the Latest Revision check box is
selected for the new revision of the drawing log, as shown in the following
screenshot.
Figure 1. The new revision of the drawing log 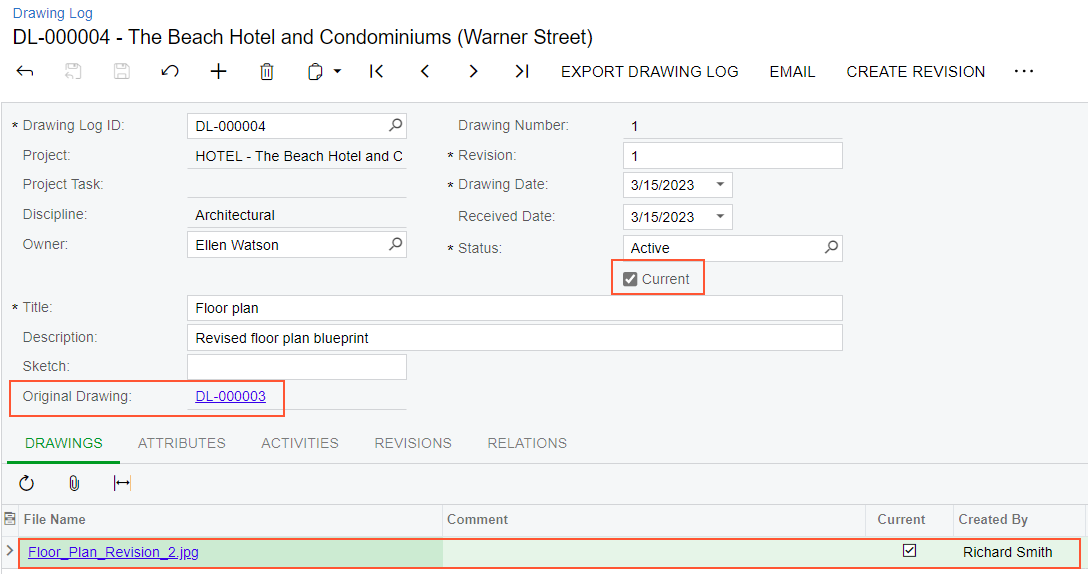
- In the Summary area, click the link in the Original Drawing box. The Drawing Log form opens with the original drawing log.
- In the Summary area of the form, select Inactive in the Status box.
- Clear the Latest Revision check box to indicate that the original drawing log is obsolete.
- On the form toolbar, click Save & Close to save your changes.
You have finished creating a new revision for a drawing log.