
Daily Field Reports: Process Activity
This activity will walk you through the process of working with a daily field report.
Story
Suppose that on April 15, 2025, Ernest Smith, a construction foreman in the ToadGreen company, spent a day on the construction site of the Italian restaurant that the company is building for the Italian Company. During the day, he has recorded the current progress of the work related to electricity installation and made notes about subcontractor activities, weather conditions, visitors, and other important information that relates to the day's work at the project site. Also, he has taken photos to support his report about weather conditions. At the end of the day, Ernest creates a daily field report, adds notes, and sends the daily field report for approval to the construction project manager.
Acting as the construction foreman, you will create and process the daily field report and add all needed information to it. Then acting as the construction project manager, you will approve the daily field report.
Configuration Overview
In the U100 dataset, the following tasks have been performed to support this activity:
- The following features have been enabled on the Enable/Disable Features
(CS100000) form:
- Construction
- Construction Project Management
- Time Management
- On the Projects (PM301000) form, the ITALIAN2 project has been created with multiple project tasks.
- On the Vendors (AP303000) form, the SUNTECH - Suntech Concrete and ACMEDO - Acme Doors & Glass subcontractors have been defined.
- On the Employees (EP203000) form, the EP00000033 - Ellen Watson employee has been defined.
- On the Customers (AR303000) form, the ITACOM - Italian Company customer has been created.
Process Overview
You will create a daily field report on the Daily Field Report (PJ304000) form. On the appropriate tabs of the form, you will then add progress worksheet lines, subcontractor activities, weather conditions, and visitors. To finish the processing of the daily field report, you will complete it to submit the report for approval. Finally, you will approve the daily field report.
System Preparation
To prepare to perform the instructions of this activity, do the following:
- As a prerequisite to the current activity, complete Daily Field Reports: To Configure Approval for Daily Field Reports.
- Launch the MYOB Acumatica website, and sign in to a company with the U100 dataset preloaded. You should sign in as a construction foreman by using the epsmith username and the 123 password.
- In the info area, in the upper-right corner of the top pane of the MYOB Acumatica screen, make sure that the business date in your system is set to 4/15/2025. If a different date is displayed, click the Business Date menu button, and select 4/15/2025 on the calendar. For simplicity, in this activity, you will create and process all documents in the system on this business date.
- Download the DFR_weather1.jpg and DFR_weather2.jpg files to your device.
Step 1: Creating the Daily Field Report
Create the daily field report as follows:
- On the Daily Field Report (PJ304000) form, add a new record.
- In the Summary area, specify the following settings:
- DFR Date: 4/15/2025 (inserted automatically)
- Project: ITALIAN2
- Project Manager: Ellen Watson (inserted automatically)
- On the form toolbar, click Save.
The daily field report is saved with the On Hold status. Now you can add the needed information to the report on the appropriate tabs of the form.
Step 2: Adding Progress Worksheet Lines
To add progress worksheet lines to the daily field report, do the following:
- While you are still viewing the daily field report on the Daily Field Report (PJ304000) form, on the Progress Worksheets tab, click Load Template on the table toolbar. The system loads three cost budget lines to the table. These lines are loaded because for these lines, Productivity Tracking is set to Template on the Cost Budget tab of the Projects (PM301000) form.
- On the table toolbar, click Add Budget Lines. In the Add Budget Lines dialog box, which opens, select the unlabeled check box for the line with the 16-200 cost code and the MATERIAL account group because you want to record the materials that have been used during the working day.
- Click Add & Close to close the dialog box and add the line to the table.
- In the Completed Quantity column, do the following:
- In the line with the 16-200 cost code and the LABOR account group, enter 15.
- In the line with the 16-200 cost code and the SUBCON account group, enter 4.
- In the line with the 16-210 cost code and the LABOR account group, enter 25.
- In the line with the 16-200 cost code and the MATERIAL account group, enter 1.
- On the form toolbar, click Save.
Step 3: Registering Subcontractor Activities
Register subcontractors’ activities in the daily field report as follows:
- While you are still viewing the daily field report on the Daily Field Report (PJ304000)
form, on the Subcontractors tab, click Add
Row on the table toolbar, and specify the following settings in
the row:
- Vendor ID: SUNTECH
- Project Task: 03
- Cost Code: 03-000
- Number of Workers: 3
- Arrived: 09:30 AM
- Departed: 06:30 PM
- Add one more row with the following settings:
- Vendor ID: ACMEDO
- Project Task: 06
- Cost Code: 06-000
- Number of Workers: 2
- Arrived: 08:00 AM
- Departed: 05:00 PM
- On the form toolbar, click Save.
Step 4: Reporting Weather Conditions
In this step, you will add records to reflect the weather conditions of the day. Do the following:
- While you are still viewing the daily field report on the Daily Field Report (PJ304000)
form, on the Weather tab, click Add
Row on the table toolbar, and specify the following settings in
the added row:
- Time Observed: 07:37 AM
- Sky: Cloudy
- Temperature: 60
- Temperature Perceived: Warm
- Precipitation Description: None
- Wind Description: None
- Site Conditions: Dry
- Delay: Cleared
- Description: Normal weather, no delay
- Save your changes.
- Add a second row, and specify the following settings:
- Time Observed: 04:30 PM
- Sky: Few Clouds
- Temperature Perceived: Mild
- Precipitation Description: None
- Wind Description: Calm
- Site Conditions: Dry
- Delay: Cleared
- Description: Warm, dry day
- Save your changes.
- In the table, at the beginning of the first row, click the button in the Files column (one of the unlabeled columns with icons as column headers) to open the Files dialog box. In the dialog box, click Browse, select the DFR_weather1.jpg file, click Upload, and close the dialog box.
- In the table, at the beginning of the second row, click the button in the Files column to open the Files dialog box. In the dialog box, click Browse, select the DFR_weather2.jpg file, click Upload, and close the dialog box.
Step 5: Recording Visitors and Completing the Report
To add records about site visitors, do the following:
- While you are still viewing the daily field report on the Daily Field Report (PJ304000) form, on the Visitors tab, click Add Row on the table toolbar.
- In the new row, specify the following settings:
- Visitor Type: Customer
- Name: Adam Smith
- Business Account: ITACOM
- Arrived: 5:00 PM
- Departed: 6:00 PM
- Purpose of Visit: Visiting construction site for progress control
- Area Visited/Inspected Entity: Basement of site
- Add a second row with the following settings:
- Visitor Type: Owner
- Name: Ellen Watson
- Arrived: 9:30 AM
- Departed: 6:00 PM
- Purpose of Visit: Review proposed changes
- Area Visited/Inspected Entity: Subfloor of site
- Description: Changes approved
- Save your changes.
- On the form toolbar, click Complete.
The system changes the report’s status to Pending Approval. Also, the system creates a progress worksheet with the On Hold status that includes the progress worksheet lines that you have added to the daily field report earlier in this activity. The reference number of the created worksheet is shown in the Worksheet Nbr. column on the Progress Worksheets tab for the lines you added.
- On the Approvals tab, make sure that Ellen Watson is specified as the approver of the daily field report.
- Sign out from the system.
Step 6: Approving the Daily Field Report
To approve the daily field report submitted by the construction foreman, Ernest Smith, perform the following steps
- Sign in as a construction project manager by using the ewatson username and the 123 password.
- On the Daily Field Report (PJ304000) form, open the daily field report that you have prepared earlier, while acting as a construction foreman.
- On the form toolbar, click Approve. On the
Approvals tab, notice that the system has changed the
approval status of the daily field report to Approved, as shown in the
following screenshot.
Figure 1. Daily field report submitted for approval 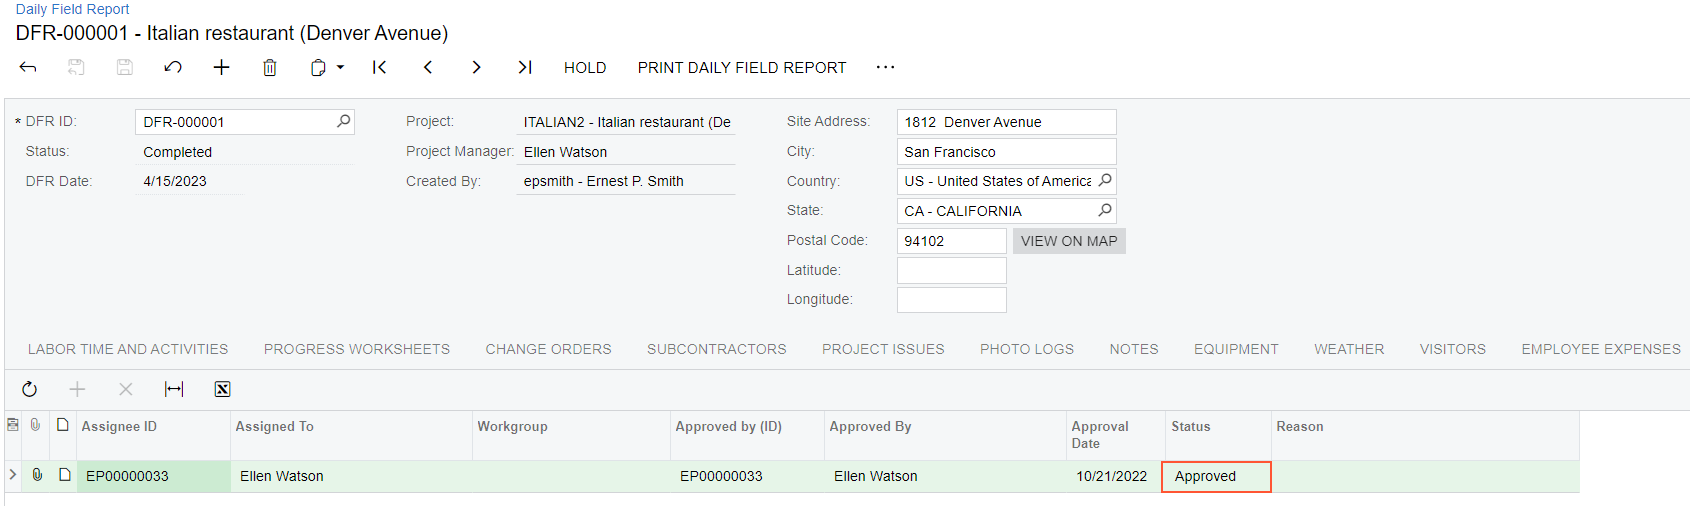
You have prepared the daily field report and approved it.