
Order Synchronization: To Configure and Import Authorize.Net Payments
The following activity will walk you through the process of configuring the system so that you can import card payments from the BigCommerce store to MYOB Acumatica and then further process them, if necessary.
Story
Suppose that the SweetLife Fruits & Jams company wants to accept card payments in the BigCommerce store. The company already has the Authorize.Net account for processing card payments.
Acting as an implementation consultant helping SweetLife to set up the integration of MYOB Acumatica with the BigCommerce store, you need to configure Authorize.Net as a card payment provider in the BigCommerce store, and then configure the import of card payments from the BigCommerce store to MYOB Acumatica.
Configuration Overview
In the U100 dataset, the following tasks have been performed to support this activity:
- On the Enable/Disable Features (CS100000) form, the Integrated Card Processing feature has been enabled.
- On the Cash Accounts (CA202000) form, the 10250ST cash account has been created.
- On the Payment Methods (CA204000) form, the ONLINE payment method has been set up to be used with the 10250ST cash account.
Process Overview
In this activity, you will do the following:
- In the control panel of the BigCommerce store, enable the Authorize.Net payment gateway for accepting card payments.
- On the BigCommerce Stores (BC201000) form, map the Authorize.Net store payment method with a Cash/Check payment method defined in MYOB Acumatica.
- On the storefront of the BigCommerce store, create a test order paid by card.
- In the control panel of the BigCommerce store, review the created test sales order.
- On the Prepare Data (BC501000) form, prepare the sales order for synchronization; on the Process Data (BC501500) form, process the sales order data prepared for synchronization.
- On the Sales Orders (SO301000) form, review the imported sales order.
System Preparation
Before you complete the instructions in this activity, do the following:
- Sign up for an Authorize.Net sandbox account at https://developer.authorize.net/hello_world/sandbox.html. After you create an account, you will get
the credentials to use in payment processing (API Login ID and Transaction Key).
You will use these credentials in this activity.Important:In your Authorize.Net sandbox account, make sure that you enable Live transaction processing mode. However, you will enable test mode when you configure the Authorize.Net payment method in your BigCommerce store and when you set up the Authorize.Net processing center in MYOB Acumatica.
- Make sure that the following prerequisites have been met:
- The BigCommerce store has been created and configured, as described in Initial Configuration: To Set Up a BigCommerce Store.
- The connection to the BigCommerce store has been established and the initial configuration has been performed, as described in Initial Configuration: To Establish and Configure the Store Connection.
- Launch the MYOB Acumatica website with the U100 dataset preloaded, and sign in with the
following credentials:
- Username: gibbs
- Password: 123
- Sign in to the control panel of the BigCommerce store as the store administrator.
Step 1: Defining the Authorize.Net Payment Gateway in the BigCommerce Store
To define the Authorize.Net payment method that the store will accept for the United States Dollar (USD) currency, in the BigCommerce control panel, do the following:
- In the left pane, click Settings.
- On the Settings page, in the Setup section, click Payments.
- On the Payment Methods page, which opens, in the
Show payment methods for box, make sure USD (US
Dollar) is selected.
The system displays the Checkout Payment Settings tab and a tab for each payment method activated for the selected currency.
- On the Checkout Payment Settings tab, under Additional providers, expand the Online Payment Methods group.
- In the row of Authorize.Net, click Set up.
- On the Authorize.Net Settings tab, which appears, specify
the following settings:
- API Login ID: The API Login ID of your Authorize.Net sandbox account
- Transaction Key: The Transaction Key of your Authorize.Net sandbox account
You should use API Login ID and Transaction Key that you used when you configured the connection to Authorize.Net payment gateway.
- Transaction Type: Authorize & Capture
- Test Mode: Yes
- In the lower right, click Save to save your changes.
Step 2: Creating the Mapping for the Authorize.Net Store Payment Method
To configure the mapping for the Authorize.Net store payment method in MYOB Acumatica, do the following:
- On the BigCommerce Stores (BC201000) form, select the SweetStore - BC store.
- In the table of the Payments tab, update the settings in
the row with the AUTHORIZENET (CREDIT_CARD) payment method as follows:
- Active: Selected
- Store Currency: USD
- ERP Payment Method: ONLINE
- Cash Account: 10250ST
Because the support of the Authorize.Net plug-in has been deprecated in MYOB Acumatica, you can map it only with a Cash/Check payment method and import the payments processed with Authorize.Net as non-card payments.
- On the form toolbar, click Save to save your changes.
Step 3: Creating an Order Through the Storefront
To purchase a jar of jam, so that you can later import the order and review the credit card payment, in the BigCommerce control panel, do the following:
- At the upper right, click View storefront to open the storefront.
- On the storefront, click Search in the upper right, and then start typing plum in the search box that appears.
- In the search results, click the tile of the Plum jam 96 oz product.
- On the page for the Plum jam 96 oz product, which opens, select a quantity of 3, and click Add to Cart.
- In the pop-up window that opens, click Proceed to checkout.
- On the checkout page, specify the needed settings as follows:
- In the Customer section, in the Email box, specify melody@example.com, and click Continue.
- In the Shipping section, fill in the shipping
address boxes as follows:
- First Name: Melody
- Last Name: Keys
- Address: 3402 Angus Road
- City: New York
- Country: United States
- State/Province: New York
- Postal Code: 10003
- My billing address is the same as my shipping address: Selected (default state)
- In the Shipping Method section, make sure that the Free Shipping option is selected, and click Continue.
- In the Payment section, make sure the
Authorize.Net option button is selected, and specify
the following card settings:
- Credit Card Number: 4111 1111 1111 1111
- Expiration: 12/25
- Name on Card: Melody Keys
- Click Place Order to place your order.
Your order has been created, and on the confirmation page, the order number is displayed. You will process the order with this order number further in this activity.
Step 4: Reviewing the Sales Order in the Control Panel
To review the sales order that you placed in the previous step, in the BigCommerce control panel, do the following:
- In the left pane, click .
- On the View orders page, which opens, click the plus
button next to the order of Melody Keys that you have just created to
expand the order details.
Notice that the Status of the order is set to Awaiting Fulfillment. The payment funds have been already captured because you have configured the Authorize.Net payment option to authorize and capture the payment amount when the order is placed.
Step 5: Importing the Sales Order
To prepare the sales order data for synchronization and then process it, do the following:
- On the Prepare Data (BC501000) form, specify the following settings in the Summary area:
- Store: SweetStore - BC
- Prepare Mode: Incremental
- In the table, select the check box in the unlabeled column in the row of the Sales Order entity, and on the form toolbar, click Prepare.
- In the Processing dialog box, which opens, click Close to close the dialog box.
- In the row of the Sales Order entity, click the link with the number of prepared synchronization records in the Ready to Process column. The Process Data (BC501500) form opens with the SweetStore - BC store and the Sales Order entity selected.
- In the table on the Process Data form, select the unlabeled check box for the only row, and click Process on the form toolbar.
- In the Processing dialog box, which opens, click Close to close the dialog box.
Step 6: Reviewing the Imported Sales Order
To review the settings of the imported sales order, do the following:
- On the Sync History (BC301000) form, specify the following
settings in the Summary area:
- Store: SweetStore - BC
- Entity: Sales Order
- On the Processed tab, in the row of the sales order that you have just imported (which you can locate by its external ID), click the link in the ERP ID column.
- On the Sales Orders (SO301000) form, which opens for the
imported order in a pop-up window, review the settings of the order.
In the Summary area, notice that the External Reference and Description boxes include the order number from BigCommerce. In the Customer box, the system has inserted the ID of the generic guest customer that you have selected on the BigCommerce Stores (BC201000) form.
- On the Payments tab, review the details of the created
payment document.
Notice that the payment document has the Prepayment type. It includes the external credit card transaction associated with the purchase. The number of the transaction is displayed in the Payment Ref. column.
Figure 1. The prepayment applied to the order 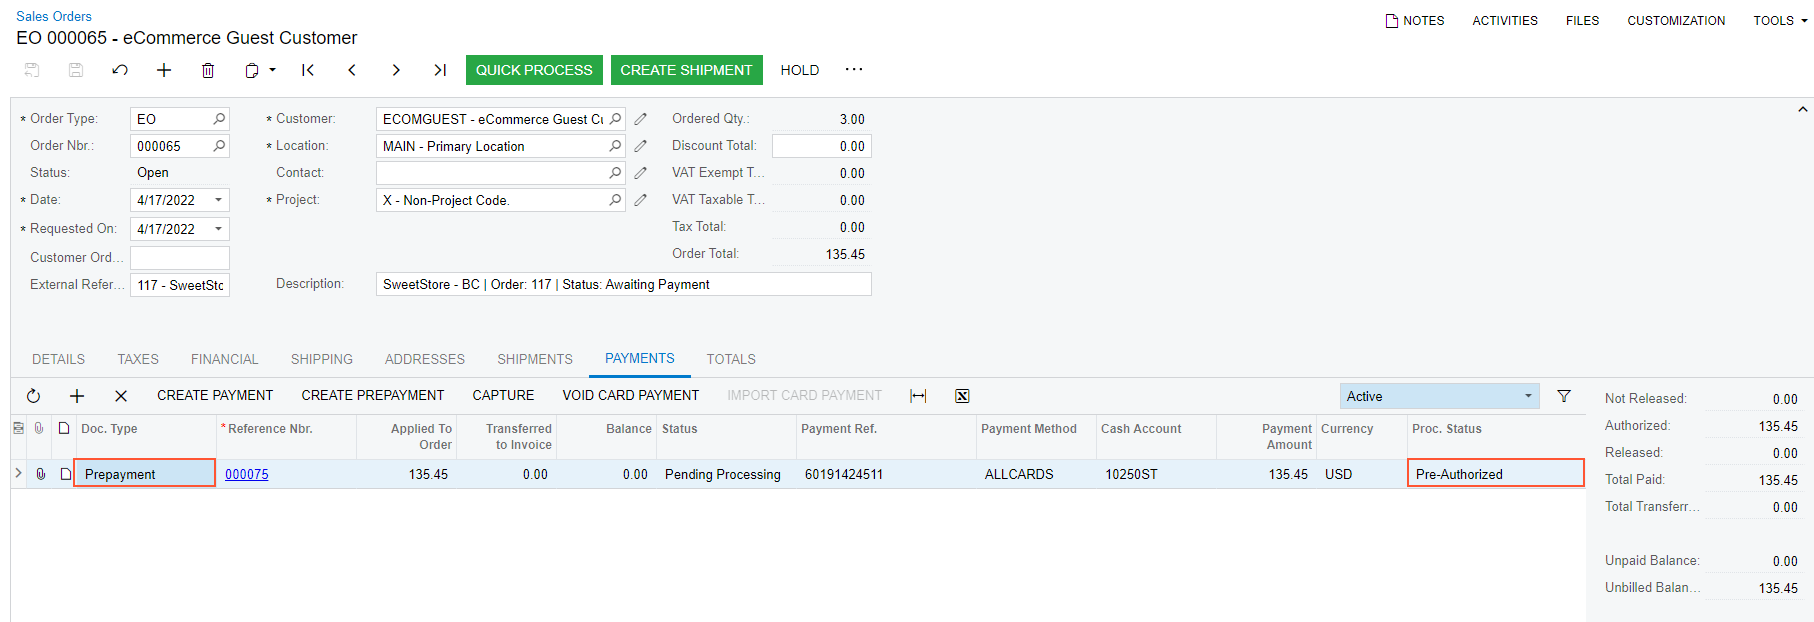
- Click the link in the Reference Nbr. column to open the payment.
- On the Payments and Applications (AR302000) form, which opens in a pop-up
window, review the payment details.
Notice that in the Payment Ref. box of the Summary area, the payment identifier assigned to the payment in the BigCommerce store is displayed. The Description box contains the store payment method, the order number, and the payment ID.
The prepayment has the Balanced status because the Release Payments and Refunds check box was cleared for the AUTHORIZENET (CREDIT_CARD) payment method in the mapping table on the Payments tab of the BigCommerce Stores (BC201000) form.
- Close the pup-up windows with the Payments and Applications and Sales Orders forms.
Next you would proceed to create and confirm the related shipment, prepare the related invoice, release the payment, and synchronize the shipment back to the BigCommerce store. For the purposes of this activity, you do not have to perform any of these operations.