
Contacts: To Create a Contact Manually
The following activity demonstrates how to manually create a contact, review and update the settings of the newly created contact.
Story
Suppose that you are David Chubb, a sales manager of the SweetLife Fruits & Jams company. You have received a call from Thomas Jones, the bakery manager at Pro Muffin, a bakery that cooks pastries, usually with jam filling. Thomas is considering purchasing 100 jars of cherry jam. You have created the lead in the system, converted the lead to an opportunity, and started negotiating the deal. Thomas asks you to discuss the financial details of the deal with his colleague Tina Parker, a finance manager, and gives you her contact details. You need to create a contact in the system and associate the contact with the opportunity created for Pro Muffin.
Configuration Overview
In the U100 dataset, for the purposes of this activity, the following tasks have been performed:
- On the Enable/Disable Features (CS100000) form, the following features
have been enabled:
- Customer Management: This feature provides the customer relationship management (CRM) functionality, including lead and customer tracking, as well as the handling of sales opportunities, contacts, marketing lists, and marketing campaigns.
- Duplicate Validation in the Customer Management group of features: This feature provides the duplicate validation functionality.
- On the Duplicate Validation (CR103000) form, duplicate validation settings have been specified.
- On the Contact Classes (CR205000) form, the BAKERY contact class has been created.
- On the Leads (CR301000) form, a lead
record for the Thomas Jones lead has been created and converted to an
opportunity as follows:
- On the Opportunities (CR304000) form, the Sale of 100 jars of cherry jam to Pro Muffin has been created.
- On the Business Accounts (CR303000) form, the PROMUFFIN business account has been created.
- On the Contacts (CR302000) form, the Thomas Jones contact has been created.
Process Overview
In this activity, you will do the following:
- Manually create a contact by using the Contacts (CR302000) form.
- Associate the newly created contact with an existing opportunity on the Opportunities (CR304000) form.
System Preparation
Before you start creating a contact manually, you should do the following:
- Launch the MYOB Acumatica website with the U100 dataset preloaded
- Sign in to the system as sales manager David Chubb by using the following
credentials:
- Username: chubb
- Password: 123
- Make sure that on the Company and Branch Selection menu, in the top pane of the MYOB Acumatica screen, the SweetLife Head Office and Wholesale Center branch is selected.
Step 1: Creating a Contact Manually
To create a contact for Tina Parker, a finance manager at Pro Muffin, do the following:
- On the Contacts (CR302000) form, add a new record.
- On the Details tab do the following:
- In the Contact section, specify the contact
settings as follows:
- In the First Name box, type Tina.
- In the Last Name box, type Parker.
- In the Account Name box, type Pro Muffin.
- In the Job Title box, type Finance Manager.
- In the Email box, type tina@promuffin.example.com.
- In the Address section, specify the address
settings as follows:
- In the Address Line 1 box, type 4897 Mapleview Drive.
- In the City box, type Philadelphia.
- In the State box, select PA.
- In the Postal Code box, type 63463.
- In the Country box, select US.
- In the Contact section, specify the contact
settings as follows:
- On the CRM Info tab, in the Contact Class box, select BAKERY.
- On the form toolbar, click Save.
You have created the Tina Parker contact in the system.
Step 2. Associating the Contact with an Existing Opportunity
To associate the Tina Parker contact you have created with the opportunity that has been created for Pro Muffin, do the following:
- Open the opportunity Sale of 100 jars of cherry jam to Pro Muffin on the Opportunities (CR304000) form.
- Open the Relations tab.
- Click Add Row on the table toolbar, and specify the
following settings in the row:
- Role: Decision-Maker
- Contact: Tina Parker
- Add to CC: Selected.
With this check box selected, the Tina Parker contact's email address will be added to each email notification automatically sent to this contact.
Notice that in the Type column, Contact has been inserted automatically, as shown in the following screenshot. Only a record of the Contact type can be a Decision-Maker.
Figure 1. The contact associated with the opportunity 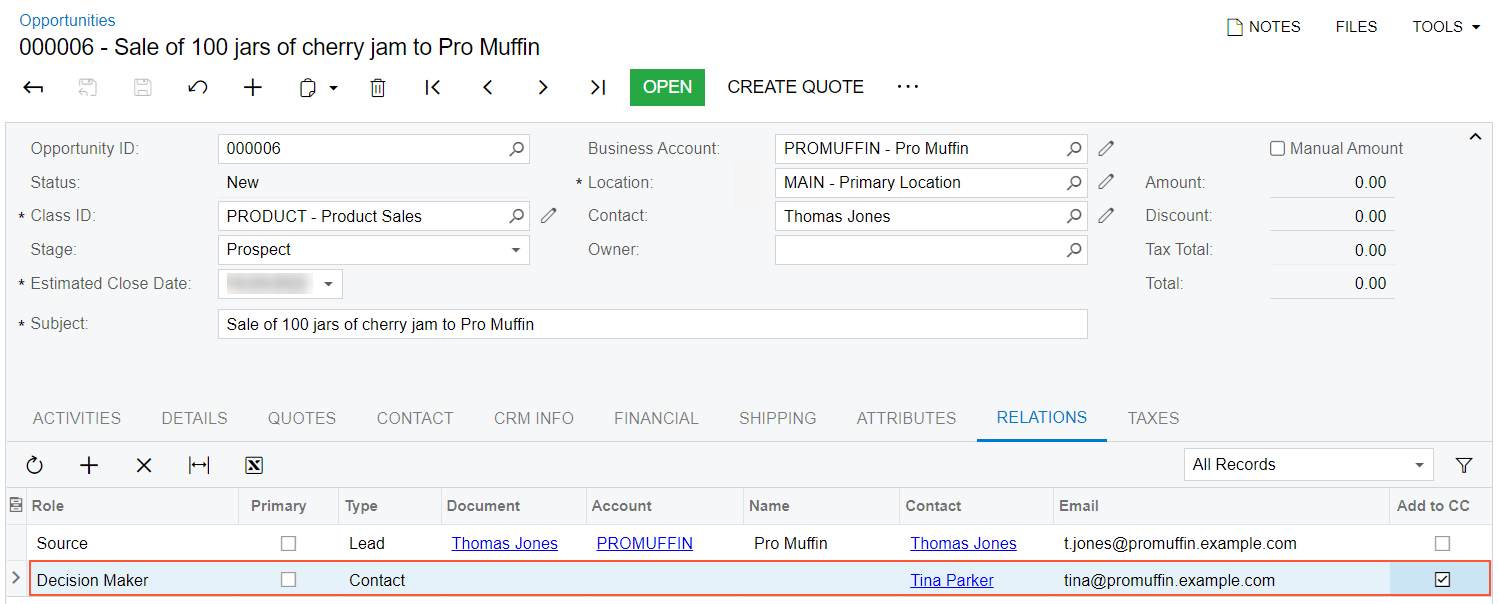
- On the form toolbar, click Save.
You have associated the Tina Parker contact with the opportunity created for Pro Muffin.