
Opportunity Assignment to Owners and Workgroups: Process Activity
The following activity demonstrates how to assign opportunities to owners and workgroups and how to set up the system to assign opportunities to owners automatically. The activity will show you how to define an opportunity class so that opportunities of the class are assigned to their creators by default. You will also practice manually assigning opportunities to the appropriate owners, both for an individual opportunity and by using the mass processing form to assign multiple users to the needed owners.
Story
Suppose that you are David Chubb, a sales manager of the SweetLife Fruits & Jams company. You are going on vacation and you need to temporarily assign the opportunity you have started working on to your colleague, Pam Brawner.
You will also change the SERVICE opportunity class so that the user who creates a new opportunity is assigned to be its owner. Finally, you will mass-assign the unassigned opportunities of the PRODUCT and PROJECT opportunity classes to workgroups.
Configuration Overview
In the U100 dataset, for the purposes of this activity, the following tasks have been performed:
- On the Enable/Disable Features (CS100000) form, the Customer Management feature has been enabled. This feature provides the customer relationship management (CRM) functionality, including lead and customer tracking, as well as the handling of sales opportunities, contacts, marketing lists, and marketing campaigns.
- On the Company Tree (EP204061) form, the company tree has been configured. It includes the Product Sales and the Project Sales workgroups, as well as the employees in the Sales department.
- On the Employees (P203000) form, the Pam Brawnerand David Chubb employees have been created , and included in the Sales department on the Company Tree form.
- On the Opportunity Classes (CR209000) form, the PRODUCT, PROJECT, and SERVICE opportunity classes have been created.
- On the Assignment Maps (EP205010) form, the Opportunity Assignment Map has been created. According to the rules (and their conditions and actions) specified in this assignment map, the opportunities of the PROJECT opportunity class are assigned to the Project Sales workgroup in the Sales department. The opportunities of the PRODUCT opportunity class are assigned to the Product Sales workgroup in the SweetLife Sales department.
- On the Opportunities (CR304000) form, the opportunity with the Inquiry for exotic fruits Subject, has been created.
Process Overview
In this activity, you will do the following:
- On the Opportunities (CR304000) form, manually assign a particular opportunity to an owner.
- On the Opportunity Classes (CR209000) form, specify how the system assigns the default owner of opportunities of a particular class.
- On the Assign Opportunities (CR503110) form, assign selected opportunities to owners.
System Preparation
Before you start assigning opportunities to owners, you should do the following:
- Launch the MYOB Acumatica website with the U100 dataset preloaded
- Sign in to the system as sales manager David Chubb by using the following
credentials:
- Username: chubb
- Password: 123
- Make sure that on the Company and Branch Selection menu, in the top pane of the MYOB Acumatica screen, the SweetLife Head Office and Wholesale Center branch is selected.
- Make sure that on the Customer Management Preferences (CR101000) form, in the Opportunity Assignment Map box of the Assignment Settings section of the General tab, Opportunity Assignment Map has been specified. If it has not, select this assignment map, and save your changes. The system will use this assignment map during the process of mass-assigning opportunities.
Step 1: Assigning an Opportunity to an Owner
To manually assign an opportunity to another owner, do the following:
- Open the Inquiry for exotic fruits opportunity on the Opportunities (CR304000) form.
- In the Owner box of the Summary area, select Pam
Brawner.Tip:You can also manually assign a particular opportunity to a workgroup in the Workgroup box on the CRM Info tab (CRM section).
- On the form toolbar, click Save.
You have manually assigned an opportunity to another owner.
Step 2: Specifying a Default Owner for New Opportunities of the Class
In this step, you will specify the owner of a new opportunity of the SERVICE opportunity class as its creator.
To specify the default owner of an existing opportunity class and make sure the owner is assigned correctly to a new opportunity of the class, do the following:
- Open the SERVICE opportunity class record on the Opportunity Classes (CR209000) form.
- On the Details tab (Data Entry Settings section), in the Default Owner box, select Creator.
- On the form toolbar, click Save.
- Make sure that the option that you have just specified assigns new opportunities
to owners correctly by doing the following:
- On the Opportunities (CR304000) form, add a new record.
- In the Opportunity Class box of the Summary area, select SERVICE.
- In the Owner box, notice that David Chubb is inserted in the box. Because this is the user account to which you are signed in and you are the creator of the opportunity, the setting of the opportunity class is causing the system to assign the owner appropriately.
- In the Description box, type Juicer repair for Food Clever store.
- On the form toolbar, click Save.
You have specified how the system determines the default owner for opportunities of the SERVICE opportunity class and then created a new opportunity to test the setting. The system has correctly inserted the default owner for the new opportunity. Each time a user creates an opportunity of the SERVICE opportunity class, the system will insert the employee name of the creator of the opportunity as the owner of the opportunity.
Step 3: Assigning Multiple Opportunities to Workgroups
Suppose that at the request of the director of your sales department, you need to regularly mass-assign the unassigned opportunities of the PRODUCT and PROJECT opportunity classes to workgroups. The system will assign these opportunities by using the Opportunity Assignment Map, which has been specified on the Customer Management Preferences (CR101000) form. Based on this assignment map, the system will assign the opportunities of the PROJECT class to the Project Sales workgroup and the opportunities of the PRODUCT opportunity class to the Product Sales workgroup.
To mass-assign multiple opportunities to workgroups, do the following:
- Open the Assign Opportunities (CR503110) form.
- In the table, click the header of the Owner column.Tip:If you need to change the order of columns in any table, you can drag a column by its header to the new place in the table.
- In the Sorting and Filtering Settings dialog box, which opens, do the following
to filter opportunities with no owner specified:
- Select the Is Empty filter condition.
- Click OK. The system closes the dialog box and applies the filter.
- On the form toolbar, click the Filter Settings button.
- In the Filter Settings dialog box, which opens, do the
following to list the opportunities of the PRODUCT and PROJECT
opportunity classes on the form, so that you can process these opportunities:
- Click Add Row to add a row to the table.
- In the Property box, select Opportunity Class.
- In the Condition box, select Equals.
- In the Value box, select PRODUCT.
- In the Operator box, select Or.
- Click Add Row to add another row to the table.
- In the Property box, select Opportunity Class.
- In the Condition box, select Equals.
- In the Value box, select PROJECT.
- Click Apply to apply the filter settings to the table and close the dialog box.
- On the form toolbar, click Process All. The
Processing dialog box opens, showing the progress
and, as soon as the processing has completed, the results of assigning the
opportunities.Attention:If an assignment map contains errors, the system will list these errors in the Processing dialog box. You can view the errors by clicking the More button on the Errors tile: In the Message column, the system displays the text of each applicable error message.
- Click Close to close the dialog box and return to the
form. The system has cleared the filter that you applied to the
Owner column and now lists all the opportunities. For
the opportunities that did not have owners, in the
Workgroup column, you can see the name of the
workgroup to which the system has assigned the opportunities, as shown in the
following screenshot.
Figure 1. The mass-assignment of opportunities to workgroups 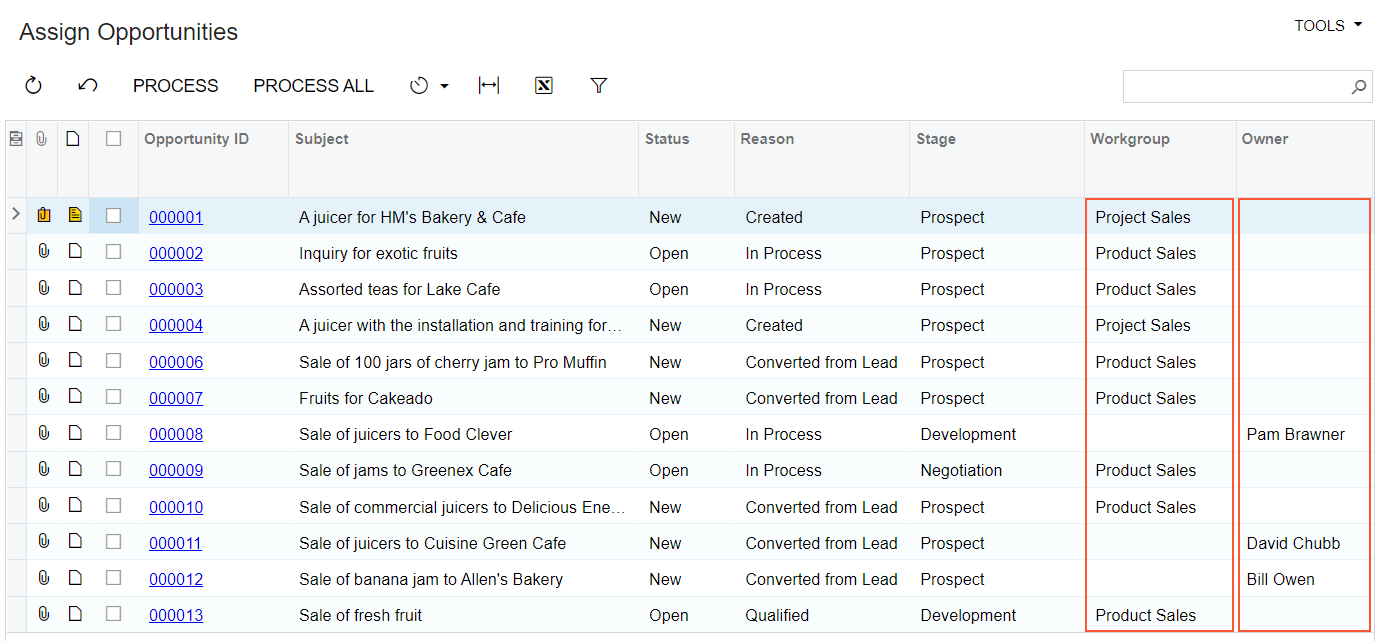
You have assigned the unassigned opportunities to workgroups and owners according to the rules specified in the Opportunity Assignment Map assignment map on the Assignment Maps (EP205010) form.